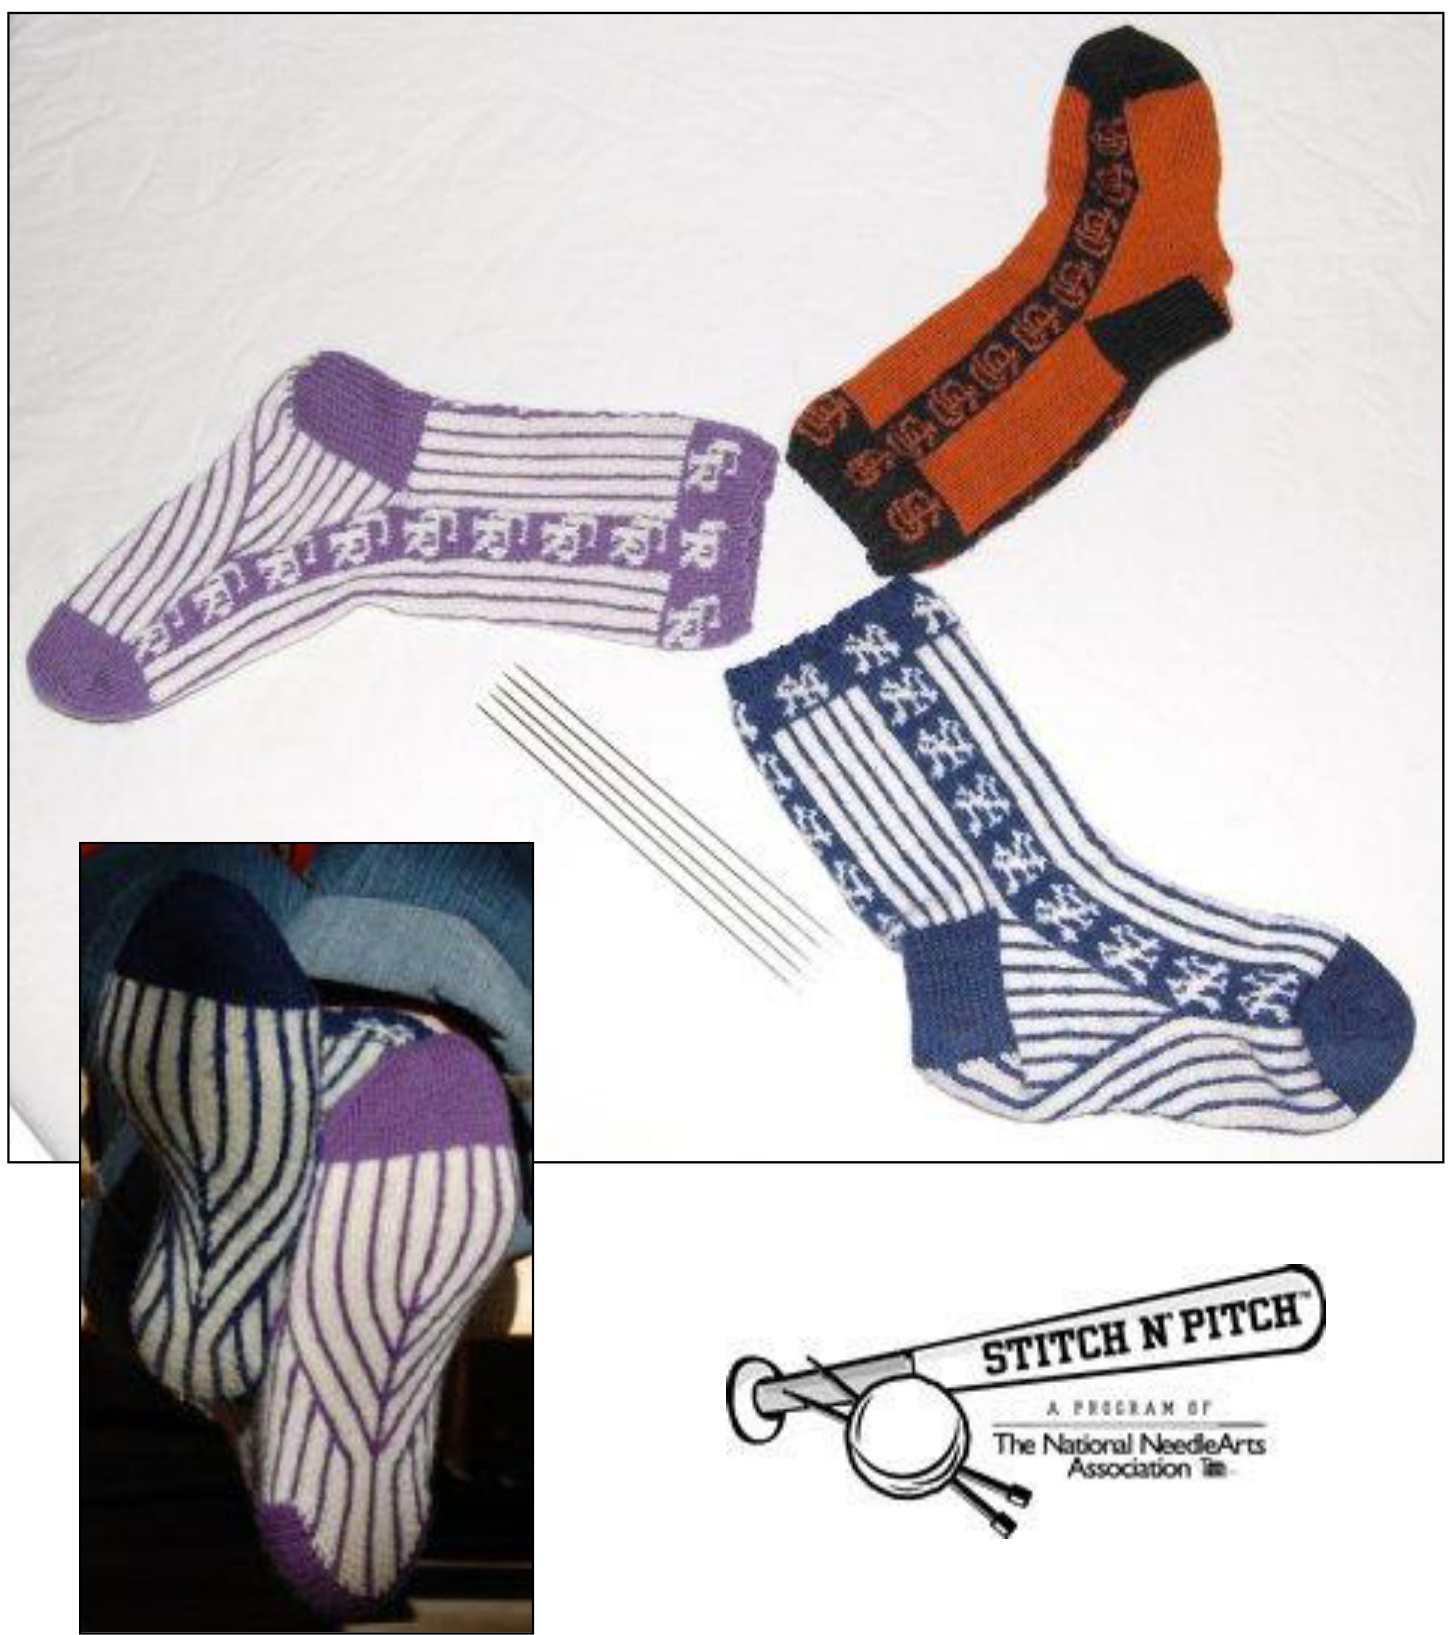
BASEBALL SOCKS BY MEREDITH DAVEY
Thisis a great knitting projct for theultmatebasebl fan.Thee oks canbe knit in two sizes: alarger sizefor a woman who wears a size 8 shoe or a child who wears a size 6 shoe (with a footapproximately $9\%$ inches long) and a smaller size for a woman who wears size $5\,^{1}\!/\!_{2}$ shoe or a child who wears a size 4 shoe (with a foot approximately $8\%$ inches long).
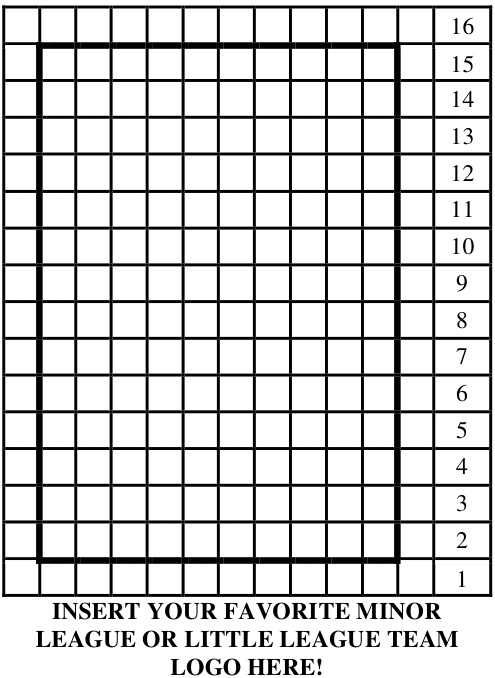
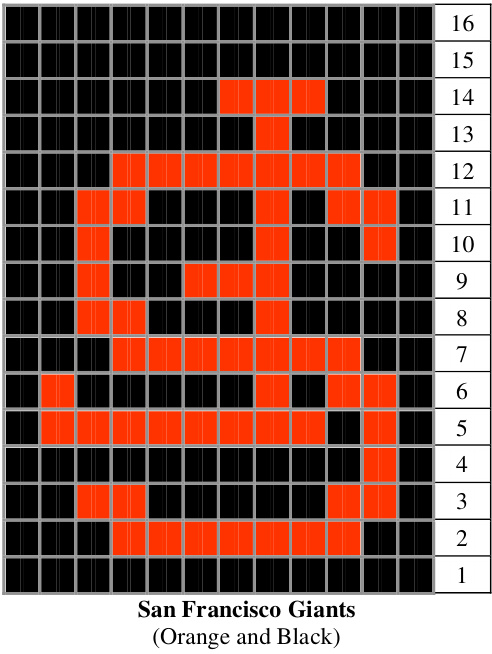
There are two ways to knit this sock. The first uses a stranded-knitting style and is perfect for the intermediate knitter. The seconduss a more comlicated technique caled fetive knitting (inwhich you knit backwads with two colors oer smallintervals), which is great for the more advanced, adventurous knitter, and has the advantage of creating a stretchier sock that wilft alargerrange offt.He willgiv directions forboth.The ae alsdretions for socks with ad without pinstripes, depending on the team's uniform. Because this pattern can be knit four ways, read through the directions before you start knitting and highlight the areas that apply to your sock. Ihave labeled the four styles of sock with the following symbols stranded knitting without pinstripes $(\mathbb{g}_{\mathbb{A}}^{\oplus})$ stranded knitting with pinstripes (), festive knitting without pinstripes (), and festive knitting with pinstripes $(\pmb{\infty})$ . This should make the pattern easier to follow. (Provided you are knitting with the correct gaue[disubelw], thdirectons are t saefbthth alle and t largesizeF the stradeditting socks, I will be knitting aanFrancisGiants patt. Fr examle of strane-nitting pinstrid sck, will sw youa previouslkit wYrkYnkees sck)Fr thefestivekniting sck, Iwillkniing ColraR pattern. This should help you tell them apart. In cases where allstyles of sock are knit in the same way, I willuse the Giants sock for demonstration. I have included stitch patterns for 26 of the 30 Major League Baseballteams. (They are shown a the end.) Unfortunately, the logos for the Seattle Mariners, Florida Marlins, Tampa Bay Devil Rays, and Houston Astros are too complex tofitinto a $10\mathrm{~x~}14$ stitch space. You will note that allof the logos are upside down; this is deliberate. This is atop-down sock pattern, so you willfollow the chart from bottom to top (this will make sense once you start knitting). Ihave also inluded ablank grid, if you would like to design and knit the logo of you favorite minor league or little league team. (Just remember to design the logo upside down.)
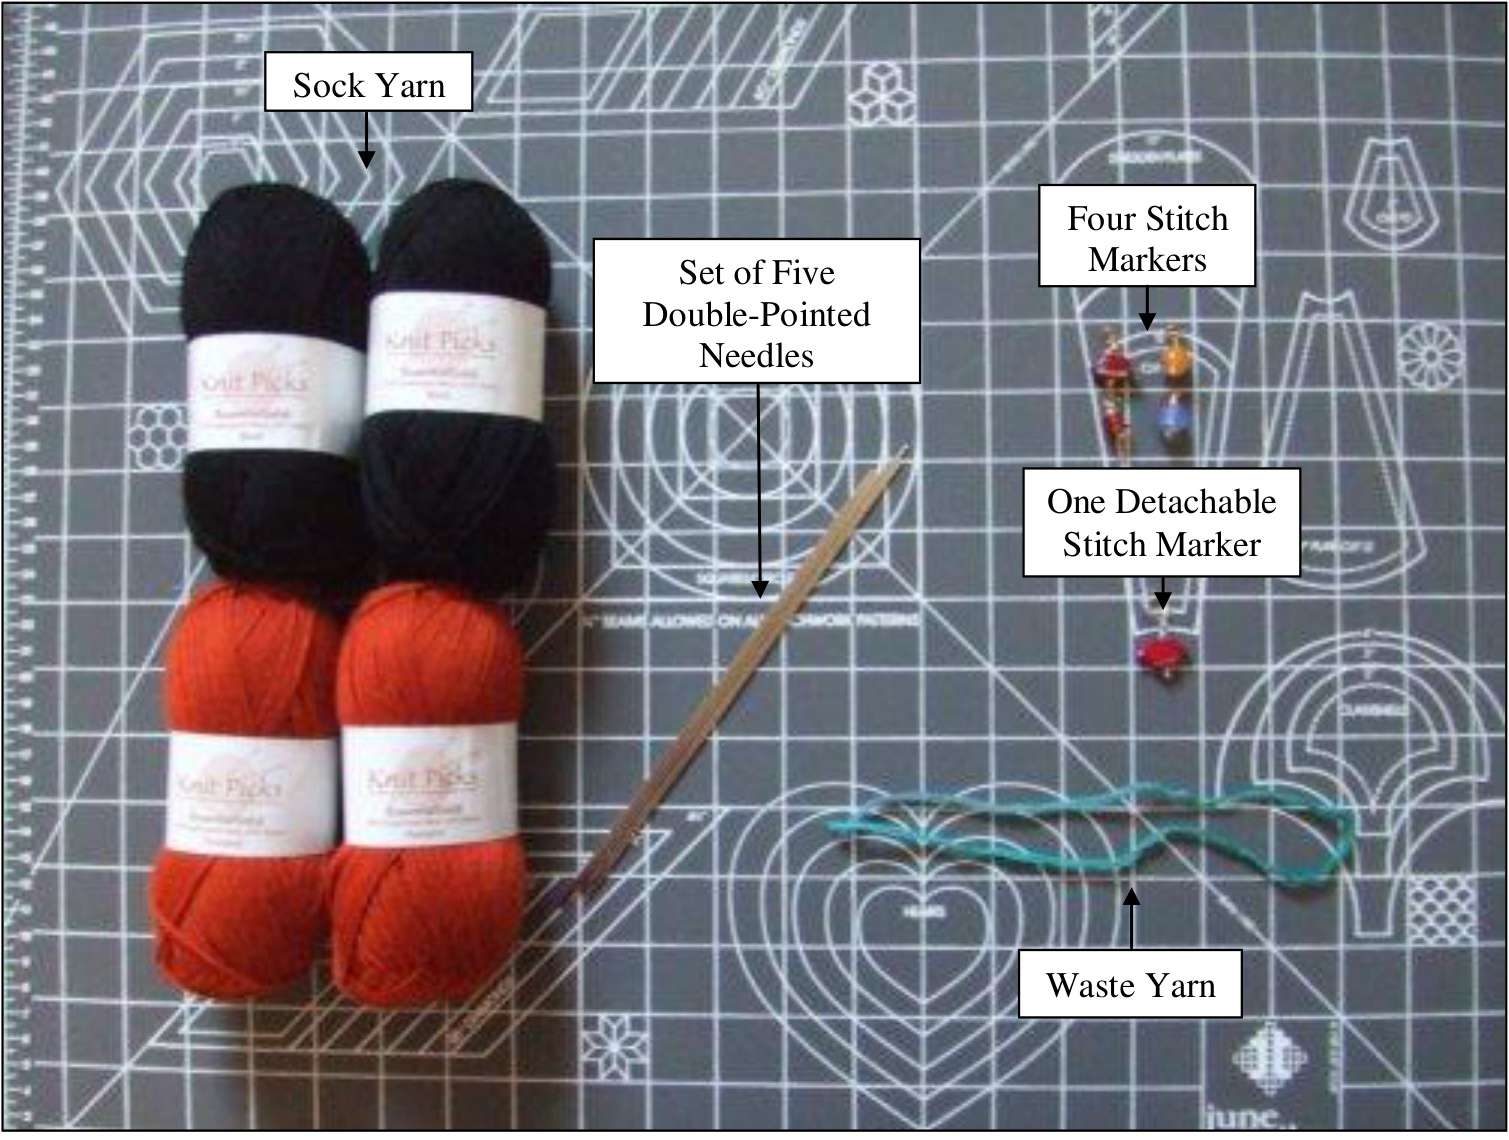
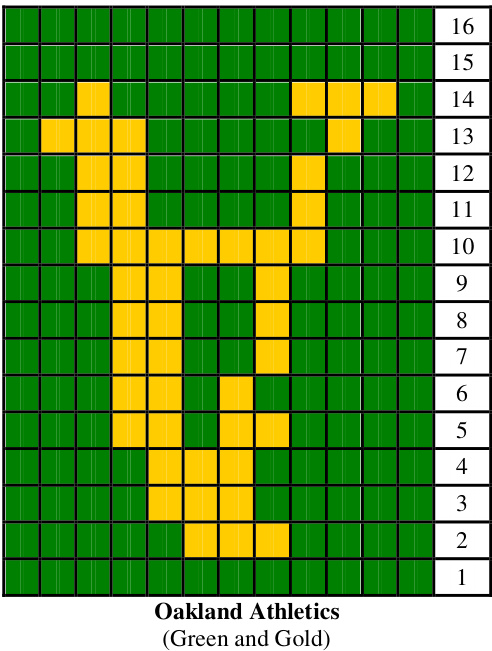
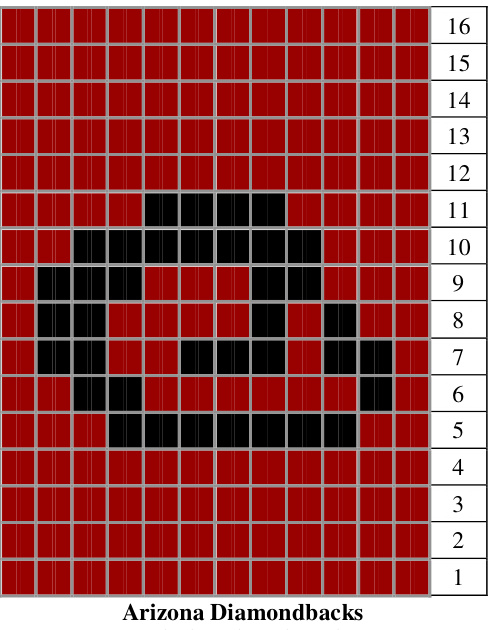
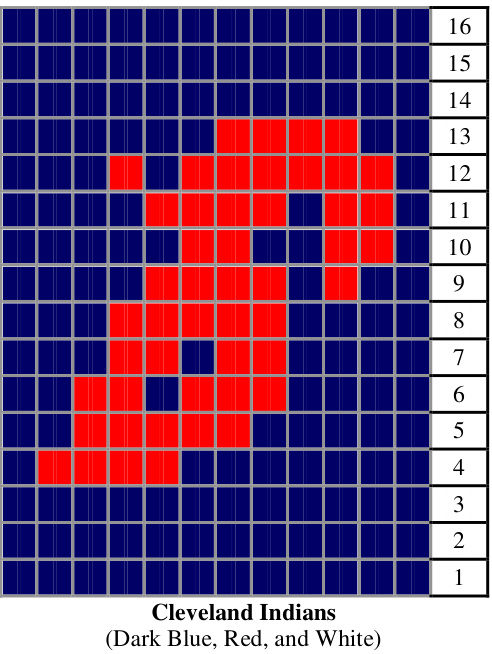
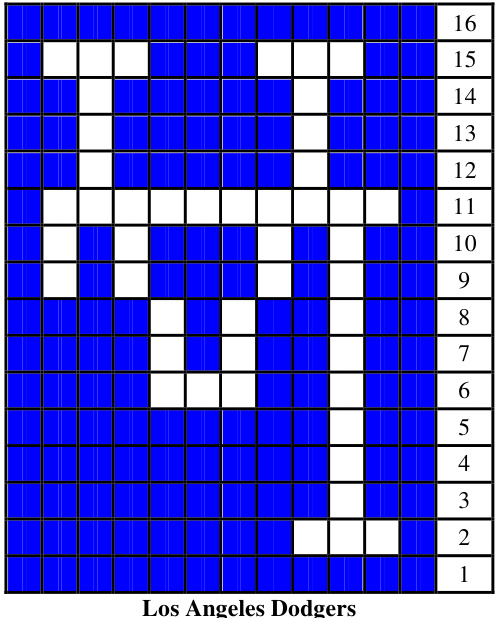
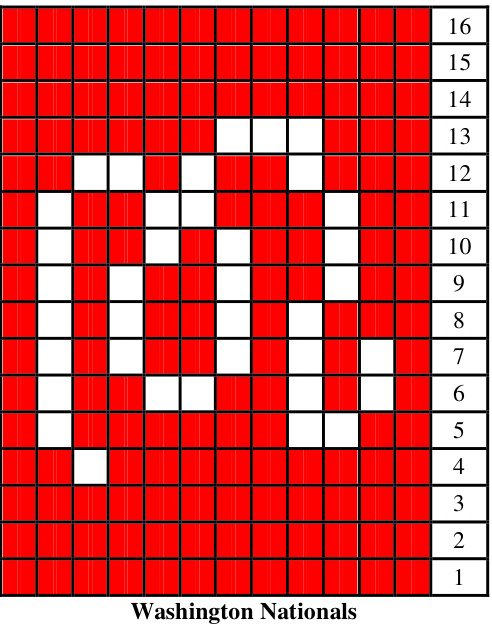
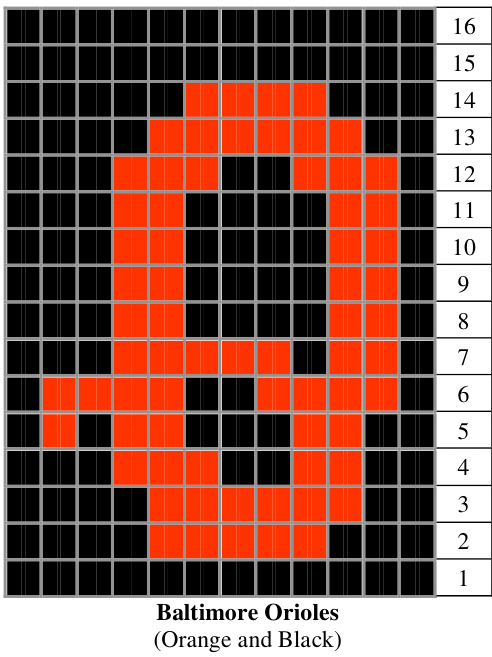
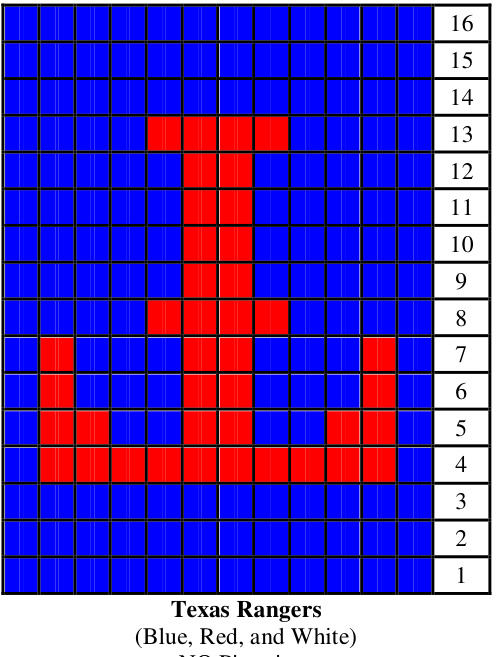
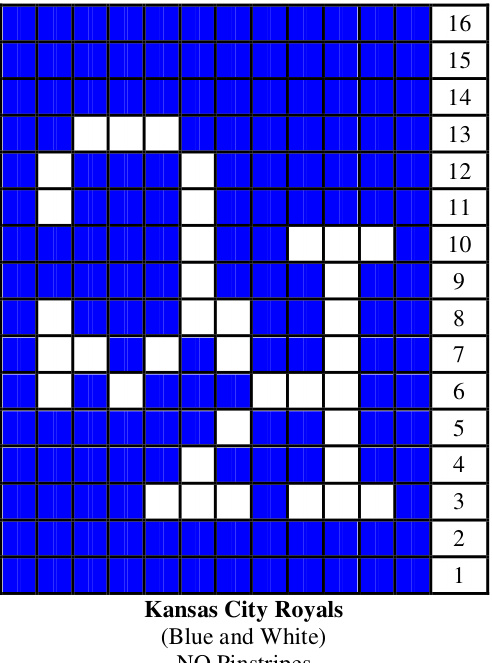
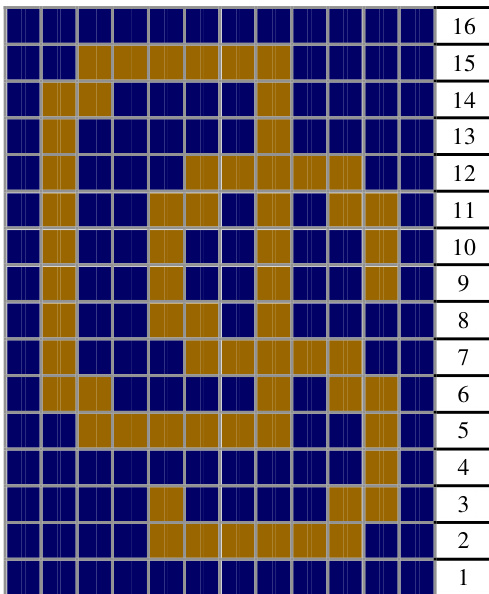
Here is a list of the materials you will need $\mathbb{\bigg.}$ 回森C3: Sock yarn (fingering weight) in the your team colors.Get sock yarn specificallyit typically knits at about 30 stitches/4 inches, and is about $75\%$ wooland $25\%$ nylon. You will need approximately 400 yards (2-50 gram skeins) of your main color (MC), 400 yards (2-50 gram skeins) of your contrast color (CC),and 400 yards (2-50 gram skeins) of your second contrast color (CC2),if your team's sock has three colors. The list of team yarn colors is as follows: Chicago Cubs: (MC)-White,(CC)-Blue, (CC2)-Red New York Mets: (MC)-White, (CC)-Bright Blue, (CC2)-Orange Philadelphia Phillies: (MC)-White, (CC)-Red \*Colorado Rockies: (MC)-White,(CC)-Purple (Exmple Sock c) Minnesota Twins: (MC)-White, (CC) Dark Blue, (CC2)-Red \*New York Yankees: (MC)-White, (CC)-Dark Blue (Exampe Sock ) Chicago White Sox: (MC)-White, (CC)-Black Los Angeles Angels of Anaheim: (MC)-White, (CC)-Dark Blue, (CC2)-Red Oakland Athletics: (MC)-Gold, (CC)-Green Toronto Blue Jays: (MC)-White, (CC)-Blue Atlanta Braves: (MC)-White, (CC)-Dark Blue, (CC2)-Red Milwaukee Brewers: (MC)-White, (CC)-Dark Blue St. Louis Cardinals: (MC)-White, (CC)-Red Arizona Diamondbacks: (MC)-Black, (CC)-Dark Red Los Angeles Dodgers: (MC)-White, (CC)-Blue \*San Francisco Giants: (MC)-Orange, (CC)-Black (Example Sock Cleveland Indians: (MC)-White, (CC)-Dark Blue, (CC2)-Red Washington Nationals: (MC)-White, (CC)-Red Baltimore Orioles: (MC)-Orange, (CC)-Black San Diego Padres: (MC)-White, (CC)-Dark Blue, (CC2)-Taupe Pittsburgh Pirates: (MC)-Gold, (CC)-Black Texas Rangers: (MC)-White, (CC)-Blue, (CC2)-Red Boston Red Sox: (MC)-White, (CC)-Dark Blue, (CC2)-Red Cincinnati Reds: (MC)-White, (CC)-Red Kansas City Royals: (MC)-White, (CC)-Blue Detroit Tigers: (MC)-White, (CC)-Dark Blue $\mathrm{2~mm})$ $\mathrm{[.5\mm]}$ double-pointed DP) needles for the larger size, a set of five Size 000 ( pointed DPnles forthe smaller i, or the sizenecssary tbtain the prer auge. Th gage is discussed below.) Four stitch markers (for marking stitches along needles) One detachale stitch marker (tomark the bginning of yourrow. often use apaper clip or a safety pin for this.) Waste yarn (for knitting the heel flap and testing sock size) ? Blunt tapestry needle (not shown) Size 1 ( $2.75\;\mathrm{mm}\mathrm{}^{\mathrm{`}}$ ) crochet hook (not shown) (fo pinstrped. fstive knit socks only C3)
Stitch gauge:
Uusing the long-tailcast-on (or whichever cast-on you prefer), cast on 3 stitches and knit a swath at least $2^{\circ}$ long Measure the number of stitches in two inches. You should have 20 stitches/2 inches for the larger size, or 22 stitches/2 inches for the smaller size. If there are too few stitches, tear out the swatch and knit it again with smaller needles; if you have too many stitches, tear out the swatch and knit it again with larger needles. The correct gauge is very important for a proper fit, particularly with the stranded-knitting socks. (Note: you should also get a vertical gauge of about 26 rows/ inches for the larger size or 29 rows/2 inches for the smaller size, but this is more forgiving.)
Instructions:
The following instructions are for both the stranded-knitting and festive knitting styles of socks uless otherwise specified. Instructions for festive knit socks $(\ast\ast\infty)$ will be given in italics.
$(\star\star\infty)$ Fofstel (for both C and CC2). Label them A, B, and C (for both C and C2).
$\mathbb{g}$ 回森 Casting On:
Make a slip knot approximately 1 yard into CC yarn ( $\mathbf{\nabla}_{\mathcal{k}\times\mathcal{C}}^{\star}$ using ball A for festive knit socks). Hook your slip knot over two DP needes. Using the long-tail cast-on over two DP needes (or whichever cast-on you prfer), cast on 80 stitches.
$\mathbb{g}$ 回 Knitting the Cuff:
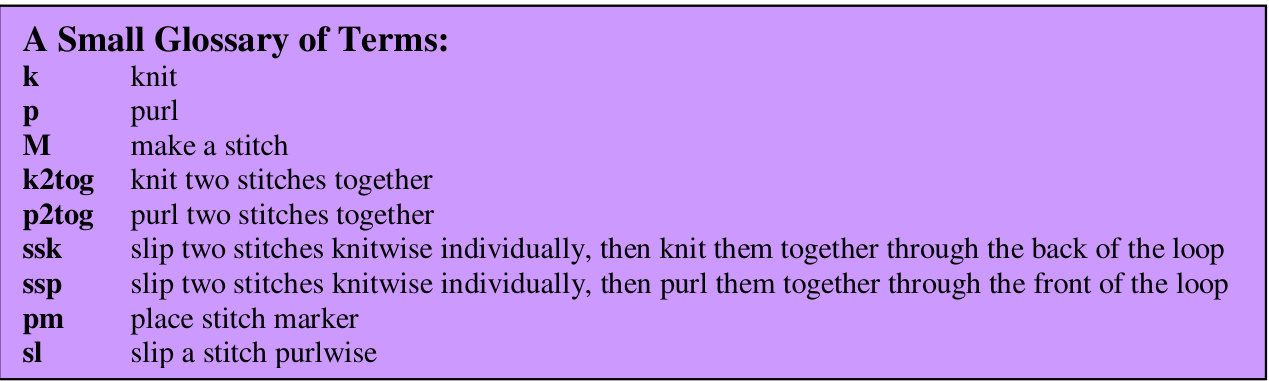
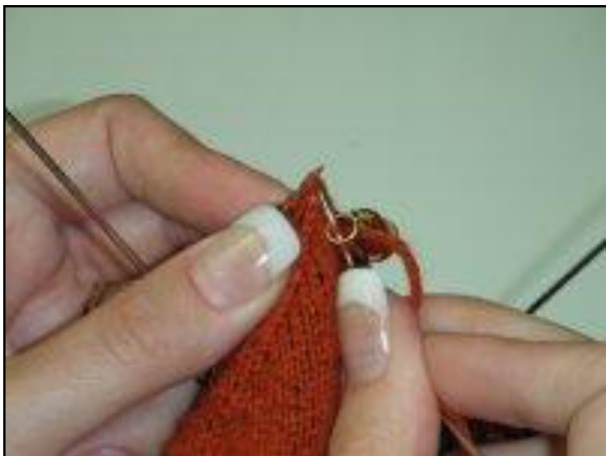
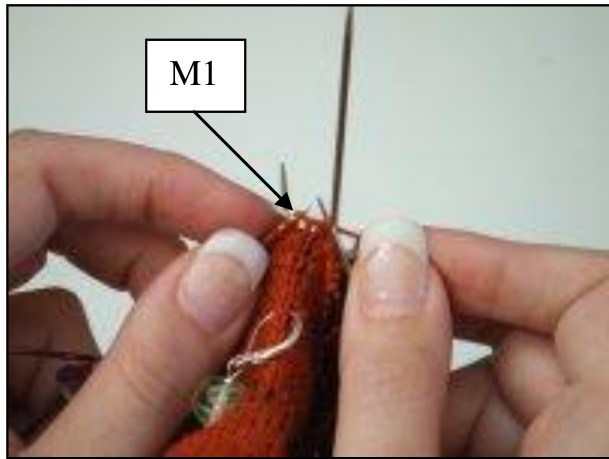
Distribute your 80 stitches evenly over 4 needles (20 stitches to a needle). Forming the needles into a circle, join the stitches in the round, being careful not to twist the stitches (otherwise you will end up with a mobius sock $\circledcirc$ ).Attach your detachable stitch marker at the begining of your row, to keep track. Move this marker down as you work, so you do not get confused. Begin knitting in the following pattern: $*\mathrm{l}_{\xi2}$ , $\mathrm{p}2^{*}$ , repeat between the $^{**}$ until the end of the row. Continue this $2\mathbf{x}2$ ribbing for 5 more rows (6 rows total). After completing the ribbing, knit an increase row, increasing the number of stithesfrom 80 to96. You do thisby knitting the folowing pattern: \*水5. $M1^{*}$ repeat between the $^{**}$ until the end of the row. Once youcreas your stitchcout t9, rearane yo stth ntd, wit32 stitch n ach.Plac a stitchmarker 16 stitches ion eachneed.Yourknitting should nowe dividdinto ix equal setions of 16 stitchs each. You have nowreached the logo pattern! Find your logo patern (cut t out and tape it to smallpiece of cardboad if you need to) and be prepared to follow it. This next row will stat at Row 2 of your logo patterm. If necessary, your logo may call for MC (and/or CC2) at this point. When you find you have to add an additional color(s), be sure to strand the non-knitted color along the back fairly loosely. Your knitting should lie flat (it should not pucker), and you should be able to stretch the stranded kniting slightly beyond its normal knitted tension. Try not to let any one strand hang loose for longer than 3-6 stitches. In those cases, wrap the stranded yarn with the knitted yarn, so the loose threads stay close to the fabric.
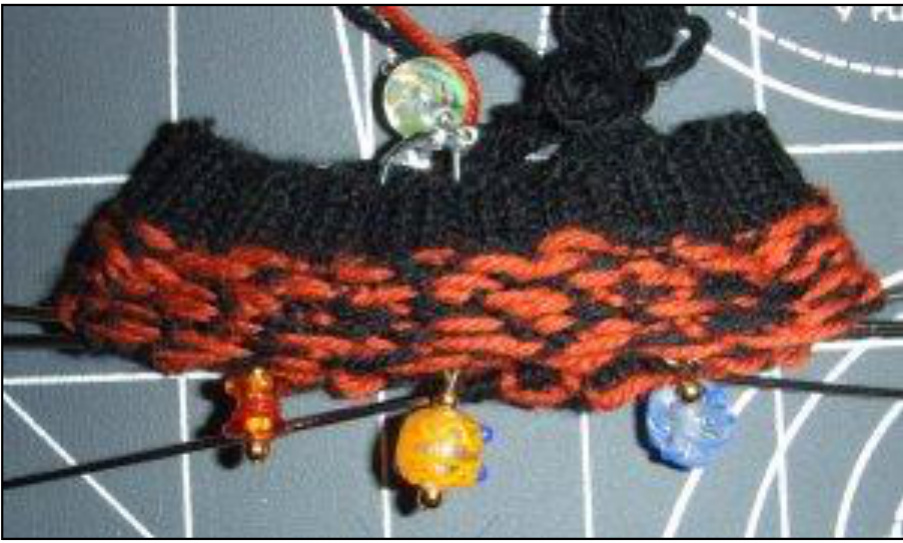
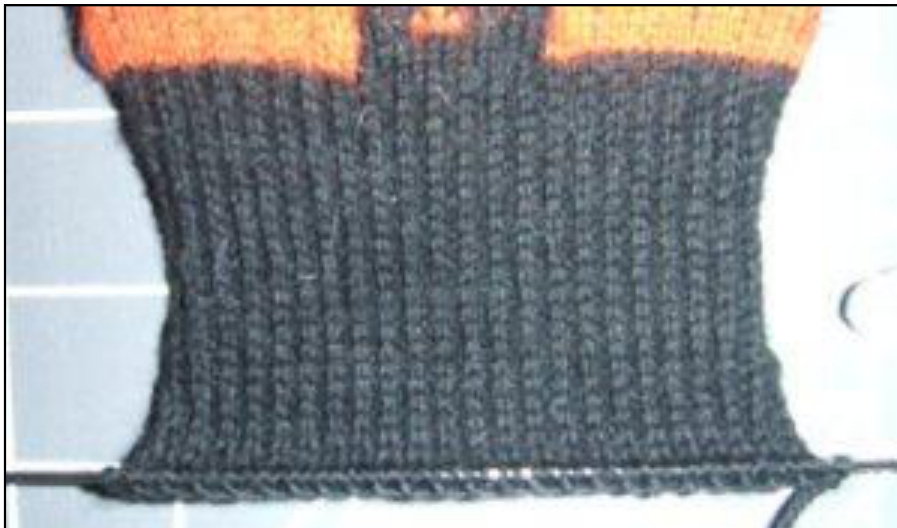
回森c An example of stranding in the cuff along the inside (wrong side) of the fabric. Notice that the MC (orange) is twisted in every 3-6 stitches. Knit the next few rows as follows: \*Knit Row 2 of logo pattern, $\mathrm{k4}$ f $C C*$ , repeat between the $^{**}$ until the end of the row (a total of six times). This is a 16-stitch repeat, and should end either at a stitch marker or the end of a needle. Knit Rows 3-15 of the logo pattern in a similar fashion: \*knit row of logo pattern, $\mathrm{k4}$ f $\mathrm{CC*}$ , repeat between the $^{**}$ until the end of the row. As you knit Row 16, decrease to 93 stitches as follows: $*_{\mathrm{k}30}$ of CC, $\mathrm{k}2\mathrm{tog^{*}}$ , repeat between the $^{**}$ until the end of the row. There will be three repeats total, one per needle. Your final cuffshould look something like this:
回森c An example of the cuff After you have finished the cuff, now would be a good time to check that your sock willactullyfit. Starting from the first stith of your row, thread allof your stitches onto your waste yarn, using the tapestry neede.Try to pullthe cuff over yourheel and anle. It might e alitte sug ver youheel, bt the pnt is,it should fit. Ifit is too tit $\circledast$ (do not worry, thishashapened tometo),try anth gauge watchonlargerneeds with 8 stitcheinchefor h larger size, or 20 stitches / 2 inches for the smaller size. Then go back to “Casting $\mathrm{On}^{\mathfrak{s}}$ and try again. If it does fit, re thread your kniting back onto your needls and move ontothe leg.
Knitting the Leg:
At this point, the directions willchange slightly, depending on whether you are doing the stranded-knitting socks or the festive knitting socks. There will alsobe sight differences i you are knitting a team logo that has pinstripes, versus one that does not. (The teams with pinstripes $[\overline{{\mathbf{[\Xi]}}}\mathbf{\(\mathcal{A}}]$ are: the Chicago Cubs, the New York Mets,the Philadelphia Phillies, the Colorado Rockies, the Minnesota Twins, the New York Yankees, and the Chicago White Sox.) For Stranded-Knitting Socks: If your team has NO pinstripes, start from the beginning of the round and kit asfollows: 1. Start with Row 1 of your team logo. \*knit team logo (over 12 stitches), pm, k19 MC (stranding CC [and CC2, if necessary] behind $\mathrm{MC})^{*}$ repeat between the \*\* until the end of the row. There will be three repeats total, one per needle. 2. Knit Rows 2-16 of your team logo in the same manner. 3. Repeat Steps 1. and 2. three more times,for a total of 4 repeats in the leg (see picture below). If your team HAS PINSTRIPES, start from the beginning of the round and knit as follows: 1. Start with Row 1 of your team logo. \*knit team logo (over 12 stitches), pm, $[\mathrm{k}3\ \mathrm{MC},\mathrm{k}1\ \mathrm{CC}]\times4,$ $\mathbf{k}3\;\mathbf{MC^{*}}$ , repeat between the \* until the end of the row. There willbe three repeats total, one per needle. If you have a CC2, strand it behind the pinstripe pattern.) 2. Knit Rows 2-16 of your team logo in the same manner.
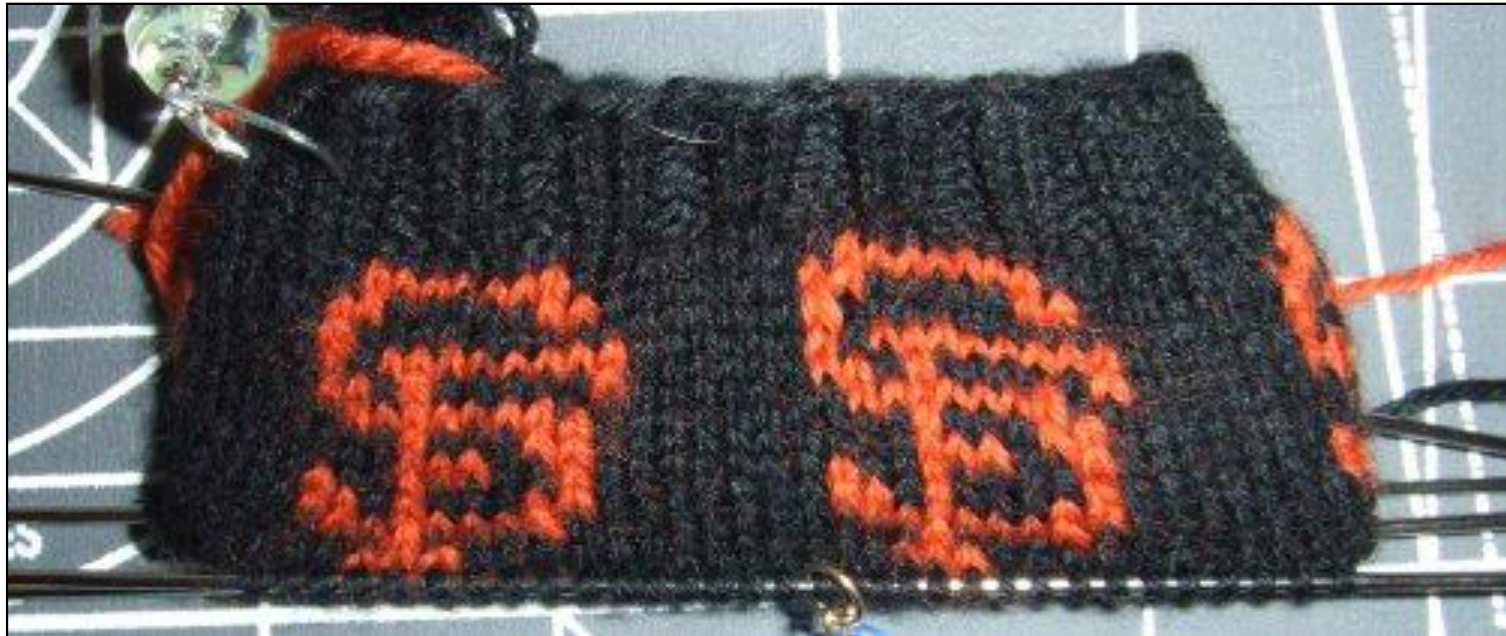
An example of the leg knit using stranded knitting.
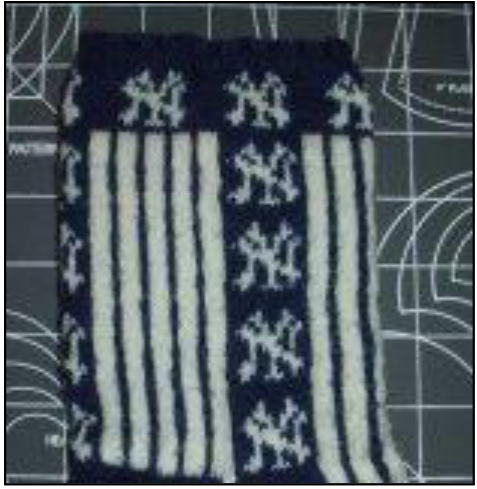
An example of the leg knit with pinstripes, using stranded knitting.

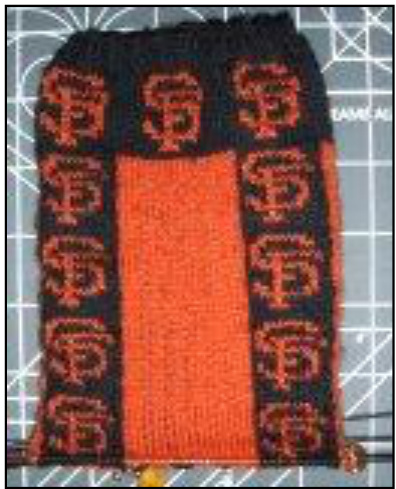
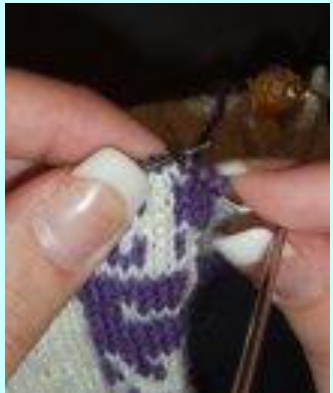
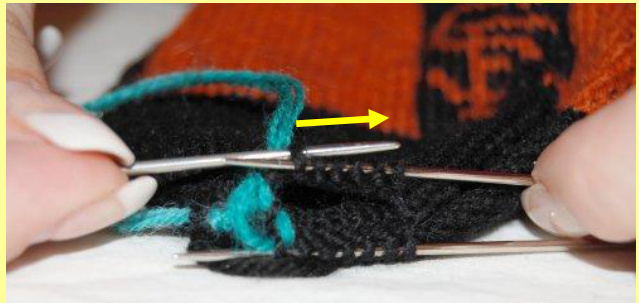
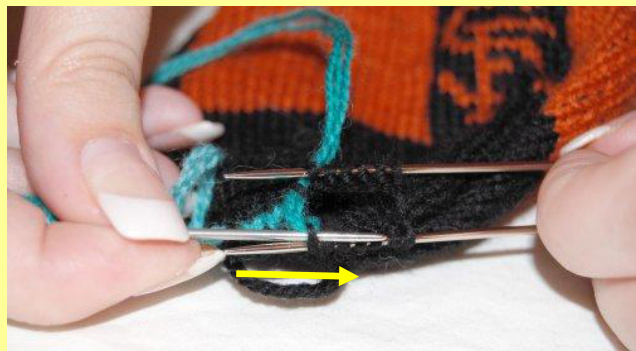
An example of the leg knit with pinstripes, using festive knitting. For Festive-Knitting Socks: I your team has NO pinstripes, start from the beginning of the round and knit as follows: 1.Start with Row 1 f your team logo. (You should be knitting already with CC [and maybe CC2 ball ) Knit team logo (over 12 stitches, stranding MC), pm, k19 MC (NO STRANDING OFCC), attach CC (and CC2) ball B and knit next team logo (over 12 stitches, stranding MC), pm, k19 MC (NO STRANDING OF CC), attach C (and CC2) ball C and knit next team logo (over 12 stitches, stranding MC), pm, k19 MC (NO STRANDING OF CC). You should nowbe carrying thre separate lines ofCC (and CC2), one (two) for each colun of logo, but only the MC should be stranded behind the logos. 2.When you come to the logos on Row 2, you willfind that your CC lines are on thefar side.This may sem like a problem, but this is where we use festive knitting. Read the instructions in the box to se how it works. 3.Comlete Row 2 as fllows: \*it team logo using festive knitting with the appropriate individul CC (and CC) yarn, k19 of MC\*, repeat between the \*\* until the end ofthe row. There willbe 3 repeats total, one per needle. 4.Comete Rw3asfllws: \*it tm logrally wih t aprit individC (ay 19 of MC\*, repeat between the \*\* until the end of the row. 5.Alternately repeat Steps 3. and 4.for even and od rows of the team logo pattern, until you reach Row 16 (you will end with Step 3.). 6. Repeat Steps 5. three more times, for a total of 4 repeats of the lIogo pattern.
How to do FESTIVE KNITTING $(\frac{*}{{\bf*}*}{\bf\cos})$ :
Examine your pa in carefllIfyou have anyC stithesn your row, start with thmKnit each of theeC stitches, and slip each of the CC stitches as if to puri. Slip stitches ali the wayto the end of the 1-stitch logo patter.
Knit the MC stitches in your row.
Slip any stitches that are supposed to be CC. 2. Turn your work around so that you are looking at the inside (wrong side) of the sock; now you can purl. (You should noticethat, from this sideyourC line is nowin theright lacetpulStarting from this end of th log,take you CC (and possibly CC2)line(s) and purl back along the logo, specificallyinto those stitches you had slipped before and slipping the MC stitches you had previously knit. When you have finished this row of the logo, turn your work and slip the logo stitches once again. You will now be ready to continue the MC pattern.

Slip the stitches you had already knit with the MC. Turn your work and purl the stitches you had slipped previously.
NOTE: BE VERY CAREFUL TO KEEP YOUR TENSION LOOSE ENOUGH. IT IS VERY EASY TO MAKE FESTIVE KNITTING PUCKER, ESPECIALLY AT THE EDGES.
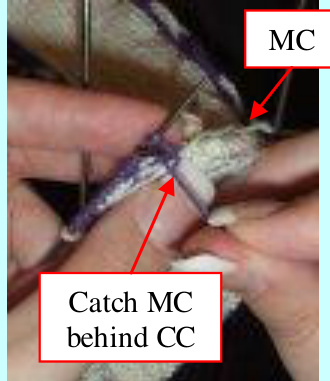
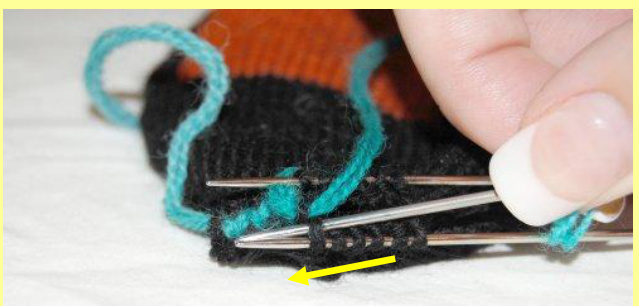
Buthnhs stitches and purl back? Good question. No. At the top or bottom of your logo, you are likely to run into a row where you need to do festive knitting, but it looks like you should strand across 12 stitches, which is too far. In that case (see the pictures below), make a point of twisting the CC yarn around the MC yarn every 3-6 stitches as you purl. Additionally, make sure to pull your MC tight(ish) behind your CC after you have caught your stitches.
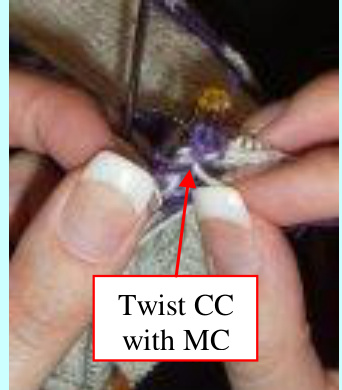
4. Twist the CC with the caught MC. Purl a few more stitches. Repeat 4.
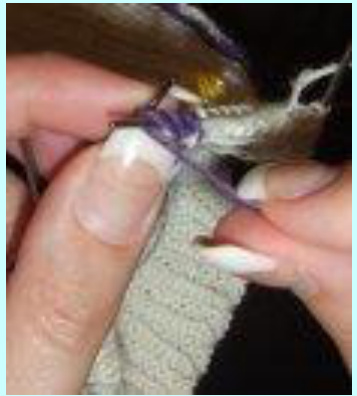
3. Purl a few stitches, holding the caught MC loosely. f your temHASPINRIES starfrom thebeinning fyourud ad work as folows: 1.Star wth Row fyourtam logo. (You should be kittin already with C [andmaybe C ballAL) nit team logo (over 12 stitches, stranding MC), $P^{m}$ (with MC) [k3, $P^{l\,J\,\times\,4,}$ k3 (NO STRANDING OF CC), attach CC (and C2) ball B and knit next team logo (over 12 stitches, stranding MC), pm, (with MC) [k3, p1] X4, k3 (NO STRANDING OF CC), attach CC (and C2) ball C and knit next team logo (over 12 stitches, stranding MC), pm, (with MC) [k3, $P^{l J\times4},$ k3 (NO STRANDING OF CC). You should now be carrying three separate lines ofC (andCC2), one two)for eachcolumflgo, but only theMC shouldbe straned hind the logos. 2.When you come to the logos on Row 2, you willfind that your C lines are on the far side. This may sem lie a problem, but this is where we use festive ntting. Red the intrutions in the box to see howit is doe. 3.Complete Row 2 as follows: \*work team logo using festive knitting with the appropriate individual CC (and CC2) yarn,(with MC) [k3, pl] ×4, k3\*, repeat between the $^{**}$ until the end of the row. There will e three repeats total, one per needle. 4.Complete Row 3 as fllows: \*knit team logo normally with the appropriate individual CC (and CC2) yarn, (with MC) [k3, $r^{I J\times4,\;k3*}\!.$ repeat between the \*\* until the end of the row. 5.Altatlyreat Ste 3. ad4.freenndd rows ofthe temlogo pat,utilyoureach Rw 16 u will end with Step 3.). 6.Repeat Step 5. three more times, for a total f 4 repeats of the logo pattern. You now have ribbing running where te pinstrie are uppedto go se picture bve.hen thsck iscoeed you will roct C it these ribs to make the pinstripes.
Knitting the Heel Flap:
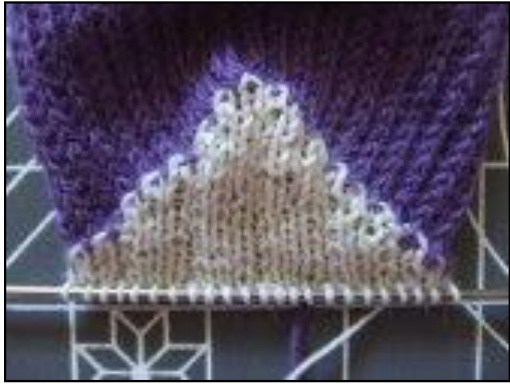
At the end of your fourth repeat of the leg team logo pattern, start the heel flap. Rearrange your stitches as follows: ? Needle 1 (including the first team logo): 30 stitches. Remove the stitch marker from this needle. · Needle 4: 18 stitches Set aside the removable stitch marker for now. Put the remaining 45 stitches on waste yarn. The heel flp begins as follows: If you have a CC2 strand, cut it at this point with a 4-inch tail. (\*\*This willbe ball A f CC2 for the festive kniting socks.) Knit Row 1 of the first team logo, then $\boldsymbol{\mathrm{k}}\boldsymbol{1}\boldsymbol{8}$ of MC (to the end of Needle 1). $\mathbb{\oplus}$ 回 If you are doing stranded-knitting scks, strand CC behind MC up to this point (you wil need it in a minute). ${\star}^{\star}{\cal C}{\cal S}{\cal I}\!f$ you are doing festive kniting, cut ball A of CC with a 4-inch tail and be prepared to re-attach it. Combine allsitches not on the waste yarn onto one needle.While working the heel flap, you should only need two needles. Cut your MC, leaving a 4-inch tail. Turn your work and purl back with CC (\*C CC from ballA for stranded knitting) for 48 stitches (these should be allof your live stitches). Using CC, work the hee flap using the“Eye of the Partridge” technique (which looks little like k, p1 ribbing): 1° \*sll1, $^{\,1\ast}$ , repeat between the $^{**}$ until the end of the row. Turn. 2. Sl1, p to end of row. Turn. 3. Repeat Steps 1. and 2. twenty-four times, for a total o forty-eight rows. 4. Repeat Step 1. one final time. Your final heel flap will look something like this:
黑回森c An example of the heel flap Turning the Heel: For Stranded-Knitting Socks: If your team has NO pinstripes, knit as follows: 1. With C,sl, p,ptog, ptog,p, tarn your workto stat knitin in the oposiediretion (yes, I know you are in the middle of the row). Cut CC and leave a 4-inch tail. 2.You should now be looking at the knit side. Sl1, atach MC (you will now be knitting with this), k2 with MC, ssk, k1, turn your work. 3. You now should be looking at the purl side. Still with MC, sl1, purl until one stitch before noticeable gap in the stitches (see the picture below). P2tog across this gap, p1, turn your work.
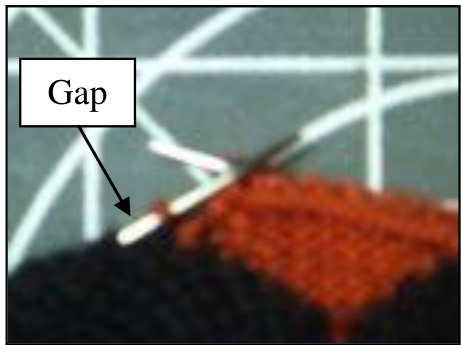
回森c The "gap" in heel turning as you purl.
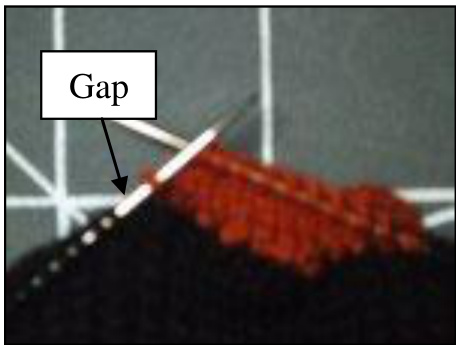
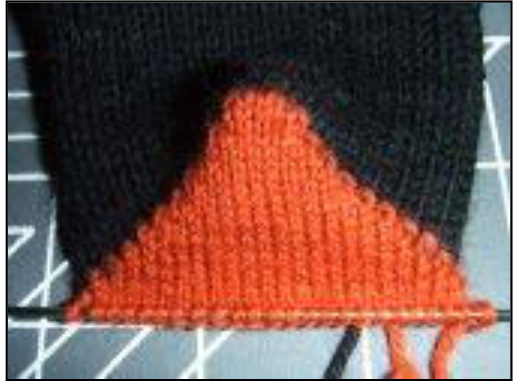
回森c The "gap" in heel turning as you knit. 4. You now should be looking at the knit side. Stil with MC, sll, knit until one stitch before noticeable gap in the stitches (see the picture above). Ssk across this gap, kl1, turn your work. 5. Repeat Steps 3. and 4. until there are no stitches left, ending with Step 4. Towards the end, you will probably have to do a p2tog or ssk at the end of the row; this is fine. In the end, you will have 25 stitches of MC on your needle. Congratulations! You have successfully turned a heel (see picturebelow). If your team HAS PINSTRIPES, knit as follows: 1.Witlt, tstr n i tsi (yes, I know you are in the middle of the row). 2. You should nowbe looking at the knit side l1, attach MC, k1 MC, k1 CC, ssk MC,k1 MC, tu your work. 3. You now should be looking at the purl side. Sl1, p1 MC, p1 CC, p2tog MC, p1 MC, turn your work. 4. You now should be looking at the knit side. Sl1, k1 MC, k1 CC,k1 MC, ssk MC, k1 MC, turn your work. 5. You now should be looking at the purl side. Sl1, p2 MC, p1 CC, p1 MC, p2tog MC, p1 MC, turn your work. 6.You nw shuld be looin at the knit id. SI1, kMC, kCC, kC, skMC, CC, tu yu work. 7. You now shuld be lookingat the pur sie SI1, p3MC, p C,p MC,ptog MC, p1 C, tun your work. 8. You now should be looking at the knit side. Sl1, k3 MC, k1 CC, k3 MC, ssk CC,k1 MC, turn your work. 9.Younowshouldbelooking at the purl sid.Contining the3stitchMC, 1-stitchCC patte, sl, purl until one stith before noticable gapin the stches s the picture above). Ptog across this gap, p1, turn your work. 10. You now should be looking at the knit side. Continuing the 3-stitch MC, 1-stitch CC pattern, sl1, knit untilone stch before noticcale gap in the stchs seeth piture above). Ssk acros this gap, k1, turn your work. 11. Repeat Steps 9. and 10. until there are no stitches left, ending with an 10. Towards the end, you will probably have to do a p2tog orsk at the end of te row; this is fine. In the end, you wil ave 25 stitches ofMC, CC pinstrpes on your needes. Congratulations! Youhave successully tud a heel!
For Festive Knitting Socks:
\*\* If your team has NO pinstripes, knit as follows: 1.Cut ball ofC, leaving a4-inchtail. S3 stitches purlwis,so you ar staring from the middl of th row. Starting from the purl sie, with MC, p2tog, p2tog, pl, turn your wor t start knitting in the opposite direction (yes, I know you are in the middle of the row). 2.You should now be looking at the nit side. Sll, k2, ssk, kl, turn your work. 3.You now shul bloingat the prl side.ll pur tilone stitchbeforenoticble gapin thestitches e the picture above). Ptog across this gap, pl, turn your work. 4.Younw shuldbe loing at the nit side.Sll, knit utilne stithbefore noticble gapin thestitchs see the picture above). Ssk acrossths gap, kl, turn your work. 5. Repeat Stps 3. and 4.util there are n stitches lft,ending withSt 4.Towards the end, you will probably have todoap2tog or ssk atthe end ofthe row; this isfine. Inthe end you willhave 25 stitches of MC onyou needle. Congratulations! You have successfully turned a hee! If your team HAS PINSTRIPES, work as follows: 1.Cut ball A fC, leaving a4-inchtail. Sstiths purlwise, so you are starting from the middle ofthe rw. Starting from the purl side, with MC, p2tog, p2tog, l, turn your work to start knitting in the opposite direction (yes, I know you are in the middle of the row). 2.You should now be looking at the knit side. Sll, kl, pl, sk, kl, turn your work. 3.You now should be looing at the purl sde. Sll, pl, kl, pl, pPtog, Pl, turn your work. 4.You now should be looking at the knit side. Sll, k2, pl, kl, ssk, kl, turn your work. 5.You now should be looking at the purl ie. Sll, p2, kl, p2, pPZtog, kl, turn your work. 6.You now should be looking at the knit side. Sll, k3, pl, k2, ssk, pl, turn your work. 7.You now should b loking at the purl side. Sll, p3, kl, p3, kltog,pl, tun your work. 8.You now shouldbe looking at the knit side. Sll, pl, k3, pl, k3, sp, kl, turn your work. 9.You now should be lking at the purl side. ll, pulcontinuing the 3k, 1p pattern (as seen from the right side)utilnstithbefrtibe gpintstits s te piue aboveg acrosts turn your work. 10. You now should be loing at the knit side. Il, knitcontinuing the 3k, Ip paten a sen fom the right side)until on stitch before noticeable gap in th sitches seethe pcture above). Ssk acrossthis gap, kl. turn your work. 11. Repeat Steps 9. and 10. until there are no stitches left, ending with Step 10. Towards the end, you will probably have to da ptog or sskat theend oftherow; thisisfin. In the end, you willhave25 stitche fMC on your needle. Congratulation! You have sucesfullyturnd a hee (seethe picture above)!
Knitting the Foot:
Knitting the foot consists of several parts. When you pick up your stitches around the heel, you willfind you have many more stitches than the number you need to go around your foot. Therefore, you will decrease these extra stitches out in gussets. At the same time, you will begin working the arch-shaped,fited portion along the bottom of the foot. (All of this, of course, while you are continuing the logo repeats fo the remaining two columns $\circledcirc$ 一。
For Stranded-Knitting Socks:
$\mathbb{\oplus}$ If your team has NO pinstripes, knit as follows: 1. Move the stitches held on the waste yarn to a new needle, removing waste yarn. 2. Starting from the end of your turned heel, use a new needl to pick up and $\mathrm{k}26$ stitches along the side of the hee lap, using MC. The final stitch between the hee flap and the stitches from the waste yarn may become loose, so twist this “corner” stitch once or twice before knitting it.
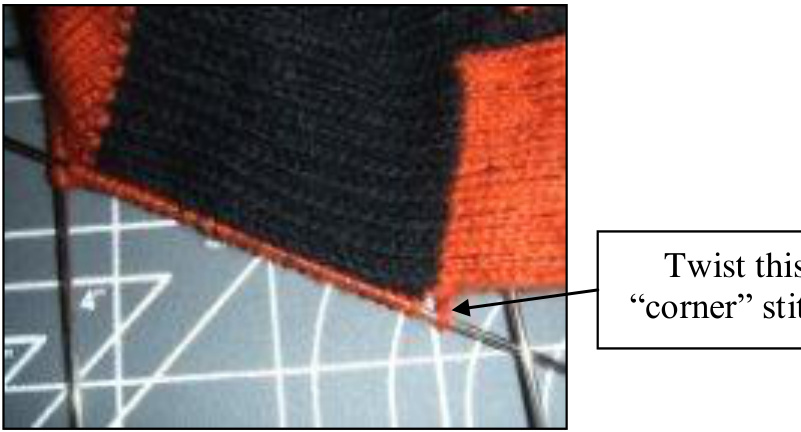
回森c An example of the picked-up heel flap stitches 3.Knit th frst sitch from the waste yarn and transfer it to the previous needle, so allof yourMC stitches are on the same needle. 4. Knit the stitches formerly on the waste yarn as follows: Re-attach CC (and CC2). Knit Row 1 of team logo (this should be a continuation of the previous column), pm, $\mathrm{k}19\,\mathrm{MC}$ (stranding CC [and CC2]), pm, knit Row 1 of team logo (this should be a continuation of the previous column), k1 MC. 5. Use another new needle to pick up and $\mathtt{k26}$ stitches along the final side of the heel flap, using MC. Since the frst stith between the heel flap and the stitches from the waste yarn may become loose, twist this corner stitch once or twice before knitting it, as you did with the other corner stitch. Transfer the final stitch of the stitches formerly on the waste yarn (the only MC stitch after the second team logo) onto this needle. 6.You should now have four needles with stitches. Knit twelve stitches into the next needle (this should line up with the center of the heel) and rearrange your needles as follows: ● Needle 1: 40 stitches (from rough heel center to beginning of first team logo) Needle 2: 22 stitches (from beginning of frst team logo to rough center of top of foot, also called the instep) · Needl 3: 21 stitches (from rough center of instep to end of second team logo) Needle 4: 39 stitches (from end of second team logo to rough heel center) 7. Place your detachable stitch marker lined up with the first stitch of Needle 1 (at heel center). This is where your row will start from now.
8. To decrease your gusset:
First row: ●Needle 1: Knit MC to one stitch from end of needle. Slip last stitch to Needle 2. Needle 2: K2tog within pattern (so that the MC stitch disappears behind the team logo pattern). Finish team logo pattern. K10 MC. Needle 3: K9 MC. Knit frst 11 stitches of team logo. Slip last stitch of team logo knitwise. Slip first stitch of Needle 4 to Needle 3 knitwise. Knit these stitches together through back of loop,like ssk (so that the MC stitch disappears behind the team logo pattern). Needle 4: Knit MC. Second row: Knit, following pattern.
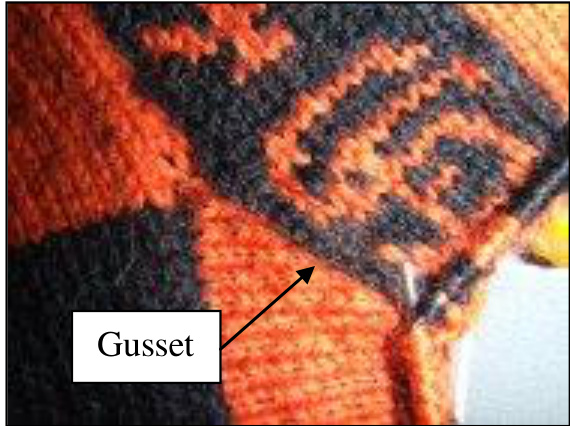
黑回森cg Example of decreasing gusset on left side
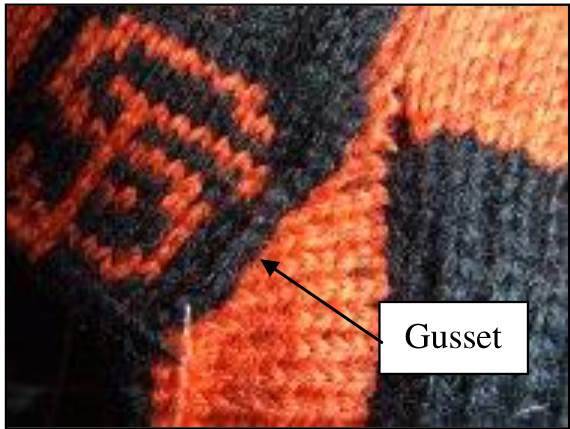
9. Knit six rows of gusset decreases (Steps 8. a. and b.) before you start to include the arch shaping. The arch shaping occurs on the underside of the foot and creates a bias stitch that causes the sock to “hug" the arch of your fot in a way that store-bought socks never do $\circledcirc$ . Knit the arch shaping as follows: a. Knit the seventh row of gusset decrease until five stitches from the end of Needle 4. Pm, k2tog, k3 (you should be at the end of Needle 4), M1. b. At the beginning of Needle 1, k1 (your center bottom stitch), M1, k3, ssk, pm. C. Continue knitting the next row of your gusset decrease (this will be Row 8. b.). When you come back to the bottom, knit straight through on Needles 4 and 1. d.Continue knitting the next row of your gusset decrease (this will be Row 8. a.), until one stitch before the marker on Needle 4. Move marker one stitch to the right by slipping stitches. K2tog, knit to the end of the Needle 4, M1. At the beginning of Needle 1, k1, M1, knit to one stitch before the marker, sk, moving the marker to just after the sk stitch. (The pictures below show the steps.) e Continue Steps c. and d. until you can count 20 stitches between your center bottom stitch and your markers. (You willfinish your arch shaping before you finish your gusset decreases.)

$\mathcal{P}$ 回森 Work to the end of Needle 4, and M1.
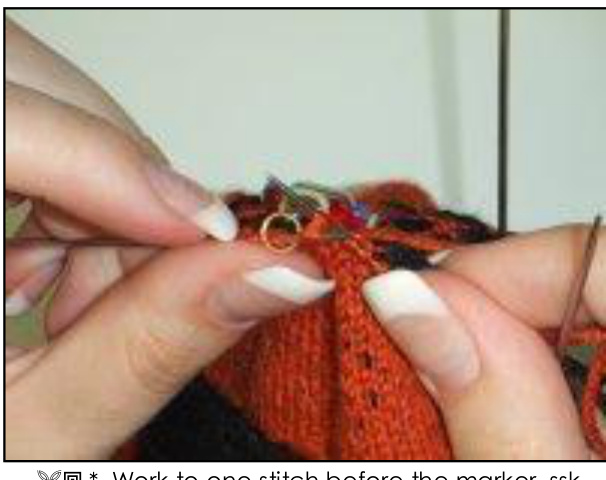
黑回森 Work to one stitch before the marker, ssk,moving the marker to the left. 10. Continue a. and b. in Step 8. until you have decreased to 82 stitches total, removing stitch markers when appropriate. 11. After you finish the gusset decreases, continue knitting the foot over those 82 stitches until you have added another four repeats of the team logo pattern. There should be nine repeats total along the two long columns: one in the cuff $+$ four in the $\log^{+}$ four in the foot. Finish your final row at the bottom of the foot, at the end of Needle 4. If your team HAS PINSTRIPES, knit as follows: 1. Move the stitches held on the waste yarn to a new needle, removing waste yarn. 2. Starting from the end of your turned heel, use a new needle to pick up and $\mathrm{k}26$ stitches along the side of thheel lap, continuing th-stitchM, 1-stith patenyoualady have in the . This should end up with a 3-stitch MC adjoining the CC edge of the team logo. The final stitch stitch once or twice before knitting it (see picture of picked-up heel flap stitches above). 3. Knit the first stitch from the waste yarn and transfer it to the previous needle, so all of your MC, CC pinstripe pattern stitches are on the same needle. 4. Knit the stitches formerly on the waste yarn as follows (if necessary, re-attach CC2): Knit Row 1 of team logo (this should be a continuation of the previous column), pm, [k3 MC, $\mathrm{k}1\;\mathrm{CC}]\times4$ , $\mathrm{k}3\,\mathrm{MC}$ pm, knit Row 1 of team logo (this should be a continuation of the previous column), $\mathrm{k}1~\mathrm{MC}$ 5. Use another new needle to pick up and $\mathtt{k26}$ stitches along the final side of the heel flap, mirroring the 3-stitch MC, 1-stitch CC pattern on the other side of the helflap. ince the frst stitch between the hee flap and the stitches from the waste yarn may become loose, twist this corner stitch once or twice before knitting it, as you did with the other corner stitch. Transfer the final stitch of the stitches formerly on the waste yarn (the only MC stitch after the second team logo) onto this needle. 6.You should now have four needles with stitches. Knit twelve stitches into the next needle (this should line up with the center of the heel) and rearrange your needles as follows: ? Needle 1: 40 stitches (from rough heel center to beginning of first team logo) Needle 2: 22 stitches (from beginning of first team logo to rough center of top of foot, also called the instep) · Needle 3: 21 stitches (from rough center of instep to end of second team logo) Needle 4: 39 stitches (from end of second team logo to rough heel center) 7. Place your detachable stitch marker lined up with the first stitch of Needle 1 (at heel center). (The stitch should be a pinstripe knit in CC.) This is where your row will start from now.
8. To decrease your gusset:
a. First row: Needl 1: Knit the MC, CC pinstripe pattern to one stitch from the end of the needle. Slip the last stitch to Needle 2. Needle 2: K2tog within pattern (so that the pinstripe pattern stitch disappears behind the team logo pattern). Finish team logo pattern. $[\mathrm{K}3\;\mathrm{MC},\mathrm{k}1\;\mathrm{CC}]\times2,\mathrm{k}2\;\mathrm{MC}.$ Needle 3: K1 MC, [k1 CC, $\mathrm{k}3\;\mathrm{MC}]\times2$ . Knit first 11 stitches of team logo. Slip last stitch of team logo knitwise. Slip first stitch of Needle 4 to Needle 3 knitwise. Knit these two together through the back of the loop, like ssk (so that the pinstripe pattern stitch disappears behind the team logo pattern). · Needle 4: Knit the MC, CC pinstripe pattern. Second row: Knit, following pattern. 9. Knit six rows of gusset decreases (Steps 8. a. and b.) before you start to include the arch shaping. The arch shaping occurs on the underside of the foot and creates a bias stitch that causes the sock to “hug” the arch of your foot in a way that store-bought socks never do $\circledcirc$ . Knit the arch shaping as follows: a.Knit the seventh row of gusset decrease until five stitches from the end of Needle 4. Pm, k2tog CC, k3 MC (you should be at the end of Needle 4), M1 CC. b. At the beginning of Needle 1, k1 CC (your center bottom stitch), M1 CC, k3 MC, ssk CC, pm. C. Continue knitting the next row of your gusset decrease (this will be Row 8. b.). When you come back to the bottom, knit straight through on Needles 4 and 1, continuing your new pinstripe pattern in the appropriate colors. d.Continue knitting the next row of your gusset decrease (this will be Row 8. a.), until one stitch before themarker onNeedle 4. Move markerone titch to the right by slipping stitches. K2tog CC, k3 MC, k1 CC, M1 MC. At the beginning of Needle 1, k1 CC, M1 MC, k1 CC, k3 MC, ssk CC, moving the marker to just after the ssk stitch. e. Knit Step c. again. f. Continue knitting the next row of your gusset decrease (this will be Row 8. a.), until one stitch before the marker onNeedle4. Move marker one stitch to the right by slipping stitches. K2tog CC, k3 MC, k1 CC, k1 MC, M1 MC. At the beginning of Needle 1, k1 CC, M1 MC, k1 MC, k1 CC, k3 MC, ssk CC, moving the marker to just after the ssk stitch. g. Knit Step c. again. h. Continue knitting the next row of your gusset decrease (this will be Row 8. a.), until one stihat stitches. K2tog CC, knit the pinstripe pattern that is emerging to the end of the needle, M1 ofthe appropriate yarn colr to continue the pattern. At the beginning of Neede 1, k1 CC, M1 of th appropriate yarn colr to contiu th patte, knit the pinstrip patte that s emerging to one stitch before the marker, ssk CC, moving the marker to just after the ssk stitch. (See pictures of the non-pinstriped version above.) i.Continue Steps g. and h. until you can count 20 stitches between your center bottom stitch and your markers. (You willfinish your arch shaping before you finish your gusset decreases.) 10. Continue a. and b. in Step 8. until you have decreased to 82 stitches total, removing stith markers when appropriate. 11. After you finish the gusset decreases, continue knitting the foot over those 82 stitches until you have added another four repeats of the team logo pattern. There should be nine repeats total along the two long columns: one in the cuff $+$ four in the leg $^+$ four in the foot. Finish your final row at the bottom of the foot, at the end of Needle 4. \*\* If your team has NO pinstripes, knit as follows: 1.Move the stitches held on the waste yarn toa new neede, removing waste yarn. 2.Starting from the end f yourtured hee,use a ew neede to pick upand k6 stitches along the side ofthe heel flap, using MC. Th final stitch between the heel flap and the stitches from the waste yarn may become looe, so twist this \*corner"'stitch once or twice before knitting it. 3.Knit thfirst tchfrthwaste yad trafer i tothe previus nede, sallf youM stth the same needle. 4.Knit the stitches formerly on the waste yarn asfllows: Knit Row l of team logo(this shouldbe a continuation of the previous column, using ball B of C), pm, k19 MC, pm, knit Row 1 fteam logo (this should be a continuation of the previous column, using ball C of C), k1 MC. 5.Use another new needle to pick up and k26 stitches along the final side of the heel flap, using MC. Since the first stith between the hee flap and the stitches from the waste yarn may become lose, twist this corner stith once or twice before nitting it, as you did with the other corner stitch.Transfer thefinal stitch of the stitches . formerly on the waste yarn (the only MC stitch after the second team logo) onto this needle. 6.Youshouldwavefourndes witstitch.Kit tele stitchs int theext nle this should with the cente of the hel) and rearange your needles as follows: ? Neede 1: 40 stiths frm rough heel entertobegining ffirst team log) Neede: 2 shfifrst logrtft instep) Needle 3: 21 stitches (from rough center of instep to end of second team logo) ? Needle 4: 39 stitches (from end of second team logo to rough heel center) 7.Place your detachable stitch marke lined up with thefirst stitch ofNedle 1 (at hee center).This is where your row will start.from now. 8. To decrease your qusset: a.First row: Kit, fowing pattern, usingfestive itting inthe lgo clus (thee will be the enumbered team logo rows). b.Second row: Needle 1: Knit MC to one stitch from end of needle. Slip last stitch to Needle 2. Needle 2: K2tog within pattern (so that the MC stitch disappears behind the team logo pattern). Finish team logo pattern. K10 MC. Nedle 3: K9 MC. Knit first 11 stitches of team logo. Slip last stitch of team logo knitwise. Slip first stitch of Needle 4 to Needle 3 knitwise. Knit these stitches together through the back ofthe loop, like ssk (so that the MC stitch disappears behind the team logo pattern). ·Needle 4: Knit MC. 9. Knit six rows f guset decreas Step 8 a. and $b$ ) before you stat to include the arch shapingn The arch shaping occurs on the underside ofthe foot and creates a bias stitch that causes the sock to“hug"the arch of your foot in a way that store-bought socks never do ${\mathcal{O}}.$ Knit the arch shaping asfllows: a.Knit the seventh row of gusset decrease untilfive stitchesfrom the end ofNeele 4. Pm, tog, k3 (you should be at the end of Needle 4), M1. b.At the beginning of Needle 1, kl (your center bottom stitch), M1, k3, ssk, pm. C。 Continue knitting the next row of your gusst decrease (this will be Row 8. b.). When you come back to the bottom, knit straight through on Needles 4 and 1. d. Continue knitting the next row of your gusset decrease (this will be Row 8. a.), until one stitch before thmarN4.Mvastithtthrihtbsliping stithtg,nit tt end ofthe Needle 4, M1. At the beginning f Needle 1, kl, M1, knit to one stitch before the marker, ss, moving the marker to just afer the sk stitch. (The pictures above show the step.) e.Continue Steps c. and d. until you can count 20 stitches between your center bottom stitch and your markers. (You will finish your arch shaping before you finish your qusset decreases.) 10.Continua. andb in Stp 8. untilyou have decreased to2 stitches total, removing stitch markers whn appropriate. 11.Afyunshtgust dee cting tt etstitchiluav anotherfuretsfthtelpattThrhoule niereeatsttalalng thwlngcol one inthe cuff $^+$ four inthe leg $+$ four in the foo. Finish your final row at the bottom of thefo, at the end of Needle 4. If your team HAS PINSTRIPES, work as follows: 1.Move the stitches held on the waste yarn to a new needle, removing waste yarn. Startingfrthe edfyour tued heel, useanw nedle topickupandwork 6 stitches along theidefthe heeflap, contiuing th Ippattnyoualredy have in thehlThis should endup with 3k adjoinig the CC edge of the team logoThe fina th btween the helflap and thestitchs from the wasteyarn may beome loe, s twist ths crer stchonce ortice bfore nittin it se pctueof pcedup heelfap stitches above). 3.Knit tfist stithfrmt wasteyad trafer it t the previus nede sllf youk p stitches are on the same needle. 4. Knit the stitches formerly on the waste yarn as follows: Knit Row 1 of team logo(this should be a continuation of the previous column, using ball B of CC), pm, [k3, pl] ×4, k3 in MC, pm, knit Row 1 of team logo (this should be a continuation of the previous column, using ball C of C), kl MC. 5.Ue awtcuawr tihlng tfidefthlrin l pattnthit.infssttttstit wasteyist swifoetingtasydwi cornerstitchafe tinstitchft stithfeleasty(tolyMstithaf second team logo) onto this needle. 6.You shoud nwaefouns witstitch.Wrk tele stith intoth ext e this shouldu with the center f the heel) and rearrange your needles as fllows: Needle 1 : 40 stitches (from rough hee center to beginning offirst team logo) d2stflrohftlinstep) · Neede3: 21 stitches frmroughcentefinsteptoend ofsond temlg) Nedle 4: 39 stitches (from end of second team logo to rough heel center) 7.Place your detachable stitch marke lined up with thefirst stitch ofNedle 1 (at heel center). (The stitch shuld be a purl stitch) This s where your row wil start from now. 8. To decrease your gusset: a. First row: Needle 1: Work the k3 pl pinstrpe patern to one stitchfrom end of needle. Slip the last stitch to Needle 2. Needle 2: K2tog within pattern (so that the pinstripe patern stitch disappears behind the team logo pattern). Finish team logo pattern. In MC, [k3, $P^{I J}\times2,\,k2$ Needle 3: In MC K1, [pl, $k3J x\,2$ Knitfirst 11 stithes ofteamlogo.Sliplast stitch of teamlogo knitwise. Slipfirst stitch ofNeedle 4 to Needle 3 knitwise. Knit these stitches together through the back of the loop, like ssk(so that the pinstripe pattern stithdisappears behind the team logo pattern). · Needle 4: Work the k3, ${}^{p l}$ pinstripe pattern. Second row: Work pattern. 9. Work six rows o gsset derases Steps 8 a. and $b$ ) befoe you sat to include the arch shaping. The arch shaping ocurs on the underside ofthe foot and creates a bias stitch that causes the sock to“hug"the arch of your foot in a way that store-bought socks never do ${\mathcal{O}}.$ Work the arch shaping as fllows (all in MC, of course): a.Worthe evehrowf guset deeutilfvstith frthedfNdP, ssk(w this seems like it should be a purl), k3, M1 purlwise (you should be at the end ofNeedle 4). b.At the beginning of Needle 1, pl (your center bottom stitch), M1 purlwise, k3, k2tog (I know this seems like it should be a purl), pm. C. Continue working the next row of your gusset decrease (this willbe Row 8. b.). When you come back to the bottom, continue your pattern through to the marker. Afer the marker, $P^{l}$ , knit the knit stitches and purl the purl stitches until one stitch before the next marker, then $P^{l}$ d. Continue working the next row of your gust decrease (this willbe Row 8. a.), until one stitchbefore the marker on Needle 4. Move marker onestitch to the right b slipping stitches. Ssk, k3, $p l$ M1 knitwise. At the beginning of Needle 1, pl, M1 knitwise, $P^{l}$ , k3, k2tog, moving the marerto jst after the k2tog stitch. e. Work Step c. again. $f.$ Continu woring the next rowof your gusset decrease (this will be Row8. a.), until one stitchbefore thmarNed4.Mvmar stithttheriht bsliing stith.Sk M knitwise. Atthe beginning of Neede 1, pl, M knitwise, kl, pl, k3, k2tog, moving the marker to just afer the k2tog stitch. $\mathcal{g}$ Work Step c. again. $h$ Continu woring the next rowf your gusset decrease (this will be Row8. a.), util one stithbefore the marker on Needle 4. Move marker one stitch to the right by slipping stitches. Ssk, work the k3. $p l$ patter that is emrging to the endfthe neede, M in the appropriate stitch style to continu the pattern. At thebegining fNede 1, pl, Ml in the appropriate stith style to continue the patt, work the k3, $P^{l}$ patern that is emerging to one stitch before the marker, k2tog, moving the marker to just after the k2tog stitch. (See pictures of the non-pinstriped version above.) i. Continue Steps g. and h. until you can count 20 stitches between your center botom stitch and your marer. Yuwilfnisyoachhaingbfreyoufinshyu guset de. 10. Continuea. and b.inStep 8. untilyou have decreaedto82 stitches total, removing stitch marers whn appropriate. 11.Afteryufinish the gusset dcrese, contine woring thefoot ovr the stiths utilyuhaved another fourrepeats ofthe team logo patern.There should be nine repeats totalalong thetwo long colns: one in the cuff $^+$ four in the leg $+$ four in the foot. Finish your final row at the bottom of the foot, at the end of Needle4.
回\*c Knitting the Toe:
To evenout your stitches, shiftne stitchfrmNeed 2 toNeed 1 andn stithfrmeed 3 toNeed 4 ye I know we have just stolen stitches from the team logos!) You should now have as follows: Needle 1: 21 stitches · Needle 2: 21 stitches Needle 3: 20 stitches Needle 4: 20 stitches Continue your pattern (pinstriped or not until the end of Neede 1, making sure toknit the last stitch i CC, as it is part ofthe team logo column. Cut your MC (and poibly CC2) yarn, leaving a4-inch tail. \* Forfstive knitting, cut ball C of CC (and CC2) as well (and ball B of CC2 of you have it).Move your detachable stitch marker to between Needle 1 and Needle 2, as our round will now be starting from here. Starting from Needle 2, and using only CC (\*use ball of C for festive knitting), knit the following decreases: 1. Knit entire row. 2. Knit as follows: ■ Needle 2: K1, ssk, knit to end. ■ Needle 3: Knit to last three stitches, k2tog, k1. ■ Needle 4: K1, ssk, knit to end. ■ Needle 1: Knit to last three stitches, k2tog, k1. 3. Repeat Steps 1. and 2. until 42 stitches remain. 4. Repeat Step 2. until 22 stitches remain.
1. Pass the tapestry needle through the first stitch on the front needle as if to knit. Drop that stitch off the needle and pull the yarn through. 2. Slide the tapestry needle through the next stitch on the front needle as if to purl. Leave this stitch on the needle.
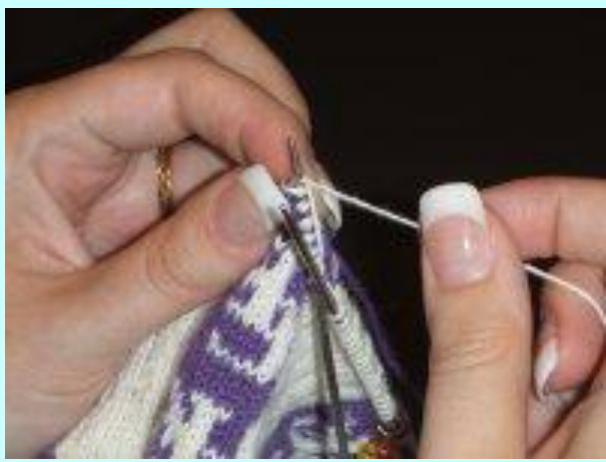
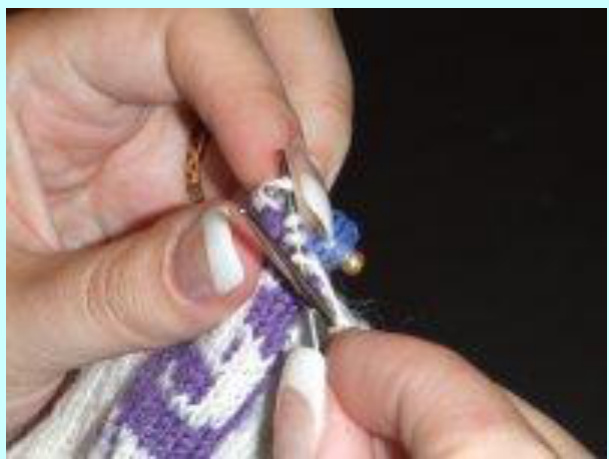
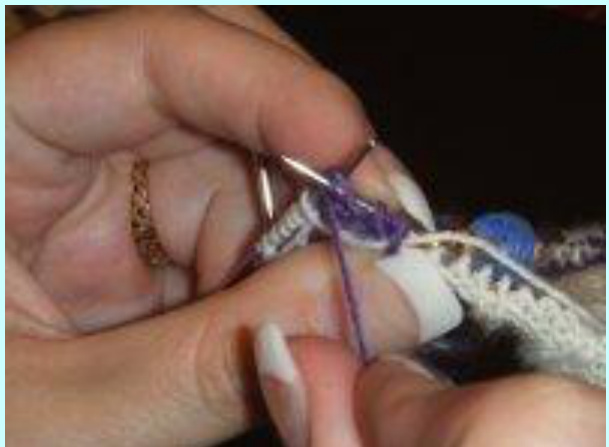
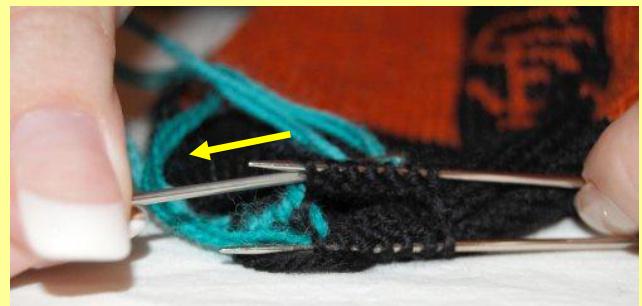
3. Pass the tapestry needle through the first stitch on the back needle as if to purl. Drop that stitch off the needle and pull the yarn through. 4. Slide the tapestry needle through the next stitch on the back needle as if to knit. Leave this stitch on the needle. Slip the stitches from Needle 3 to Needle 2, and the stitches from Needle 4 to Needle 1. You should have two needles with 11 stitches each. Cut the CC yarn, leaving a 12-inch tail. Thread the 12-inch tail onto the tapestry needle and use the Kitchener Stitch (see the box above) to graft the toe. Afterwards, turn the sock inside out and use the tapestry needle to weave in any remaining loose ends, remembering to pull the associated stitches tight. Attaching the Pinstripes (Festive Knitting only): f youhavbeittifstive niting socs with instrp yuave pbbly ntic there ar onlyurldivots whee pinstripe are suppsed to be ${\mathcal{O}}.$ Thisis where you put in the pinstrps. Take bl C f C and the crochet hook and, using single rochet, rh hf shwwfp stAttdtaainuwilfer over a chain f mossitch-like stitchs, but it willijst fineif you keep to the outside of theadjoining knitted line in the arh shaping.Crochet all ofthe longest lines first, and then crochet the shorter lines abutting thm; this makes fora smoother look. Also, be pearedtav maymytds syougserchetdln pdus t ens a ast tha s thwId itn the otherhand you endup with lovely, strethy socks, andthe pinstripes look wonerfl which makes it worth it inthe ed.
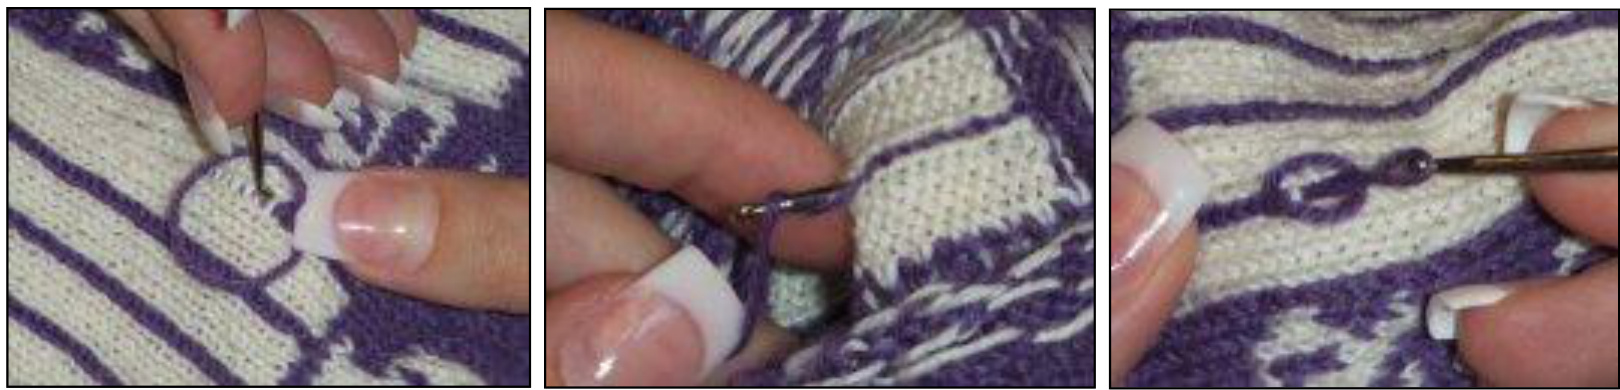
c Examples of crocheting pinstripes for pinstriped festive knitting socks.
Biography:
Meredith Davey was born the day Hank Aaron tied Babe Ruth's home run record, and her fate as α baseball fan has been sealed ever since. Raised in New York as a Yankees fan, she now lives happily in Colorado, where she has had season tickets to the Rockies for several years. (Go Yankees and Rockies!) An astrophysicist by training, Meredith spends all of her spare time watching baseball and knitting complicated projects on teeny, tiny needles. Photographs by Laurel Rachmeler, Meredith Davey, and Pamela Batchelor.
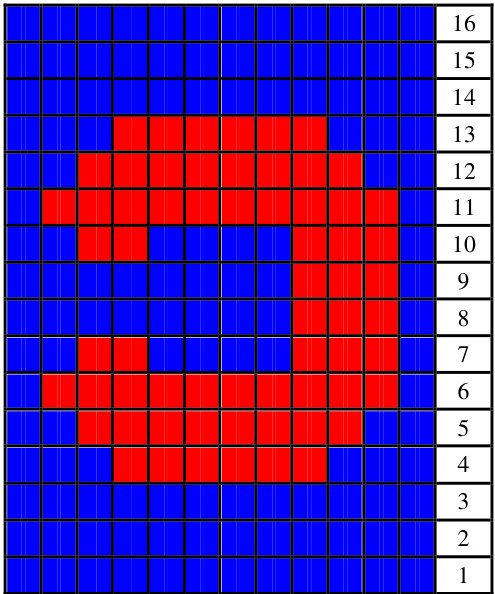
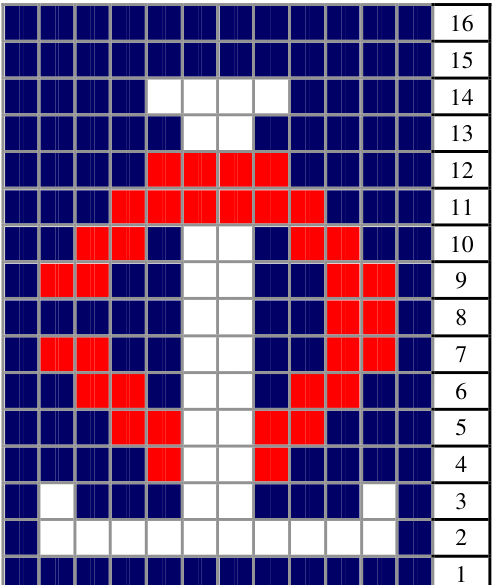
Chicago Cubs (Blue, Red, and White) PINSTRIPES: Blue
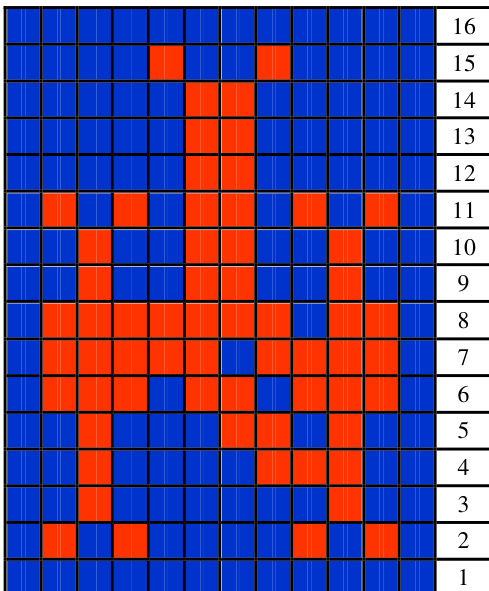
New York Mets (Bright Blue, Orange, and White) PINSTRIPES: Blue
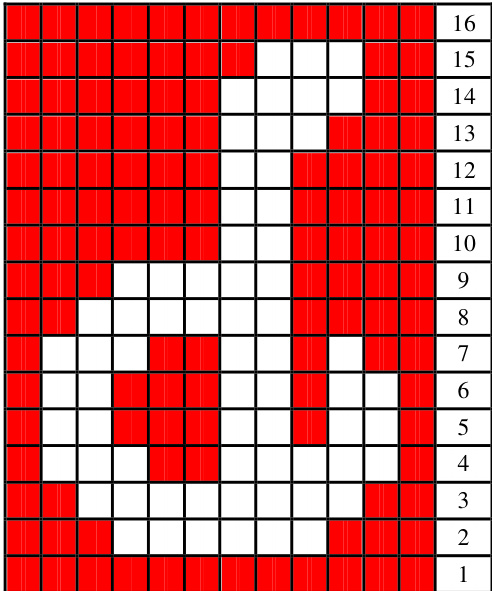
Philadelphia Phillies (Red and White) PINSTRIPES: Red
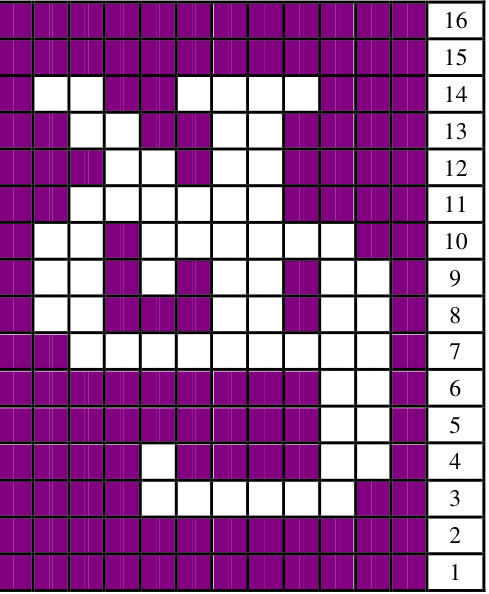
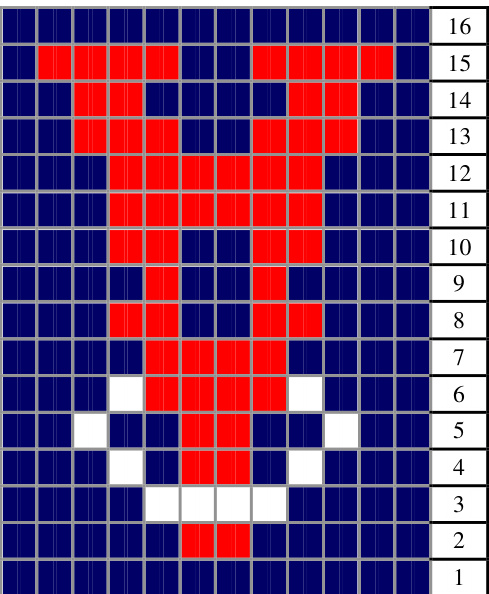
Colorado Rockies (Purple and White) PINSTRIPES: Purple
Minnesota Twins (Dark Blue, Red, and White) PINSTRIPES: Dark Blue
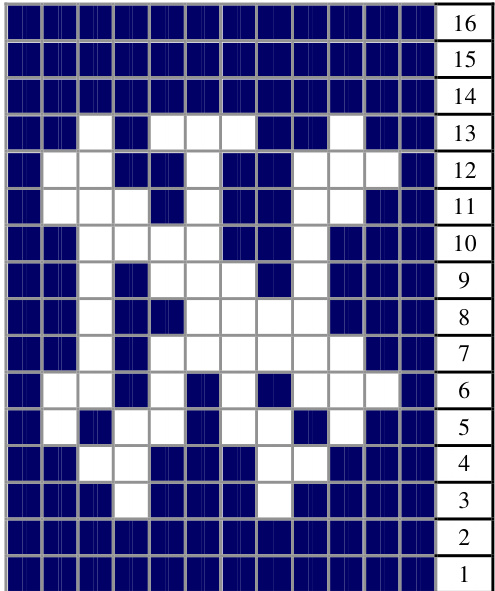
New York Yankees (Dark Blue and White) PINSTRIPES: Dark Blue
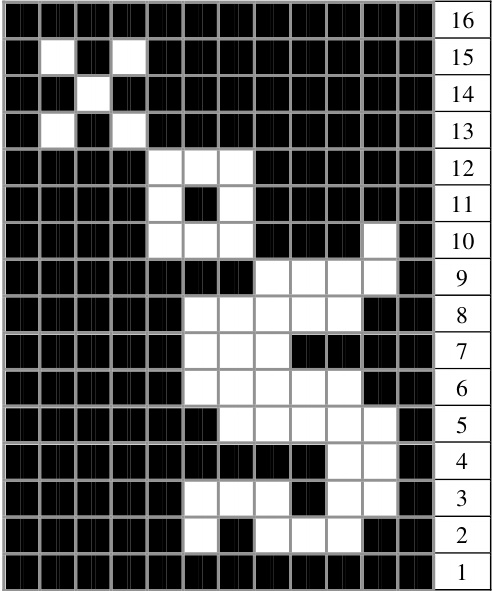
Chicago White Sox (Black and White) PINSTRIPES: Black
Los Angeles Angels of Anaheim (Dark Blue, Red, and White) NO Pinstripes

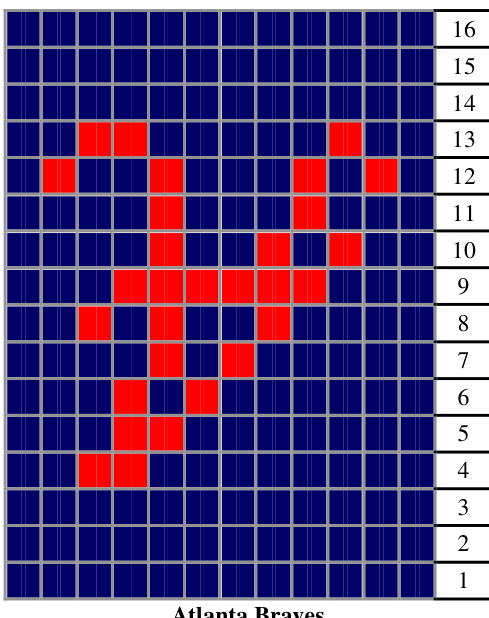
Atlanta Braves (Dark Blue, Red, and White) NO Pinstripes

Milwaukee Brewers (Dark Blue and White) NO Pinstripes
(Blue and White) NO Pinstripes
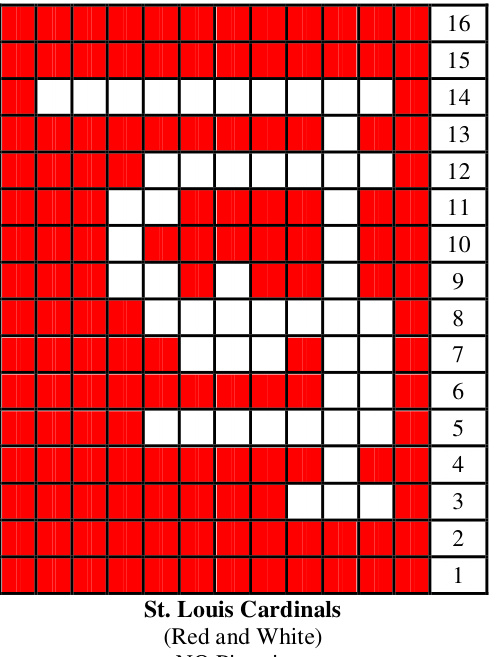
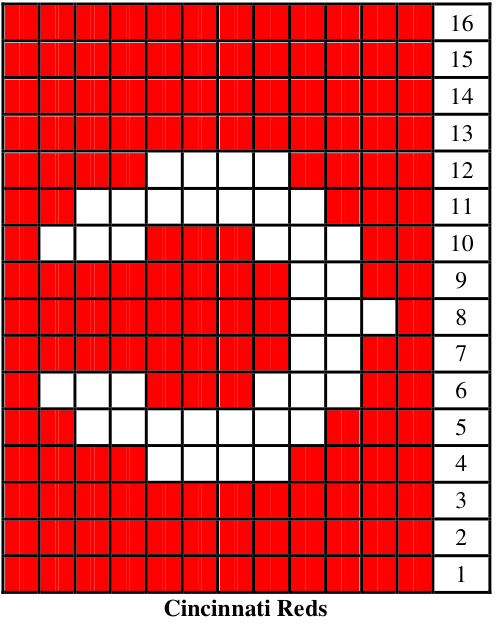
(Red and White) NO Pinstrpes
San Diego Padres (Dark Blue, Taupe, and White) NO Pinstripes
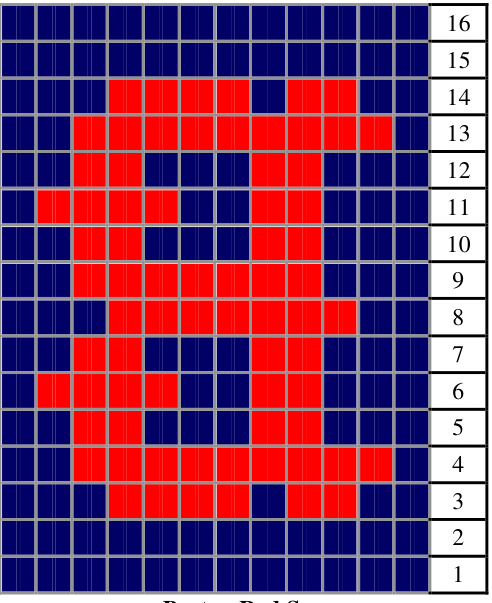
Boston Red Sox (Dark Blue, Red, and White) NO Pinstripes
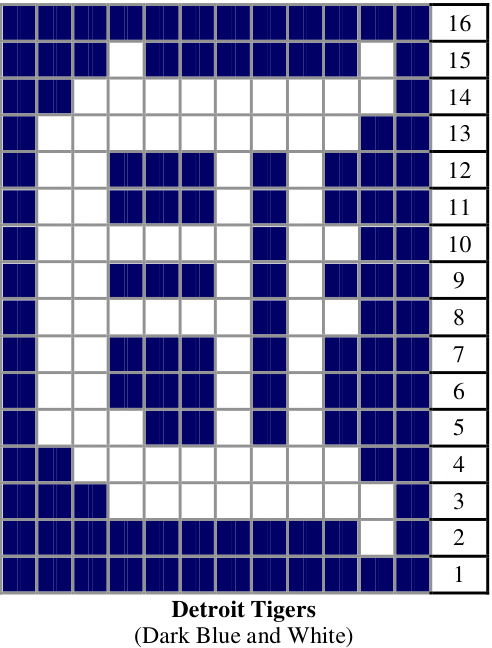
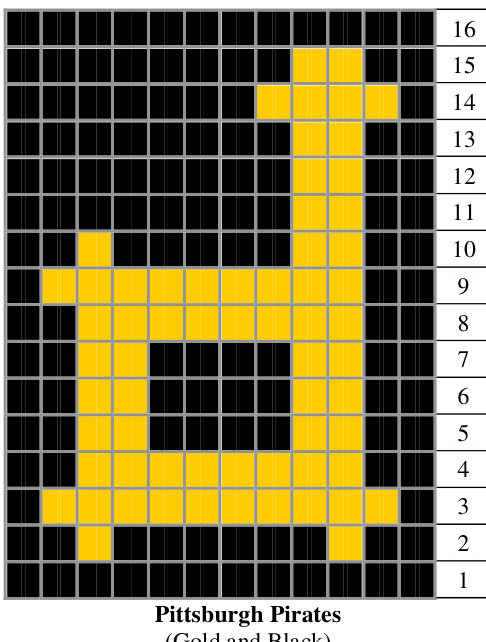
(Red and White) NO Pinstripes