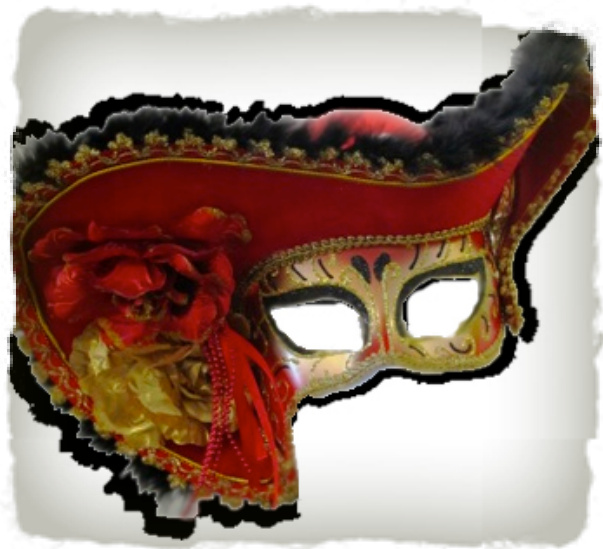
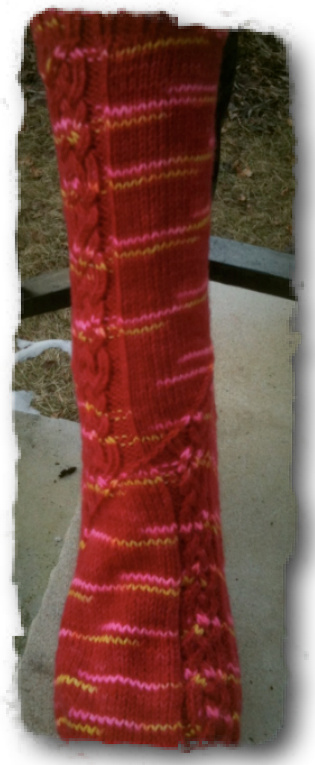
Veronica, The Red Lady, lived and died as a Pirate Queen in the 15oos. She would disguise herself as an entertainer in order to gain access to ships. Once on board, she would perform a Strip tease, slowly revealing her <gasp> trousers! This also freed up her sword, and after a battle, she would sail the ship out to open water. These socks also begin one way, and after a slash become something else. I hope you enjoy them! Skill Level: Intermediate (pattern includes intricate cabling, wrong side cables, Ktbl & Ptbl) Materials: 350-400 yds (320-365m) of sock weight yarn Needles: US1 (2.25mm) sock needles (either DPNs or Magic Loop) Sizing: Small (Medium, Large) creates a circumference of 8 (8.5, 9) inches or 20 (21, 22.5) cm. Leg length and foot size are adjustable to fit. Gauge: 8 stitches & 12 rounds in Stockinette. Abbreviations: K= Knit P= Purl Ktbl= Knit through the back loop Ptbl= Purl through the back loop S= Slip purlwise SSK= Slip, slip, knit K2tog= Knit 2 stitches together as 1 P2tog= Purl 2 stitches together as 1
Cables:
Cable 2 Right (C2R): Right side: Slip 1 stitch to a cable needle and hold to the back. Ktbl, Ktbl from the cable needle. Wrong side is unnecessary for this pattern. Cable 2 Left (C2L): Right side: Slip 1 stitch to a cable needle and hold to the front. Ktbl, Ktbl from the cable needle. Wrong side is unnecessary for this pattern. Cable 1/1 Right (C1/1R): Right side: Slip 1 stitch to a cable needle and hold to the back. Ktbl, P1 from the cable needle. Wrong side is unnecessary for this pattern.
Cable 1/1 Left (C1/1L): Right side: Slip 1 stitch to a cable needle and hold to the front. P1, Ktbl from the cable needle. Wrong side is unnecessary for this pattern. Cable 3 Right (C3R): Right side: Slip 1 stitch to a cable needle and hold to the back, K2tbl, P1 from the cable needle. Wrong side: Slip 2 stitches to a cable needle and hold to the back. K1, P2tbl from the cable needle. Cable 3 Left (C3L): Right side: Slip 2 stitches to a cable needle and hold to the front, P1, K2tbl from the cable needle. Wrong side: Slip 1 stitch to a cable needle and hold to the front. P2tbl, then K1 from the cable needle. Cable 4 Right (C4R): Right side: Slip 2 stitches to a cable needle and hold to the back, K2tbl, K2tbl from the cable needle. Wrong side: Slip 2 stitches to a cable needle and hold to the back, P2tbl, P2tbl from the cable needle. Cable 4 Left (C4L): Right side: Slip 2 stitches to a cable needle and hold to the front. K2tbl, K2tbl from the cable needle. Wrong side: Slip 2 stitches to a cable needle and hold to the front. P2tbl, P2tbl from the cable needle.
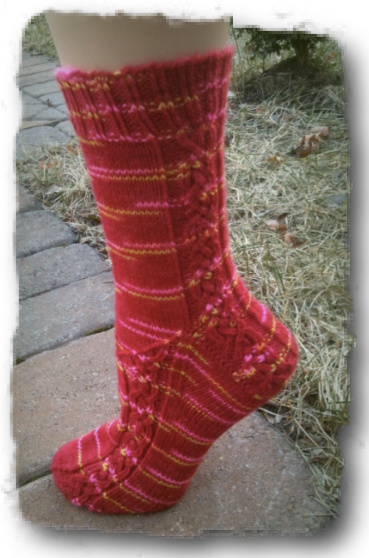
The Red Lady, worked in BDY Achilles, "Fire Folly" Cuff: Cast-on 64 (68, 72) stitches and join for working in the round, being careful not to twist the stitches. Work the ribbing round until the cuff measures 1.5 inches (4cm). Ribbina: IK2tbl. P2l repeat to the end. Leg: Work the leg round until the leg measures 5 (6, 7) inches or 12.5 (15, 17.5) cm. Note which round of the chart you stop with as you will begin the gusset and the heel flap at the same point. Leg Round: \*Work the 18 stitches of The Red Lady Chart, then knit 14 (16, 18) stitches. Repeat from \* to complete the round.
Heel Flap:
Right Sock: The heel flap will be worked back and forth as for flat knitting over the next 32 (34, 36) stitches. Begin with the RIGHT SIDE row. Heel Flap RIGHT SIDE Row: S1, Work stitches 2-18 of The Red Lady Chart, knit 14 (16, 18) stitches. Heel Flap WRONG SIDE Row: S1, Purl 13 (15, 17) stitches, work stitches 18-1 of The Red Lady Chart. Left Sock: Work 18 stitches according to the chart. TURN WORK, the heel flap will be worked on the second half of the stitches. Begin with the WRONG SIDErow. Heel Flap WRONG SIDE Row: S1, Work stitches 17-1 of the chart (working back and forth as for flat knitting). purl 14 (16, 18) stitches. Heel Flap RIGHT SIDE Row: S1, K13 (15, 17) stitches; work the 18 stitches of the chart.
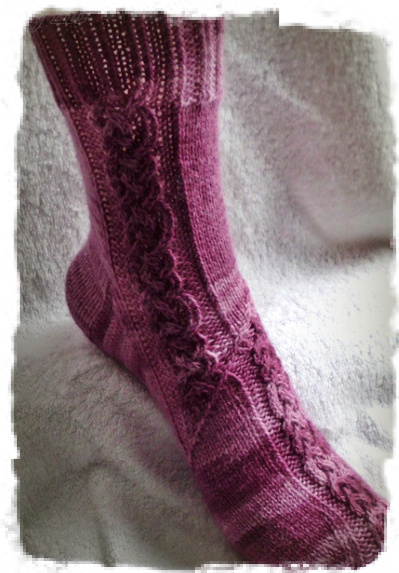
The Red Lady, worked in a hand dyed yarn \*Note: The chart stitches should now be worked back and forth as for flat knitting. The charts all show RIGHT SIDE symbols, when working the wrong side, use P and Ptbl in place of K and Ktbl. Alternate Heel Flap Rows until the heel flap measures 2.5 inches (6cm) or heel flap reaches desired length (additional heel flap length results in a stretchier ankle) Finish the Heel flap after working a RIGHT SIDE ROW. Heel Turn: The heel turn is worked using short rows over the heel flap stitches beginning with a wrong side row. Row 1: S1, P18 (18, 20), P2tog, P1, turn work Row 2: S1, K7 (5, 7), SSK, K1, turn work Row 3: S1, P8 (6, 8) P2tog, P1, turn work Row 4: S1, K9 (7, 9) SSK, K1, turn work Row 5: S1, P10 (8, 10), P2tog, P1, turn work Row 6: S1, K11 (9, 11) SSK, K1, turn work Row 7: S1, P12 (10, 12) P2tog, P1, turn work Row 8: S1, K13 (11, 13), SSK, K1, turn work Row 9: S1, P14 (12, 14), P2tog, P1, turn work Row 10: S1, K15 (13, 15), SSK, K1, turn work Row 11: S1, P16 (14, 16), P2tog, P1, turn work Row 12: S1, K17 (15, 17), SSK, K1 SMALL SIZE STOP HERE. Medium & Large size: turn work Row 13: S1, P16 (18), P2tog, P1, turn work Row 14: S1, K17 (19), SSK, K1 Total stitches 20 (20, 22) Gusset: The gusset returns to knitting in the round. The charted stitches will continue from the last completed leg round. Set-up Round: Using the needle currently holding the heel flap stitches, pick-up and knit one stitch in each slipped stitch along the side of the heel flap; this is now Needle 1. Using a second needle (Needle 2), work the leg stitches in pattern according to the Gusset Chart. Using a third needle (Needle 3), pick up and knit the same number of stitches along the other side of the heel flap AND knit 10 (10, 11) of the heel flap stitches. New beginning of the round. Gusset Round 1: On Needle 1, knit to the last 3 stitches, K2tog, K1. On Needle 2, work the next round of the Gusset Chart. On Needle 3, K1, SSK, knit to the end of the round. Gusset Round 2: On Needle 1, knit all stitches. On Needle 2, work the next round of the Gusset Chart. On Needle 3, knit all stitches. Alternate working Gusset Rounds 1&2 until 64 (68, 72) total stitches remain. \*\*Note: When allthe charted rounds of the Gusset Chart have been worked, continue working the sock in pattern, knitting the stitches in the stockinette section and then working the 18 Red Lady Chart Stitches. Foot: If any Gusset Chart Rounds remain to be worked, complete them. Then, work the sock in pattern using The Red Lady Chart. Foot Round: On Needle 1, knit all stitches. On Needle 2, work all stitches in pattern, knitting the stockinette stitches and following the appropriate chart as needed. On Needle 3, knit all stitches. Work the foot round until the foot of the sock measures 1(1.25, 1.5) inches (2.5, 3, 3.5 cm) shorter than the desired total length. Toe: The pattern band continues along the toe. Right Toe Round 1: On Needle 1, knit to the last 3 stitches, K2tog, K1. On Needle 2, K1, SSK, K to the last 19 stitches, K2tog, work chart in pattern. On Needle 3, K1, SSK, knit to the end. Right Toe Round 2: On Needle 1, knit allstitches. On Needle 2, knit to the last 18 stitches, work chart in pattern. On Needle 3, knit all stitches. Left Toe Round 1: On Needle 1, knit to the last 2 stitches, K2tog, K1. On Needle 2, work 17 stitches according to the chart, SSK, knit the remaining stitches on the needle. On Needle 3, K1, SSK, knit to the end of the round. Left Toe Round 2: On Needle 1, knit all stitches. On Needle 2, work 18 stitches according to the chart, knit remaining stitches on the needle. On Needle 3, K1, SSK, knit to the end of the round. Both Socks: Alternate the appropriate toe rounds 1&2 until 40 stitches total stitches remain. Knit one round.
Finishing:
Using Needle 3, knit the 10 stitches on Needle 1. Break yarn, leaving a longish tail, and work the Kitchener stitch to close the toe. Lightly block if desired.
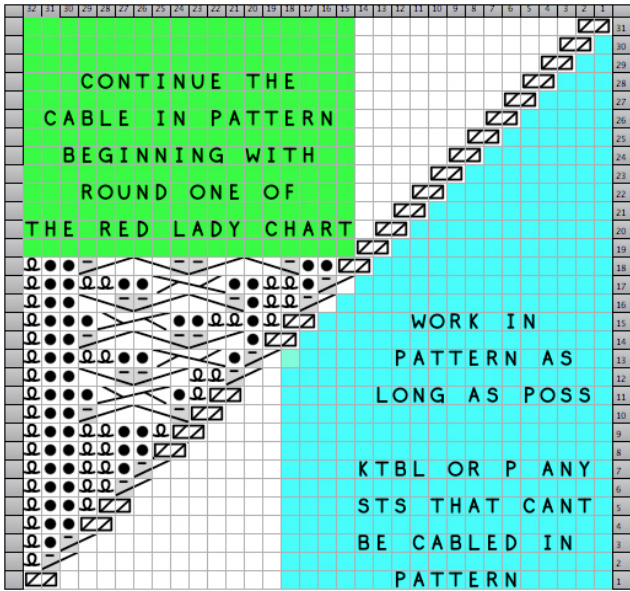
SMALL SIZE Charts:
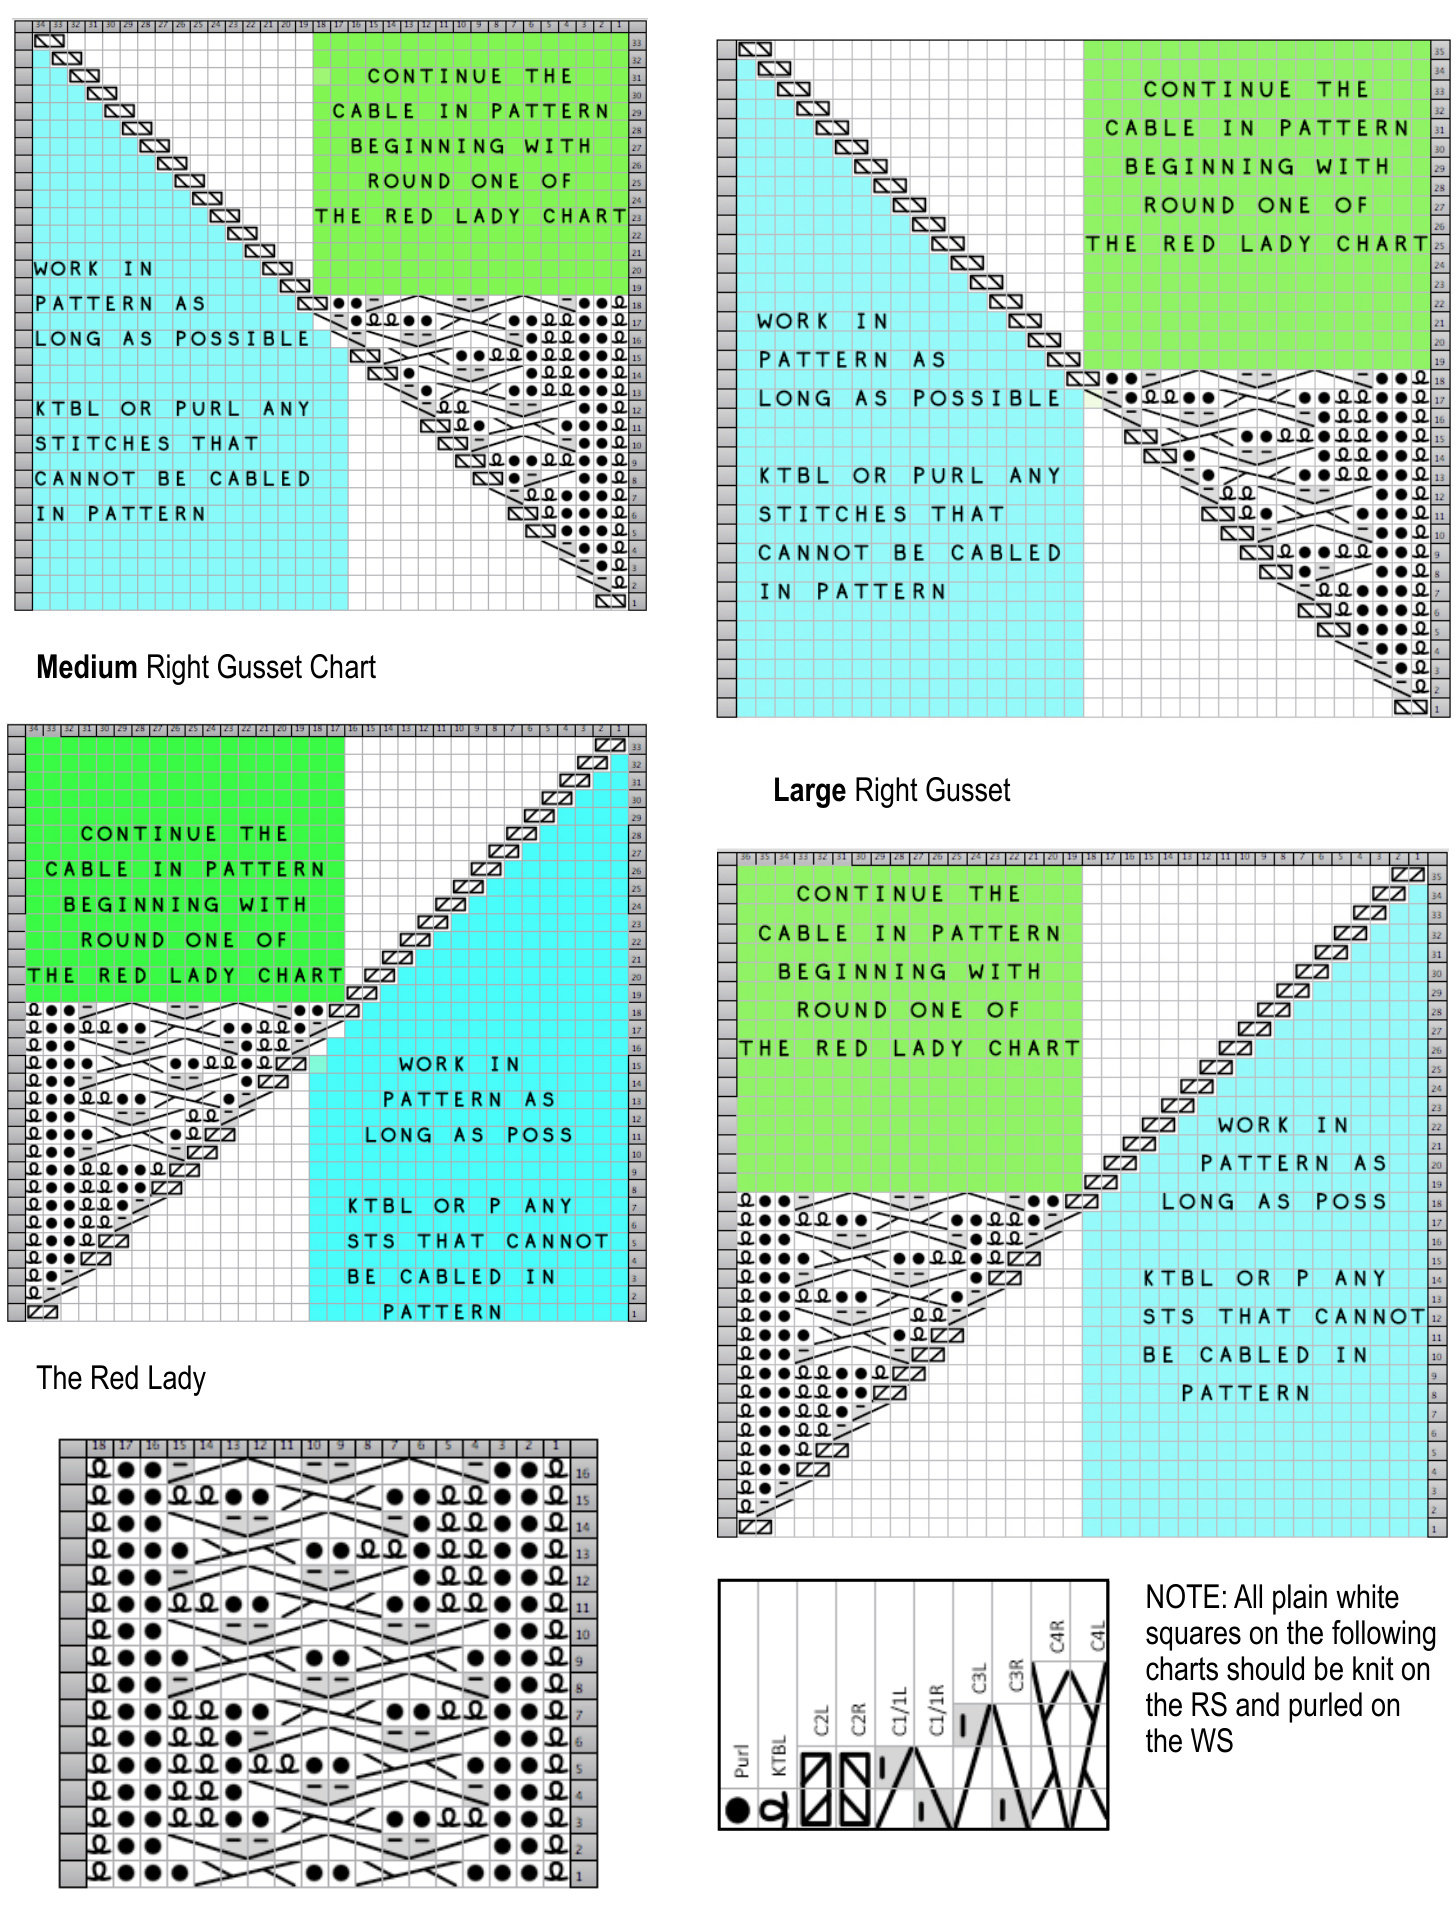
The Red Lady Chart
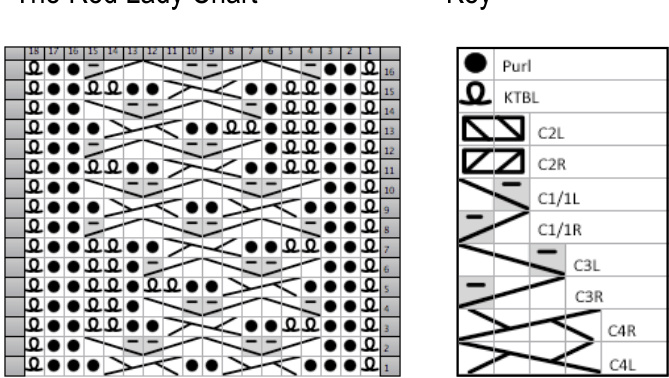
NOTE: All plain white squares on the following charts should be knit on the RS and purled on the WS:
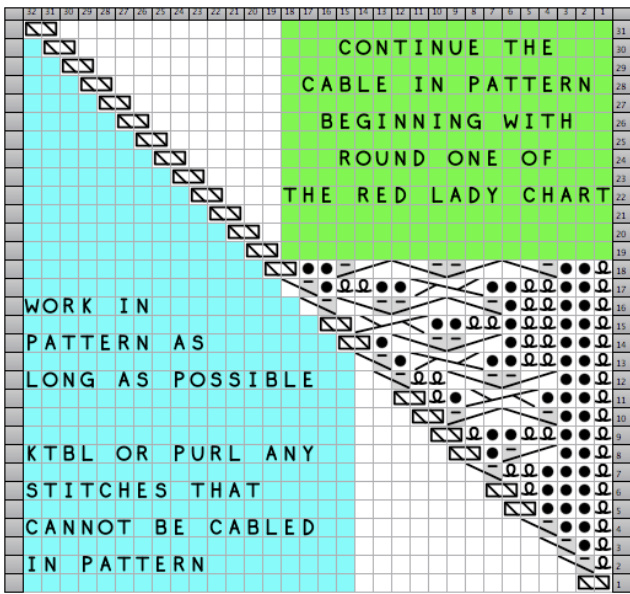
Small Left Gusset Chart Small Right Gusset Chart