Solid Socks January / February 2010 Mystery
CLUE1 Sizes: Small (Medium, Large) Gauge: 36 stitches and 45 rows in stockinette over 4 inches with $2.5\;\mathrm{mm}$ needles. 32 stitches and 44 rows in stockinette over 4 inches with $2.75~\mathrm{mm}$ needles. Materials: Yarn: Fingering Weight in Solid or Semi Solid 370 to 400 yards Cable needle 2 Stitch markers Needles: 2 Circular $2.75\mathrm{mm}$ needles 2 Circular $2.5~\mathrm{mm}$ needles
Abbreviations
K Knit P Purl St Stitch SSK Slip, Slip, Knit K2tog Knit two together P2TOG Purl Two together RC Right Cable LC Left Cable S1 Slip CN Cable Needle RS Right Side WS Wrong Side Cast on 72 (72, 84) stitches with the $2.75\;\mathrm{mm}$ needles. Divide the stitches evenly between the two needles.
Purl the first row.
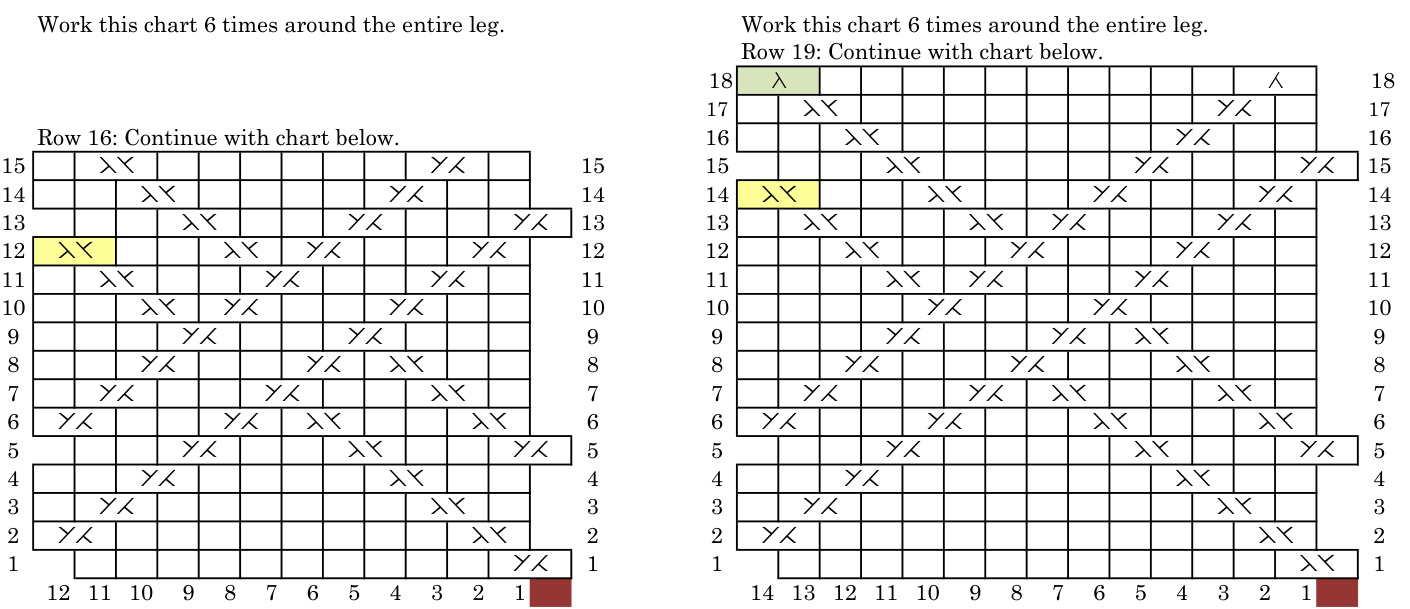
Work 10 rows of K2, P2 ribbing. Knit 5 rows of stockinette. DO NOT knit the very last stitch of the fifth row but move it to Needle 1 and begin chart. The chart is repeated 6 times around the entire leg of the sock. You will need to adjust the stitches at the end of the needles on several rows. These stitches are needed as part of a cable on the following row. Once you complete the charts, center the pattern on the needles again by moving the first stitch on each needle back to the other needle (so the cable straddles the needles). Knit this stitch on Needle 2 so all stitches are worked. NOTE: This is the tightest part of the pattern. Try it on when completed to be sure it will go over your ankle. The rest of the pattern is much looser. There are now 64 (68, 72) stitches.
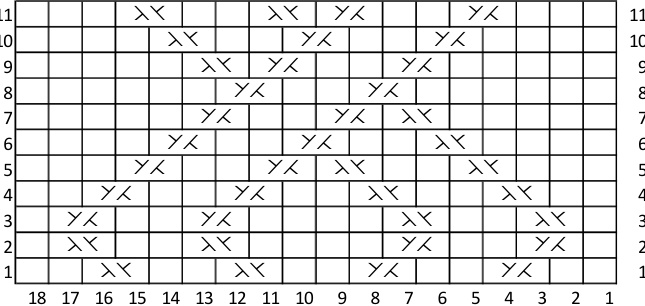
Solid Socks January/February Mystery Clue 1 Charts.
Small and Medium Leg Chart
For this column, the 1st cable on the needle willbe worked over the first st on that Needle, and last st on the previous Needle. Knit K21OG RC - Put first stitch on CN and hold in back, K next stitch, K stitch off CN LC - Put first stitch on CN and hold in front, K next stitch, K stitch off CN. These stitches are included in the pattern rep, EXCEPT on last repeat: Cross the cable and only Kthe Ist ST of the cable, move 2nd ST to Needl 1 and work as part of 1st cable on row 13 (15). This stitch is included in the pattern rep, Except on the last repeat. Instead of an SSK, Slip the two stitches, then pass the first ver the second (one stitch reduced) and move ST to Needle 1 and cross as nart of 1st cable on row 19.


Solid Socks
January / February 2010 Mystery
CLUE 2
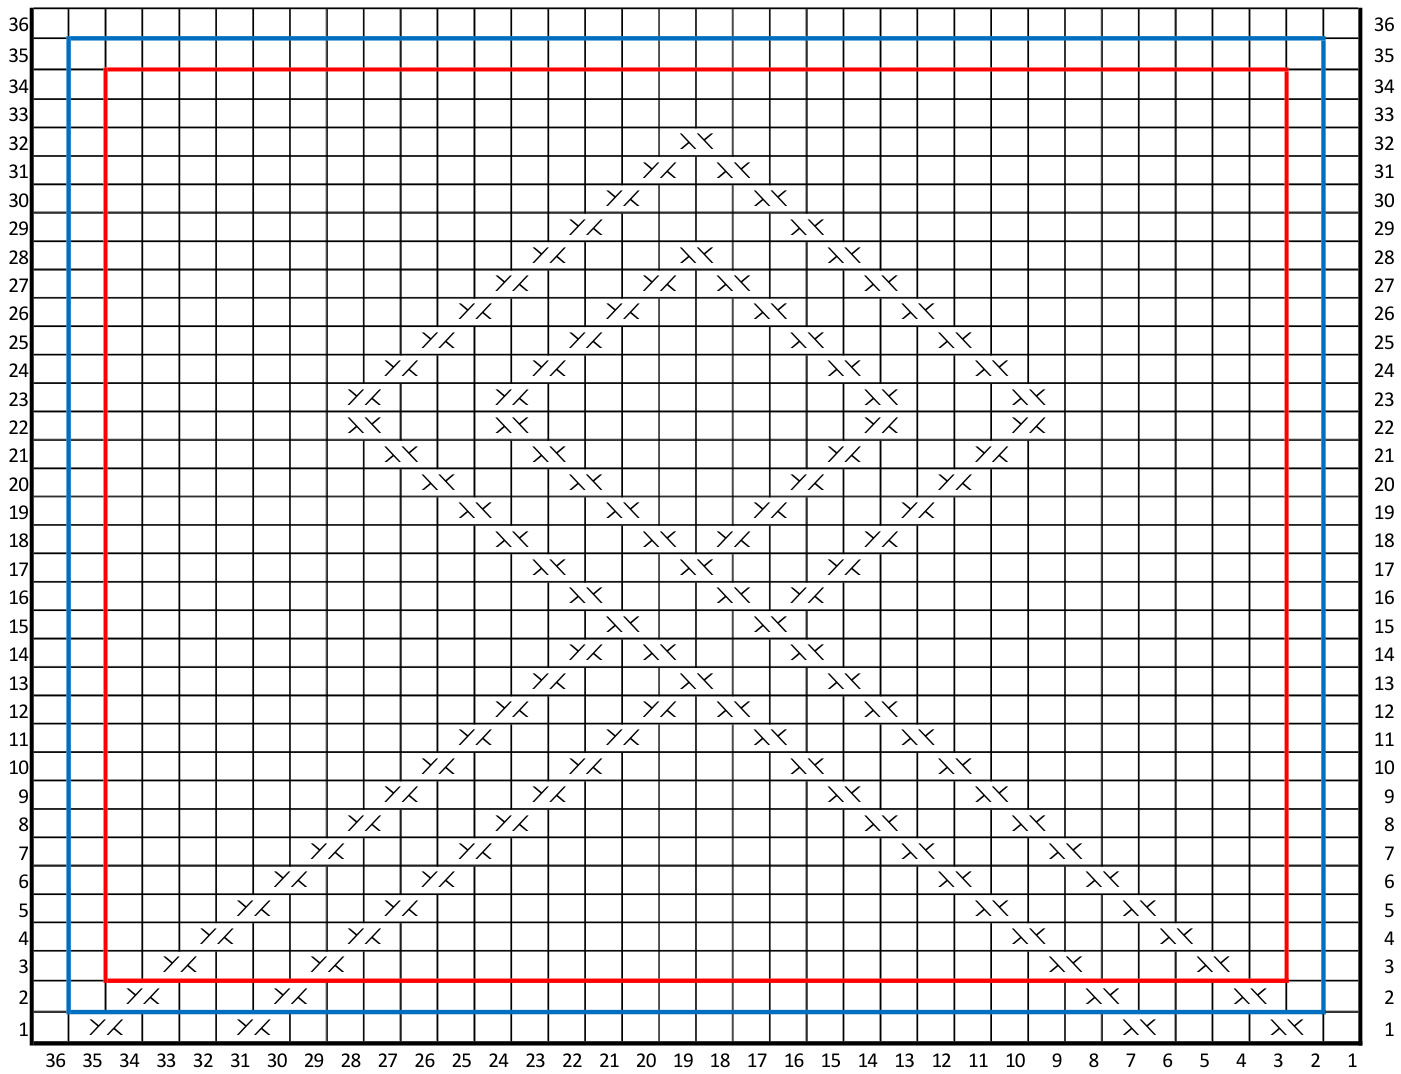
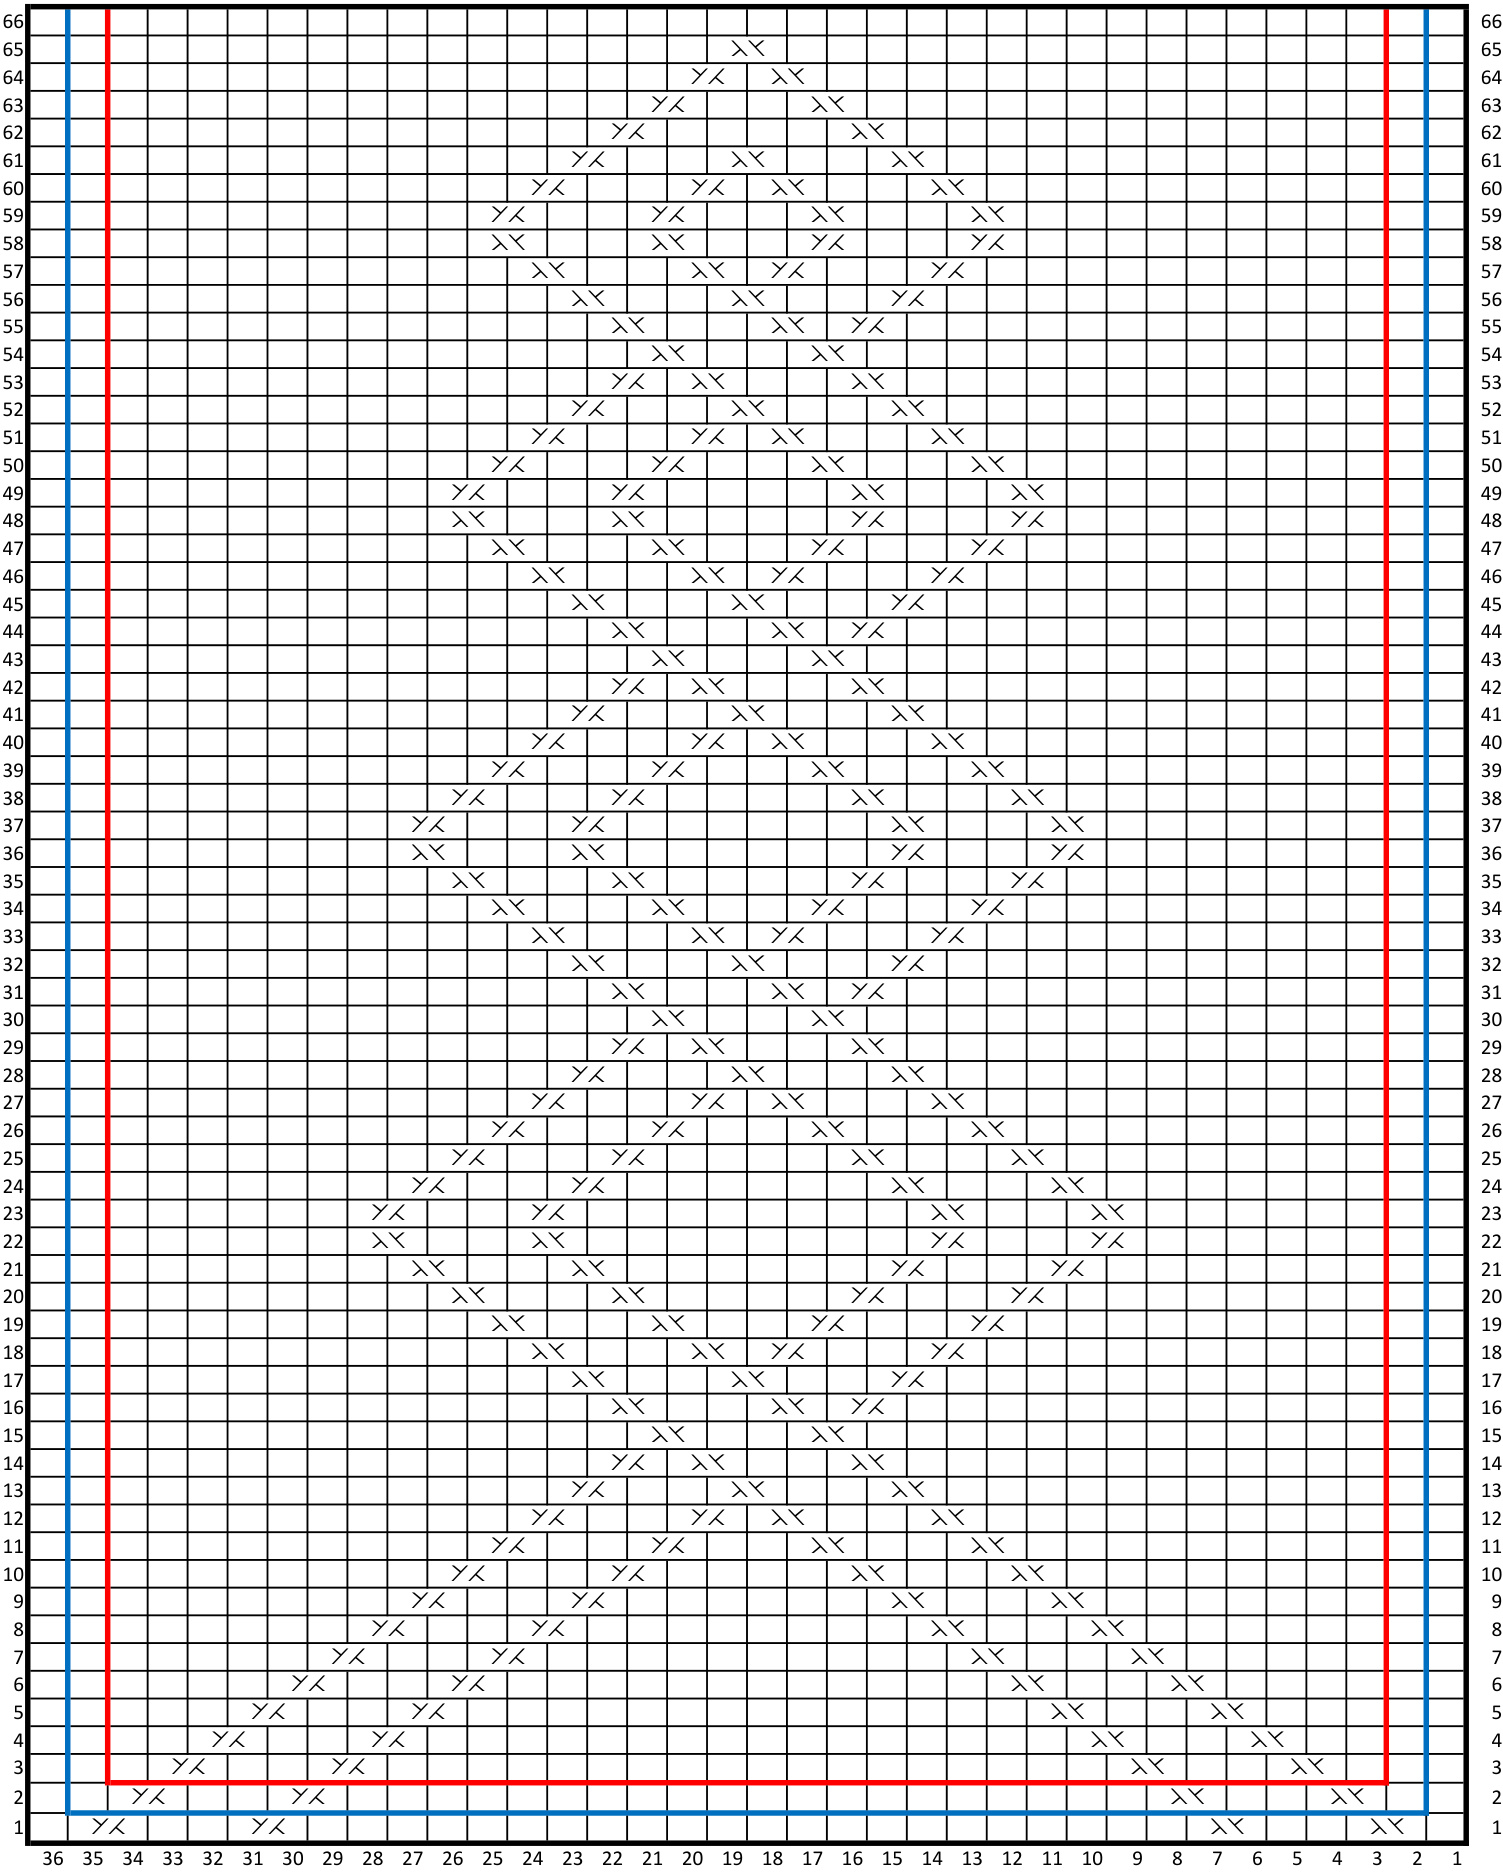
Reminder: There are now 64 (68, 72) stitches. The first stitch on needle one should be the second half of the last cable. This will make Clue 2 align with Clue one. Switch to smaller needles. K 7 (8, 9), place marker. Begin working Leg Set Up chart for Needle 1. After the chart, K the last 7 (8, 9) stitches. On Needle 2, K 7 (8, 9), place marker, work Leg Set Up chart for Needle 2. After the chart, K the last 7 (8, 9), stitches. Knit the stitches before the place marker and after the chart on all rows of this clue. Begin Large size on Row 1 and Small and Med on row 2. After you have completed the Set Up charts work the Needle 1 and Needle 2 Leg pattern charts three times.
CHARTS
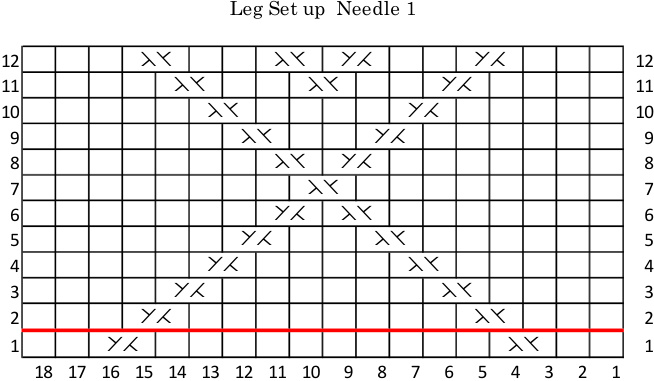
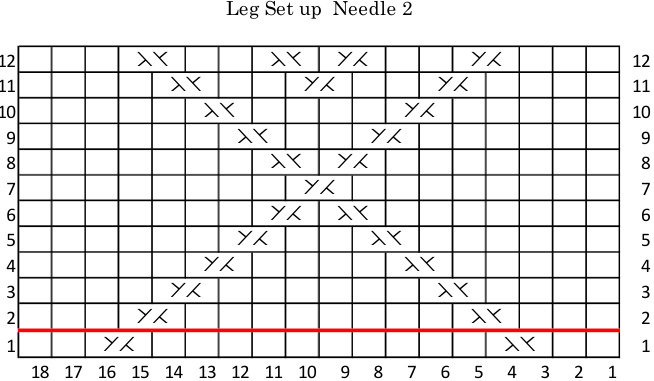
Knit Y人 RC - Put first stitch on CN and hold in back, K next stitch, K stitch off CN 入Y LC - Put first stitch on CN and hold in front, K next stitch, K stitch off CN. Begin Small and Medium
Remove the stitch markers on the last round.
End of Clue 2.
Solid Socks
January / February 2010 Mystery CLUE 3
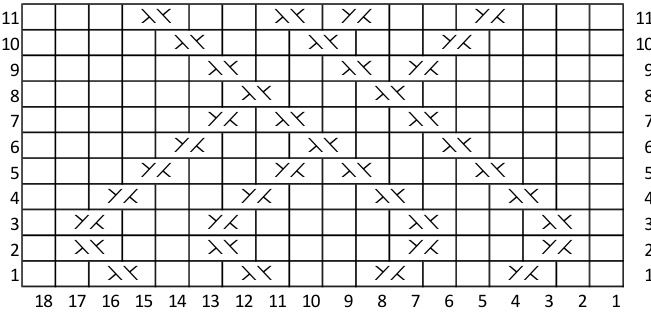
To begin the heel, rearrange the stitches as follows. Knit 10 (11, 12), Slip 1, Knit 3, Slip 1, Knit 1 onto Needle 2. Move the first 16 (17, 18) stitches from Needle 2 to Needle 1. The cables worked in clue 2 are now on the sides of the sock. The heel flap will be worked with the following chart on Needle 2. NOTE: The first stitch of each row will be slipped on the heel flap (Right side and Wrong side). This is for ease of picking up stitches when you begin the gusset. Remember this is flat knitting. The chart is a mirror image so if you forget you will get the same effect. This is cables on a stockinette background.

Knit on the Right side, Purl on the Wrong side. RC- RS (WS)- Put first stitch on CN and hold in back of work, K(P) next stitch, K(P) stitch off CN LC - RS (WS) - Put first stitch on CN and hold in front of work, K(P) next stitch, K(P) stitch off CN.
Heel turn
Row 1: (Wrong Side) Sl 1, P 18(18, 20), P2TOG, P1, turn. Row 2: (Right Side) Sl 1, K 7(5, 7), SSK, K1, turn. Row 3: Sl 1, P to 1 stitch before gap, P2TOG, P1, turn. Row 4: Sl 1, K to 1 stitch before gap, SSK, K1, turn. Repeat rows 3 and 4 until all stitches have been worked. There will be 20 (20, 22) stitches left on the heel needle.
End of Clue 3
January / February 2010 Mystery
CLUE 4
Gusset
Pick up and K 16 (17, 18) stitches on the right side of heel flap. Begin knitting in pattern from the chart on instep, and then pick up and K 16 (17, 18) stitches on the other side. K 10 (10, 11), place marker. This is the center back and is now where each round starts. Place marker if desired. Round 1: K until 3 St before the end of Needle 2, K2Tog, K1. Continue pattern across Needle 1. On Needle 2 K1, SSK, knit to center back marker. Round 2: K all St on Needle 2. K in pattern on Needle 1. K St on Needle 2 to center back marker. Repeat rounds 1 and 2 until you have a total of 64 (68, 72) stitches. Remove stitch marker.
Foot
Work in pattern from chart. Once chart in finished continue in stockinette until foot measures $2^{\circ}$ less than desired length. Begin Toe Decreases. Note: on the smaller sizes you may need to start the toe decreases before you complete the chart. Check the size as you are knitting.
Toe Decreases
Round 1: Knit until 3 stitches before the end of needle 2, K2Tog, K1. On Needle 1 K1, SSK, K to 3 stitches before end of needle K2Tog, K1. On Needle 2 K1, SSK, K to center back. Round 2: Knit all stitches on needle 2; Knit across all stitches on needle 1 and Needle 2 to center back marker. Continue in rounds 1 and 2 until there are a total of 28 stitches (14 on each needle). Then knit Round 1 only until there are a total of 16 stitches, (8 on each needle). Cut a long tail and graft the stitches together. Weave in ends.
Knit RC-Put first stitch on CN and hold in back,K next stitch, K stitch off CN LC - Put first stitch on CN and hold in front, K next stitch, K stitch off CN. Small Size Large Size


