WASTL
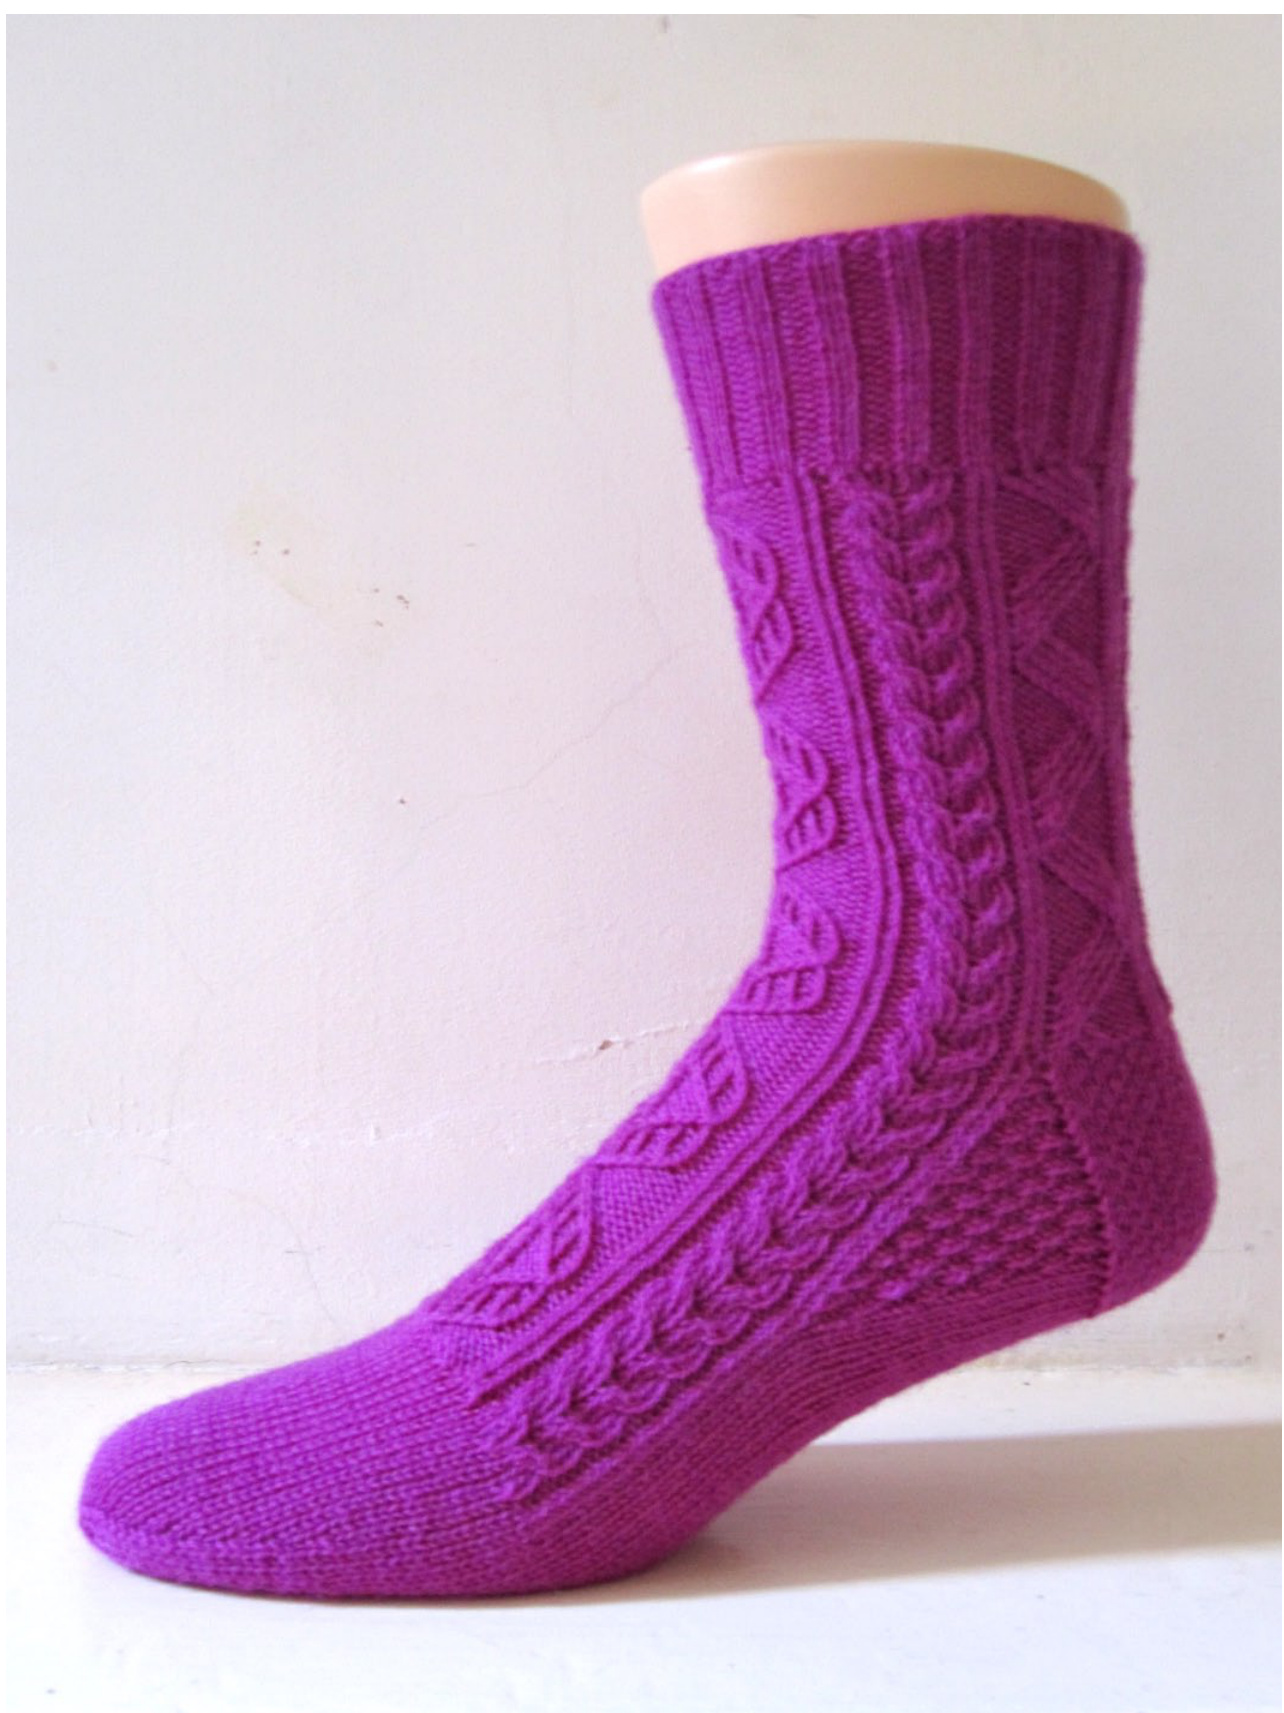
These socks use a combination of various traditional Bavarian patterns, and because there is an almost infinite number of ways these can be combined I have provided 2 different versions. You can knit both socks the same or knit a fraternal pair - please make sure you also read the suggestions at the end to see more possible ways to customise your socks.
Size:
Because of the complexity of the charts I have only provided one size that represents a medium and should therefore fit most people. However, if you have a look at the charts you can see that it would be very easy to add extra stitches in the columns of two twisted stitches that separate the individual designs should you need to make the sock bigger. You will also have the chance to adjust your stitch count when it comes to the gusset and foot section by decreasing the foot portion to either more or less than the 32 stitches that I have used. The stitch count of 82 sts for the leg may seem a lot, but both the twisting and the cables draw in a lot, and I personally like these patterns better if the sts are not stretched too much, as this makes the cables look more 3 dimensional. If you would knit a plain vanilla sock with around 64 sts these should be fine for you.
Material:
Precise amounts of yarn will always depend on the length of the leg and the size of the foot, but broadly speaking you should be ok with around 100 gr / 400 mtrs of sock yarn (4 ply / fingering weight). The high stitch count will use up a fair amount of yarn, though, so you may need more than one skein for very large socks. For a size 42/43 I have used about 90 gr.
Needle size:
2.5 mm or size needed to get the right dimensions. This design can equally be knit on circulars or DPN's, use what you are most comfortable with and what works best for you, the instructions will assume that you are working on either two circular needles or magic loop.
Further requirements:
Tapestry needle Stitch markers (although you could do it without if they irritate you)

Cuff:
Using your cast on method of choice, cast on 80 sts. Close to a round, taking care not to twist the sts. You should have 40 sts on each needle. Rib: K1, [P2, K2] to last st, K1 Work in 2x2 rib for as long as you prefer, my sample has 24 rounds. I would suggest that you should work a minimum of 12 rows to give you a solid base for the cable design.
Leg:
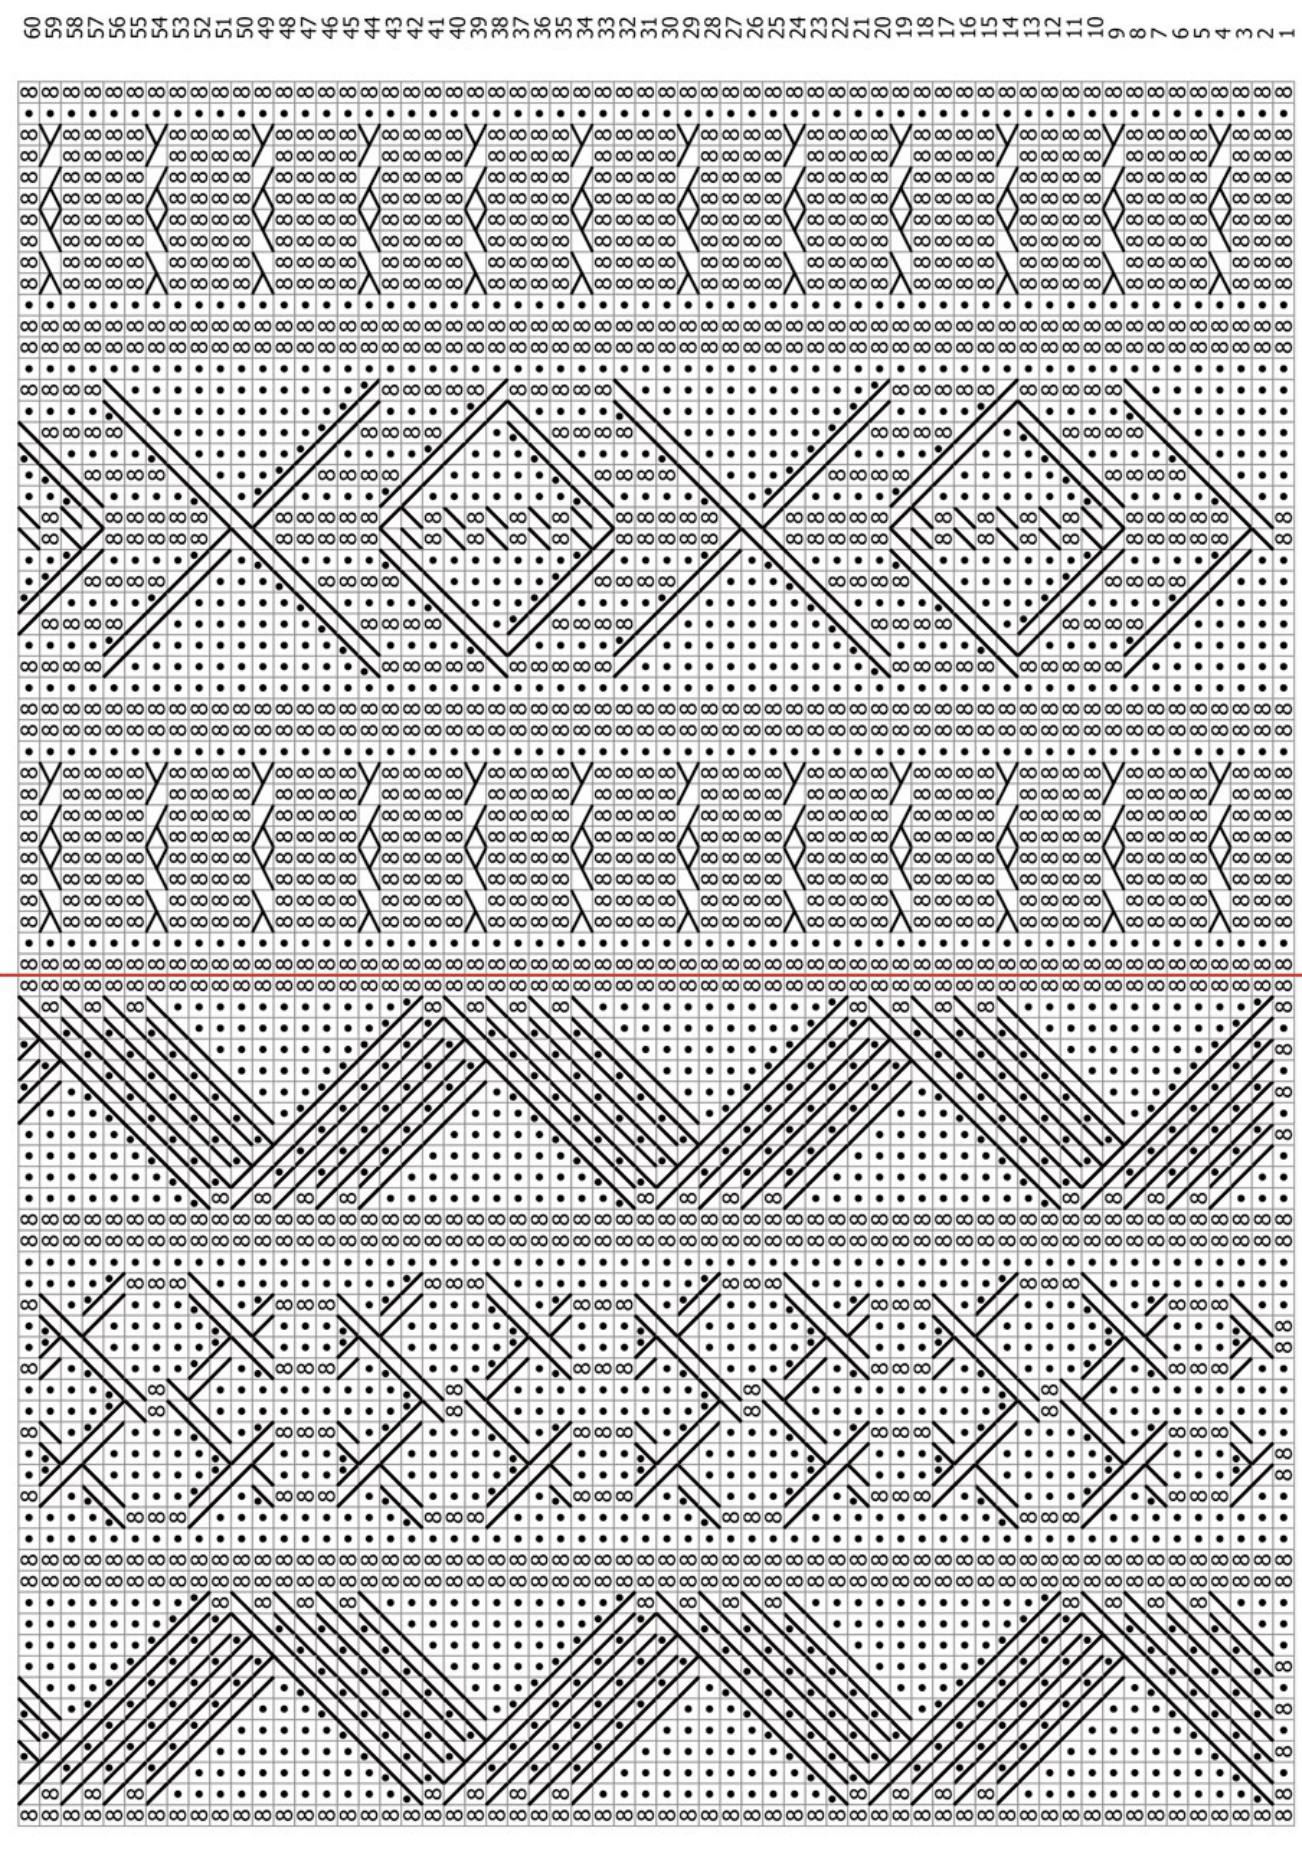
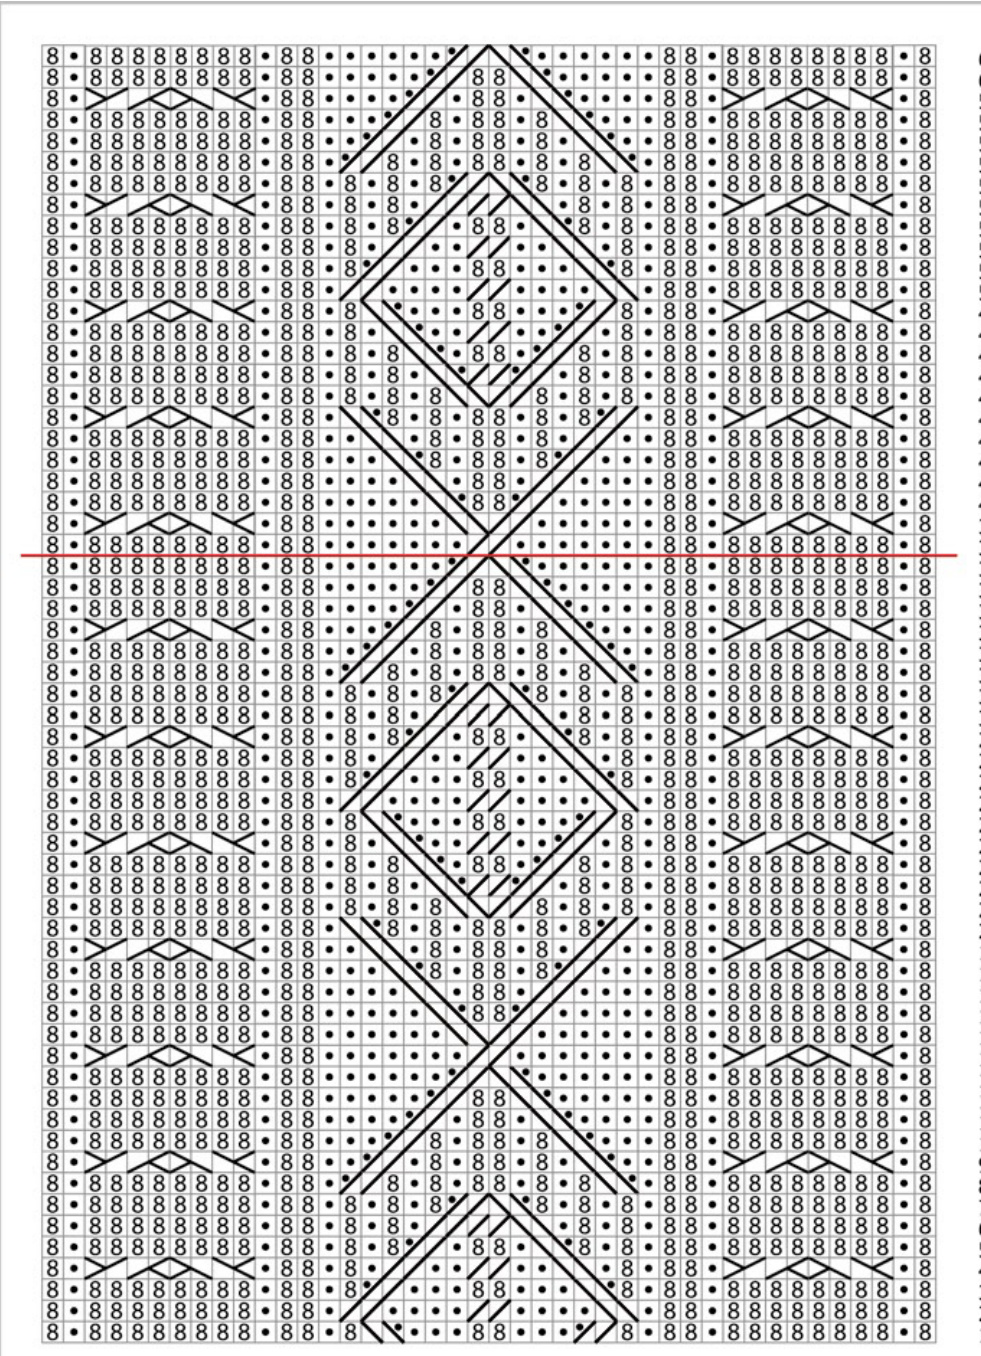
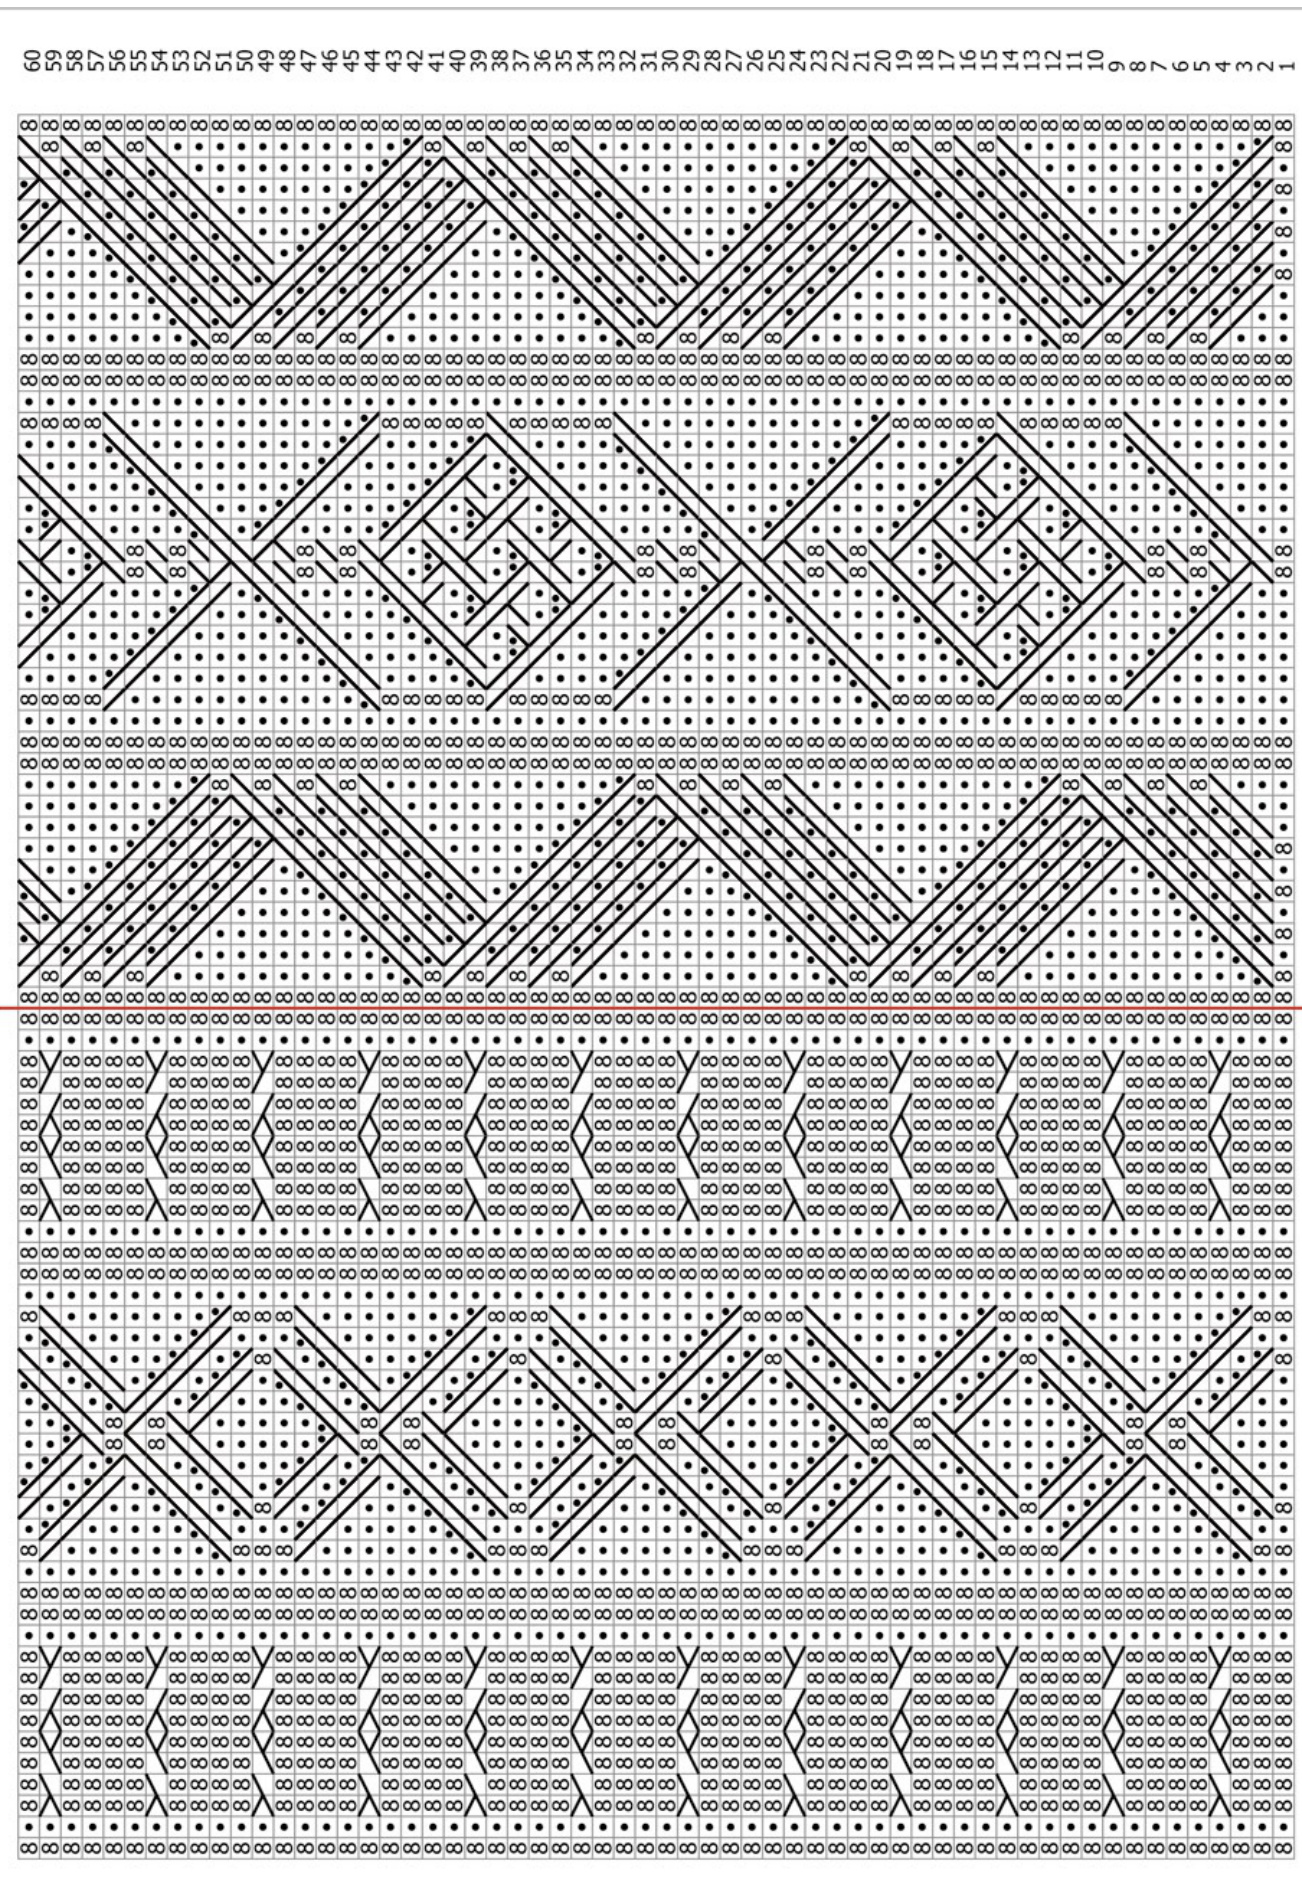
On needle 1: K2, M1, k to last 2 sts, M1, K2 On needle 2: K (82 sts) Work the leg according to the desired leg chart; the red line denotes the split between needle 1 and needle 2. If you are working on DPNs, make sure your splits lie within the 2 st columns to avoid having to cable across a needle divide. Unfortunately, the different designs have different pattern repeats, so if you want to knit the leg portion shorter or longer than the 60 rows that I have charted then you can certainly do this, but you will need to pay close attention to where you are within the various pattern repeats and adjust the foot chart accordingly later on.
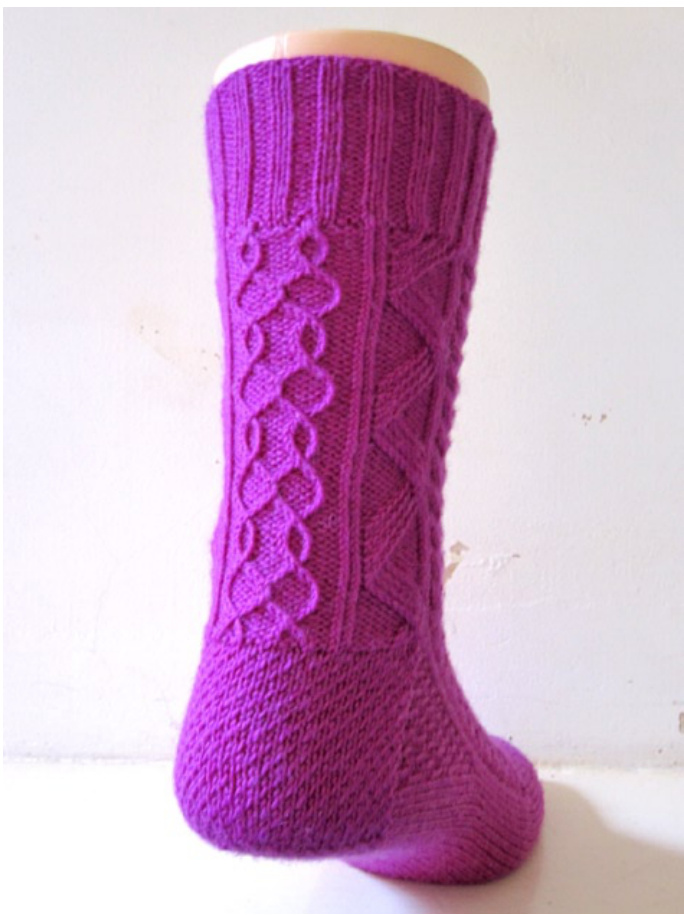
Heel:
I have chosen an Eye of Partridge Heel, as I wanted a relatively flat heel section to complement the complex cables. If you want a more pronounced structure, you can slip the stitches knitwise, otherwise slip them purlwise for a more subtle pattern. The heel is worked over the sts on needle 2, leaving the sts on needle 1 for the instep., so turn the work to start with a WS row. In the first WS row you will decrease the 40 sts to 36. Decrease row: Sl1, P3, [P2tog, P8] 3 times, P2tog, P4, turn Row 1: Sl2, [K1, SL1] to last 2 sts, K2, turn Row 2: Sl1, purl to end, turn Row 3: [Sl1, K1] to end, turn Row 4: Sl1, purl to end, turn Repeat these last 4 rows until you have worked a total of 39 rows (including decrease row), ending with a Ws row. You can make the flap shorter or longer, but this will effect the number of sts you can pick up for the gusset, so this will need to be taken into account when you come to the gusset. Turn the heel as follows: Row1: [SL1, K1] 9 times, K1, SSK, K1, turn (leaving 14 sts unworked) Row2: Sl1, P3, P2tog, P1, turn (again leaving 14 sts unworked) Row3: Sl1, K to 1 st before gap, SSK, K1, turn Row4: Sl1, P to 1 st before gap, P2tog, P1, turn Repeat rows 3 and 4 until you have used up all the sts either side. You should be ready to work a K row, with 20 sts on your needle.
Gusset:
For the gusset and the foot, the beginning of the round will be in the centre back. If you split the sts evenly over your needles it will mean that you have the split in the centre of the foot chart, and therefore you would have to shift the sts around a bit whenever there is a cable in the very centre. To avoid this, you could introduce a third needle to hold all of the instep sts, or you could position the divide between needle 1 and needle 2 in the 2 st column just before the centre motive; do what feels most comfortable for your way of working (this problem doesn't occur when working on DPNs, of course). With needle2, K10 (this is the new beginning of the round) Pick up and K 1 st in each of the slipped stitches all the way down the heel flap to the instep. You should pick up half the number of sts that you have knitted rows in your flap, i.e. 20 sts for a 39 row flap (rounding up). M1 st in the gap between the flap and the instep sts, place a stitch marker, work across half your instep sts according to row 1 of the foot chart. (see comments above) With needle2, work across the remaining instep sts according to chart, place a second marker, M1 in the gap between the instep and the flap. Pick up and K one st in each of the slipped sts up the second side of the heel flap, taking care to pick up the same number as on the other side. K remaining 10 sts to centre back. I am working the sole to a final st count of 32 sts, so I will have 16 sts between centre back and instep; if you would like to work with less or more sts for the sole calculate half that number and K one st less at the beginning and end of Round1. So if you would like to end up with 36 sole sts, start Round 1 with K 17 instead. Round1: K 15, [P1, K1tbl] until 2 sts before the instep marker, K2tog twisted. work across instep to second marker, K2tog tbl, mirror the rib from the other side until you have 15 sts left, K to end Round2: work without decreases, keeping the gusset in rib as established (see below) and working the instep according to chart. Please note that the first and last st of the sole are twisted and should beworked tbl. Repeat these two rounds, but shift the gusset sts between P and Ktbl every 3 rounds to create an elongated moss st design until you have decreased all of the gusset sts and are left with 32 sts for the sole (or your personal desired amount) and 42 sts for the instep.
Foot:
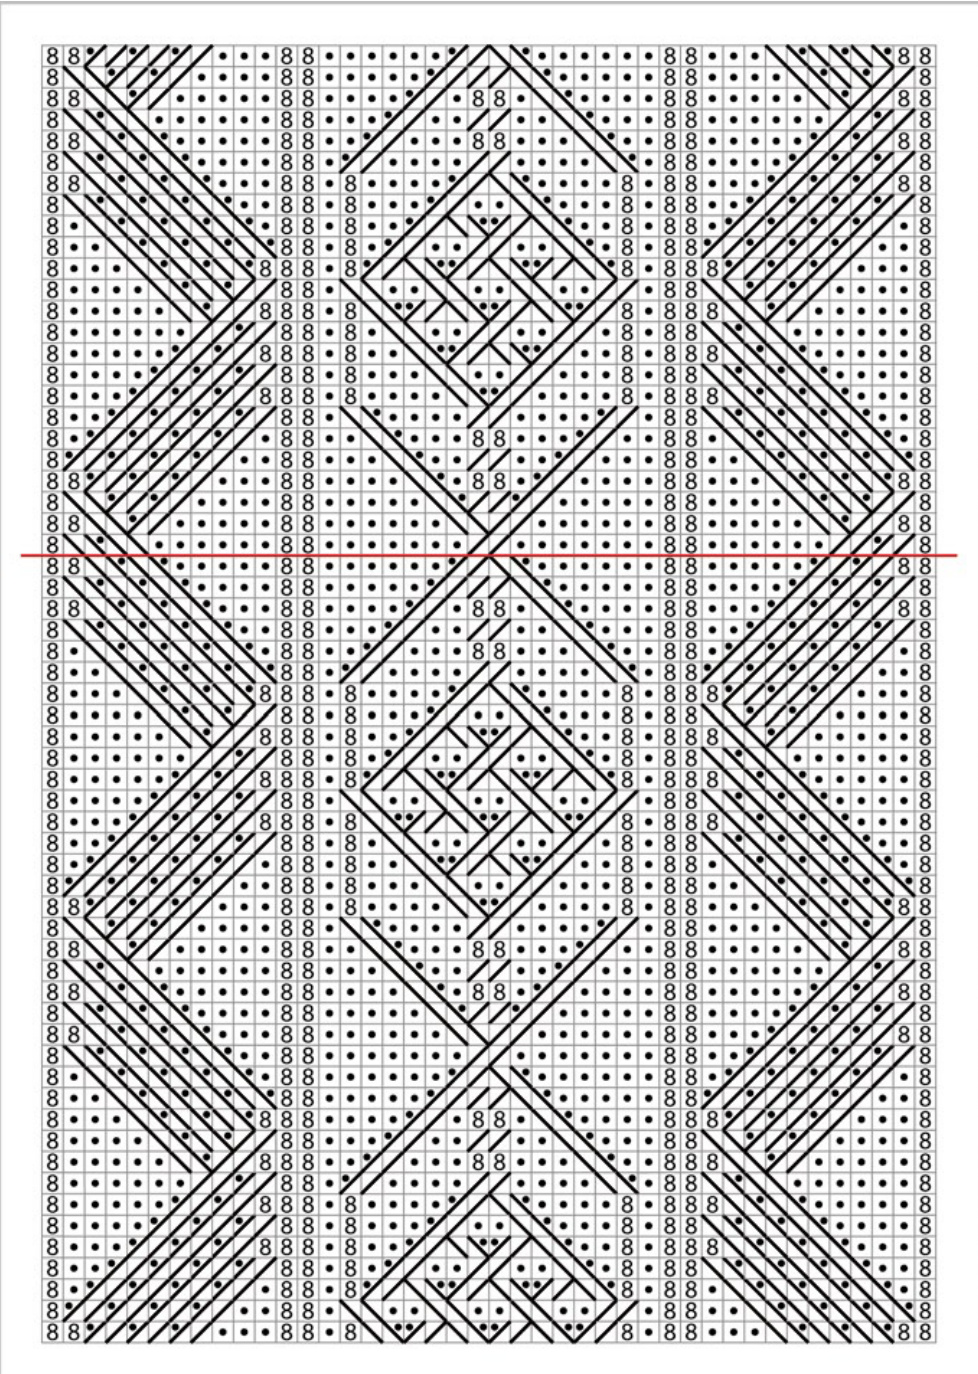
Continue without decreases, knitting the sole sts and working the instep according to chart, until you have finished row 61 of the foot chart. If you have a very short foot, you could stop at row 37 instead. In fact, you can stop after any row you like, but it will look best if you have just finished one of the main central motives. Now decrease you instep sts as follows: K18, [SSK, K2] 5 times, [K2tog, K2] 5 times, K16 (64 sts) If you are working with a different number of sole sts you will need to adjust your decreases accordingly. Continue working plain K rounds until you are ready to work the toe; this will be around 2 inches / 5 cm before you have reached your desired foot length.
Toe:
To place your markers for the toe decreases (if you prefer to use them), work first round as fol lows: K 13, K2tog, K1, place marker, K1, SSK, K 13. Repeat on Needle2 Round2: K Round3: K Round4: K Round5: [K to 3 sts before marker, K2 tog, K1, sl marker, K1, SSK, K to end] on each needle Round6: K Round7: K Round8: as Round 5 Round9: K Round10: K Round11: as Round5 Round12: K Round13: as Round5 Round14: K Round15: as Round5 Round16: K Round17: as Round5 Keep working Round 5 until you have a total of 16 sts. With a DPN, K 4 sts from needle1. Move the remaining 4 sts from needle1 and the first 4 sts from needle2 onto a second DPN. Move the last 4 sts from needle2 onto the first DPN. Cut yarn, leaving about 10 inches / 25 cms and graft the toe closed. Turn sock inside out and darn in both loose threads.
Further suggestions:
It is very easy to substitute other types of heel if you prefer, just work it instead of the flap + gusset heel described here. You could work the gusset plain or in any alternative pattern you prefer; a simple 1x1 twisted rib would work equally well. Just follow the instructions as written and do not shift every 3 rounds. For more options, you could combine the back of version A with the front of Version B or vice versa, or substitute your personal favourite cable design from a stitch dictionary, as long as you maintain the overall st count. You could probably run the design all the way into the toe, but you will have to incorporate the extra decreases somewhere.
Glossary:
St, sts stitch, stitches K knit P purl SI slip M1 Make one new sts by lifting the strand between two sts and knitting it tbl tbl through the back loop K2tog knit 2 stitches together K2tog twisted slip 1 st purl wise, slip 1 st as if to Ptbl, put both sts back onto left needle and K2tog. SSK slip, slip, knit. Slip 2 stitches separately as if to knit, insert left needle into these two stitches from the right and knit onto right needle. P2tog purl 2 stitches together WS, RS Wrong Side, Right Side
Glossary of symbols used:

knit through the back loop C1B: put next st onto a cable needle and hold at the back of work. K1tbl, K1tbl from cable needle, or cable without a cable needle. ↑ CP1B: put next st onto a cable needle and hold at the back of work. K1tbl, P1 from cable needle, or cable without a cable needle.

C1F: put next st onto a cable needle and hold at the front of work. Kitbl, K1tbl from cable needle, or cable without a cable needle.
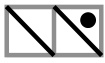
CP1B: put next st onto a cable needle and hold at the front of work. P1, Kitbl from cable needle, or cable without a cable needle.
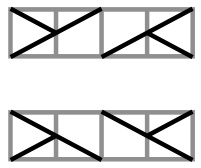
C2B: put next 2 sts onto a cable needle and hold at the back of work. K2tbl, K2tbl from cable needle, or cable without a cable needle. C2F: put next 2 sts onto a cable needle and hold at the front of work. K2tbl, K2tbl from cable needle, or cable without a cable needle.
LEG CHART VERSION A
FOOT CHART VERSION A
LEG CHART VERSION B
FOOT CHART VERSION B
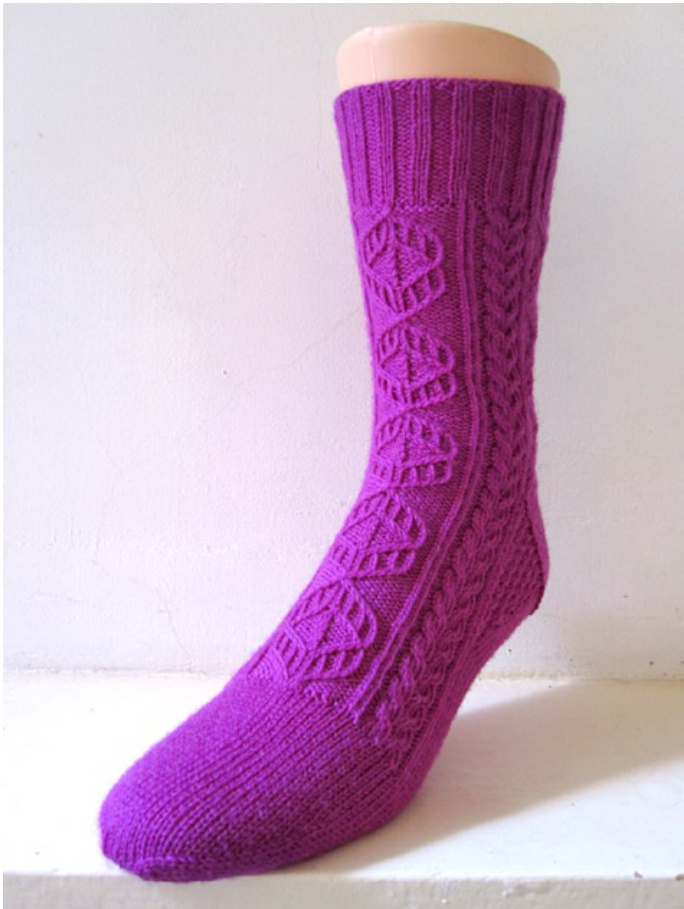

VERSION A
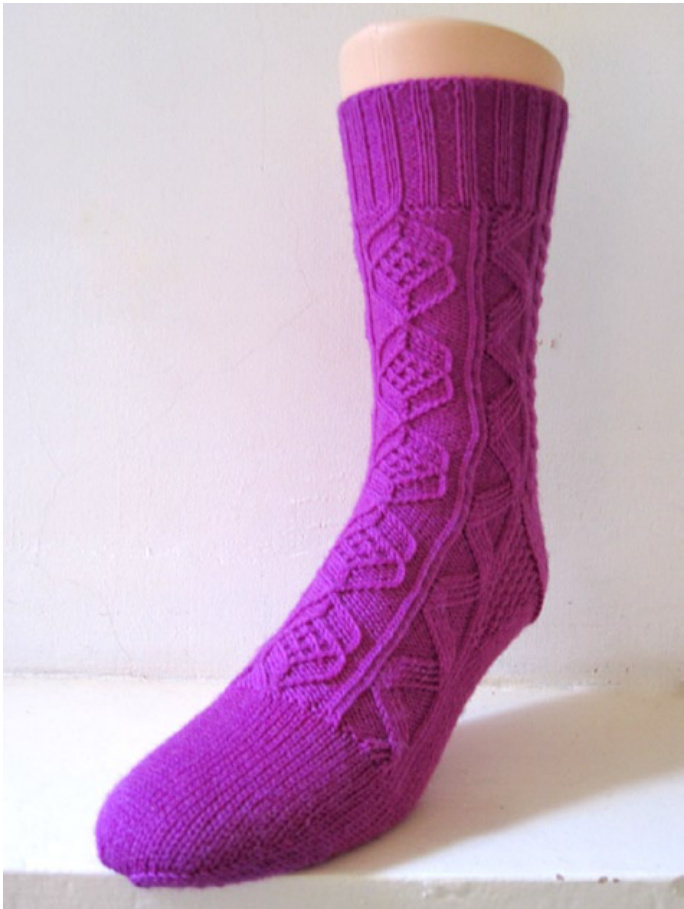

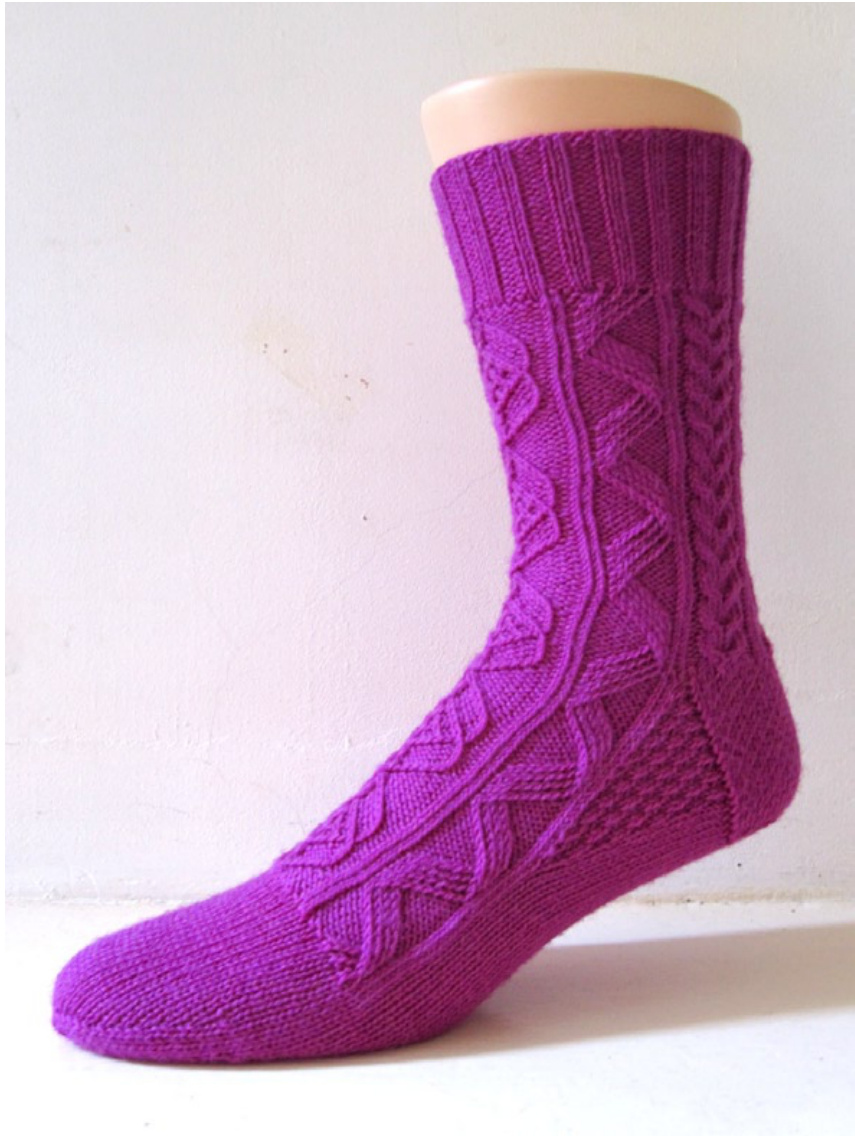
VERSION B


