Do It Yourself Mittens Oct. 2009 Designed by String Theory 2.0 http://stringtheory2.blogspot.com
Did you fall victim for the mid 20oo's craze for space dyed sock yarn? Do you have a metric ton of cool space dyed-yarn but not enough to do anything with? This pattern is a blank for you to design your own mittens--men's, women's, kid's. Make them as complicated or as basic as you like, lots of colors or just two! Print off as many copies of Pages 2 and 3 as you want and start drawing-fair isle, simple stripes or draw your own pictures, animals, flowers, anything you like! You can work these with lined cuffs (l recommend part silk for softness) and they're designed long enough so you can tuck them up under your coat sleeves. I've included directions for “traditional"' cuffs also. Advice on carrying colors, with pictures, available
from http://www.ehow.com/how_2221040_knit-twocolor-pattern.html. \$ize: Child's medium (Women's smal/medium, Women's medium/large, Men's medium).
Materials:
Size 2 and 3 double pointed needles (or circular if you do socks and mittens the magicneedleway) Yarn A: 1/2 skein Knitpicks Gloss yarn OR 1/4 hank of Gloss Bare spaced dyed (you can dothis yourselfwith food coloring orKoolAid) (orequivalent fingering weight yarn containing at least 30% silk or cottonforsoftness) Yarn B: 1 ball Knitpicks Palette yarn (or equivalent fingering weight yarn)
Gauge:
Yarn A on size 2 needlles 7 sts per inch straight st. Yarn B on size 3 needlles 7 sts per inch straight st. Gauge overcolor work should be about 6 sts per inch,but keeping your work evenly tensioned is more Traditional cuffs: Cast on 48 (54, 62, 72) stitches with Yarn B on smaller needles , divide stitches evenly amongst 3 needles and join without twisting. Work k2, p2 ribbing for 25 (30, 30, 34) rounds. Next RowChngetolarge needes and knit one round nrese4 (6, 6,8stithes during this round; equals 52(60,68) stitches total. Now go to \*\* and follow pattern from there.
Directions-- Hand, front and back with lined cuff:
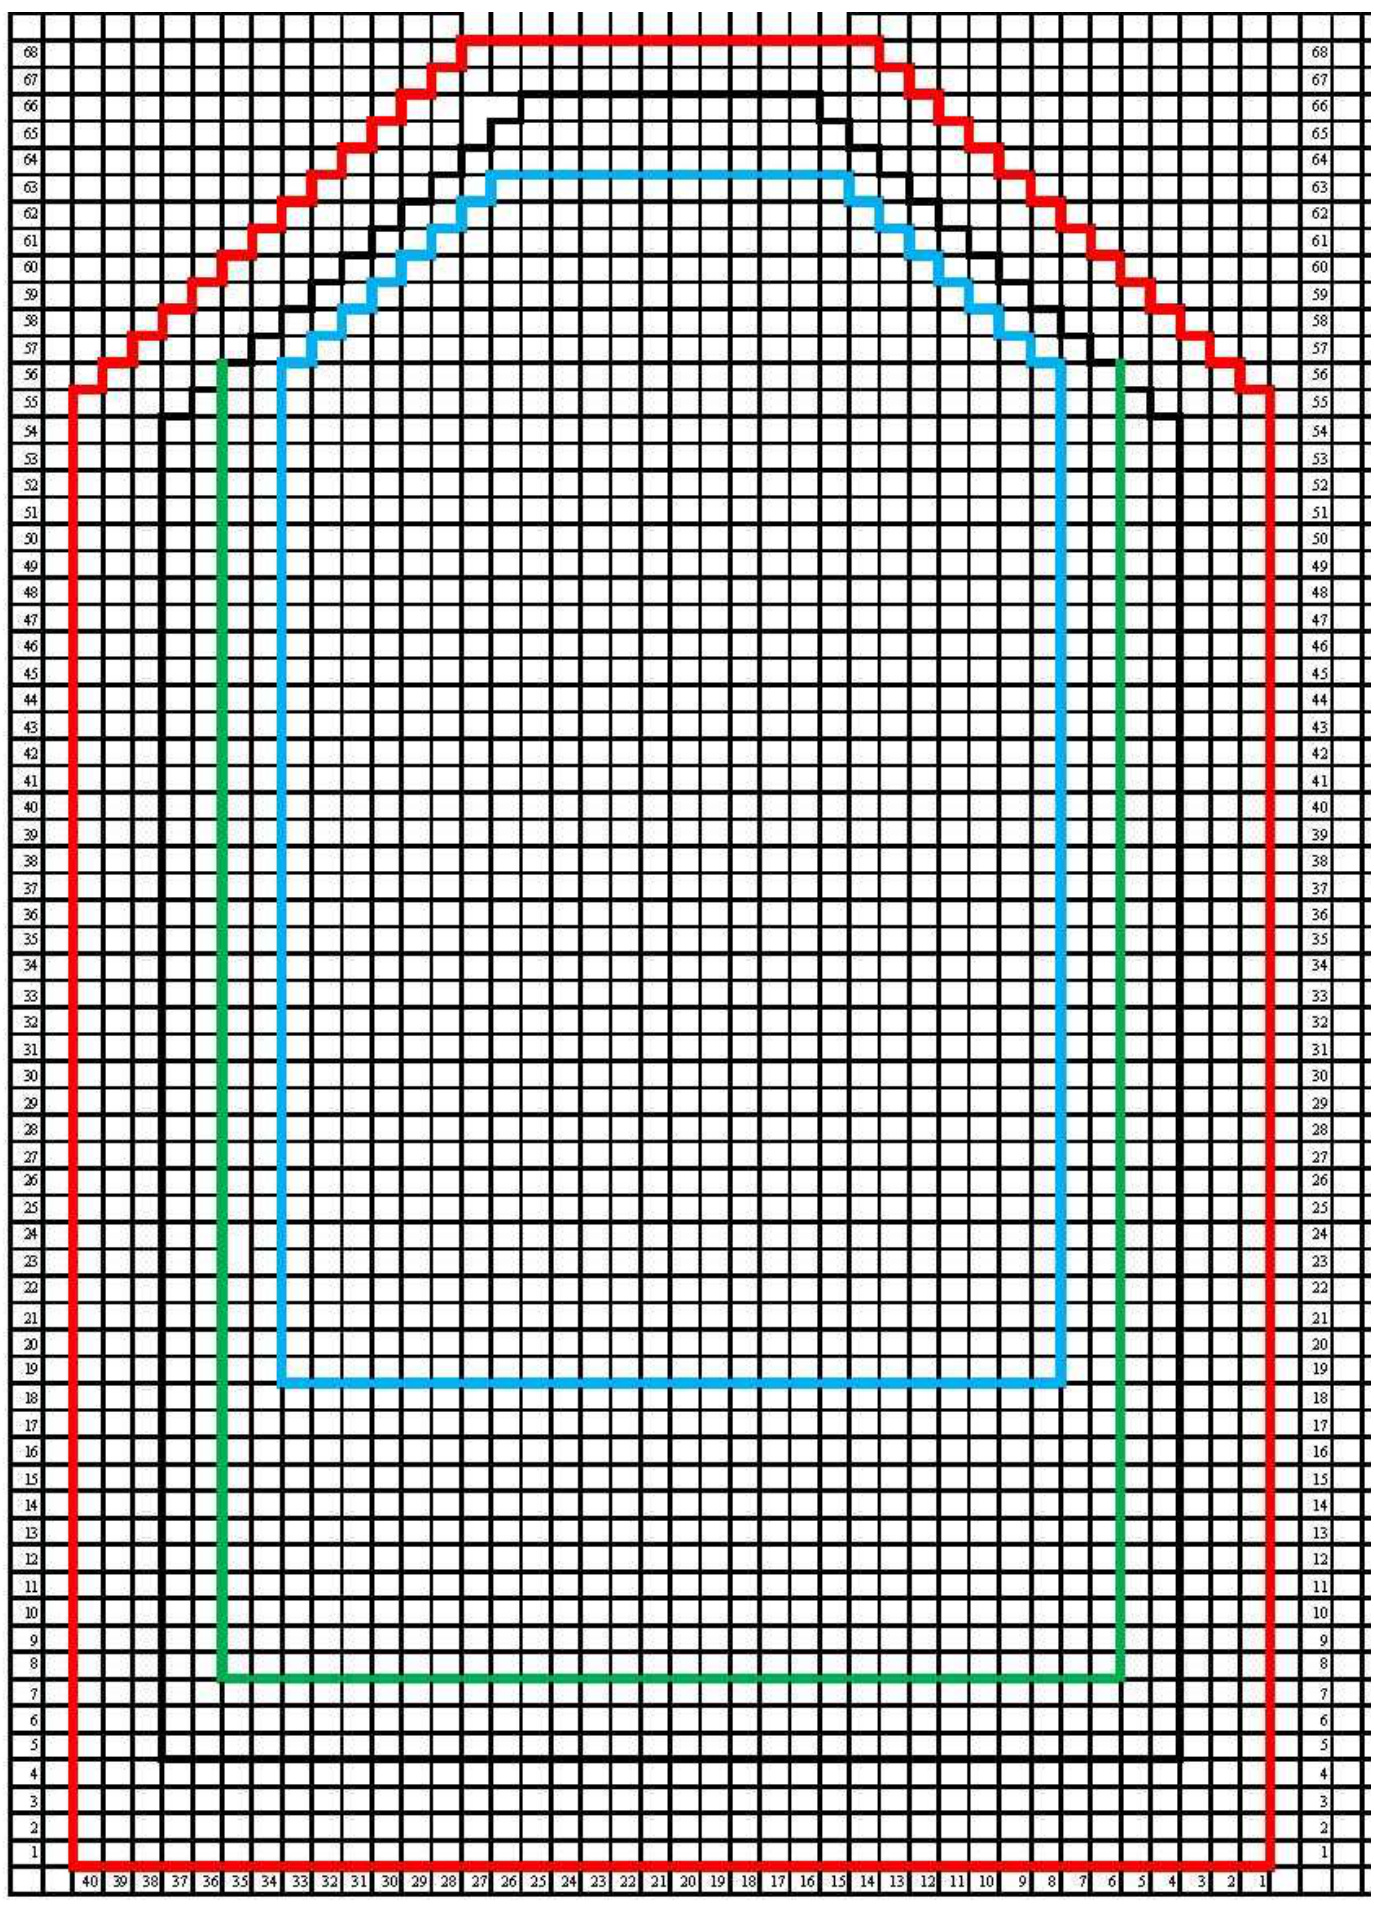
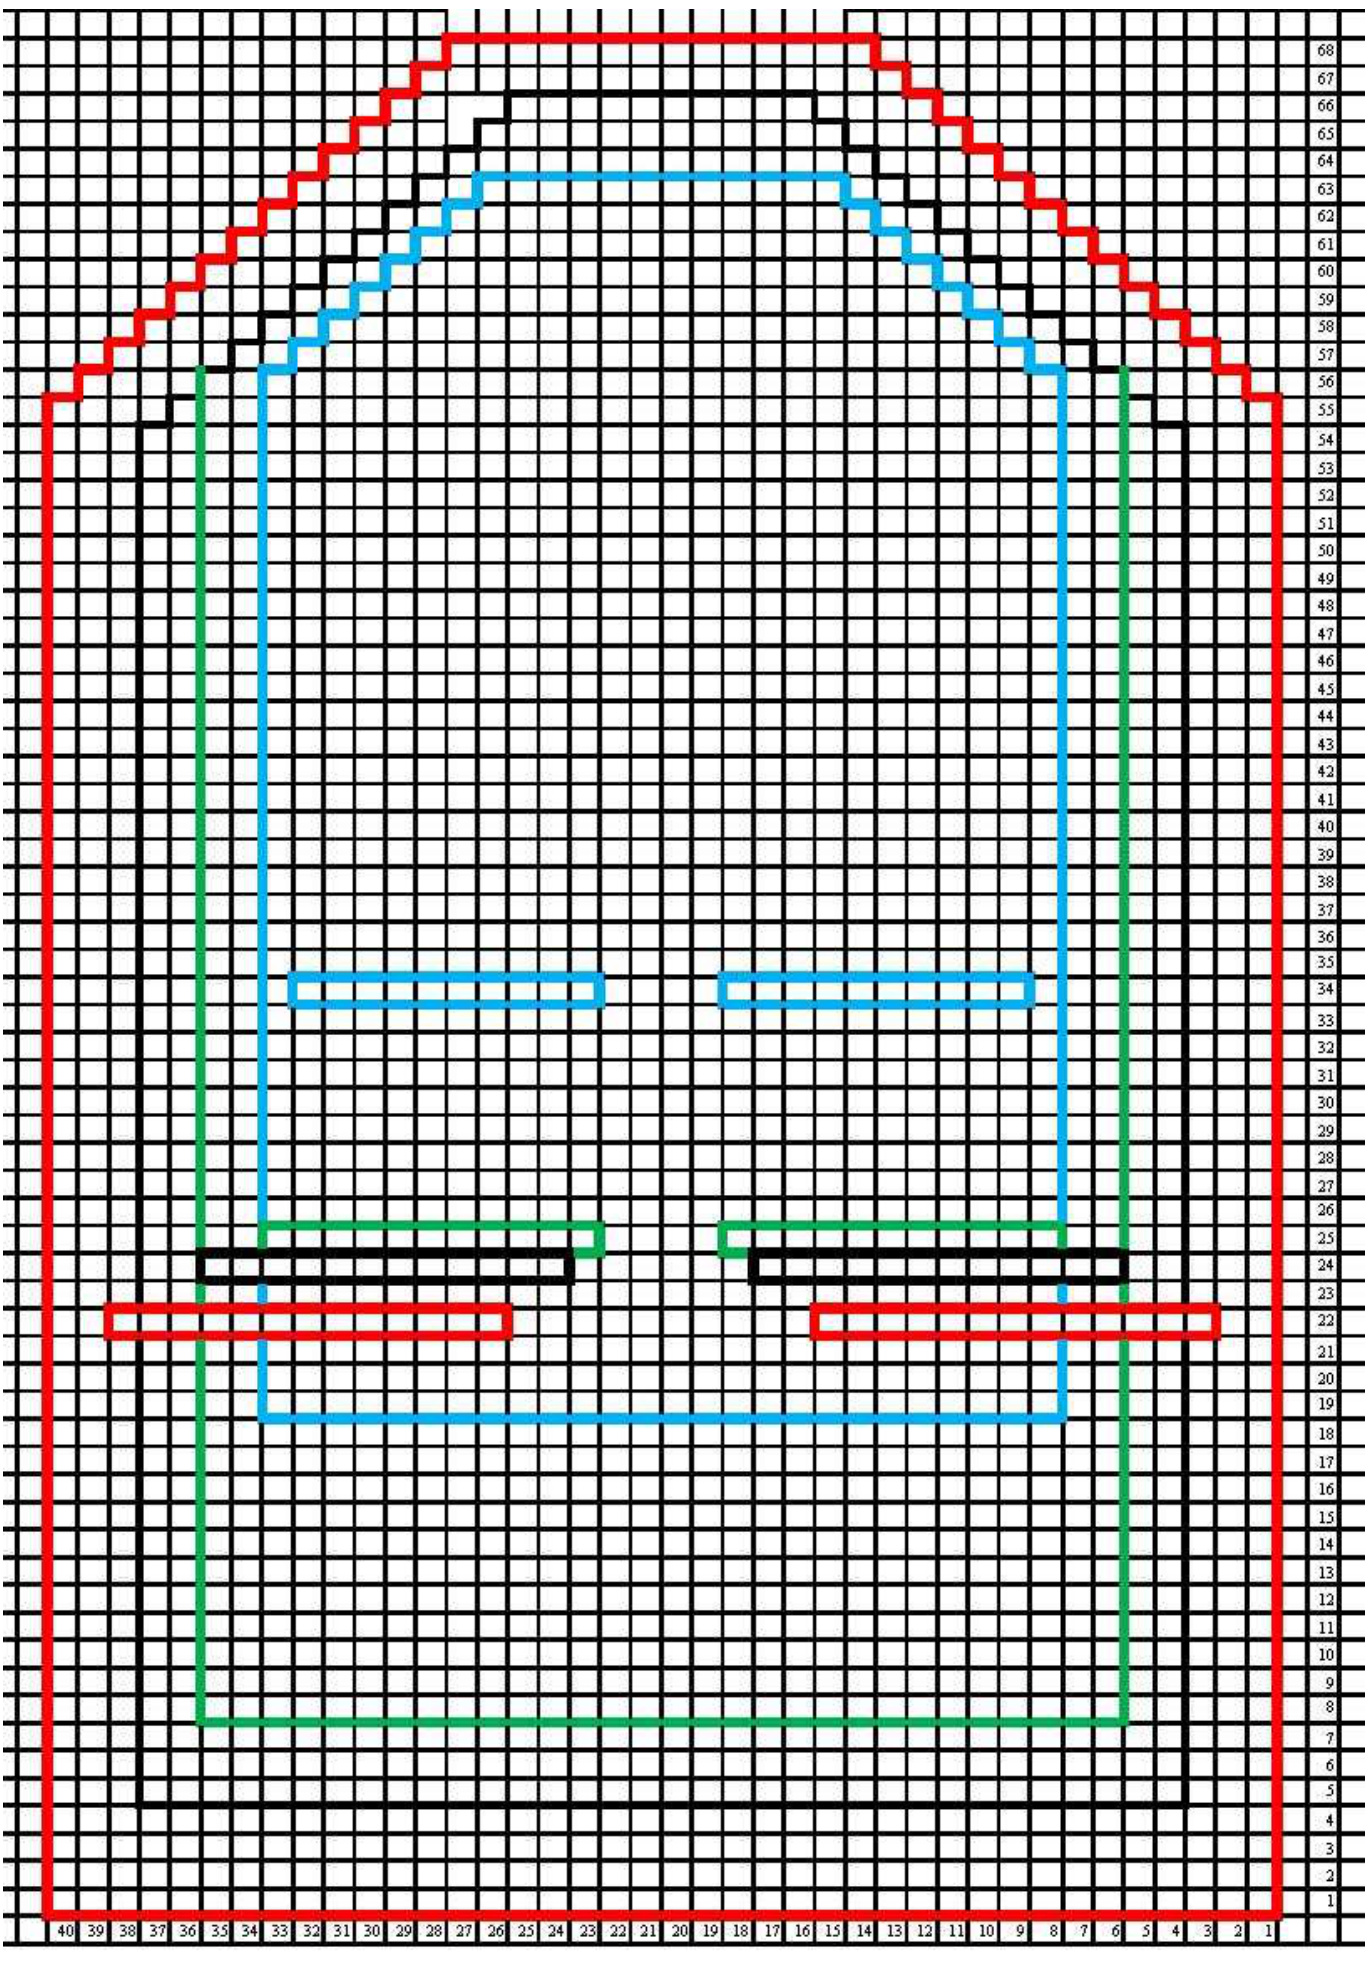
Cast on854,62,72) stithe withYarnA onsmaller edes,divide stitches venly mngst eedlesnd joinwih twisting. Work 25 (30, 30, 34) rows in straight stitch (Stockinette stitch, knit every round). Next Row:Change to larger needles and purl one round, increase 4 (6, 6, 8) stitches during this purl round; equals 52 (60, 68, 80) stitches total. Next Row: Change to Yarn B, knit 25 (30, 30, 34) rounds. During row 25 (30, 30, 34),\*\*distribute your stitches amongst your needles this way: 4 needles, distribute stitches 26, 13, 13 (30, 15, 15; 36, 18, 18; 40, 20, 20); 5 nedles, distribute stitches 13, 13, 13, 13 (15, 15, 15, 15; 18, 18, 18,18; 20, 20, 20, 20). The front needle (4 needles) or 2 needles (5 needles) willbe the back of the hand, the last 2 will be the palm. Next Row;Rejoin Yarn A and begin working body of mitten with row 1of Chart for right mitten, Chart 2 for left mitten, row1of Chart 3. Be sure not to carryyarns more than5 stitches without wrapping them so you don't get loops. \*\*Err on the side of being a little loose with your 2 color knitting, this can be fixed when you block the mittens. Next RowRow2of Chart for right mitten,Chart 2forlft mitten,row2of Chart 3.Continue patte as set, placing in scrap yarn for the thumb as charted and decreasing for the top of the hand as charted. Finish the final 24 (20, 20, 28) stitches with Kitchner Stitch (see instructions below) to close off the top of the hand. Whip stitch the bottom of the lining into place on the inside at row 25 (30,30, 34) using the long tail of the cast on of Yarn A. Sew every other stitch and work loosely.
Directions-- Thumb:
Using largerneedles, slipaneedle into the (11, 12, 13stitches on thetopof thewaste yarnyou've nit inforthe thumbhol AND the bottom of the waste yarn you've nit in for the thumb hole (you'llhave two needles each holding 10 stitches). Carefullyremove the waste yarn-I use a crochet hook, rather than scissors. Pickup $^3$ (3, 4, 4) additional stitches at each side of the thumb hole. Distribute the stitches evenly amongst 3 needles. Join yarns A and B (leave long tails to weave in later, at least 6 inches) and work in a1 x1 color pattern until thumb measures 18 (20, 24,28) rows. Next tworows:UsingYanAandtogether nit togetherllthewayaround (youll probablyhaveextrastitchjust it it). Break off yarns and thread through the remaining stitches. Pullfirmly (not tightly) to close off top of thumb.
Finishings
Weave in allends, block (choose your method, ht:/knitty.com//SSUEwintero2/FEATdiyknitter.html). Ilike to gently submerge mine in warm water with baby shampoo, rinse twice, rollup in a towel and press to get out most of the water, then shape gently to even out all the stitches and place in a warm place to dry. Kitchtch forafllexntionwith piues shtp:/wwkity.m/SEsuerAtheraum Step1 Insert the needle intothefist stitch on the front needle asif toknit, whileslipping it offtheendof the eedl. St2:ert tneintxstithtnt siftthisteeitnll the yarn through. Step3:Insert the needle intothe first stitch on the back needle as if to purl, and slip it offthe end of the needl. Step4ert thenlnt thextstithon tack neeasitokit, anlavt n thendlePll tey th. Keep reeatinstps4,pauintotightnupthestitches nowan thenutillthe stitheareworkThelast stitches remaining on the needlle will equire you to perform step I then go directly tostep 3.