Tessellating Diamonds Versatile Mitts
Deborah Tomasello
Copyright 2015 by Deborah Tomasello All rights reserved. This pattern or any portion thereof may not be reproduced or used in any manner whatsoever without the express written permission of the publisher. WARNING: Giving or accepting a free copy of this pattern to another, without permission of the designer, is stealing.
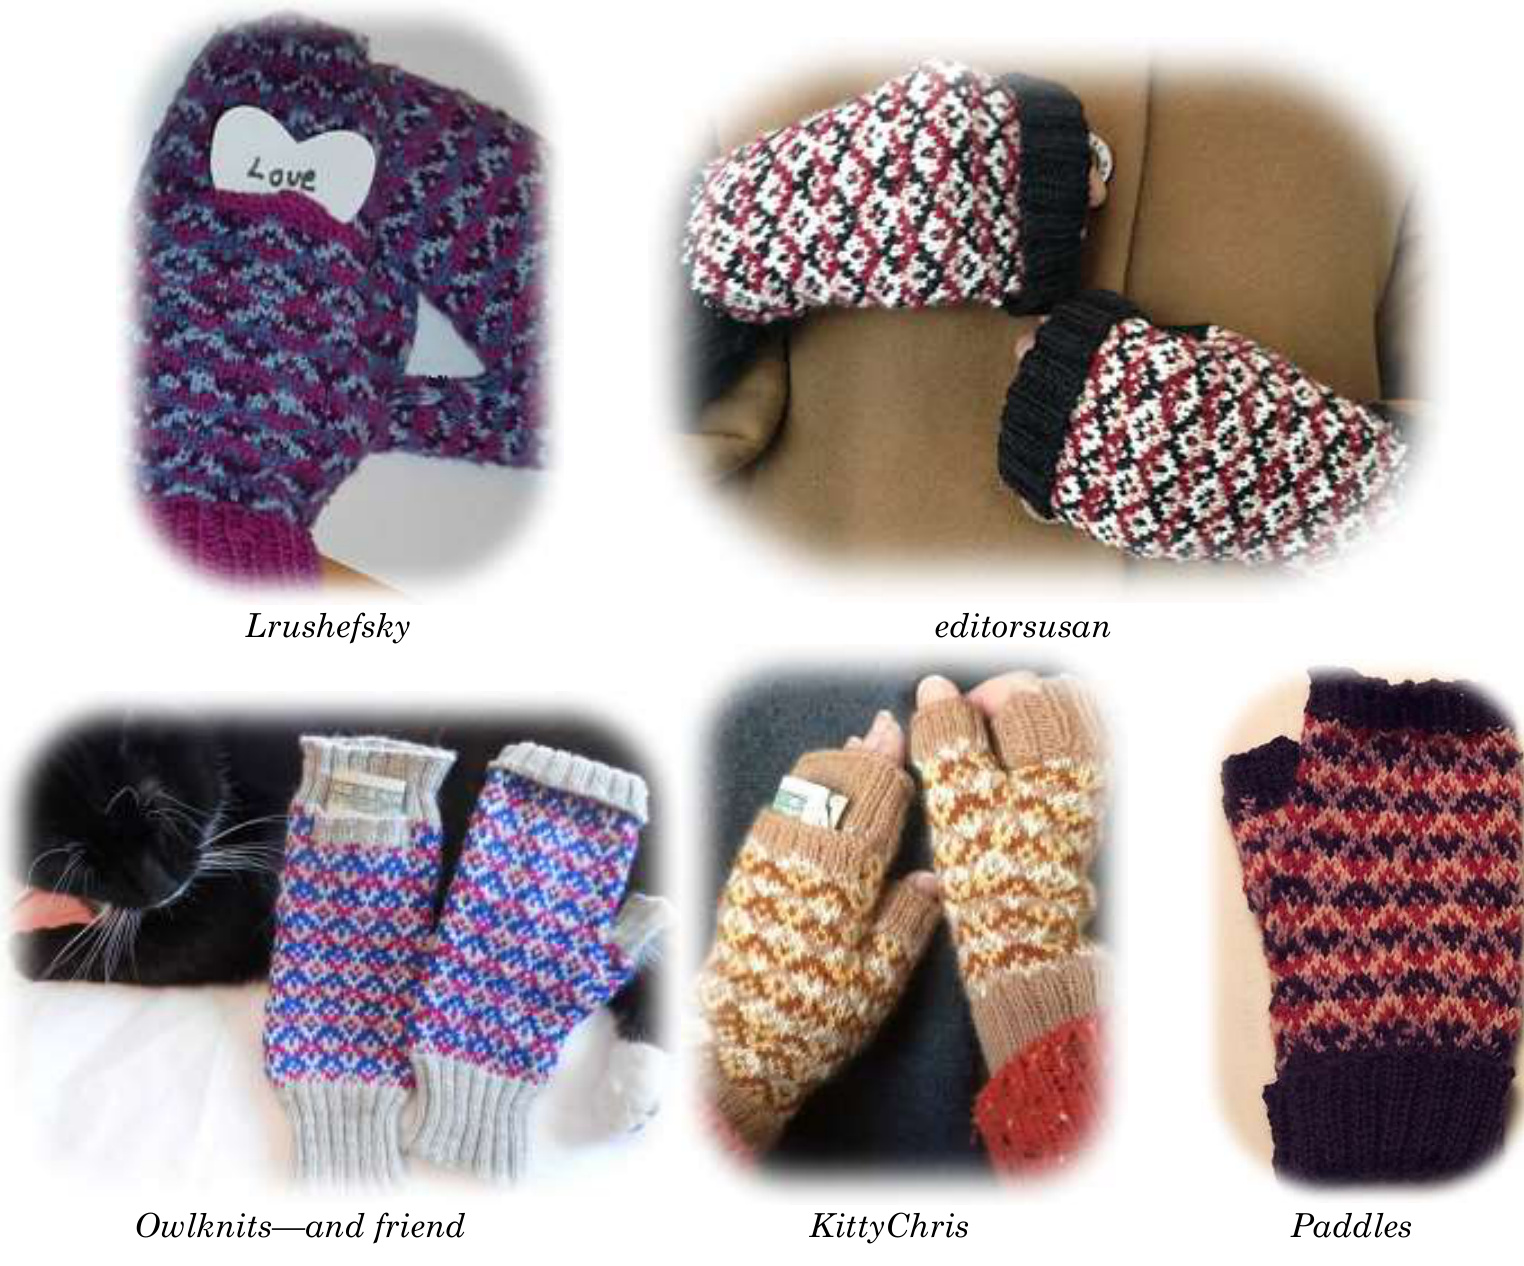
Look What They Did!
Knitters should not feel tied to the written pattern. I did not include instructions to add a button to the pocket, but a couple of our KALers thought it was a good idea. And they were right! How cool is this! Don't be afraid to spread your creative wings!
Odilemat also changed the thumb tip, opting to use a solid color for the very top.
Avalanche
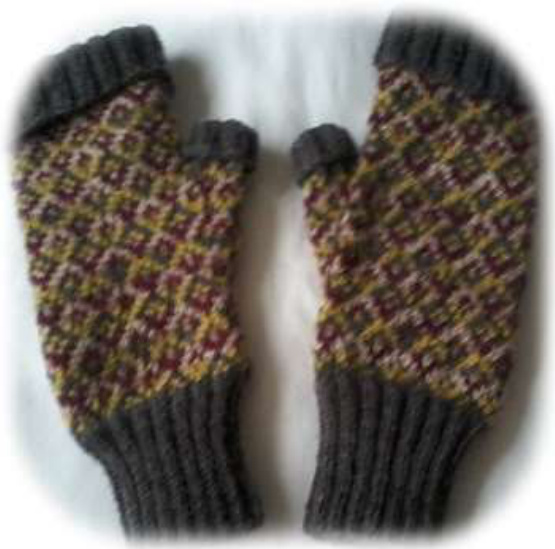
Susimaloney improvised the top of her mitts, omitting the ribbing.
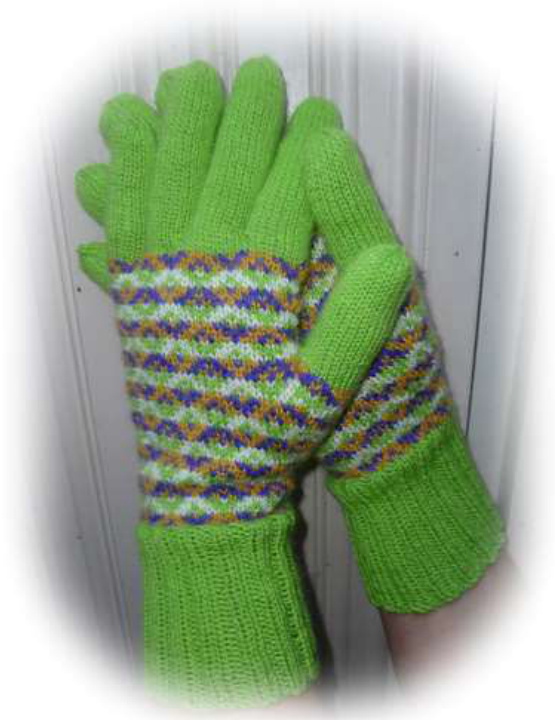
paraknits decided to knit fingers for her Project. I am not including instructions for this in this pattern, but you can use finger instructions found elsewhere and plug them into this mitt pattern.
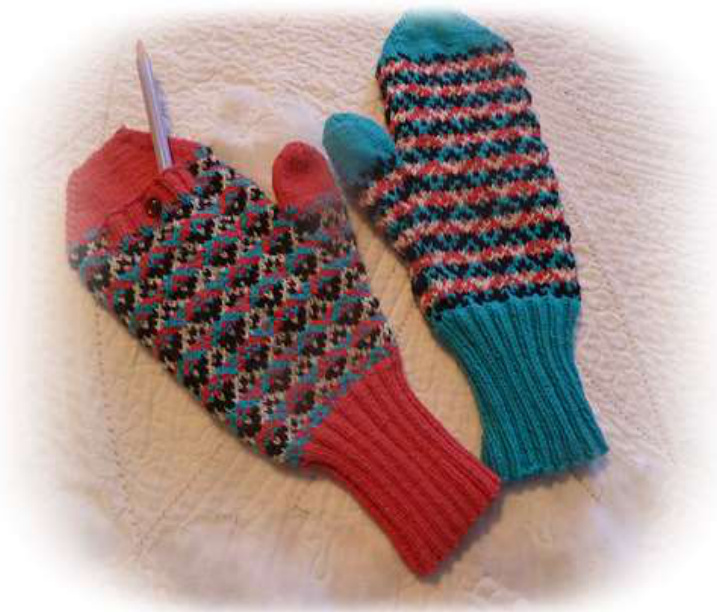
tighniamh used a subtle gradient for one of her Color choices resulting in an interesting occasional teal stripe in her mitts. annemargaret simply switched up her colors for her second mitt. Look at the difference! What fun!
Magicquilt wanted to see what the mitts would look like using two, rather than four, colors. Cool! catexer is a Seattle Seawhawks fan, and she knitted a second pair in honor of their great season and trip to Superbowl XLIX!
innudo knitted a matching cowl for her beautiful cat.
innudo knitted a second pair of mitts using a completely different color scheme.
canadiankiwi used different colors for the ribbing portions of each mitt. She opted out of ribbing for thumb and mitt tops.
sandima omitted pocket ribbing for a really hidden pocket in her mitten.
barbina made her thumb convertible as well as the top of her mitt.
cozyknitsca made her mitts to macth her Infinitam and her Infinicowl. Oh, and in her mitt pocket? Treats for Casper, of course!
maybaby24 changed up thumg ribbing color to bring out the pink in her mitts.
The Wonderful World of Color
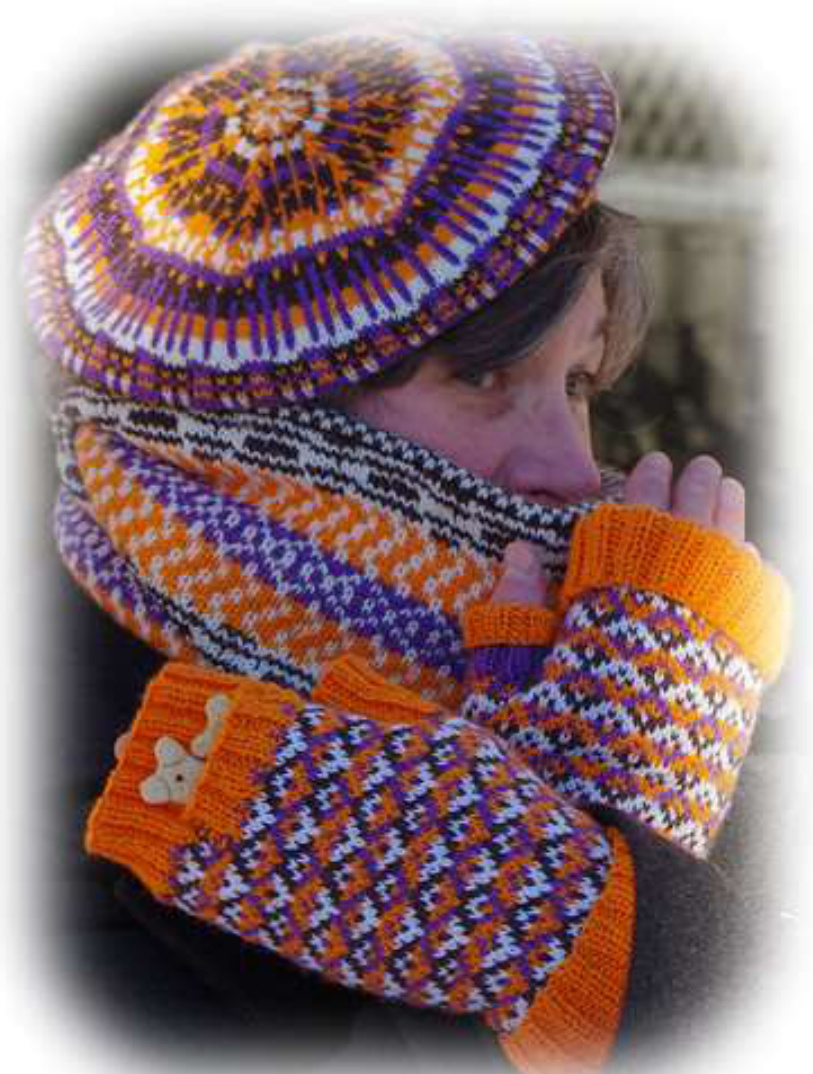
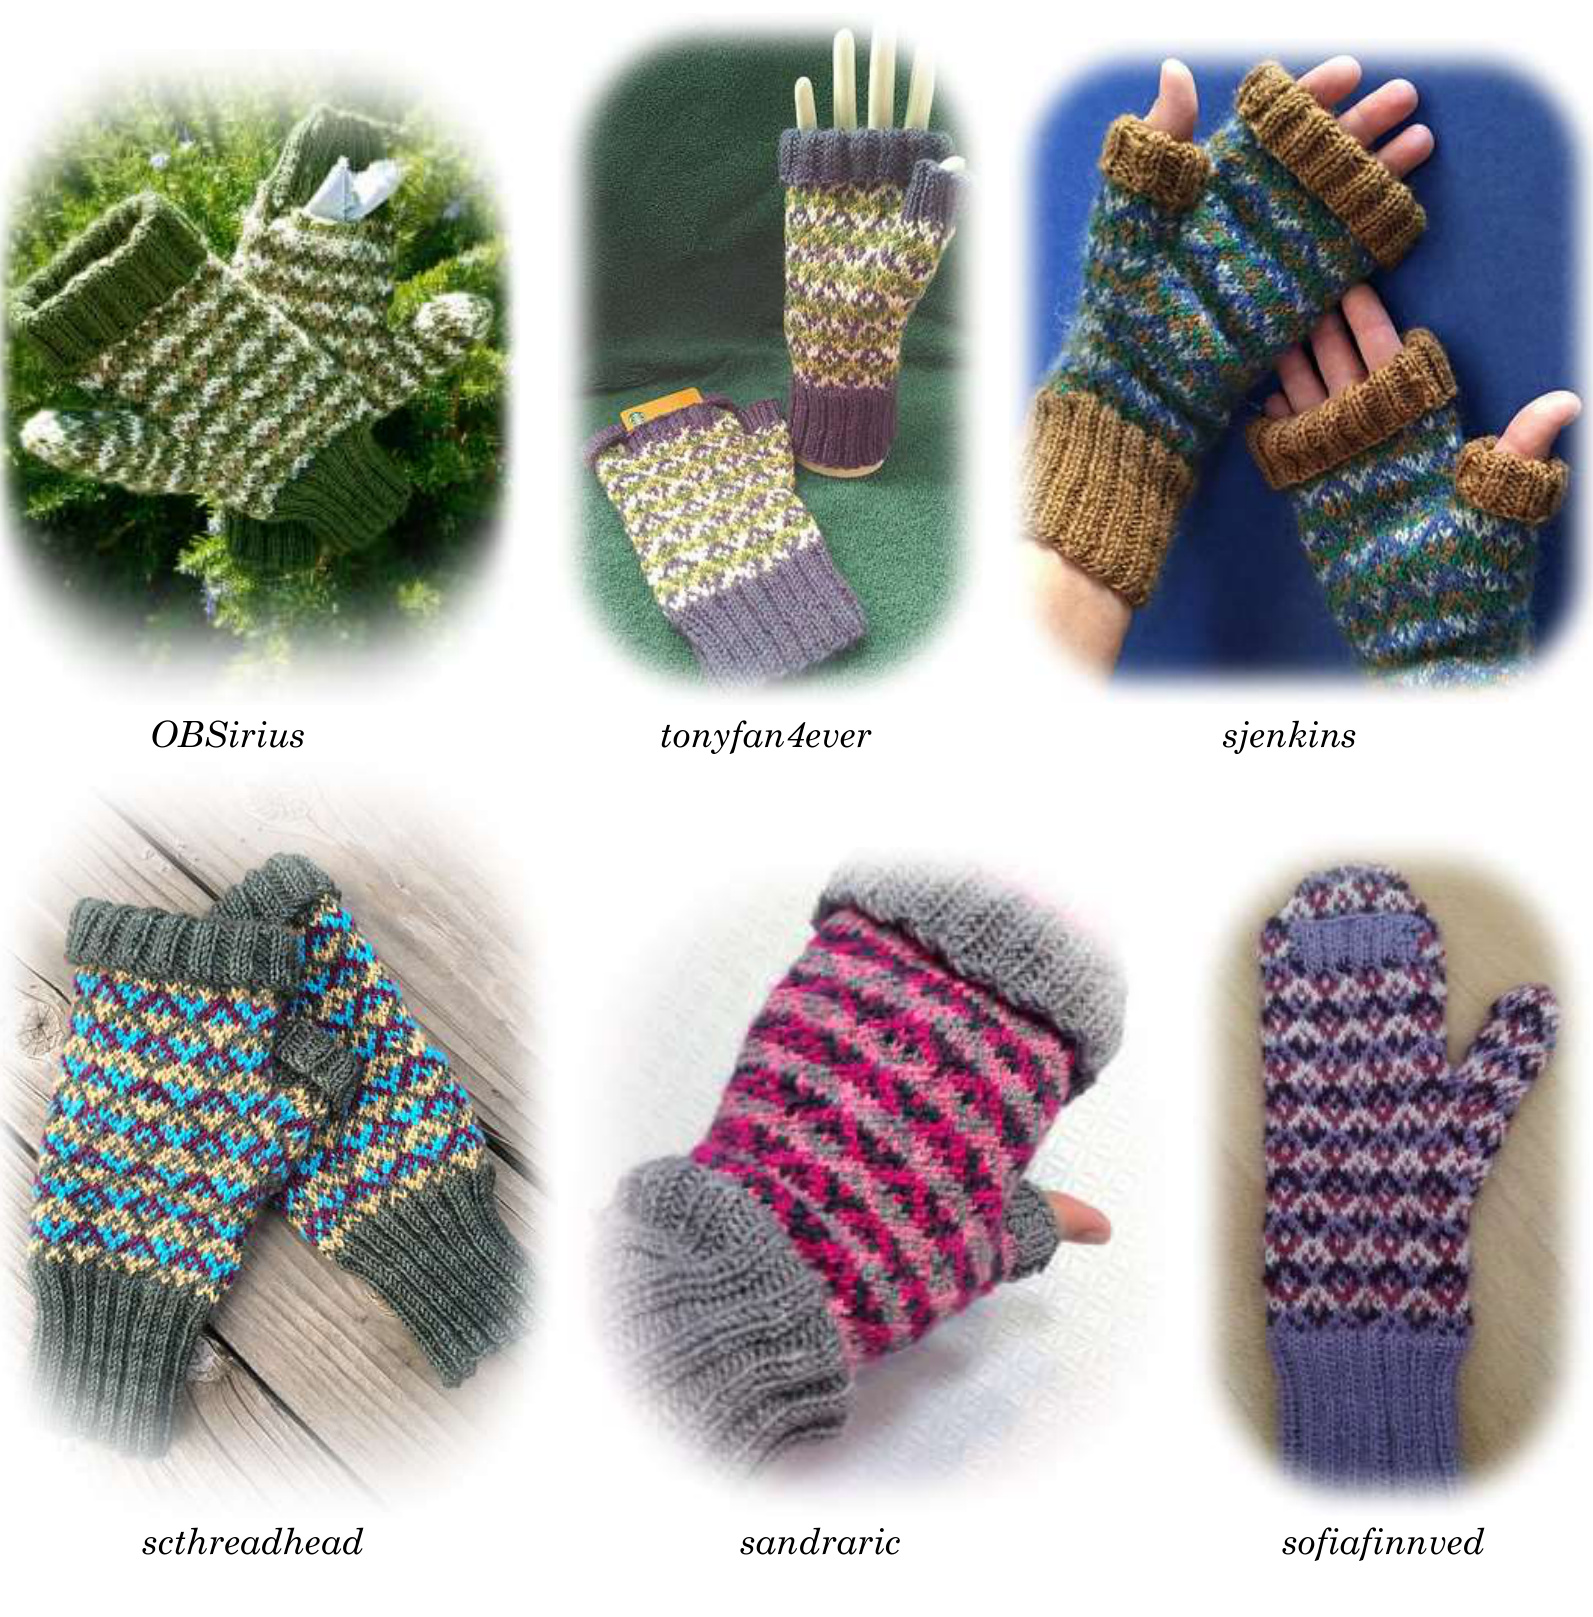
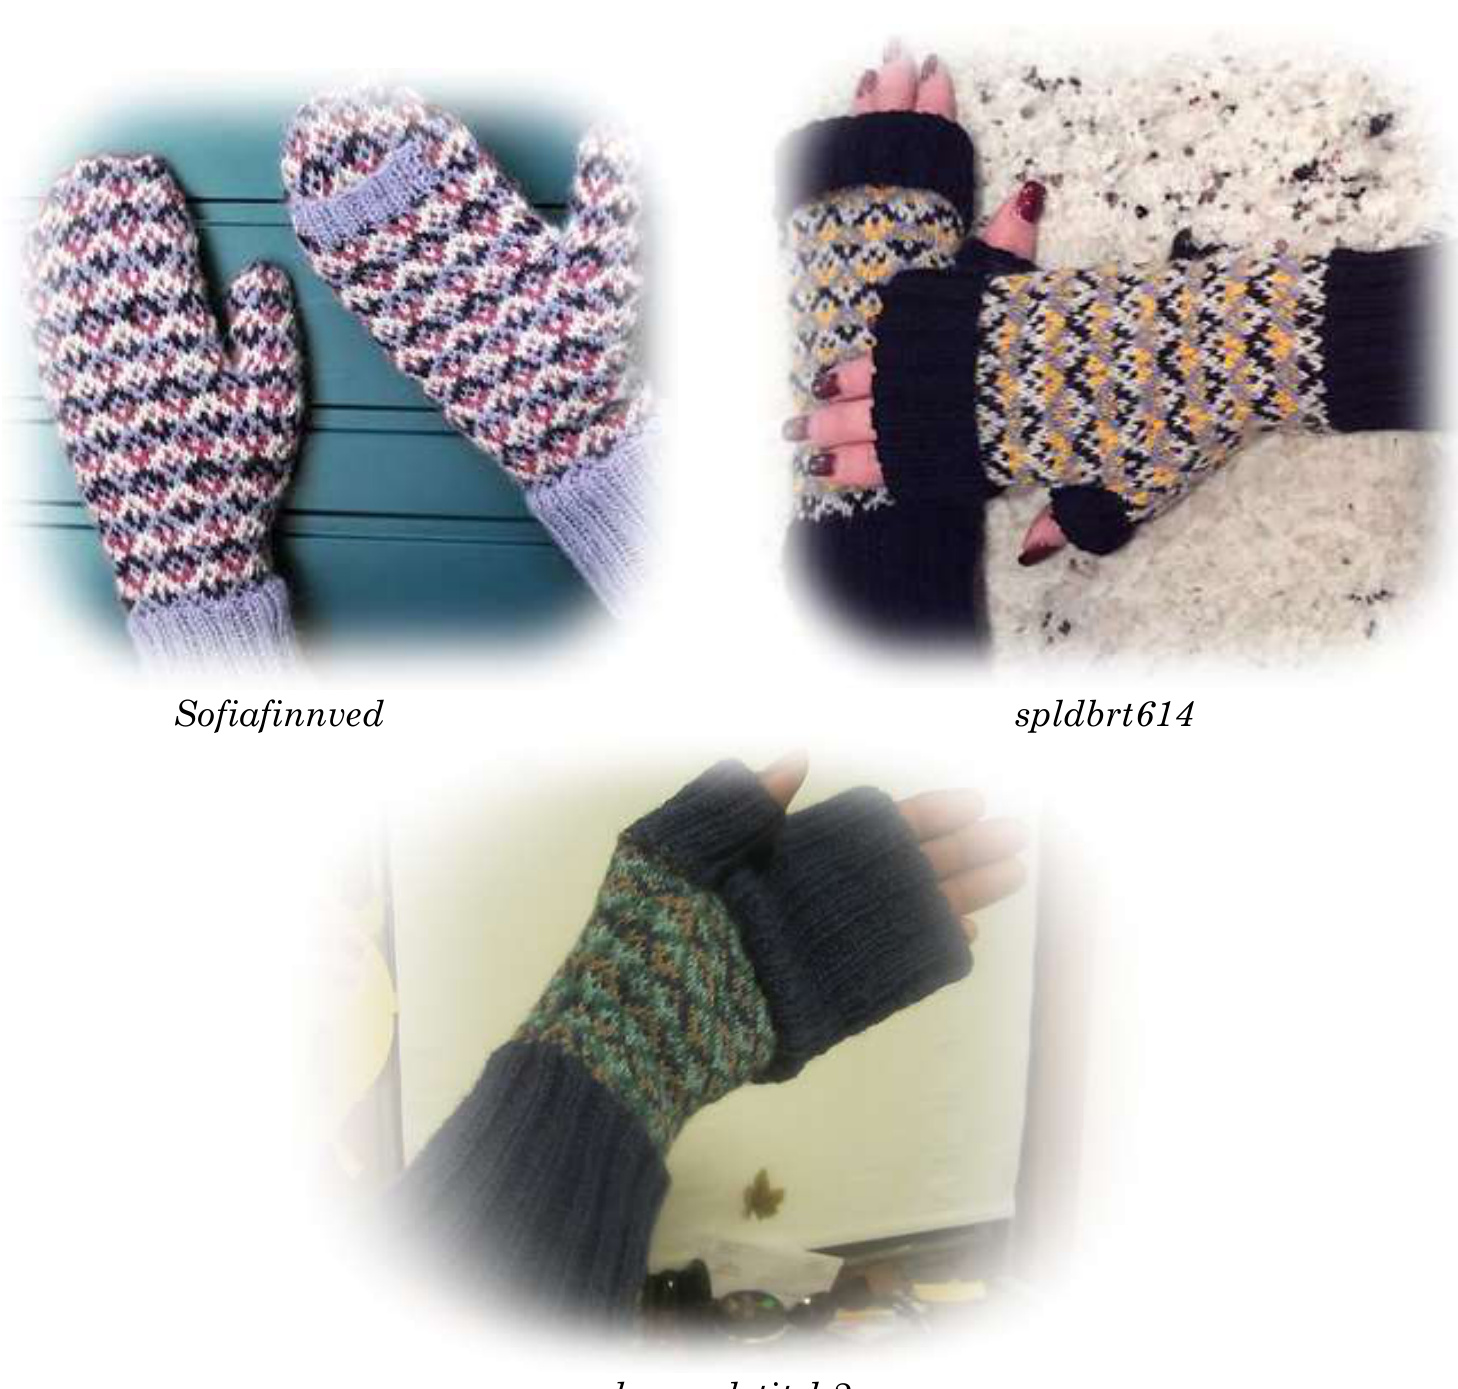
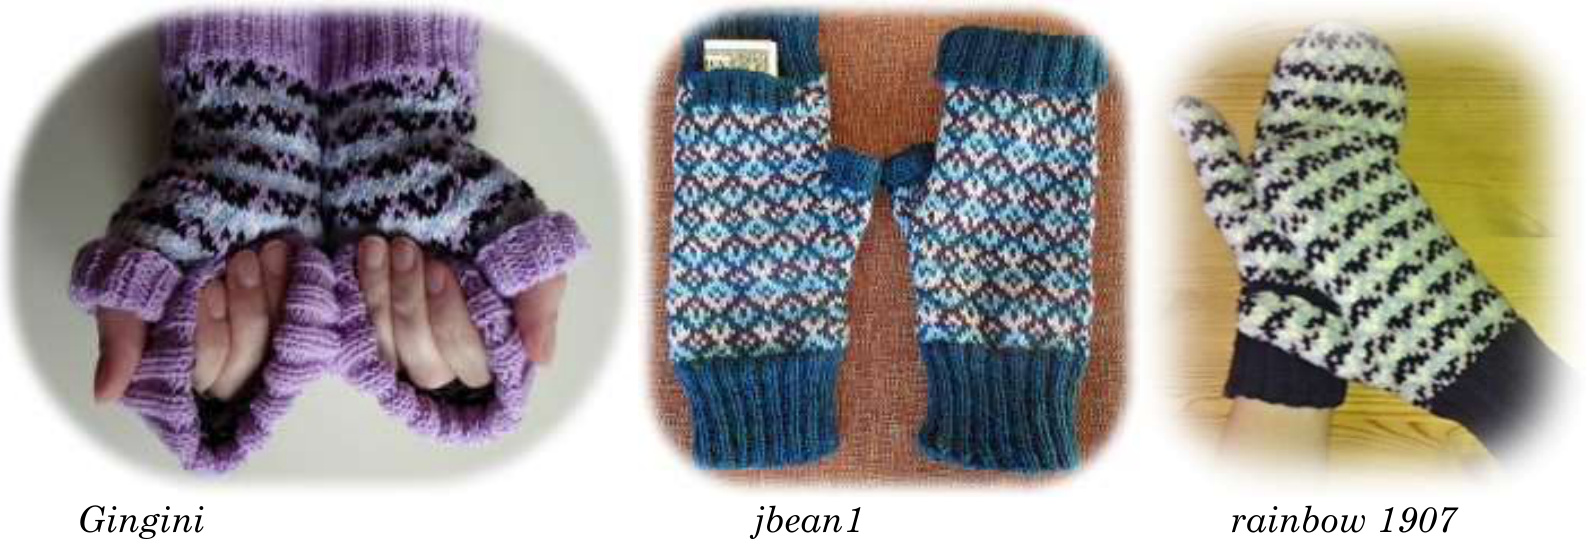
I will go out on a short limb here to say that we stranded knitters are drawn to colorwork primarily because of, well, color! I am constantly amazed by the creative use of color CBD KALers employ. Just when I think I have envisioned all possible conmbos, you all wow me with your own wonderful color ideas. Some of the outstanding color used are featured above, others are shown here. The beauty of color is inifinite.
ilenek1p2
jvee2
SCgrandma

thiagram
droppedstitch2
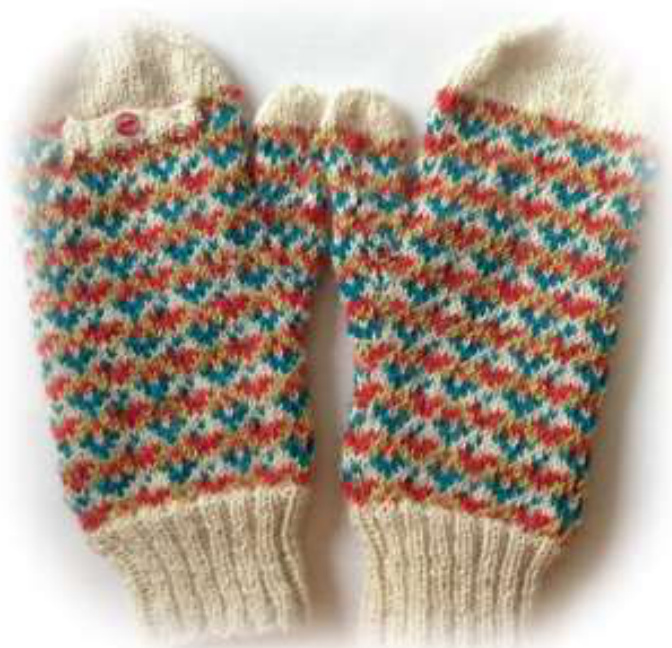
Now You see It...Now You don't!
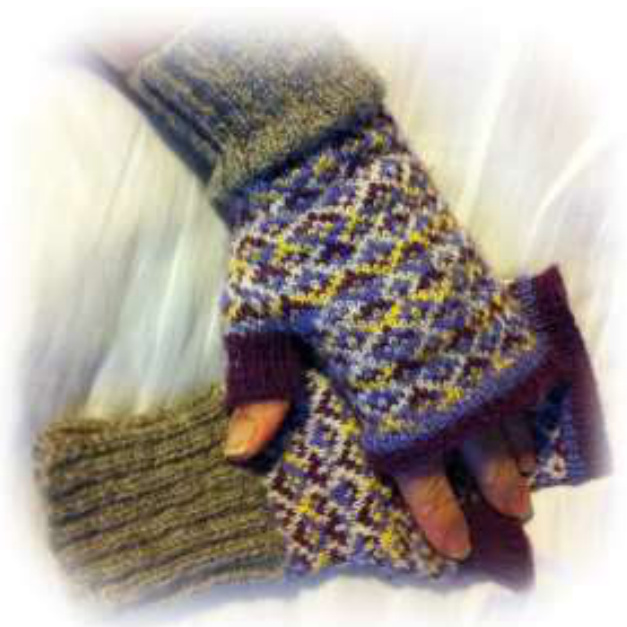
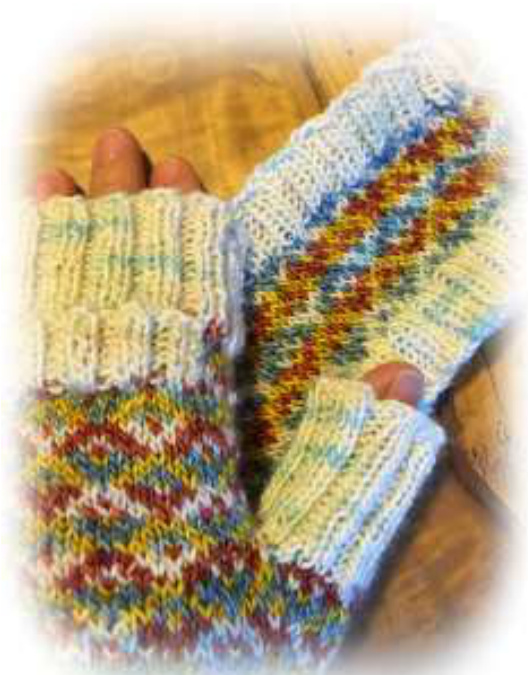
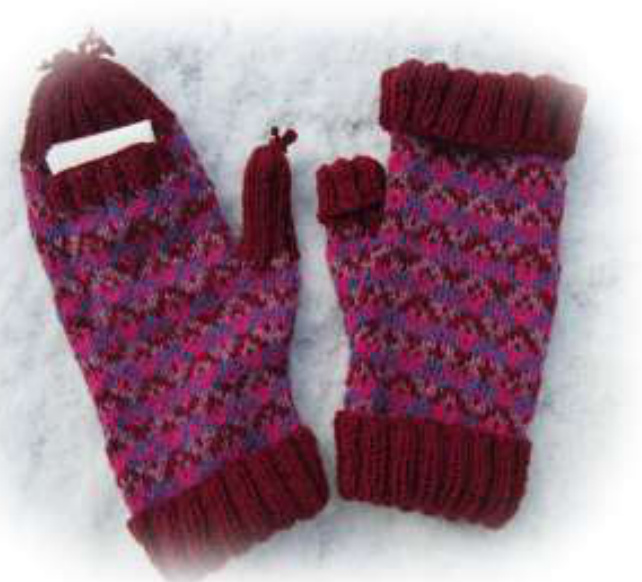
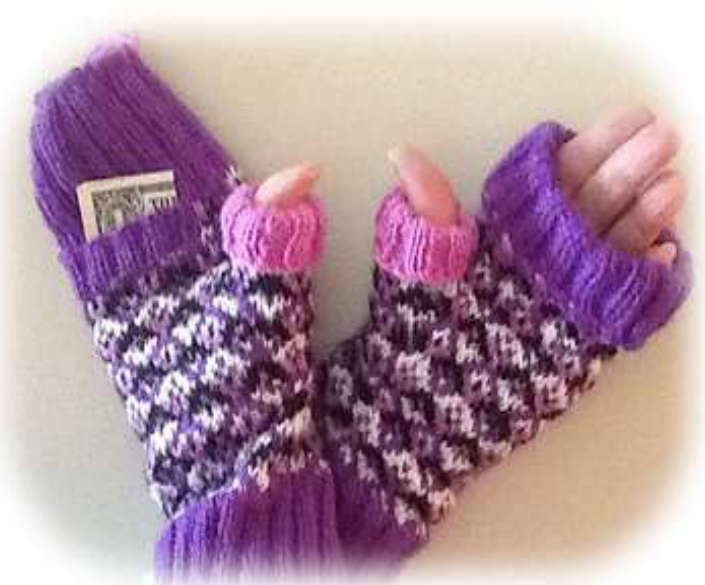
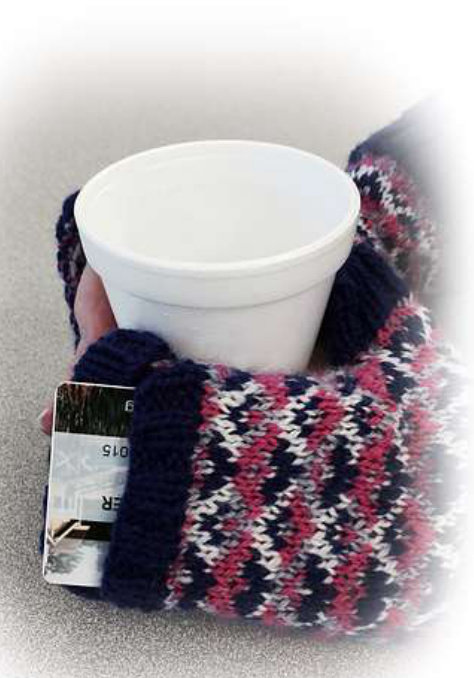
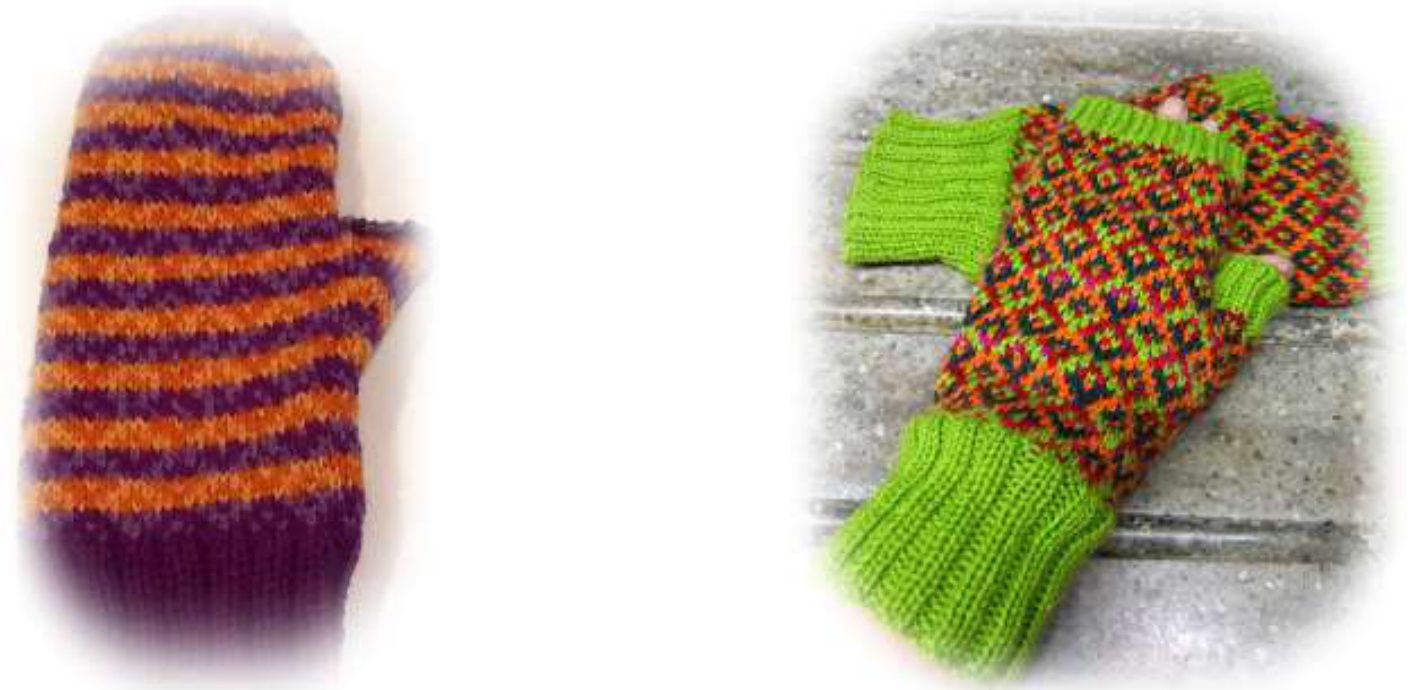
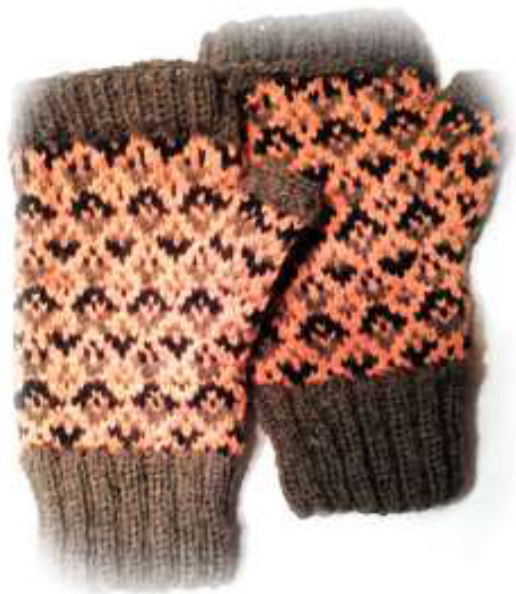
These wonderful mitts feature a secret pocket that is hidden to protect your valuables while you use your hands. The pocket is large enough to hold cash, credit card, metro card, keys, tissue, hand warmers, toys, or even treats for when you walk Fido! Stranding adds extra wool for extra warmth. Top can be unfolded to cover fingers, or folded down to cover pocket and expose those texting fingers.

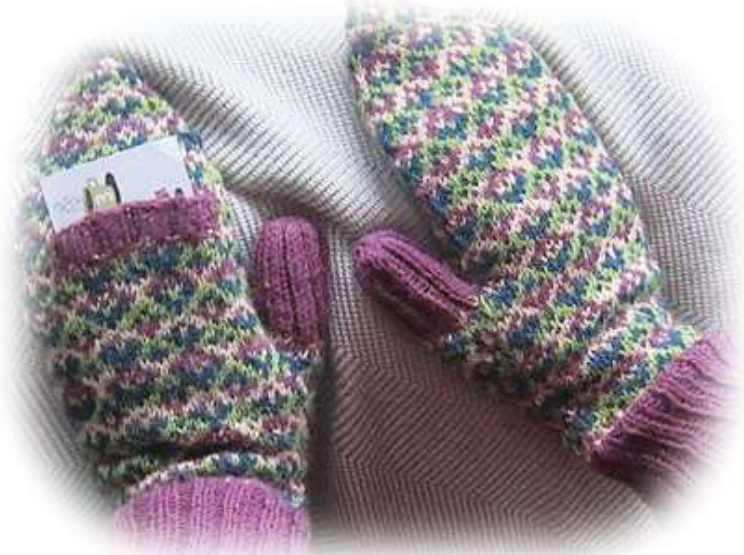
Pjalaska knitted one version of the fingerless mitts. Here she demonstrates the secret pocket.
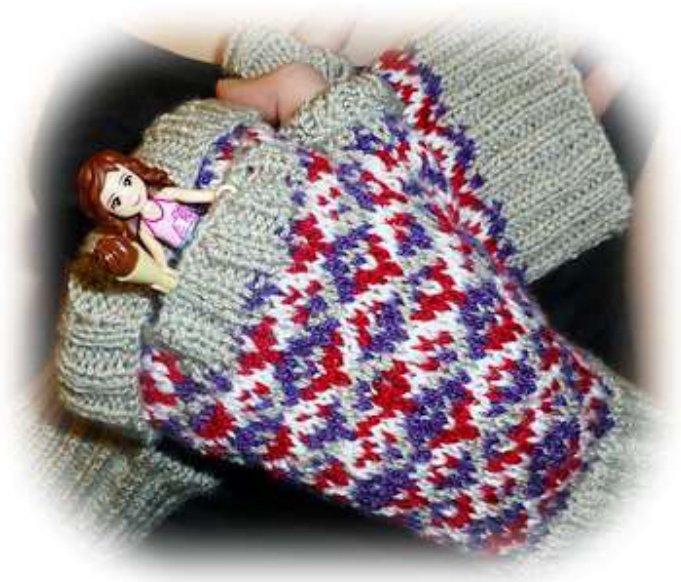
Renieandbo knitted her mitts, and her 10-year old daughter grabbed them right up. She knew right away what that pocket is for!
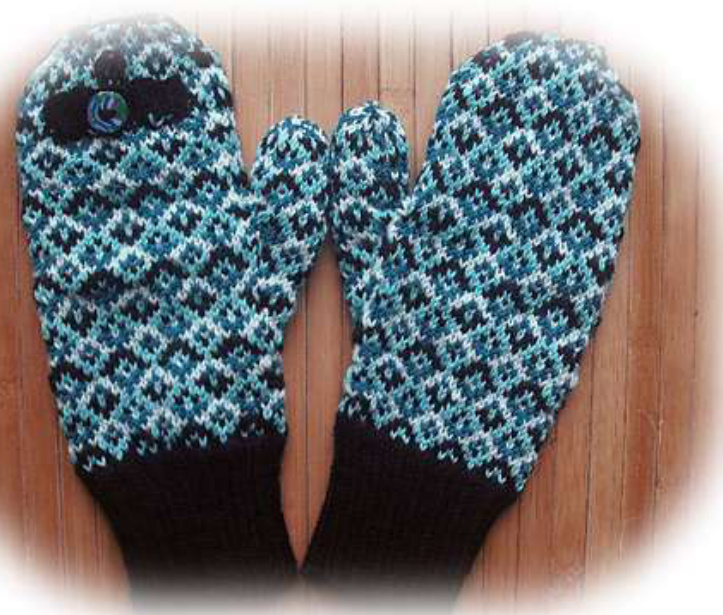
A Word About Color
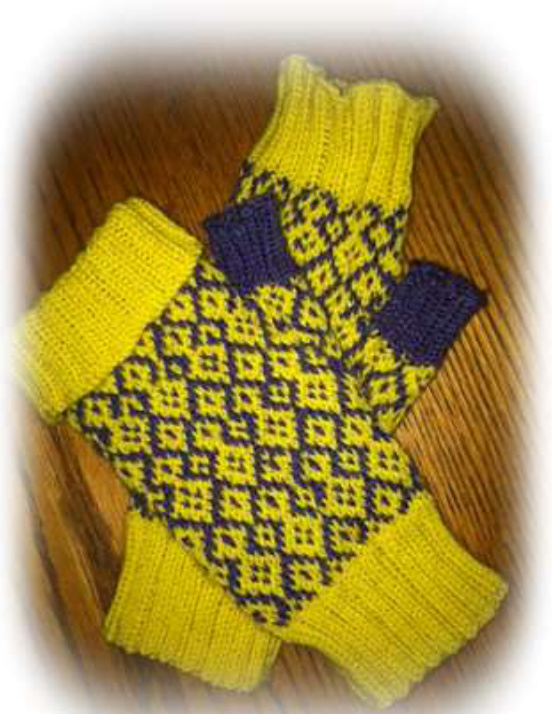
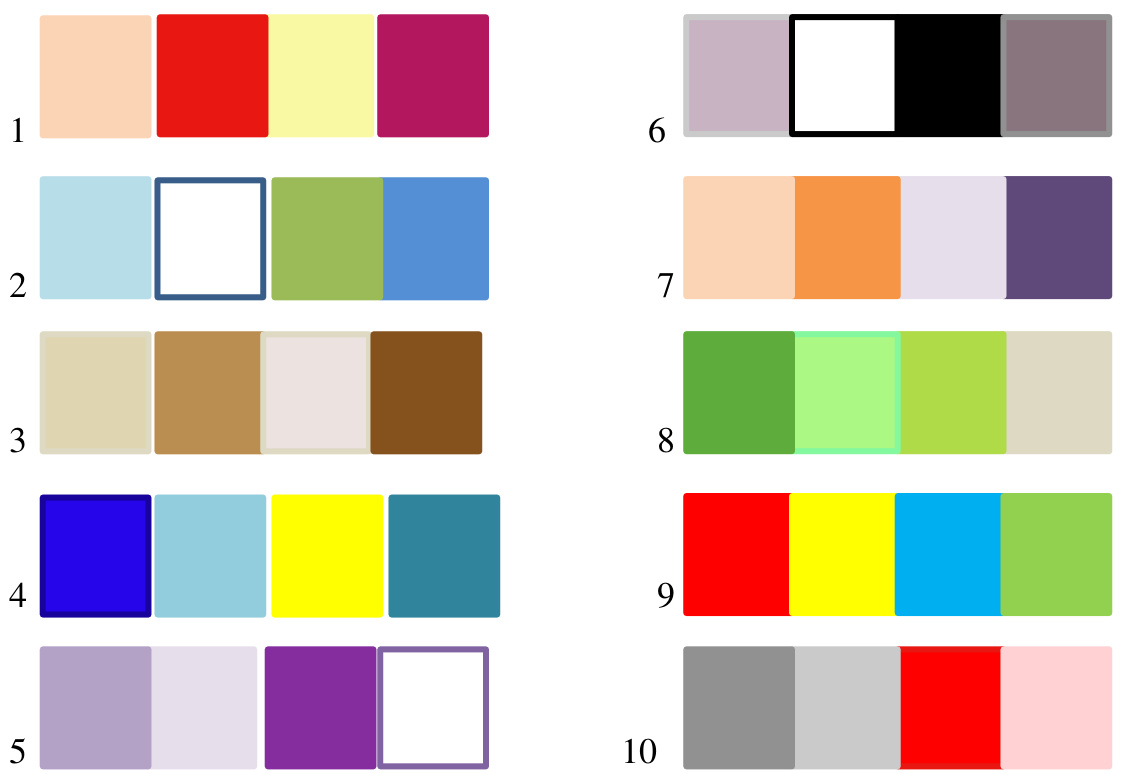
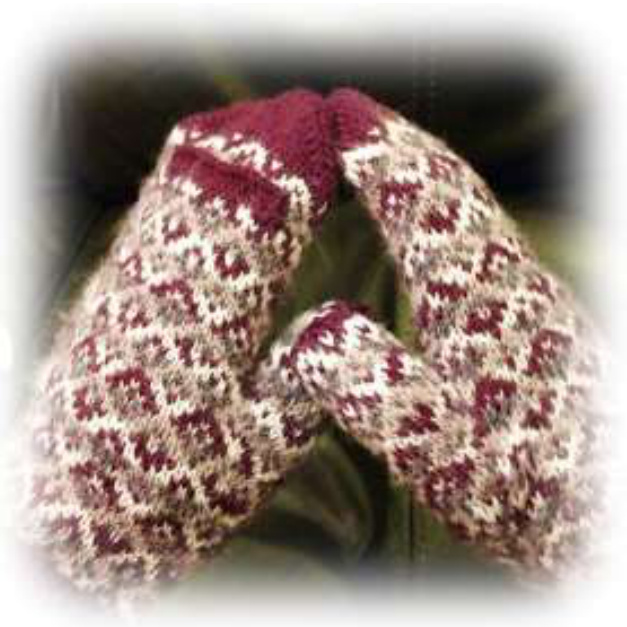
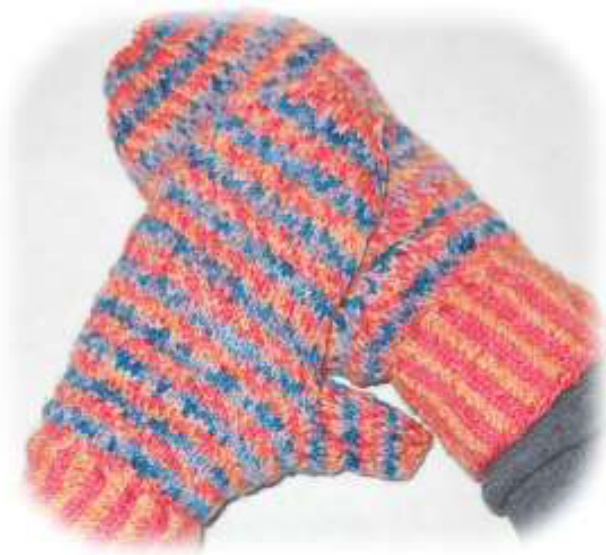
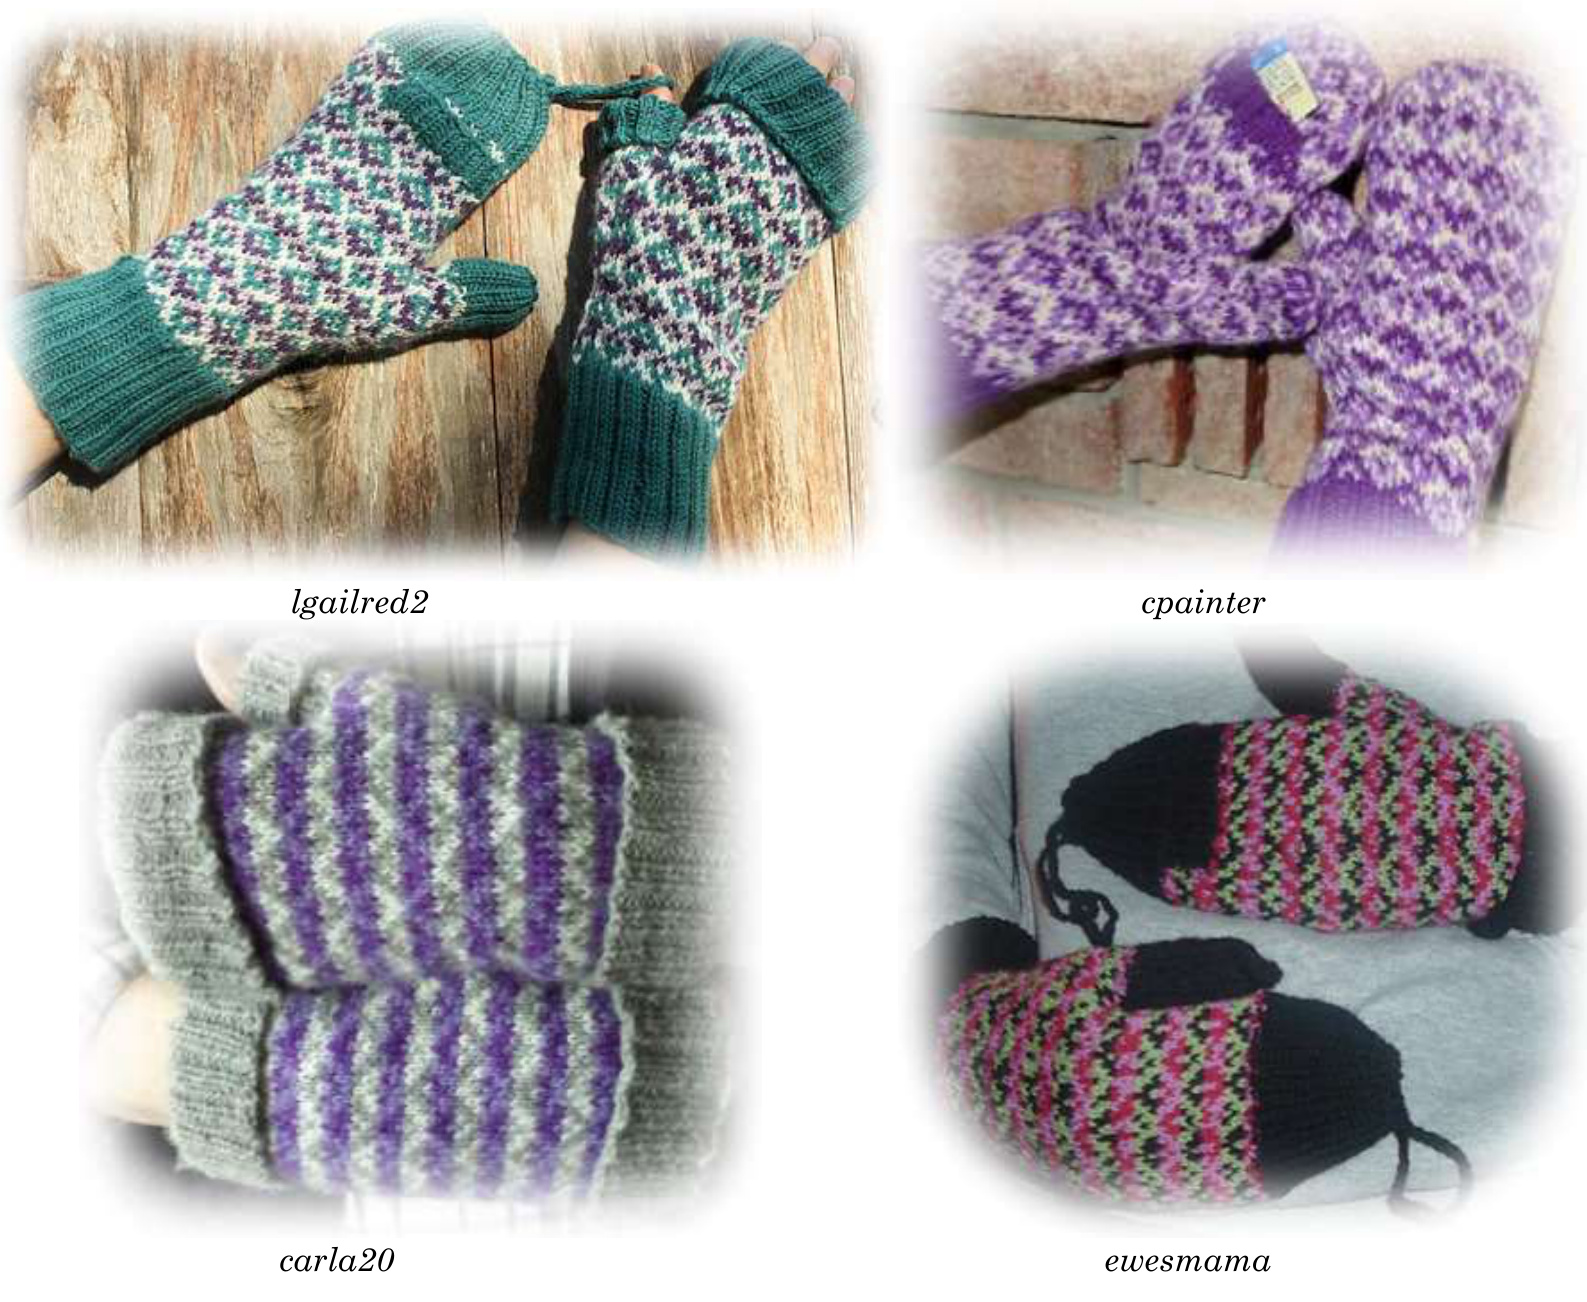
As you will see from the project pictures below, color choice is a main ingredient to this colorwork design. As important as the choice of colors themselves is, the arrangement of the colors influences the appearance even more. Notice some mitts look striped while other mitts display the tessellating diamonds more prominently. The pattern used for all the mitts is identical. The differences in appearance are the result of color placement. While most of my stranded charts use colors to represent stitches, rather than symbols, for this design I decided to use symbols, giving the knitter a blank palette on which to place her colors. I will be including a place for you to experiment with your color placement as well as your color choices. Use some colored pencils and, replacing the symbols in the chart with the colors you have chosen, try different arrangements before you start to knit. Do you want a light and dark shade of each color next to each other (as katycabot did)? This will emphasize the stripes in the design. Or do you want those shades opposing each other (as carol222 did) to emphasize the tessellating diamonds? Below is an array of color combination possibilities. Color choices are infinite. These serve to give you a sense of combinations and how to place them in your chart. Be creative. Generally, you will want 4 colors of fingering weight yarns. These should have a good level of contrast—2 light shades and 2 dark shades with fairly equal color value. You can go for a monochromatic color scheme, as shown in examples 3, 5, and 8. Or you can choose a light and dark shade each of 2 colors on opposite sides of the color wheel, as shown in example 7. You can choose a range of neutral shades, as shown in example 6, or you can combine neutrals with shades of one color, as in example 10 below. Or go wild with neons and primaries-see example 9. Just be sure your color values (saturation---color strength) areclose. As I have often said, with color all things are possible. You choose your own colors...match your coat, match your mood, use up stash. The infinite choice for color is what makes colorwork so enticing!
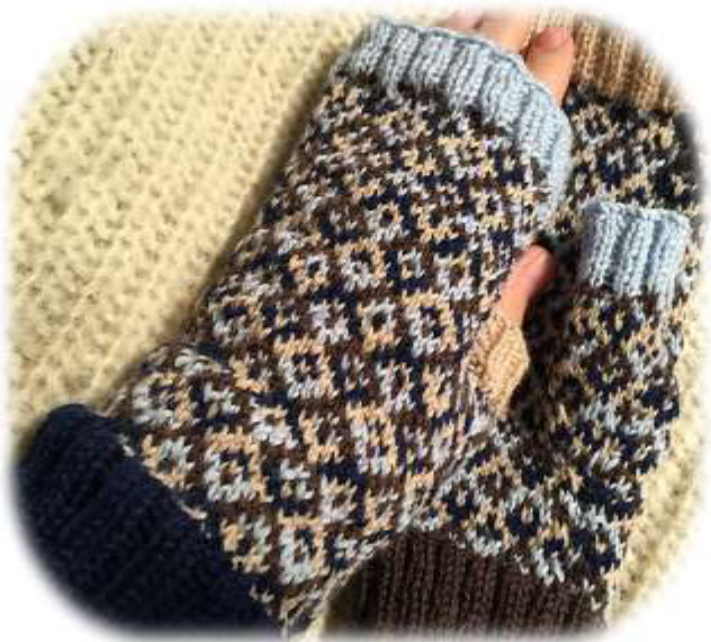
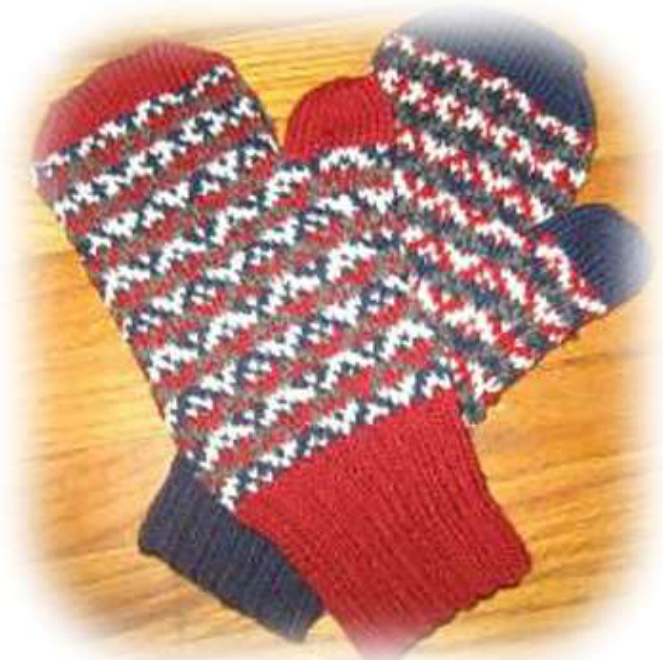
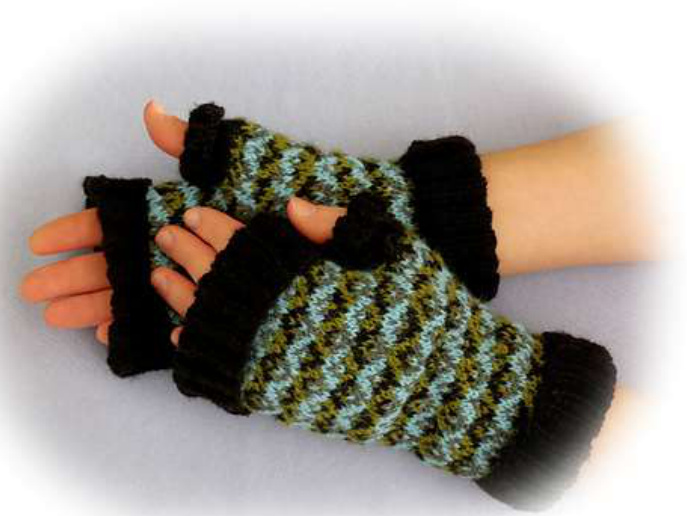
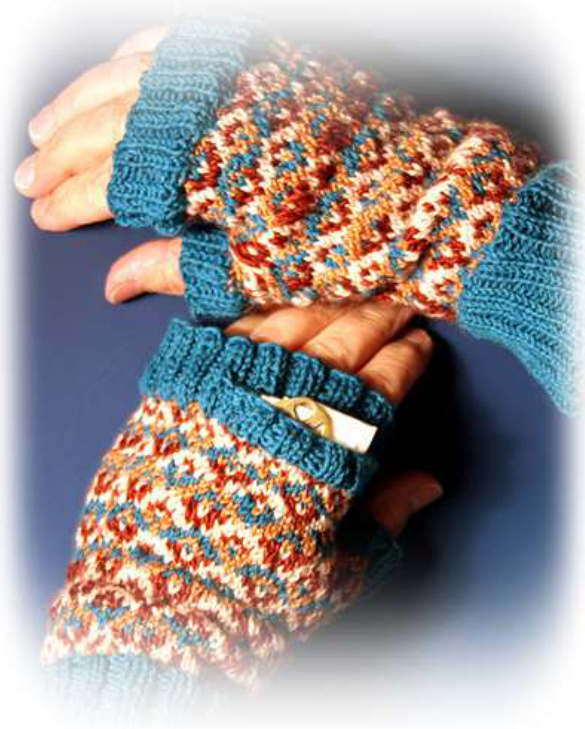
(photo on left) Katycabot used highly contrasting colors, but she arranged them so that the liht and dark shades of each worked side by side. Her mitts reveal the design's stripes allowing the diamonds to recede into the background.
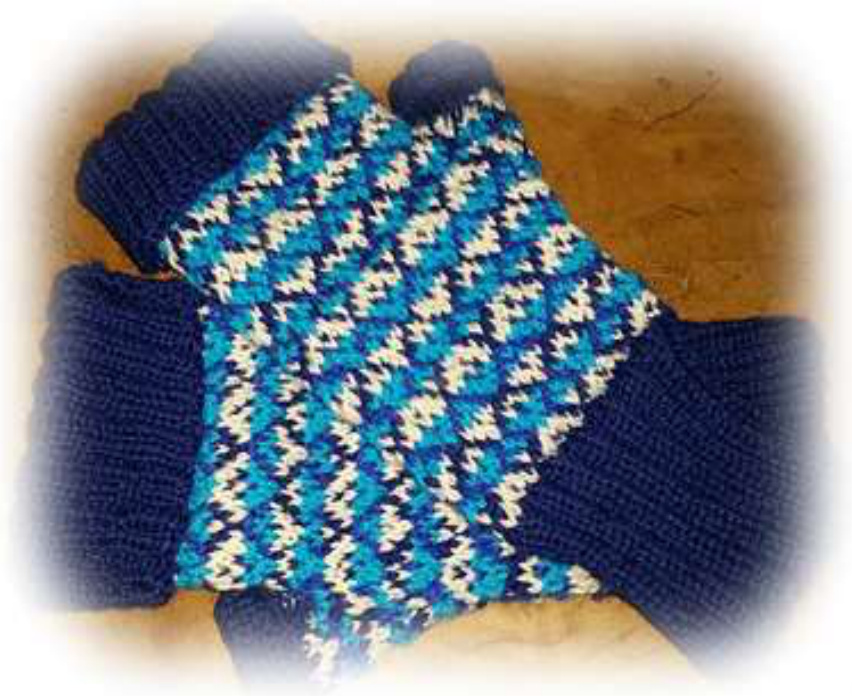
(photo on right) carol222 used highly contrasting colors, arranged against each other. The result is the striping effect fades into the background and the diamond shapes stand out.
lyns88
Cellogirl2 experimented with the design itself to yield her own unique mitts.
A Word About Color Dominance
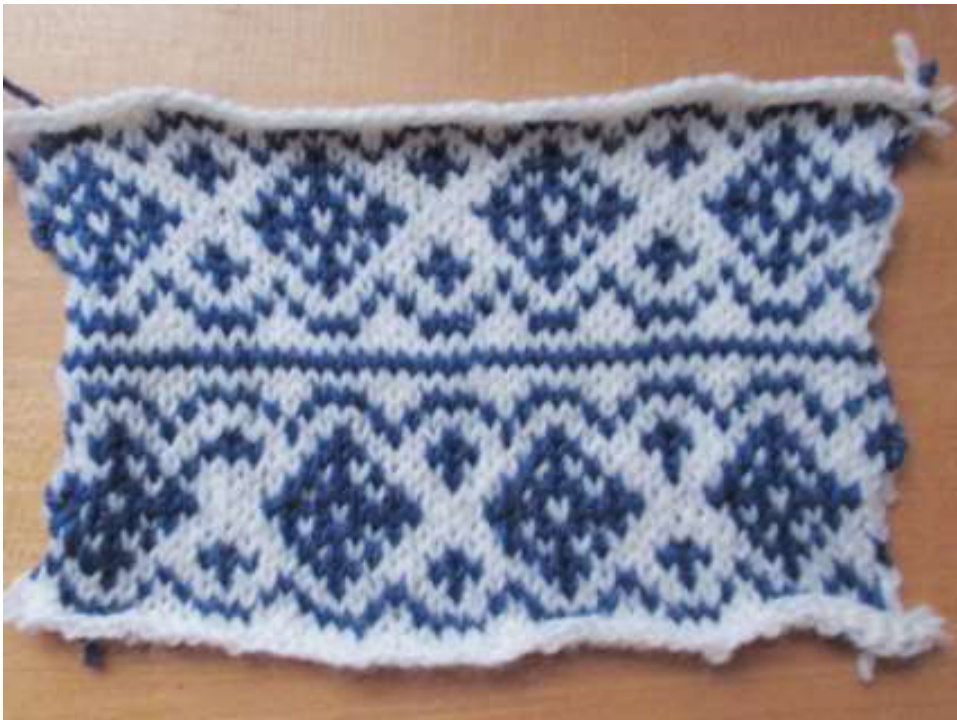
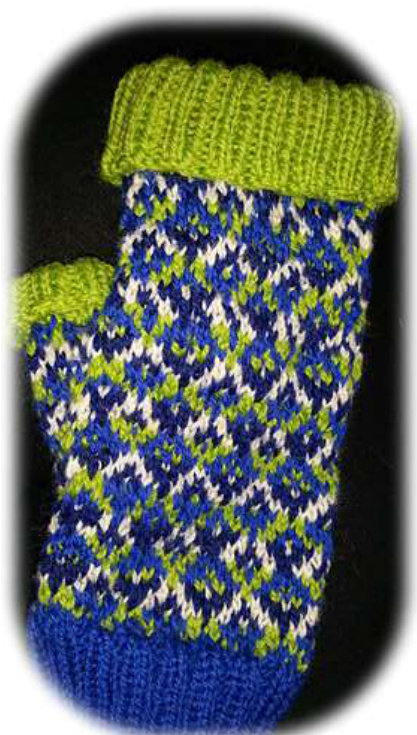
In the above swatch, I knitted the same motif across the piece, and then I repeated it. The only difference I made was the position in which I held my yarns. In the bottom half, I held my yarns so that the blue was dominant, that is to say more obvious than the white, on the front of the work, and the white receded into the background. On the top half, I knitted the same stitches but I held my yarns so that the white dominated and the blue receded. You see a definite difference in the appearance of the motifs when comparing the top and bottom halves of my swatch.
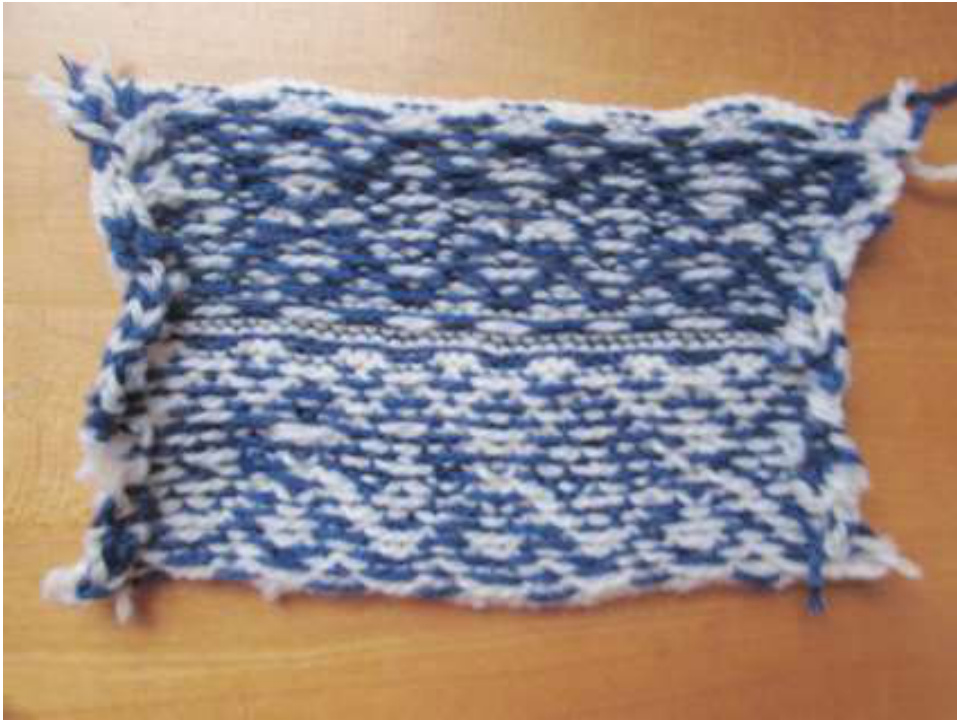
Viewing my swatch from the back, you notice that the color that dominated on the front recedes on the back, and the color that was recessive on the front dominates on the back. A color cannot be dominant both on the front and the back at the same time. So, how do you control for this? How does a color become dominant? I have read many explanations of color dominance, and frankly, they all leave me scratching my head. Terms are used like “over” and “under,” which are nonsensical to me. Over where? Under where? Also, each knitter has her own yarn-holding method. We need an explanation that works no matter how we hold our yarns. First, it is important to point out that, whatever way you hold your yarns when stranding, you want to maintain the same position throughout the piece so that you catch your floats the same way, consistently. That said, here's how color dominance happens. (And it happens whether you like it or not!) The color that will dominate---or stand out-on the front of your work is the color that consistently lies closer to your work as you go. In the above example, on the bottom half of the front of the piece, the blue is more prominent than it is on the top portion of the piece. This is because it lay closer to the piece as I was working the bottom half. How do we know this? Look at the back of the swatch. The bottom on the back shows more white relative to the top of the swatch. You see more white because the floating yarn, the white, is floating over, or around, the blue..it lies further from the piece, has farther to travel, than the blue. Because the white lies closer to you on the bottom half when viewing the back, it is more visible to you than is the blue. Because it is more visible—dominant—on the back, it cannot be, at the same time, the dominant color on the front. No matter how you choose to hold your yarns, one in each hand, both in the right hand, or between your toes as I do, the above rules apply. Try a swatch as I did. Try knitting with the yarns in one position and then switching them. Take note of the color that has to travel to float around the color that lies closer to the work. The one that has to travel to float around the close color is not the color that will dominate on the front of your swatch, but it is the color that will be most evident on the back. Try knitting this chart with two, highly-contrasting colors and DPNs so that you are working inthe-round. You will cut the swatch open when you complete it:
A Word about this Mystery Mitts KAL
When this design was born, it was nameless. It was simply known as the CBDJAN15 Mystery Mitt. As the projects started taking shape, I asked participants to submit possible names for the design. After receiving many great suggestions, I narrowed it to three, and Thiagram (I will use Ravelry names throughout) set up a poll for us. You voted and ultimately chose Tessellated Diamonds as the name for your mitts. Thank you to everyone who suggested names, and congratulations to cellogirl2 for choosing the winning name. It fits the design perfectly. As the CBD (Colorworks by Debi) group on Ravelry has grown, the KALs have become more complex. A greater number of participants gives rise to a greater number of logistical issues. So, some refining of process has been taking shape. The group has helped me define and hone a process for conducting future KALs. Making improvements will, no doubt, continue to be an ongoing thing, but the purpose of the CBD KALs remains constant. We endeavor to knit along, together as a group, a design I create specifically for the KALs. Our goal is to create, and recreate monthly, a community--an online knitting group, if you will. We do this by asking participants to post progress pics regularly and interact with others via the CBD forum threads. This works for most, and some have been joining us regularly for over 21/2 years. We have formed real friendships. It serves to deepen our joy of knitting. And that's what it's all about! January also saw the birth of the CBD advice thread. I look forward to having fun with this as we seek advice from each other on all things knitting-related and beyond. There you have it. And now, we give you the Tessellating Diamonds Versatile Mitts.
muddancer
catexer

Deborah Tomasello
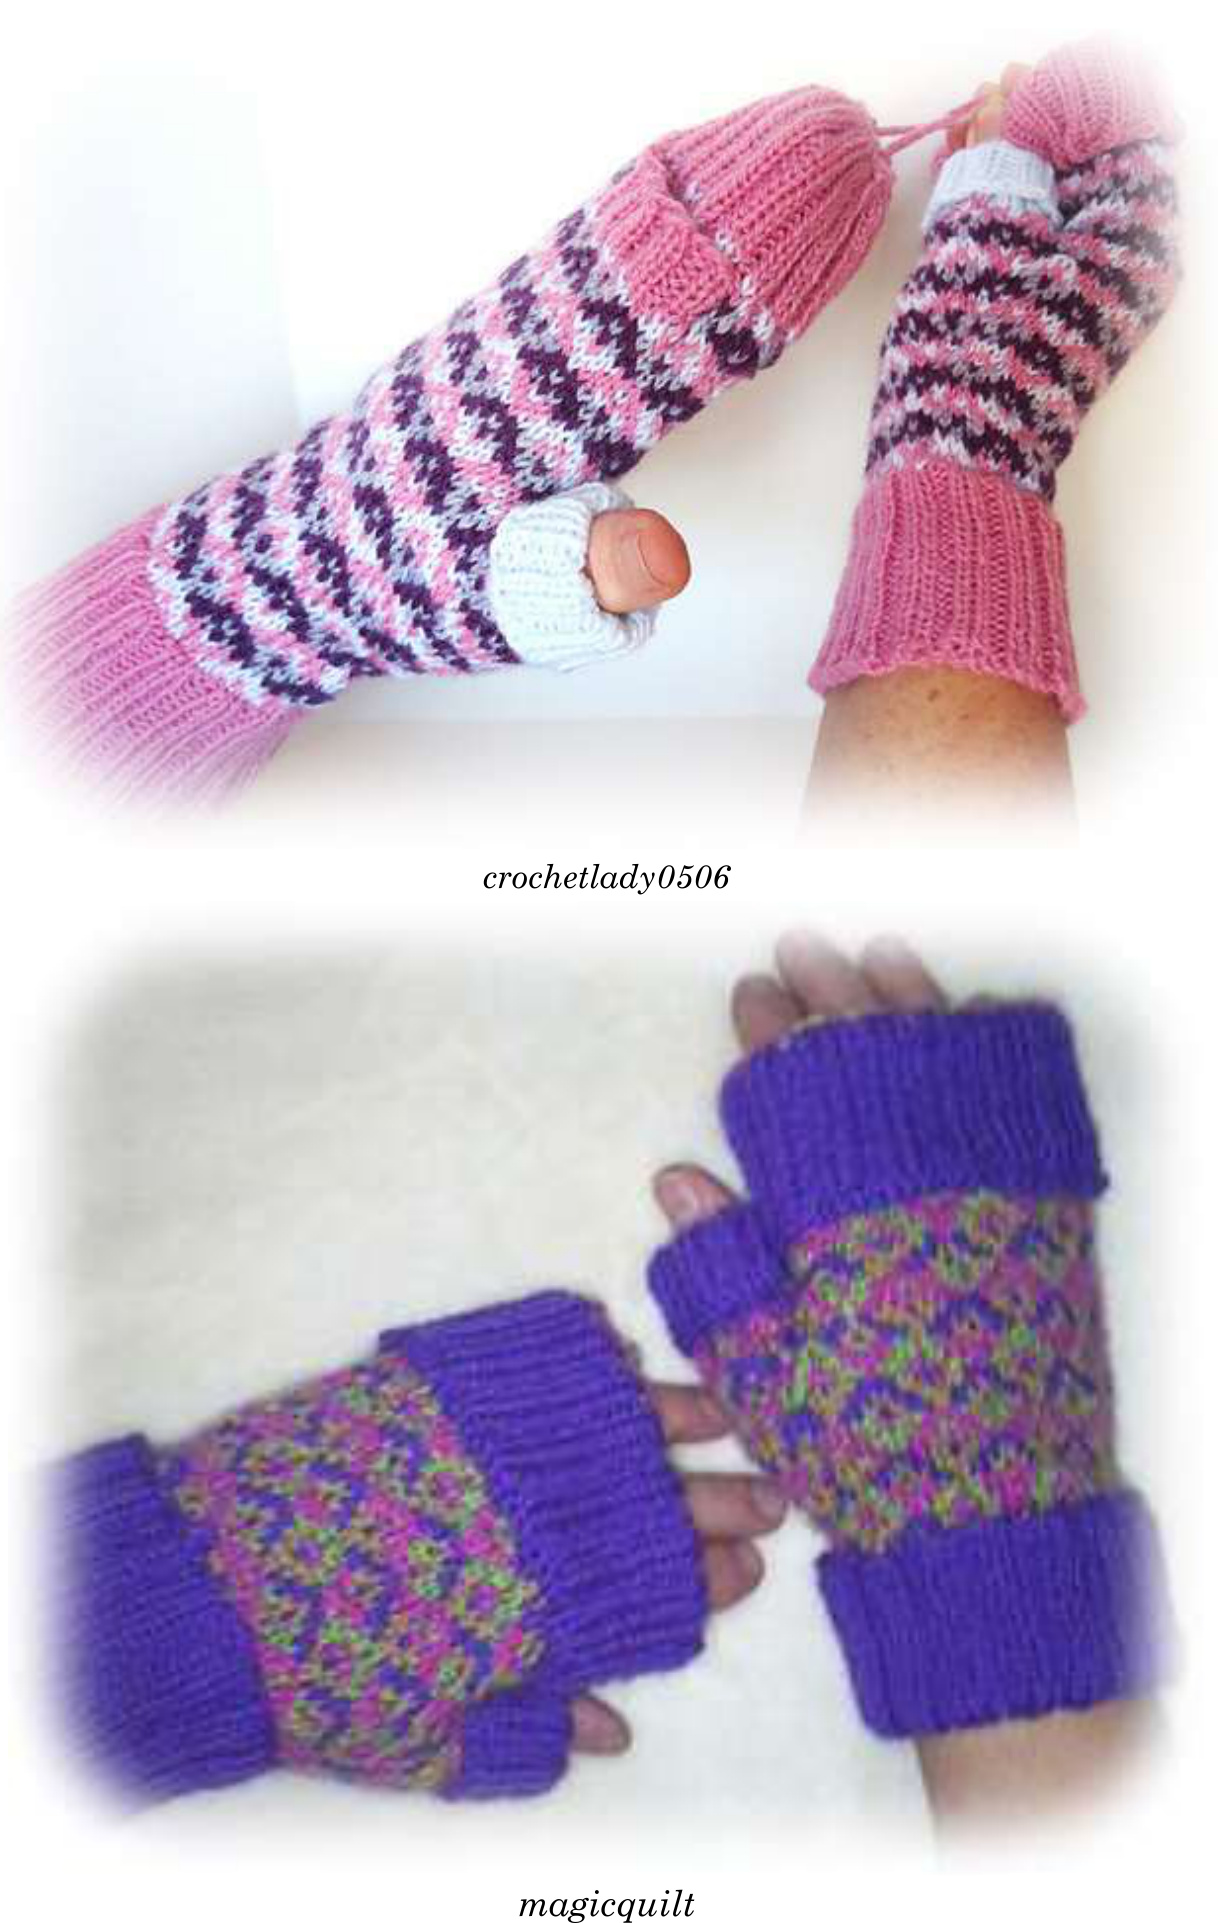
Tessellating Diamonds Versatile Mitts.
Now you see it--now you don't! These wonderful mitts feature a secret pocket that is hidden to protect your valuables while you use your hands. The pocket is large enough to hold cash, credit card, metro card, keys, tissue, Chapstick, hand warmers, or even treats for when you walk Fido! Stranding adds extra wool for extra warmth. Top can be unfolded to cover fingers, or folded down to cover pocket and expose those texting fingers. Layer over gloves for extra warmth and a nifty look. The pattern also includes options. You can choose to make mittens rather than fingerless mitts (as cpainter did). Or, if you can't decide, get the best of both mitt worlds by knitting the convertible mitt option, as crochetlady0506 did. With all the possibilities, these mitts are so much fun to knit! One Size: Woman and Teen Medium Materials: Approx. 50g each of 4 colors of fingering weight yarns. These should have a good level of contrast—suggested: 2 light shades and 2 dark shades with fairly equal color value. five#3DPNs tapestryneedle Gauge: 32 stitches and 30 rounds = 4” using #3 needles. Abbreviations: M1: This is not “the” M1 stitch. It is the Bumpless m1. It is a modification of KFB. See my video tutorial here: https://www.youtube.com/watch?v=syFeOy1B9Ok Pocket (Optional): CO 20 stitches with any color. Knit, back and forth in stockinette, about 30 rows or 3.5 inches. End with a purl row. DO NOT Bind off. Steam block. Set aside. MITTS (MAKE TWO): Mitt: With DPNs, CO 64 sts (16 sts on eah of 4 DPNs) using the color you have chosen to be your ribbing color. Join to work in the round taking care not to twist sts.(if using circs) Knit 2x2 rib for 26 rounds, or to desired cuff length. CHART K1, place marker between fist two stitches. You are merely placing a marker after the very first stitch. This first stitch will eventually become the thumb. So, you will be working the pattern on 64 sts still. Follow chart for 13 rounds. Continue to follow chart, and inc for thumb as follows: To increase thumb: umb: Round 14: m1, k1, m1 in first st (3 sts now in first st). Continue to k sts as shown around Round 15: knit all sts according to chart Round 16: m1, k3, m1, continue to k sts as shown around Round 17: knit all sts around according to chart Round 18: m1, k5, m1, continue to k sts as shown around Round 19: knit all sts around according to chart Round 20: m1, k7, m1, continue to k sts as shown around Round 21: knit all sts around according to chart Round 22: m1, k9, m1, continue to k sts as shown around Round 23: knit all sts around according to chart Round 24: m1, k11, m1, continue to k sts as shown around Round 25: knit all sts around according to chart Round 26: m1, k13, m1, continue to k sts as shown around Round 27: knit all sts around according to chart Round 28: m1, k15, m1, continue to k sts as shown around Round 29: knit all sts around according to chart Round30: m1, k17, m1, continue to k sts as shown around Round 31: knit all sts around according to chart Round 32: m1,k19, m1, continue to k sts as shown around Round 33: knit all sts around according to chart Round 34 Move 21 thumb sts to fifth DPN (or waste yarn) to be worked as thumb later. M1\* st in next st so you will be working the chart's 64 sts. Follow chart around with 64 stitches on needles. \* See tutorial here: https://www.youtube.com/watch?v=syFeOy1B90k Rounds 35 to 50: Knit chart. (The mitt will be a minimum of 1 inch longer. If you want a shorter mitt, you might want to rip back some rounds before proceeding with the next step). If adding a pocket, do so here: Pocket: Round 51: Add pocket—-Knit 6 stitches. Move next 20 sts to stitch holder. Retrieve needle with pocket stitches, and with pocket front (stockinette side) facing you, continue to knit chart with these stitches. Knit chart through round 54, or if, the mitts are long enough, stop at round 51
Fingerless Glove option:
Detach all but the color you used for knitting your cuff, and using that color, knit 2x2 rib twice as long as you want the cuff length. Bind off loosely. Fold cuff back over itself. If you added a pocket, Move 20 stitches from stitch holder to needle. Attach ribbing color and knit 2x2 rib for 6 rows. Bind off. Sew rib sides to mitt, creating the pocket top. When the mitt cuff is folded back, it will hide the pocket opening.
Convertible Glove/Mitt option:
Detach all but the color you used for knitting your cuff, and using that color, knit 2x2 rib long enough that it reaches just past the top of your fingers. BO loosely. Now, either knit a 3-stitch i-cord or crochet a chain long enough to fit top circumference of mitt rib. Leave tails long enough to attach and tie. With tapestry needle, weave chain, loosely, through each rib at the top of mitt. Tie chain ends SECURLY in the back, weave in and trim ends. Now, when chain loop is gently tugged from other side, the mitt top will close up, creating a warm mitten. When it is relaxed, the cuff will fold down over itself, forming the fingerless glove.
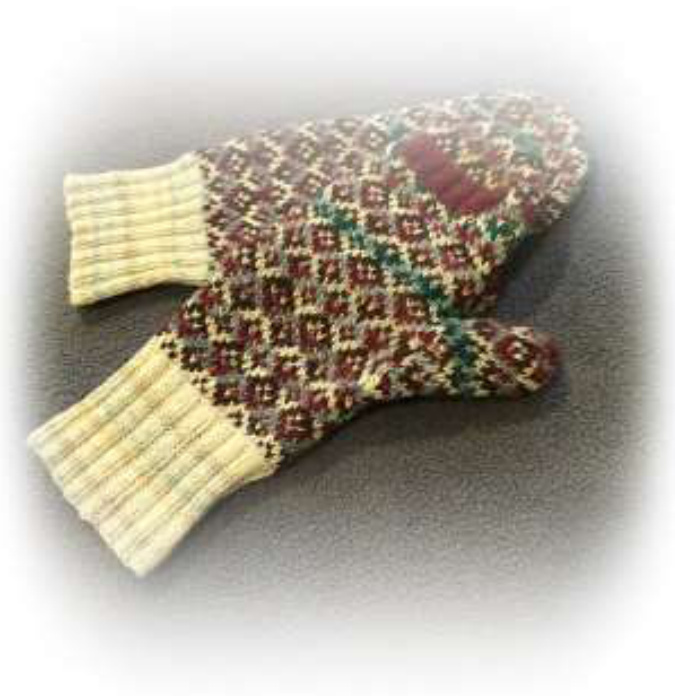
Mittens option:
AftercompletingClue6andstavingtruetotheestablishednattern.decreasemitttonasfollows: TntorcopietrmgCiaeo,anaBtayrmgtraetoteCstaosneapatter,acercasenntttopas1o Place sts on 4 DPNs, evenly---16 sts per needle. Then: Needle 1: K1, K2TOG knit to last 3 sts of NEEDLE 2 Needle 2: K to last 3 sts of NEEDLE 2, SSK, K1 Needle 3: K1, K2TOG knit to last 3 sts of NEEDLE 4 Needle 4: Knit to last 3 sts, SSK, K1. Repeat this until there are 7 sts left on each needle. Place sts from needles 1 and 2 onto one needle: 14 sts. Place sts from needles 3 and 4 onto another needle: 14 sts. Cut 3 of the 4 strands and, using the remaining strand, graft the remaining stitches together using Kitchener st, and weave in all ends. After completing Clue 6, alternating two colors from your mitt, and striping in 2-stitch stripes, decrease mitt top as follows: Place sts on 4 DPNs, evenly---16 sts per needle. Then: Needle 1: K1, K2TOG knit to last 3 sts of NEEDLE 2 Needle 2: K to last 3 sts of NEEDLE 2, SSK, K1 Needle 3: K1, K2TOG knit to last 3 sts of NEEDLE 4 Needle 4: Knit to last 3 sts, SSK, K1. Repeat this until there are 7 sts left on each needle. Place sts from needles 1 and 2 onto one needle: 14 sts. Place sts from needles 3 and 4 onto another needle: 14 sts. Jraft the remaining stitches together using Kitchener st, and weave in all ends
Thumb
Fingerless Mitts:
Using the color you used for other ribbing portions of your mitts, pick up 7 sts from body of mitt and add them to the 21sts from 5" DPN or waste yarn (split so you're working on 3 needles) for a total of 28 thumb sts. Join. Knit 2x2 rib for 16 rounds or desired length. Bind off. Pocket: Sew 3 sides of pocket to the inside of the mitt Finishing: Tie and trim all yarn ends. Wear layered over gloves for extra warmth or as-is for easy texting!
Convertible Mitts:
Using the color you used for other ribbing portions of your mitts, pick up 7 sts from body of mitt and add them to the 21sts from 5" DPN or waste yarn (split so you're working on 3 needles) for a total of 28 thumb sts. Join. Knit 2x2 rib for 16 rounds or desired length. Bind off. Knit a 3-st icord or crochet a short chain and work through top of thumb ribbing as you did for the mitt. Pull closed or leave open and fold ribbing down. Pocket: Sew 3 sides of pocket to the inside of the m :im all yarn ends. Wear layered over gloves for extra warmth or as-is for easy texting Mittens: Pick up 7 sts from body of mitt, working pattern as established, knit those 7 sts plus the 21sts from 5"h DPN or waste yarn (split so you're working in-the-round on 3 needles) for a total of 28 thumb sts. Keeping true to the pattern design as you knit (28 sts will not allow for the first and last st to line up according to the design-don't worry about this.), work 10-12 rounds of design, then detach the two colors not in use and, with the two remaining colors, knit 2 together around, alternating color strands (14 sts). Repeat last round (7 sts.) Move last 7 sts to tapestry needle and pull yarn through to close. Secure,Tightly. Pocket: Sew 3 sides of pocket to the inside of the mitt. Finishing: Tie and trim all yarn ends. Embroider antennae and add beads to antennae tips, if desired. Wear layered over gloves as shown or as is for easy texting!
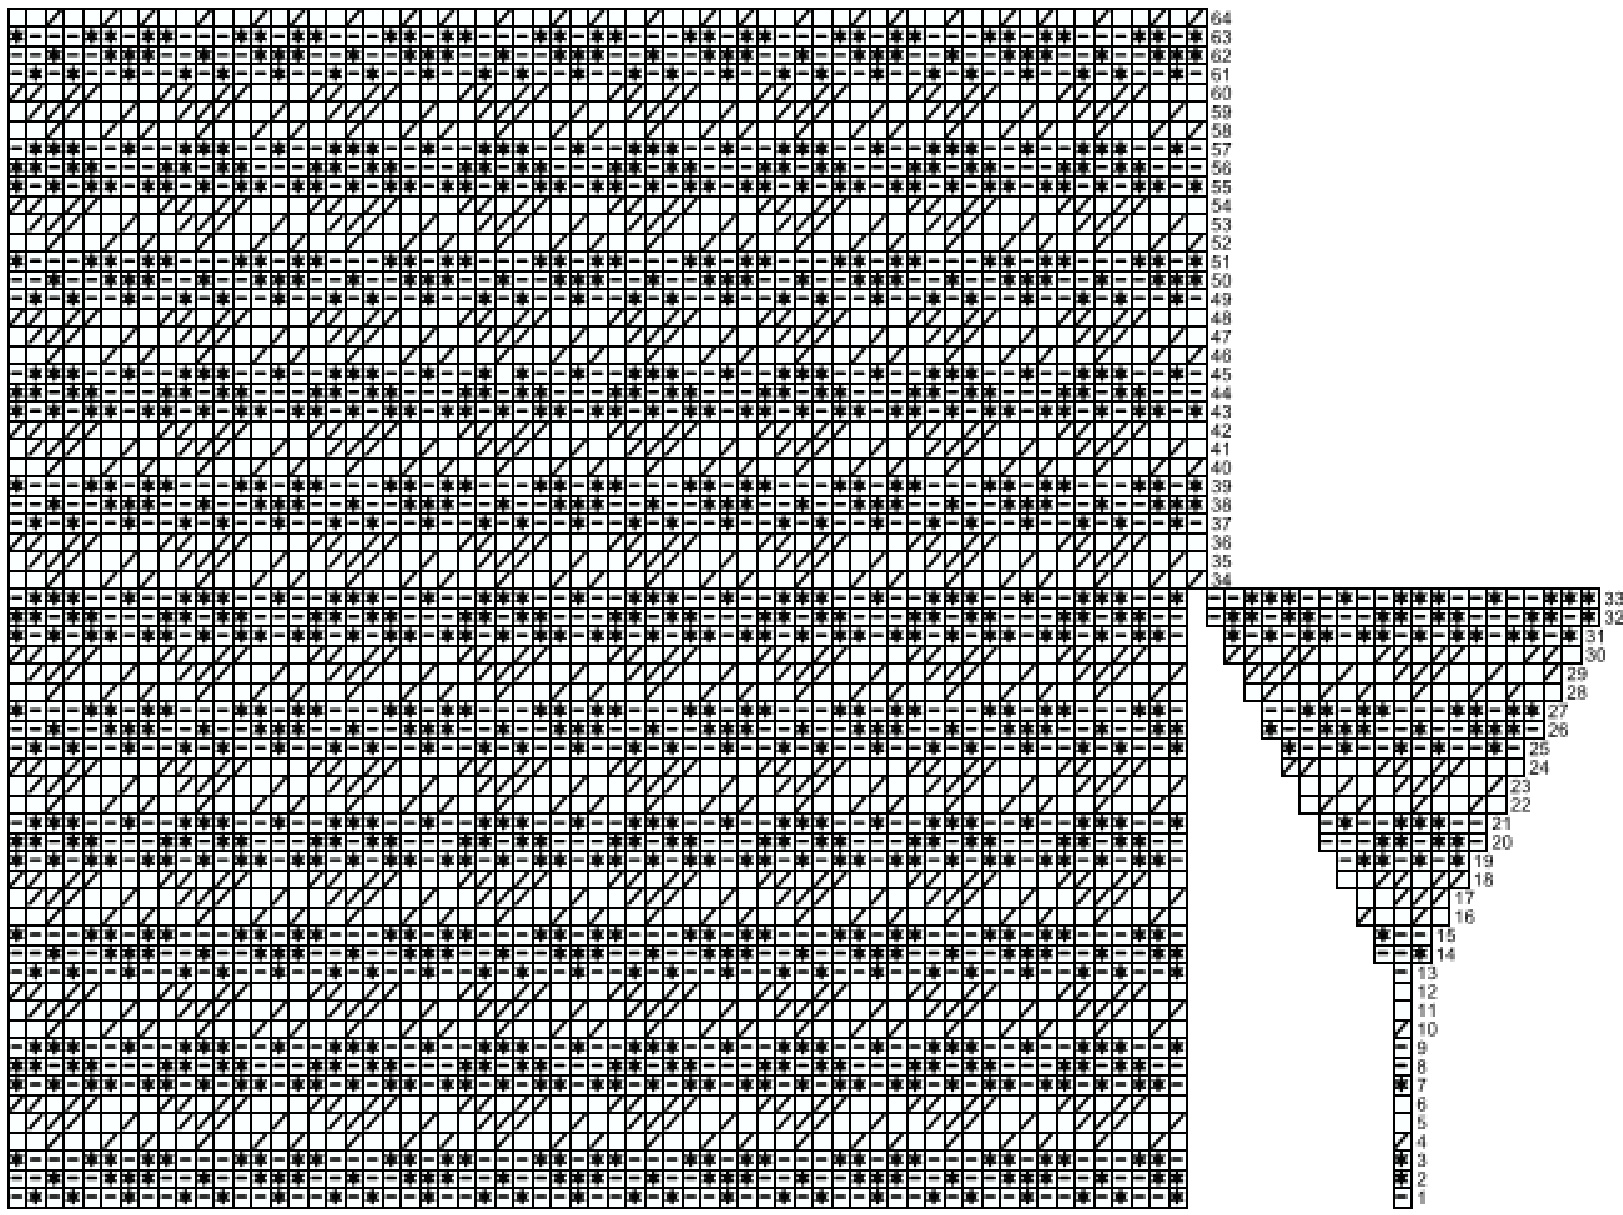
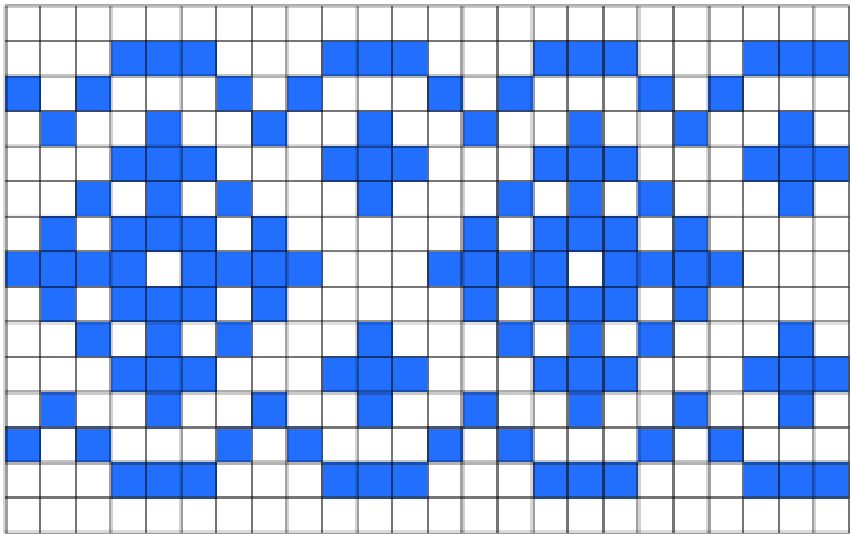
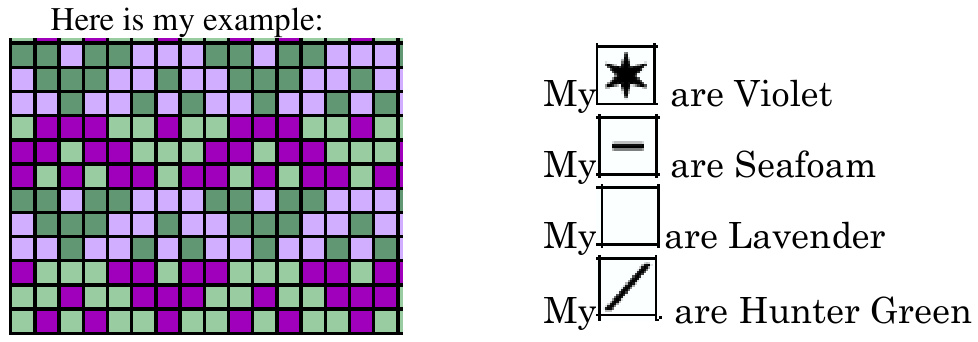
The design comprises an 8-stitch repeat. Each different symbol represents one color. Below are some blank grids, with enough squares to show 2 complete pattern repeats. This will help you choose the best color-placement option. Using colored pencils, experiment with color choices and color placement by substituting a color for each symbol. For example, if blue is one of your colors, fill in the test grid with blue wherevr you se a ame wih theremaining colors. Then try ain on the next grid, changing the color around until you find an arrangement that is pleasing to you.
Now it's your turn:

cided, place color name on the line to the right of the symbol below for easy referene ★

angiann
cbrirish
dianne45
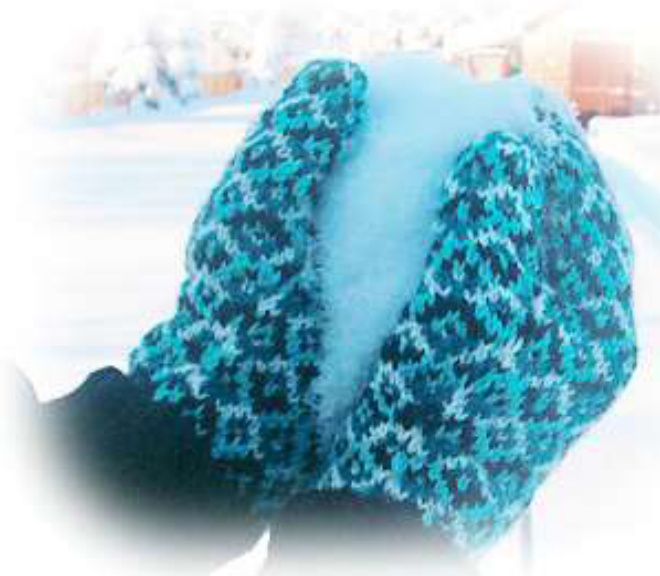
avalanche
Nadelhexe1