

Table of Contents
page three page seven
page ten
page twelve
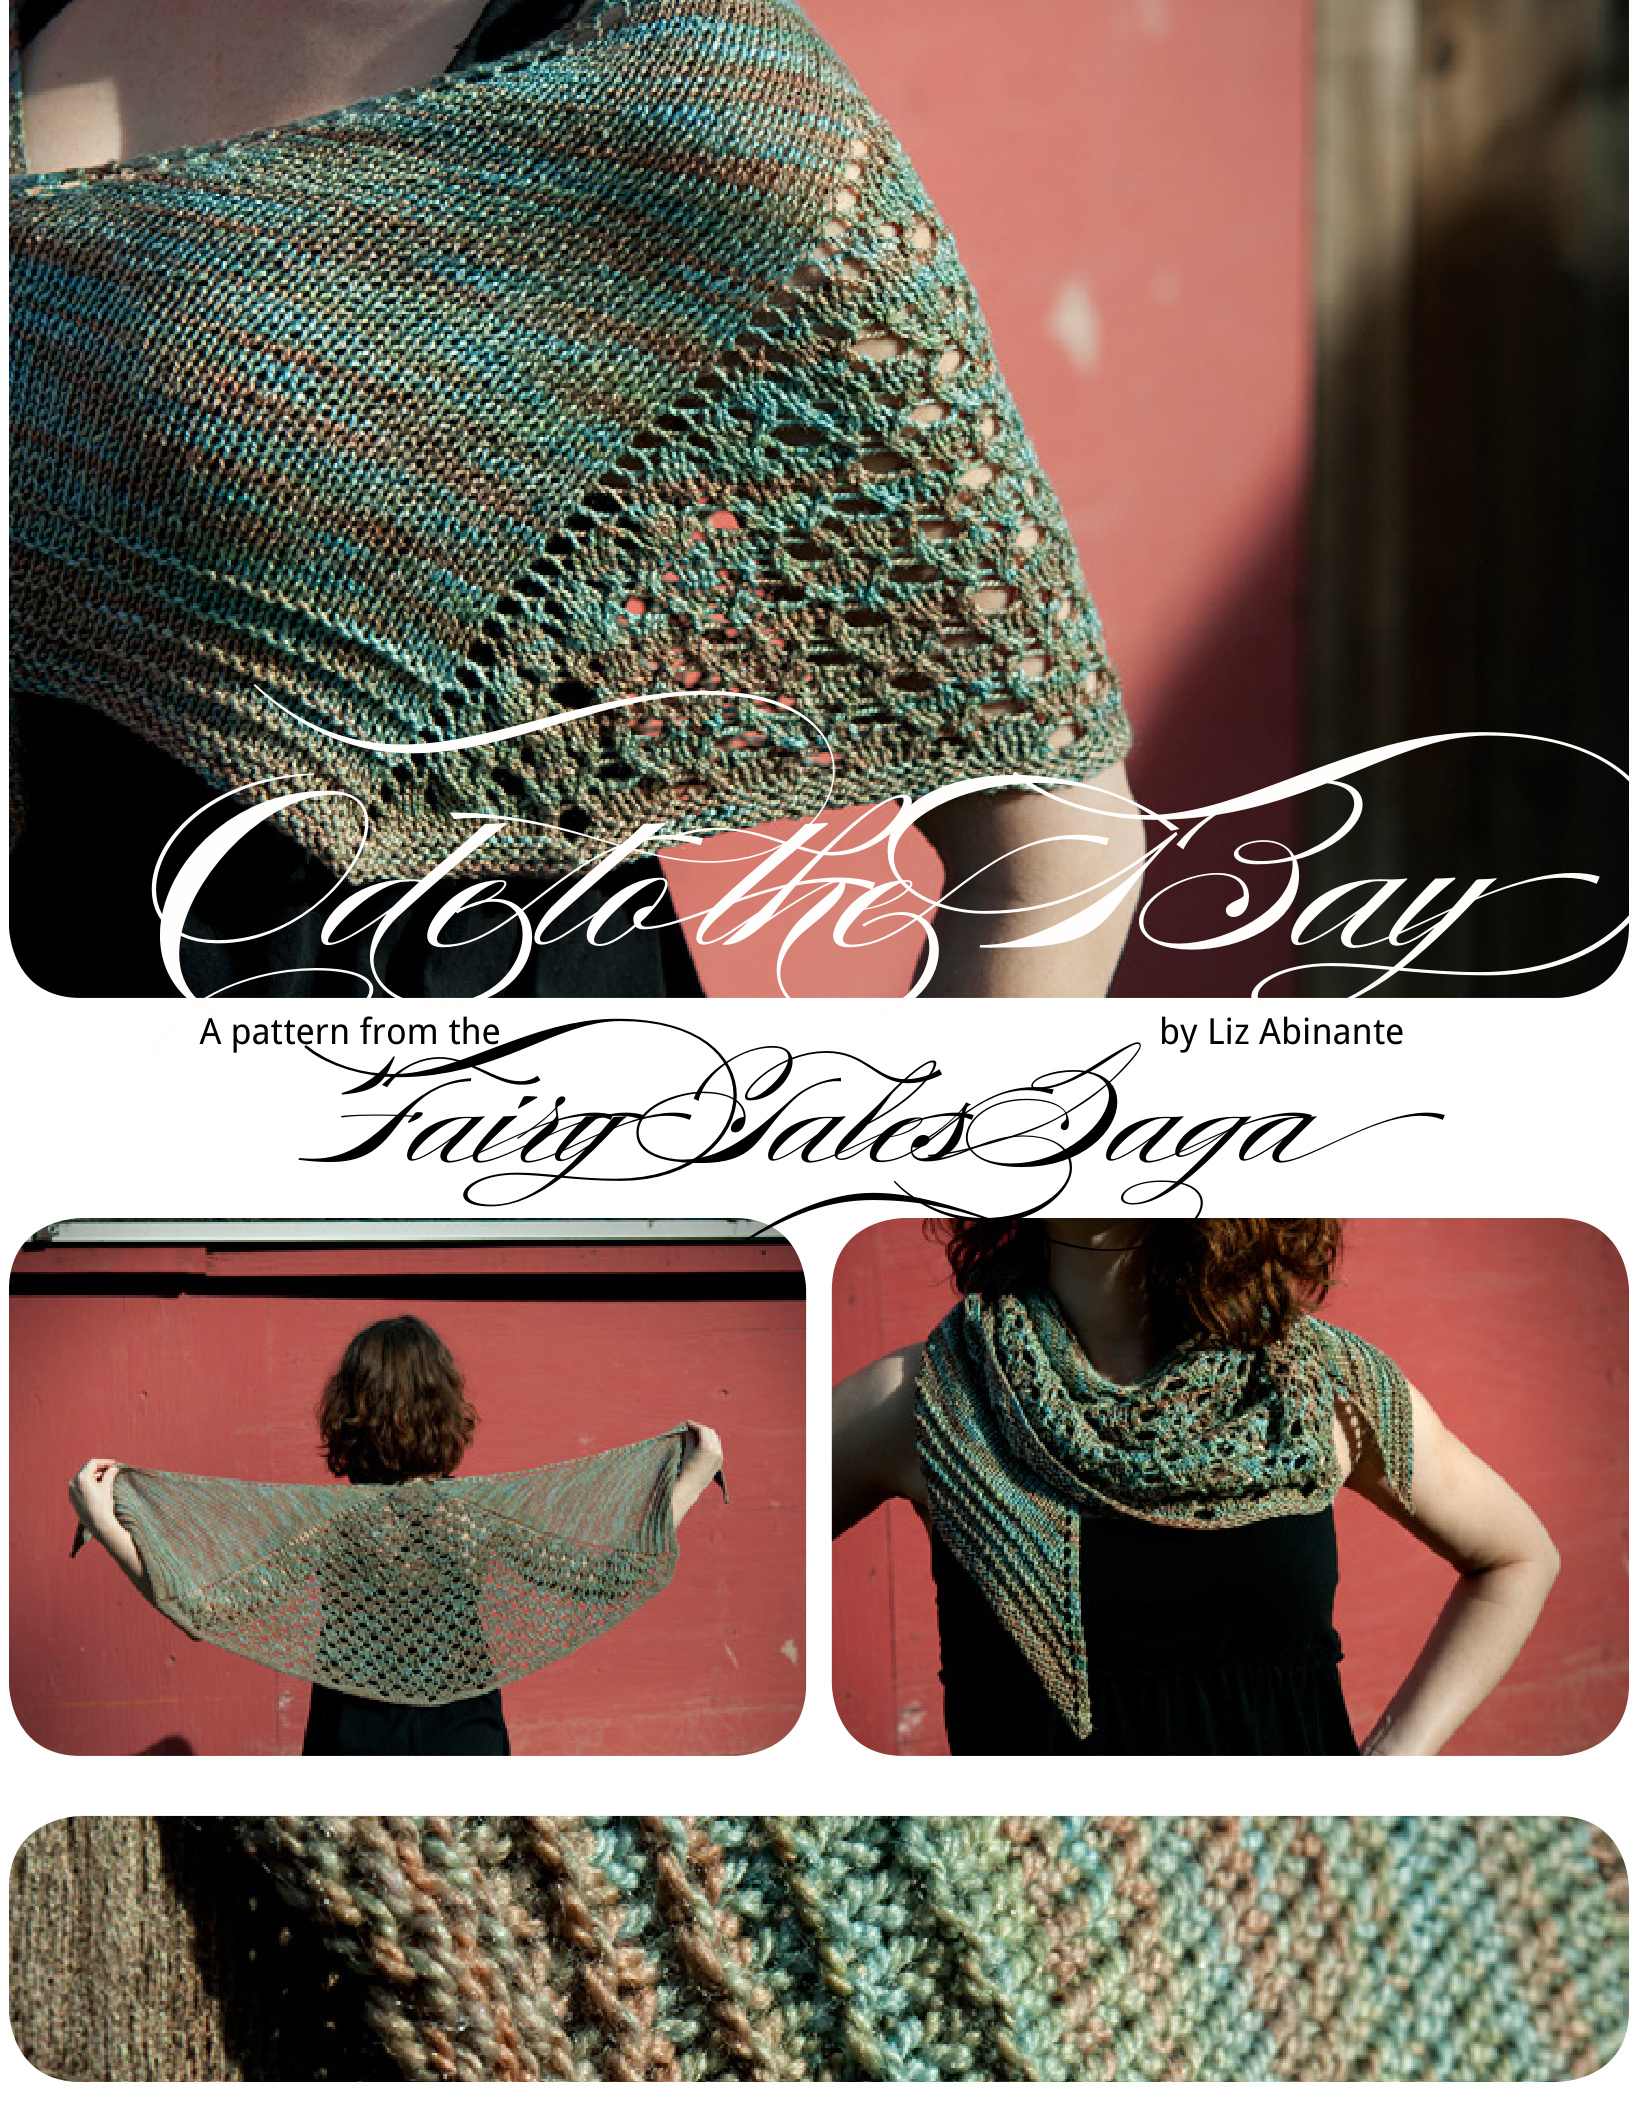

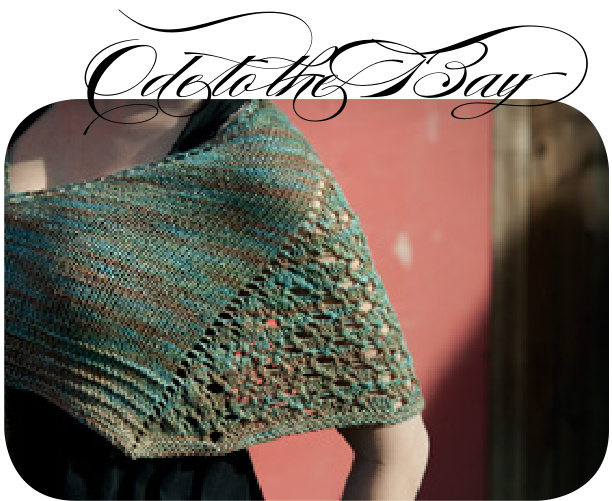
This is the first pattern in the Fairy Tales Saga. Ariel was always one of my favorite Disney characters-she was a ginger, after all. This shawl is inspired by another mermaid, though. The mermaid from the original Hans Christian Andersen tale was more like your typical fairy tale damsel than Ariel ever was and I found her adventure for love to be more sincere than Ariel's. She slept on a pillow outside of the prince's door to prove her devotion! There's quite possibly nothing less demeaning than that. This shawl is an ode to the waves that the little mermaid forsakes for a man who made her sleep on a pillow outside of his door. Although beautiful, love proved to be more alluring than the sea. This yarn is the perfect choice for the shawl: a gorgeous yarn inspired and dyed by nature, that so perfectly resembles the sea.
Yarn
One skein light sport weight or heavy fingering weight yarn.
Shown in
Shown in The Wild Peacock's Plume. Approximately 1 skein used. Note: A Verb For Keeping Warm Metamorphosis is classified as a sport weight yarn. However, most knitterswill be able to obtain a similar gauge with a heavy fingering weight yarn. Needles US 6 (4mm) 24" circular needle. Gauge 5 sts per in, 6 rows per in, stockinette. Finished size 52" wingspan, 16.5" deep Notions 4 stitch markers
Instructions
13 panels: one stockinette, one lace, and one stockinette. Increases are incorporated into the lace patte Instructions for the lace pattern are provided in both chart and written form. Wrong side rows for the lace pattern are not charted. When working WS rows, work (k1, p1) into the double yarn overs (yo 2x) from the previous row and purl all other stitches. When blocking the shawl, take care to preserve the soft slope. I would recommending using twine or cotton to block the rounded edge. The pattern ends with several rows of garter stitch, so it will not roll when worn.
Abbreviations
CO/BO:cast on/bind off k: knit k2tog: knit two together m1: make 1 (lift horizontal bar between sts from back to front onto ndl, knit) ndl: needle p: purl pfb: purl through front and back loop pm: place marker RS/WS: right side, wrong side sl: slip. slm: slip marker ssk: slip, slip, knit two slipped stitches together st(s): stitch(es) tbl: through the back loop yo:yarn over yo2x: yarn over twice
Instructions
CO 4.
Knit 6 rows. Do not turn work on the last row. Rotate work 90° clockwise and pick up 6 stitches along the row edge and cast on. 10 sts total.
Set-Up
Row 1 (WS): k2, p6, k2. Row 2 (RS): k2, pm, yo, k1, kfb, k2, kfb, k1, yo, pm, k2. (14 sts) Row 3: k2, slm, p to m, slm, k2. Row 4: k2, slm, yo, k to m, yo, slm, k2. (16 sts) Row 5: k2, slm, p to m, slm, k2. Row 6: k2, slm, yo, k4, pm, yo, k4, yo, pm, k4, yo, slm, k2. (20 sts) Row 7: k2, slm, p to m, slm, k2. Row 8: k2, slm, yo, k to m, slm, yo, k to m, yo, slm, k to m, yo, slm, k2. (24 sts) Row 9: k2, slm, p to m, slm, k2. Your stitches should be separated by markers as follows: 2 - 6 - 8 - 6 - 2. You are now ready to begin a RS row.
Body
You now have three panels to the shawl. The 2 outer panels will increase 1 st each with every RS row and are worked in stockinette stitch until the border. The shawl border is worked in garter stitch.

Body, continued 'he center panel is worked according to the lace chart and increases on the RS rows Row 1: adds 2 Row 3: adds 4 Row 5: adds 2 Row 7: adds 4 Work 12 rpts or Rows 1-8: (96 rows total) Row 1 (Rs): k2, slm, yo, kto m, slm, [lace row 1] rpt to m, slm, kto m, yo, slm, k2. Row 2 (Ws): k2, slm, p to m, slm, [lace row 2] rpt to m, slm, p to m, slm, k2. Row 3: k2, slm, yo, k to m, slm, [lace row 3] rpt to m, slm, k to m, yo, slm, k2. Row 4: k2, slm, p to m, slm, [lace row 4] rpt to m, slm, p to m, slm, k2. Row 5: k2, slm, yo, k to m, slm, [lace row 5] rpt to m, slm, k to m, yo, slm, k2. Row 6: k2, slm, p to m, slm, [lace row 6] rpt to m, slm, p to m, slm, k2. Row 7: k2, slm, yo, k to m, slm, [lace row 7] rpt to m, slm, k to m, yo, slm, k2. Row 8: k2, slm, p to m, slm, [lace row 8] rpt to m, slm, p to m, slm, k2. You should have 264 sts total, separated by markers as follows: 2 - 54 - 152 - 54 -
Edge Transition
Work 2 rpts of Rows 1-8:(16 rows total) Row 1 (Rs): k2, slm, yo, k to m, slm, [lace row 1] rpt to m, slm, k to m, yo, slm, k2. Row 2 (Ws): k2, slm, k to m, slm, [lace row 2] rpt to m, slm, k to m, slm, k2. Row 3: k2, slm, yo, k to m, slm, [lace row 3] rpt to m, slm, k to m, yo, slm, k2. Row 4: k2, slm, p to m, slm, [lace row 4] rpt to m, slm, p to m, slm, k2. Row 5: k2, slm, yo, k to m, slm, [lace row 5] rpt to m, slm, k to m, yo, slm, k2. Row 6: k2, slm, k to m, slm, [lace row 6] rpt to m, slm, k to m, slm, k2. Row 7: k2, slm, yo, k to m, slm, [lace row 7] rpt to m, slm, k to m, yo, slm, k2. Row 8: k2, slm, p to m, slm, [lace row 8] rpt to m, slm, p to m, slm, k2.
Edge
Do not remove the markers! The center is worked from Rows 1-3 of the lace chart. Rows 4-7 of the center and edge panels are worked in garter stitch. Row 1 (Rs): k2, slm, yo, k to m, slm, [lace row 1] rpt to m, slm, k to m, yo, slm, k2. Row 2 (Ws): k2, slm, k to m, slm, [lace row 2] rpt to m, slm, k to m, slm, k2. Row 3: k2, slm, yo, k to m, slm, [lace row 3] rpt to m, slm, k to m, yo, slm, k2. Row 4: k2, slm, kto m, slm, k to m, slm, kto m, slm, k2. (Don't forget to work the yo2x as [k1, p1]) Row 5: k2, slm, yo, k to m, slm, yo, k to m, yo, slm, k to m, yo, slm, k2. Row 6: k2, slm, k to m, slm, k to m, slm, k to m, slm, k2. Row 7: k2, slm, yo, k to m, slm, yo, k to m, yo, slm, k to m, yo, slm, k2. BO on RS row as follows: ssk, [sl st to left needle, ssk] rpt to end.
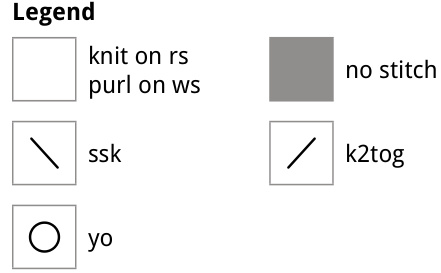
| 0 | 0 | 0 | \ | 0 | 0 | 7 | ||||||||||||||
| 0 | 0 | 0 | \ | 0 | 5 3 | |||||||||||||||
| 0 | 0 | / | O | 0 | \ | 0 | 0 | |||||||||||||
| 0 | 0 | \ | / | 0 | 0 | 1 | ||||||||||||||
Lace chart: read all rows from right to left.
Row 1: yo, k1, [yo, ssk, k2tog, yo, k2] to 1 st before m, k1, yo. Rows 2, 6: p all sts. Row 3: yo, k2, yo, [k2tog, yo2x, ssk, k2] to 2 st before m, yo, k2, yo. Rows 4, 8: p all sts, working (k1, p1) into yo2x. Row 5: yo, k4, [k2tog, yo, k2, yo, ssk] to 4 sts before m, k4, yo. Row 7: yo, k2, yo, k3, [ssk, k2, k2tog, yo2x] to 5 sts before m, k3, yo, k2, yo

| Body: Starts with 24 sts | |||||||
| Row | Edge | Outer | Lace | Outer | Edge | Total | Rpts |
| 1 | 2 | 7 | 10 | 7 | 2 | 28 | |
| 3 | 2 | 8 | 14 | 8 | 2 | 34 | |
| 5 | 2 | 9 | 16 | 9 | 2 | 38 | |
| 7 | 2 | 10 | 20 | 10 | 2 | 44 | 1 |
| 1 | 2 | 11 | 22 | 11 | 2 | 48 | |
| 3 | 2 | 12 | 26 | 12 | 2 | 54 | |
| 5 | 2 | 13 | 28 | 13 | 2 | 58 | |
| 7 | 2 | 14 | 32 | 14 | 2 | 64 | 2 |
| 1 | 2 | 15 | 34 | 15 | 2 | 68 | |
| 3 | 2 | 16 | 38 | 16 | 2 | 74 | |
| 5 | 2 | 17 | 40 | 17 | 2 | 78 | |
| 7 | 2 | 18 | 44 | 18 | 2 | 84 | 3 |
| 1 | 2 | 19 | 46 | 19 | 2 | 88 | |
| 3 | 2 | 20 | 50 | 20 | 2 | 94 | |
| 5 | 2 | 21 | 52 | 21 | 2 | 98 | |
| 7 | 2 | 22 | 56 | 22 | 2 | 104 | 4 |
| 1 | 2 | 23 | 58 | 23 | 2 | 108 | |
| 3 | 2 | 24 | 62 | 24 | 2 | 114 | |
| 5 | 2 | 25 | 64 | 25 | 2 | 118 | |
| 7 | 2 | 26 | 68 | 26 | 2 | 124 | 5 |
| 1 | 2 | 27 | 70 | 27 | 2 | 128 | |
| 3 | 2 | 28 | 74 | 28 | 2 | 134 | |
| 5 | 2 | 29 | 76 | 29 | 2 | 138 | |
| 7 | 2 | 30 | 80 | 30 | 2 | 144 | 6 |
Row-by-Row Stitch Counts
| Body, continued: Starts with 144 sts | |||||||
| Row | Edge | Outer | Lace | Outer | Edge | Total | Rpts |
| 1 | 2 | 31 | 82 | 31 | 2 | 148 | |
| 3 | 2 | 32 | 86 | 32 | 2 | 154 | |
| 5 | 2 | 33 | 88 | 33 | 2 | 158 | |
| 7 | 2 | 34 | 92 | 34 | 2 | 164 | 7 |
| 1 | 2 | 35 | 94 | 35 | 2 | 168 | |
| 3 | 2 | 36 | 98 | 36 | 2 | 174 | |
| 5 | 2 | 37 | 100 | 37 | 2 | 178 | |
| 7 | 2 | 38 | 104 | 38 | 2 | 184 | 8 |
| 1 | 2 | 39 | 106 | 39 | 2 | 188 | |
| 3 | 2 | 40 | 110 | 40 | 2 | 194 | |
| 5 | 2 | 41 | 112 | 41 | 2 | 198 | |
| 7 | 2 | 42 | 116 | 42 | 2 | 204 | 9 |
| 1 | 2 | 43 | 118 | 43 | 2 | 208 | |
| 3 | 2 | 44 | 122 | 44 | 2 | 214 | |
| 5 | 2 | 45 | 124 | 45 | 2 | 218 | |
| 7 | 2 | 46 | 128 | 46 | 2 | 224 | 10 |
| 1 | 2 | 47 | 130 | 47 | 2 | 228 | |
| 3 | 2 | 48 | 134 | 48 | 2 | 234 | |
| 5 | 2 | 49 | 136 | 49 | 2 | 238 | |
| 7 | 2 | 50 | 140 | 50 | 2 | 244 | 11 |
| 1 | 2 | 51 | 142 | 51 | 2 | 248 | |
| 3 | 2 | 52 | 146 | 52 | 2 | 254 | |
| 5 | 2 | 53 | 148 | 53 | 2 | 258 | |
| 7 | 2 | 54 | 152 | 54 | 2 | 264 | 12 |
| Edge Transition: Starts with 264 sts | |||||||
| Row | Edge | Outer | Lace | Outer | Edge | Total | Rpts |
| 1 | 2 | 56 | 154 | 56 | 2 | 270 | |
| 3 | 2 | 57 | 158 | 57 | 2 | 276 | |
| 5 | 2 | 58 | 160 | 58 | 2 | 280 | |
| 7 | 2 | 59 | 164 | 59 | 2 | 286 | 1 |
| 1 | 2 | 60 | 166 | 60 | 2 | 290 | |
| 3 | 2 | 61 | 170 | 61 | 2 | 296 | |
| 5 | 2 | 62 | 172 | 62 | 2 | 300 | |
| 7 | 2 | 63 | 176 | 63 | 2 | 306 | |
| Edge:Startswith306sts | |||||||
| Row | Edge | Outer | Lace | Outer | Edge | Total | Rpts |
| 1 | 2 | 64 | 178 | 64 | 2 | 310 | |
| 3 | 2 | 65 | 182 | 65 | 2 | 316 | |
| 5 | 2 | 66 | 184 | 66 | 2 | 320 | |
| 7 | 2 | 67 | 188 | 67 | 2 | 326 | 1 |
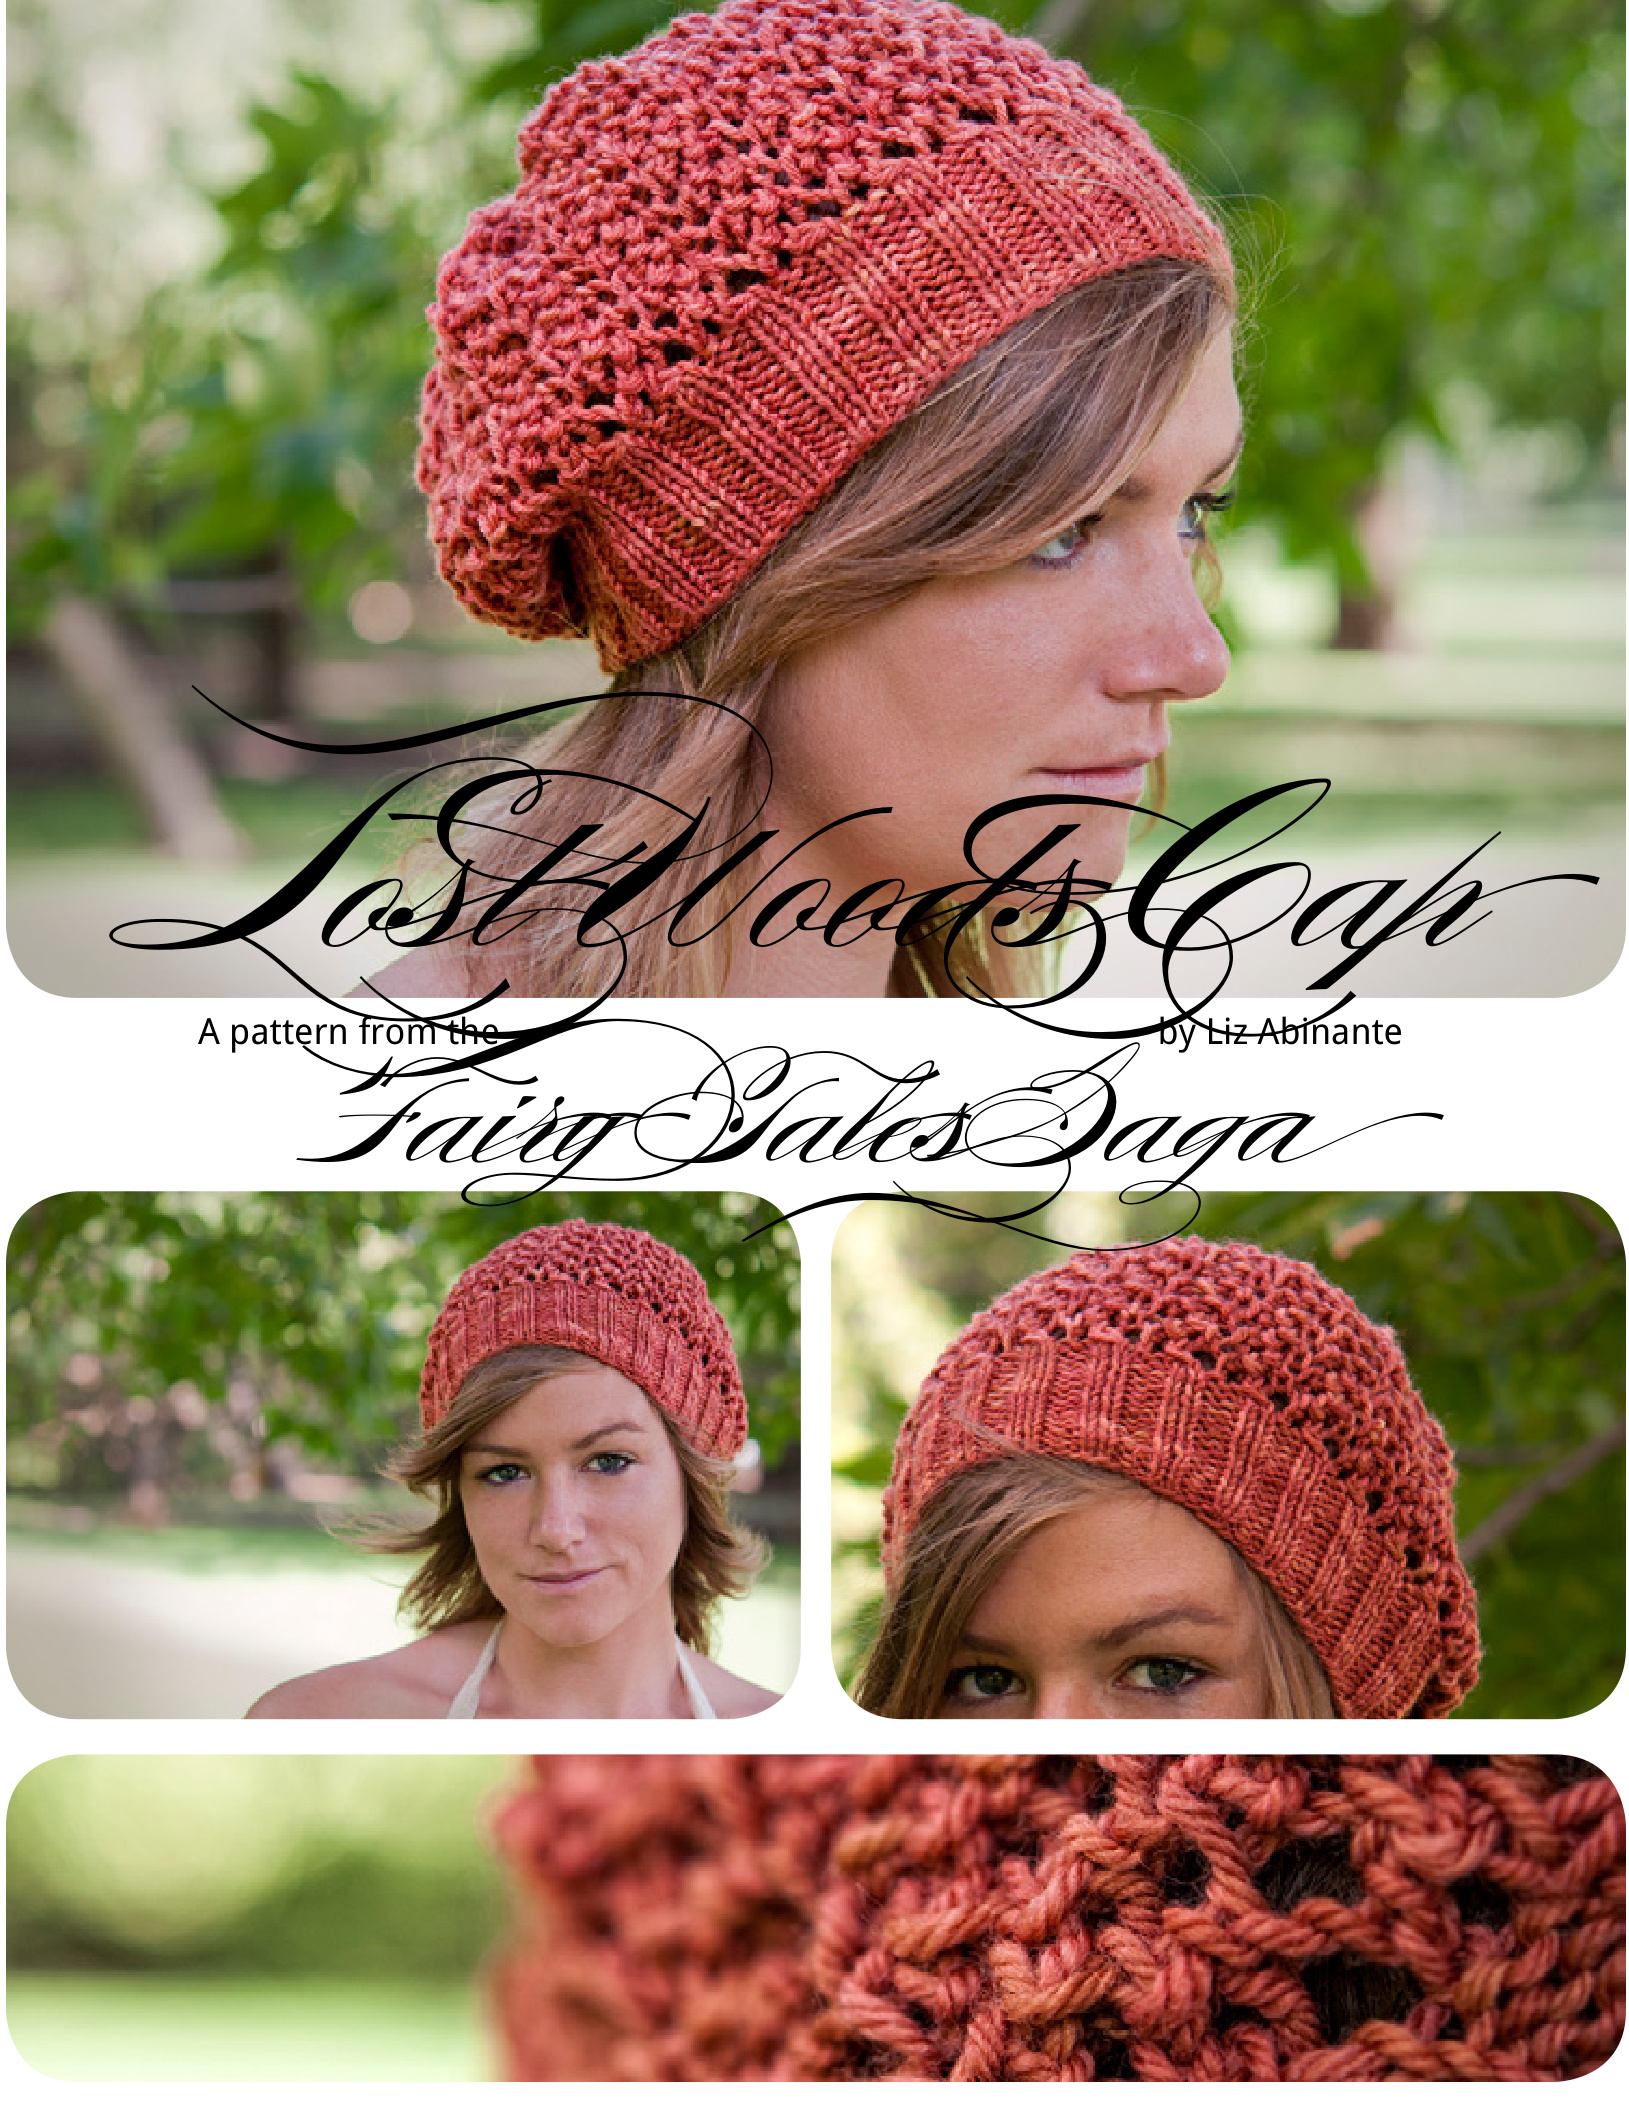

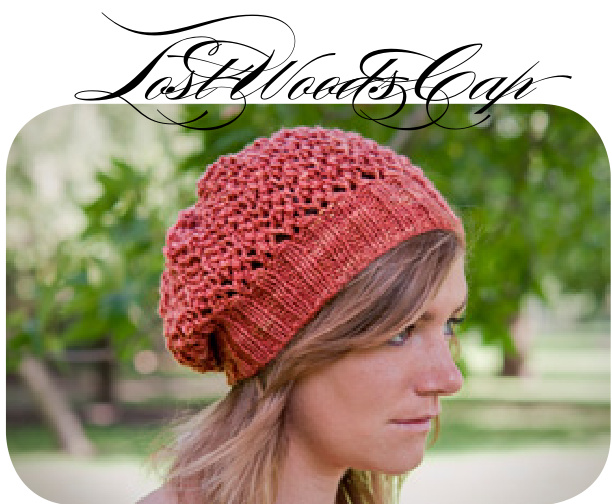
This is the second pattern from the Fairy Tales Saga. I always wondered why girls in fairy tales got lost in the woods-it almost always seems to be their own fault, too. Little Red strayed from the path, Alice followed a silly rabbit, and Snow White fled to the woods to escape her evil stepmother. Somehow these ladies are incapable of not getting lost. This cap possesses no magical powers that would help these ladies stay find their way, but at least they'd be lost in style. Yarn One skein light worsted weight yarn.
Needles
US 6 (4.0mm) and US 9 (5.5mm), 16" circular Sizes Small (fits head with 20" circumference). Medium (fits head with 22" circumference). Large (fits head with 24" circumference). Shown in Miss Babs Yowa! Whatta Skein (100% superwash merino, 560 yds per 8 oz), shown in Terra Cotta. Less than 1 skein for size medium.
Gauge
2" 2x2 ribbing using US 6 needles, unstretched, unblocked: 6 sts per inch, 7 rows per inch. The ribbing on my size medium hat was approximately 4 sts per inch when worn. Notions 1 stitch marker Darning needle.
Notes
This cap is a rare instance where knitting actually looks good unblocked. The mesh lace pattern provides the cap with a textured slouch and gives it a perky air. The comfortable ribbing makes it easy to pull on and off without destroying your perfectly coiffed hair, and the openwork pattern makes it ideal for indecisive weather. Don't block it-trust me, you'll love it. Abbreviations CO/BO: cast on/bind off k: knit k2tog: knit two together ndl: needle p: purl pm: place marker sk2p: sl1, k2tog, psso sl: slip. slm: slip marker ssk: slip, slip, knit two slipped stitches together st(s): stitch(es) yo:yarn over
Instructions: Size Small
CO 88 with US 6 (4mm) needle. Place marker and join in the round. Work in 2x2 ribbing for approximately 2 inches: [k2, p2], repeat to marker. Switch to US 9 (5.5 mm) needle. The following rows are all worked using the US 9 (5.5mm) needle. Next row: k all sts. Lace Mesh Pattern Row 1: [yo, sk2p, yo, k1] to end. Row 2: k all sts. Row 3: [k1, yo, sk2p, yo] to end. Row 4: k all sts. Repeat rows 1-4 until lace portion measures 5 inches from ribbing, ending with row 4. Because these crown decreases are worked in wedges, you can easily continue working decreases if you dislike the way the lace pulls together at the crown. Row 1: [yo, sk2p, yo, k1] to end. Row 2: [k1, ssk, k17, k2tog] 4x. (80 sts) Row 3: [k1, yo, sk2p, yo] to end. Row 4: [k1, ssk, k15, k2tog] 4x. (72 sts) Row 5: [yo, sk2p, yo, k1] to end. Row 6: [k1, ssk, k13, k2tog] 4x. (64 sts) Row 7: [k1, yo, sk2p, yo] to end. Row 8: [k1, ssk, k11, k2tog, slm] 4x. (56 sts) Row 9: [yo, sk2p, yo, k1] to end. Row 10: [k1, ssk, k9, k2tog] 4x. (48 sts) Row 11: [k1, yo, sk2p, yo] to end. Row 12: [k1, ssk, k7, k2tog] 4x. (40 sts) Row 13: [yo, sk2p, yo, k1] to end. Row 14: [k1, ssk, k5, k2tog] 4x. (32 sts) Row 15: [k1, yo, sk2p, yo] to end. Row 16: [k1, ssk, k3, k2tog] 4x. (24 sts) Row 17: [yo, sk2p, yo, k1] to end. Row 18: [k1, ssk, k1, k2tog] 4x.(16 sts) Row 19: [k1, yo, sk2p, yo] to end. Row 20: [ssk, k2tog] 4x. (8 sts) Using darning needle, thread needle through stitches and cinch top of cap togethel CopyrightIformation:Parnsuprtisrovidedforfrfyouhaveanyquetionsrthinkyoumayhaveoundanrrorleaseemailsuport@feministycmTheentirecontntsfthisateandthenitteddesintwhichiter aresubjecttocoprightydowloadingthisatternyouhaetherightprintandusethispatternnlyforyoureronalnoncommercialuseWithoutheermissionof Libinanteyoumaynotdistribteorelcopiesof thispattn You may not sellany items produced using the directions in this pattern.

Instructions: Size Medium
CO 96 with US 6 (4mm) needle. Place marker and join in the round. Work in 2x2 ribbing for approximately 2 inches: [k2, p2], repeat to marker. (5.5 mm) needle. The following rows are all worked using the Us 9 (5.5mm) needle Next row: k all sts. Lace Mesh Pattern Row 1: [yo, sk2p, yo, k1] to end. Row 2: k all sts. Row 3: [k1, yo, sk2p, yo] to end. Row 4: k all sts. Repeat rows 1-4 until lace portion measures 6 inches from ribbing, ending with row Because these crown decreases are worked in wedges, you can easily continue working decreases if you dislike the way the lace pulls together at the crown. Row 1: [yo, sk2p, yo, k1] to end. Row 2: [k1, ssk, k11, k2tog] 6x. (84 sts) Row 3: [k1, yo, sk2p, yo] to end. Row 4: [k1, ssk, k9, k2tog] 6x. (72 sts) Row 5: [yo, sk2p, yo, k1] to end. Row 6: [k1, ssk, k7, k2tog] 6x. (60 sts) Row 7: [k1, yo, sk2p, yo] to end. Row 8: [k1, ssk, k5, k2tog] 6x. (48 sts) Row 9: [yo, sk2p, yo, k1] to end. Row 10: [k1, ssk, k3, k2tog] 6x. (36 sts) Row 11: [k1, yo, sk2p, yo] to end. Row 12: [k1, ssk, k1, k2tog] 6x. (24 sts) Row 13: [yo, sk2p, yo, k1] to end. Row 14: [ssk, k2tog] 6x. (12 sts) Break yarn. Using darning needle, thread needle through and cinch top of cap together.
Instructions: Size Large
CO 108 with Us 6 (4mm) needle. Place marker and join in the round. Work in 2x2 ribbing for approximately 2 inches: [k2, p2], repeat to marker. ; 9 (5.5mm needle). The following rows are all worked using the Us 9 (5.5mm) need Next row: k all sts. Lace Mesh Pattern Row 1: [yo, sk2p, yo, k1] to end. Row 2: k all sts. Row 3: [k1, yo, sk2p, yo] to end. Row 4: k all sts. Repeat rows 1-4 until lace portion measures 7 inches from ribing, ending with row 4. Because these crown decreases are worked in wedges, you can easily continue working decreases if you dislike the way the lace pulls together at the crown. Row 1: [yo, sk2p, yo, k1] to end. Row 9: [yo, sk2p, yo, k1] to end. Row 2: [k1, ssk, k13, k2tog] 6x. (96 sts) Row 10: [k1, ssk, k5, k2tog] 6x. (48 sts) Row 3: [k1, yo, sk2p, yo] to end. Row 11: [k1, yo, sk2p, yo] to end. Row 4: [k1, ssk, k11, k2tog] 6x. (84 sts) Row 12: [k1, ssk, k3, k2tog] 6x. (36 sts) Row 5: [yo, sk2p, yo, k1] to end. Row 13: [yo, sk2p, yo, k1] to end. Row 6: [k1, ssk, k9, k2tog] 6x. (72 sts) Row 14: [k1, ssk, k1, k2tog] 6x. (24 sts) Row 7 : [k1, yo, sk2p, yo] to end. Row 15: [k1, yo, sk2p, yo] to end. Row 8: [k1, ssk, k7, k2tog] 6x. (60 sts) Row 16: [ssk, k2tog] 6x. (12 sts). Break yarn. Using darning needle, thread needle through and cinch top of cap together. CopyrightInfrmation:Patternsupportisrovidedforfrefyouaveanyquestionsrthinkyoumaavefoundanrrorleasemailur@fministyomThentirecontentsfthsatternndthenittedeintwhichitrr are subjeto copyrightBydownloading this paternyouhave theright to print andusethispatternonlyforyourpersonalnoncommercialuseithouthepermissionof iAbinante youmaynot disribte orellcopieofthis pattern. Youmay not sellany items produced using the directions in this pattern.
by Liz Abinante
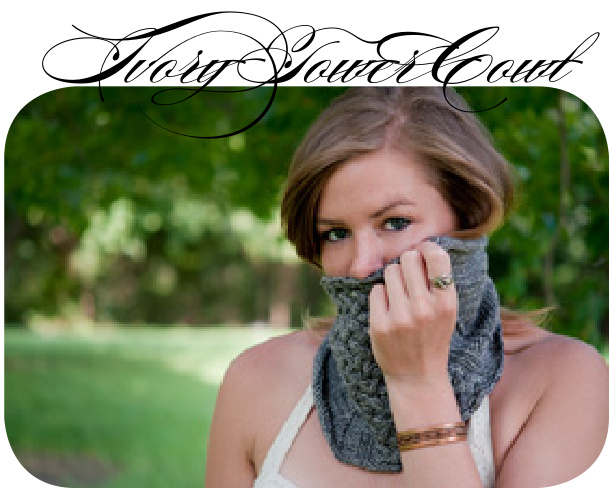
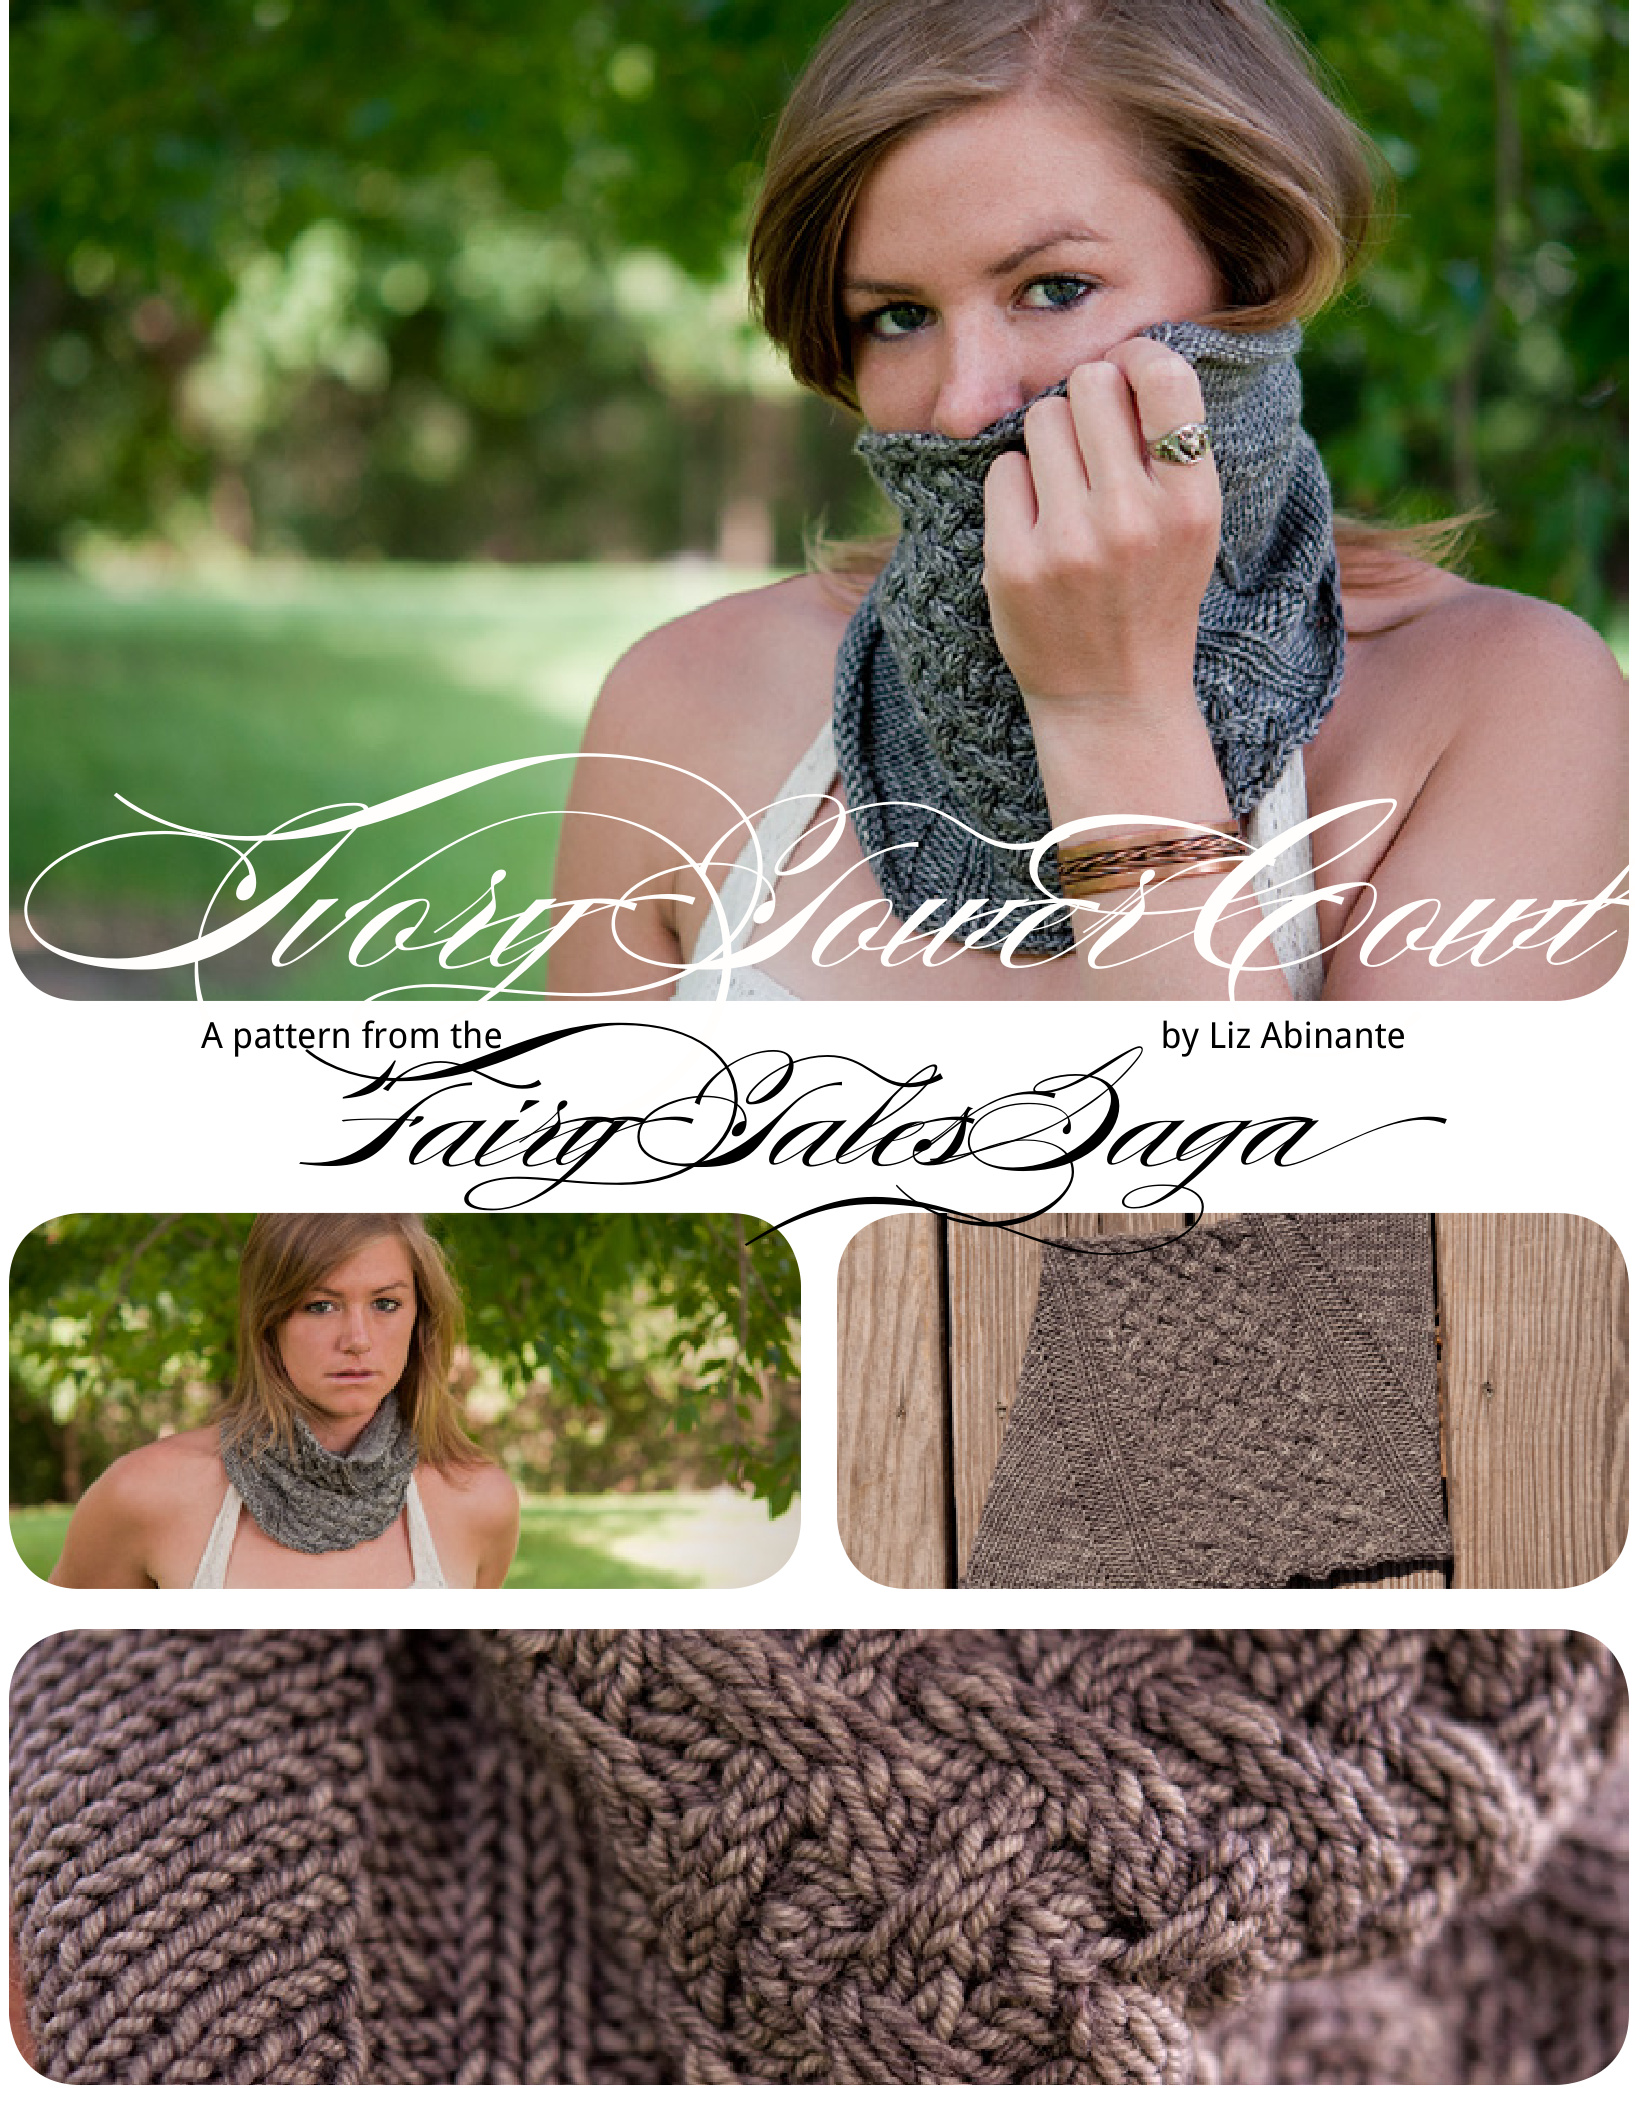
This is the third pat- tern from the Fairy Tales Saga. Precious princesses locked in the highest towerhave very little to do all day except wait to be rescued, read "What to Expect When You're Expecting to Be Rescued" and grow out their hair in hopes of using it as an escape mechanism. Ivory towers are seldom ivory, and the perfect gray used in this cowl with its wandering cable motif mimics the ivy and stonework that helps keep these ladies locked away until they're ready to be wed. Keep the castle draft out with this cozy cowl, and keep princesses stylish while they wait for their own personal fairy tale to get started.
Yarn
One skein light worsted weight yarn. Needles US 7 (4.5mm) 16" circular needle. Finished size 8.25 in tall, 20 in circumference. Shown in: The Plucky Knitter Primo Worsted (75% merino, 20% cashmere, 5% nylon; approximately 200 yards per 100 grams), 1 skein. Shown in Thornfield Hall.
Gauge
17.5 sts per 4in, 28 rounds per 4in, stockinette.
Notions
3 stitch markers, darning needle for bind off.
Abbreviations
C4B: sl2 sts to cn, hold in back. k2, k2 from cn. C4F: sl2 sts to cn, hold in front. k2, k2 from cn. C4PB: sl2 sts to cn, hold in back. k2, p2 from cn. C4PF: sl2 sts to cn, hold in front. p2, k2 from cn. CO/BO:cast on/bindoff k:knit m1l: make 1 (lift horizontal bar between sts from back to front onto ndl, knit) ndl:needle p: purl pm: place marker sl: slip slm: slip marker ssk: slip, slip, knit two slipped stitches together st(s): stitch(es)
Instructions
CO 95 sts, pm and join in the round. Setup row: k1, pm, p3, k2, p1, [k4, p2] 5x, p1, k2, p3, pm, k to end. You should have 3 markers total: 1 indicating the beginning of the round, and 1 on each side of the cable chart. Work rows 1-8 of the chart 8x (64 rows). Charted rows are worked as follows: Odd rows: k to 2nd m, work chart, k to end. Even rows: k to 1 st before 2nd m, work chart, k to end. uctions for when to slip the second and third markers (indicated with a green line) BO using EZ's Sewn Bind off or other preferred technique: break yarn approximately 3x the length of finished project. Thread darning needle and bind off as follows: [insert needle through first 2 sts as if to purl and pull the yarn through, insert needle through first st as if to knit, slip first st off needle] repeat until all stitches are worked.

Row 1: m1l, slm, p3, k2, p1, [C4F, p2] 5x, p1, k2, p3, slm, ssk. Row 2: k1, slm, p3, k2, p1, [k4, p2] 5x, p1, k2, p3, slm, k1. Row 3: m1l, slm, p3, k2, p3, [k2, C4PB] 4x, k4, p1, k2, p3, slm, ssk. Row 4: k1, slm, p3, k2, p3, [k4, p2] 4x, k4, p1, k2, p3, slm, k1. Row 5: m1l, slm, p3, k2, p3, [C4B, p2] 4x, C4B, p1, k2, p3, slm, ssk. Row 6: k1, slm, p3, k2, p3, [k4, p2] 4x, k4, p1, k2, p3, slm, k1. Row 7: m1l, slm, p3, k2, p1, k4, [C4PF, k2] 4x, p3, k2, p3, slm, ssk. Row 8: k1, slm, p3, k2, p1, [k4, p2] 5x, p1, k2, p3, slm, k1.
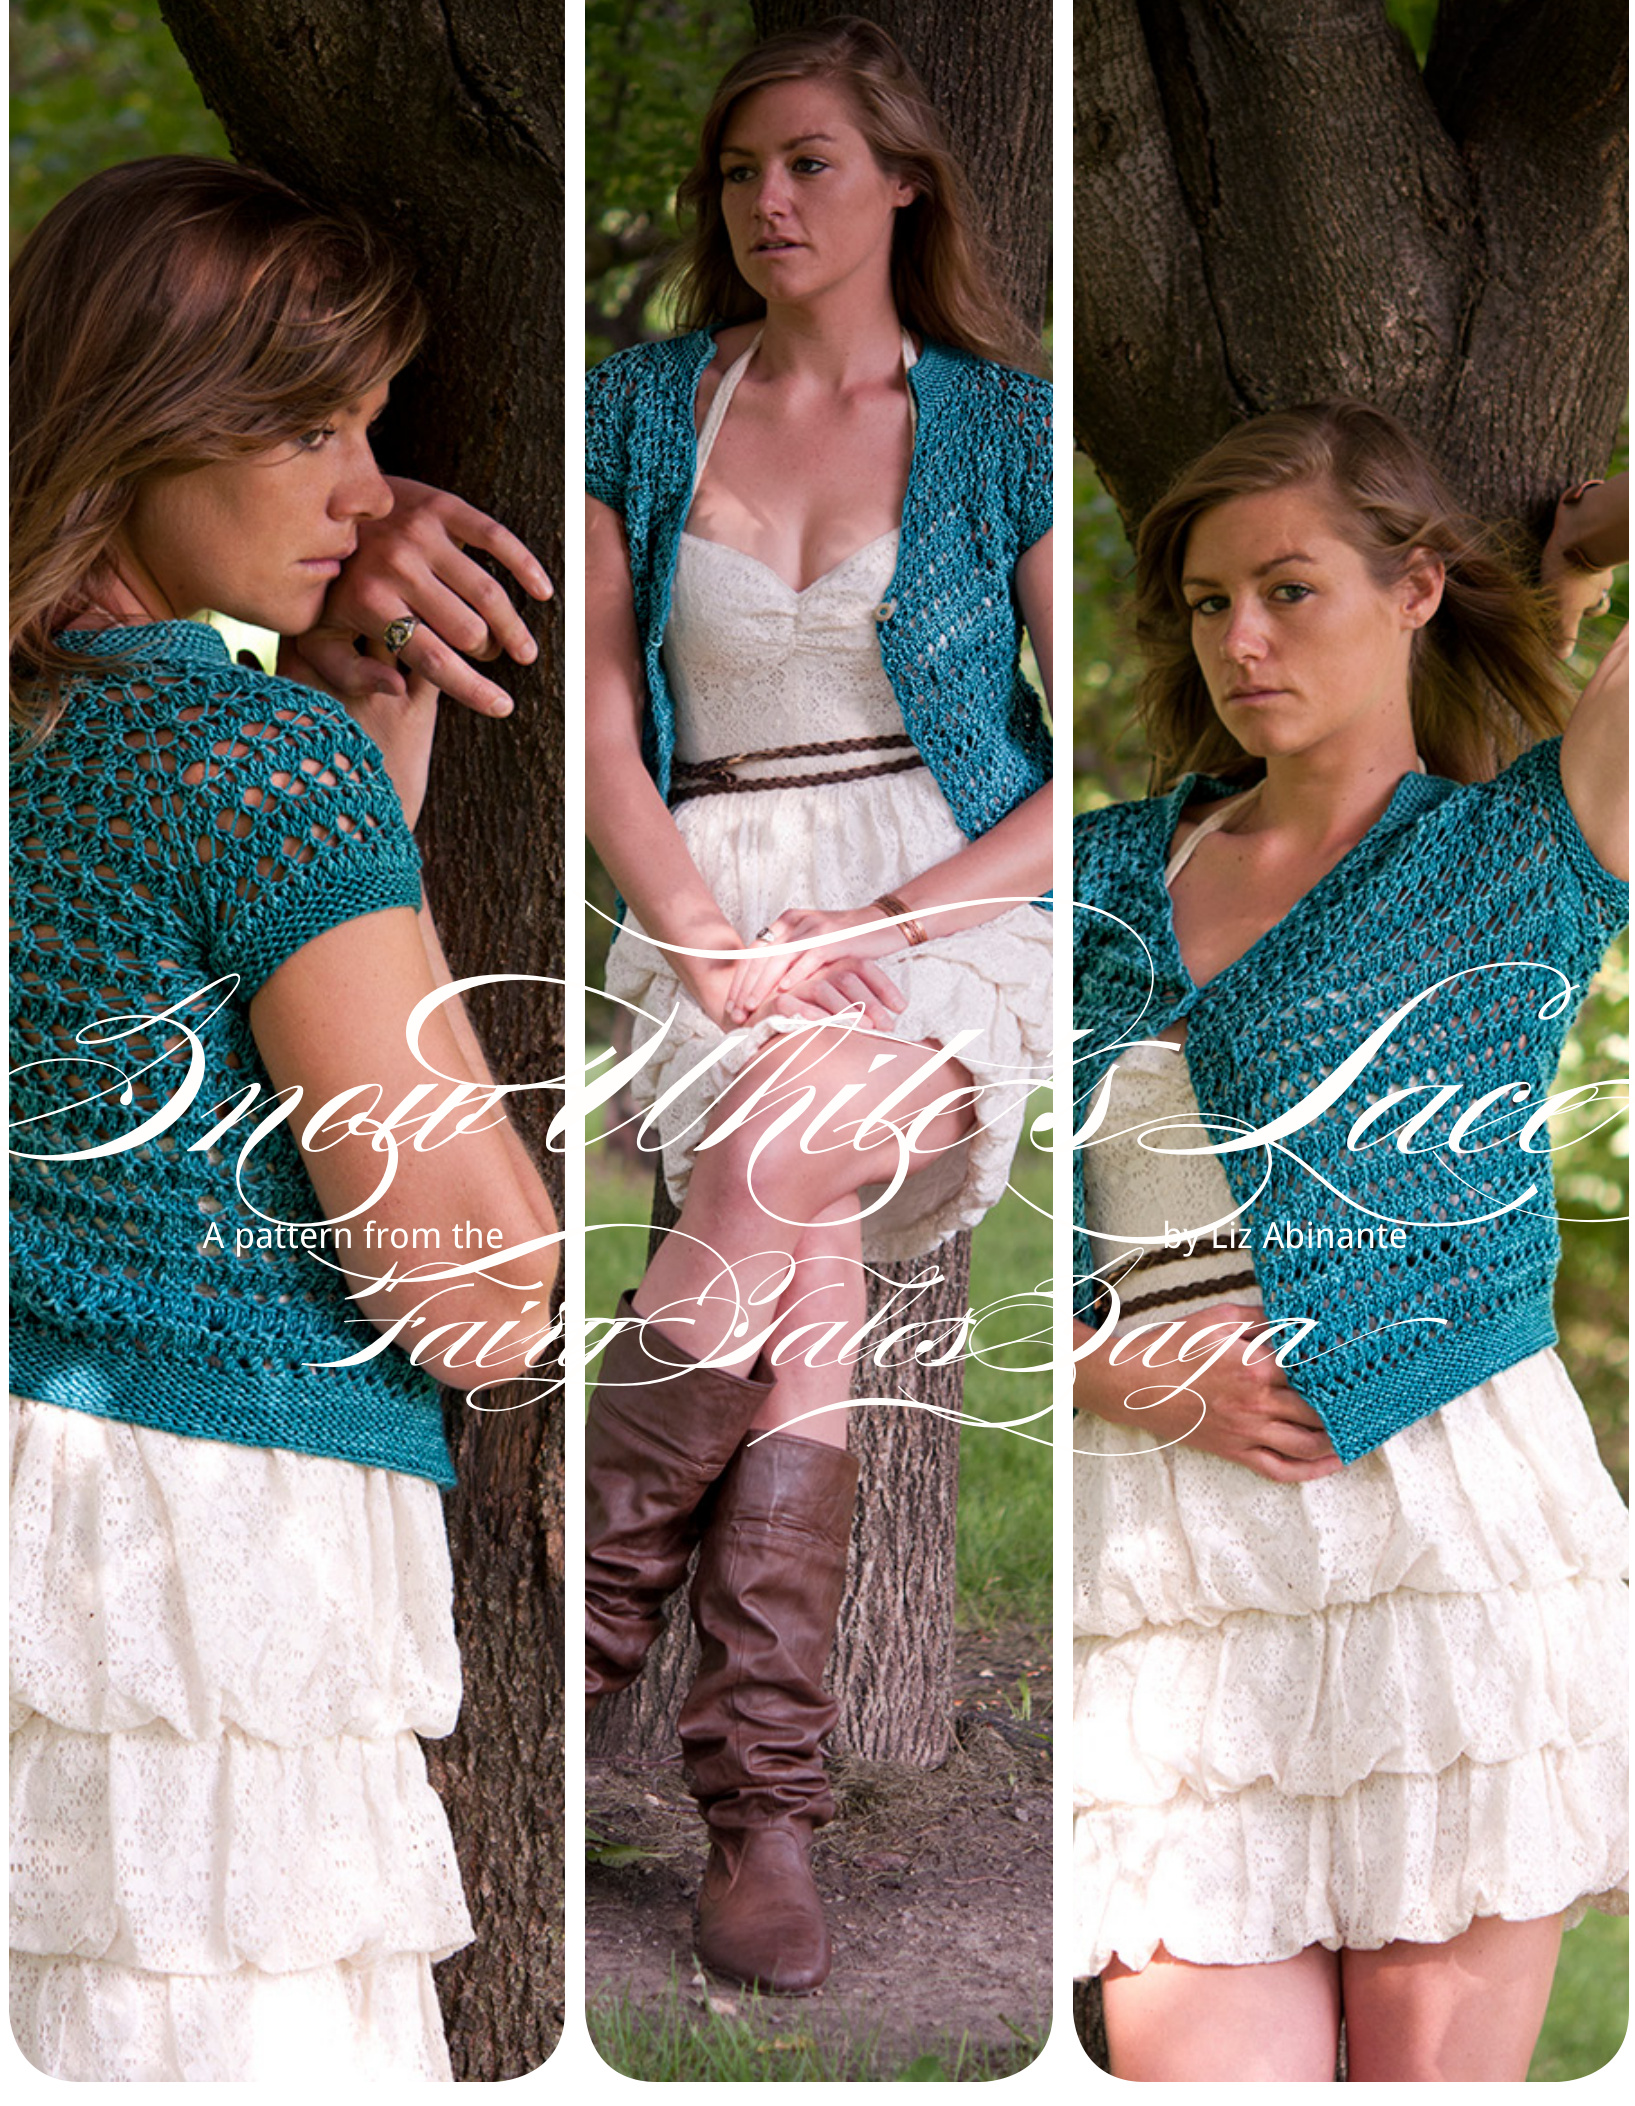

This is the fourth pattern from the Fairy Tales Saga. Snow White's dress was the height of fashion during the Disney heyday of my childhood. But now that I'm older, I think her ensemble needs a bit of an upgrade. A little bit of feminine lace, with a flattering v-neck that suits many styles, this simple cardigan adds some chic to even the most medieval of wardrobes. This charming, dead simple lace cardigan that features lace, garter stitch, and a sloped v-neck. Wear open or closed with one very special button.
Sizes
33 (37,41,45,49,53)"/83 (93,103,113,123, 133)cm.
Yarn
Approximately 400 (600,600,800,800,1000) yards worsted weight yarn. Shown in Madelinetosh Tosh Vintage (100% superwash merino, 200 yards per 110 grams/3.88 oz), shown in Kelp. 2 (3, 3, 4, 4, 5) skeins.
Needles
US 6 (4.0mm) and Us 7 (4.5mm)
Gauge
Garter stitch, 4.0mm needles (or size required to obtain gauge): 5 sts and 10 rows per inch Lace mesh, 4.5mm needles (or size required to obtain gauge): each 6-row repeat is approxi mately 1 inch. Approximately 4-6 stitches per inch (garter portions are 6 sts per inch, [yo, k2tog] portions are 4 sts per inch). Notions 1 stitch marker Darning needle 1 button (optional)
Notes
This cardigan can be worn with positive or negative ease. It is modeled with approximately 1" negative ease. It fits me comfortably with 0.5" positive ease. If you are between sizes, pick the smaller or larger size based on whether or not you would like positive or negativeease. Abbreviations CO/BO: cast on/bind off k: knit k2tog: knit two together ndl: needle p: purl pm: place marker sl: slip slm: slip marker ssk: slip, slip, knit two slipped stitches together st(s): stitch(es) yo: yarn over
Instructions
This pattern is written using a table format to make it easier to follow directions for your size. For those you prefer textonly instructions, you can find them on the last page of the pattern.
Collar
Using smaller needles and long tail cast on, CO:
| 33"/83cm | 37"/ 93cm | 41"/103cm | 45"/113cm | 49″/123cm | 53"/133cm |
| 52 | 52 | 52 | 74 | 76 | 106 |
Row 1 will be a RS row. Knit 13 rows. Next row, place markers as follows:
| 33" / 83cm | 37" / 93cm | 41"/103cm | 45"/113cm | 49"/123cm | 53" / 133cm |
| k11, pm, k6, pm, k18, pm, k6, pm, k11 | k11, pm, k6, pm, k18, pm, k6, pm, k11 | k11, pm, k6, pm, k18, pm, k6, pm, k11 | k15,pm, k10, pm,k24, pm, k10, pm, k15 | k15, pm, k10, pm, k26, pm, k10, pm, k15 | k23,pm,k13,pm,k34, pm, k13,pm, k23 |
Knit 2 rows.
Raglan Set Up
Row 1 (RS): k1, [(yo, k1) to 1 st before m, k1, yo, slm, k1] 4x. (yo, k1) to last st, k1. Row 2 (Ws): k1, p to last st, k1. Switch to larger needles. Row 3: [k1, (k2tog) to m, slm] 4x, k1, (k2tog) to last st, k1. Row 4: k1, (yo, k2tog) to m, slm, [k2, (yo, k2tog) to m, slm] 3x, k2, (yo, k2tog) to last st, k1. Row 5: k1, (yo, k2tog)to m, yo, slm, [k1, yo, k1, (yo, k2tog) to m, yo, slm] 3x, k1, yo, k1, (yo, k2tog) to 1 st before end of row, k1. 8 sts inc for all sizes. Row 6: k all sts.

Raglan Repeats
support@feministy.com Version 1, Nov 2011 designed by Liz Abinante Row 1 (Rs): k1, [(yo, k1) to 1 st before m, k1, yo, slm, k1] 4x. (yo, k1) to last 2 sts, yo, k2. Row 2 (WS): k1, p to last st, k1. Row 3: k2, yo, k1, (k2tog) to 2 sts before m, k2, yo, slm, k2, yo, (k2tog) to 3 sts before m, k2, yo, k1, slm, k2, yo, k1, (k2tog) to 3 sts before m, k2, yo, slm, k2, yo, (k2tog) to 3 sts before m, k2, yo, k1, slm, k2, yo, k1, (k2tog) to last 3 sts, k1, yo, k2. Row 4: [k2, (yo, k2tog) to m, slm] 4x, k2, (yo, k2tog) to last 2 sts, k2. Row 5: k2, yo, k1 (yo, k2tog) to 1 st before m, k1, yo, slm, k1, yo, k1, (yo, k2tog) to m, yo, slm, k1, yo, k1, (yo, k2tog) to 2 sts before m, k2, yo, slm, k1, yo, k1, (yo, k2tog) to m, yo, slm, k1, yo, k1, (yo, k2tog) to last 2 sts, yo, k2 Row6:k allsts Work rows 1-6 a total of:
| 33"/ 83cm | 37" / 93cm | 41"/103cm | 45"/113cm | 49"/123cm | 53"/133cm |
| 3x | 4x | 5x | 5x | 6x | 6x |
A total of:
| 33"/83cm | 37"/ 93cm | 41"/103cm | 45"/113cm | 49"/123cm | 53"/133cm |
| 24 rows | 24 rows | 30 rows | 30 rows | 36 rows | 36 rows |
Work rows 1-5 once more.
Separating Sleeves
Next row: kto first m, slm, place sleeve stitches on waste yarn, remove second marker, CO6 sts. kto third m, slm, place sleeve stitches on waste yarn, remove fourth marker, co6 sts. k to end.
Body
Row 1: k1, [(yo, k1) to 1 st before m, k1, slm, k1] 2x. (yo, k1) to last st, k1. Row 2: k1, p to last st, k1. Row 3: k1, [(k2tog) to 1 st before m, k1, slm, k1] 2x, (k2tog) to last st, k1. Row 4: k2, [(yo, k2tog) to m, slm, k2] 2x, (yo, k2tog) to last 2 sts, k2. Row 5: k2, [(yo, k2tog) to m, slm, k2] 2x, (yo, k2tog) to last 2 sts, k2. Row6:kall sts. Repeat rows 1-6 until piece measures from underarm when stretched, approximately
| 33"/83cm | 37"/93cm | 41"/103cm | 45"/113cm | 49"/123cm | 53"/133cm |
| 10.75" | 11" | 11.25" | 11.5" | 11.75" | 12" |
| 33"/83cm | 37"/93cm | 41"/103cm | 45"/113cm | 49″/123cm | 53"/133cm |
| 8.75" | 9" | 9.25" | 9.5" | 9.75" | 10" |
inches unstretched. Or work to desired length.
Garter Border
Switch to smaller needle. Knit 13 rows, bind off loosely.
Sleeves
Using smaller needle, transfer stitches from waste yarn, pick up 3 sts from underarm cast on, pm to indicate beginning of the round, pick up 3 additional sts and begin working sleeves in garter stitch. Row 1: p all sts. Row 2: k allsts. Repeat rows 1-2 4x (8 rows total), bind off loosely. ock sweater: wet blocking is recommended due to the extremely open lace pattern. dd one button to the front of the cardigan (shown at the v-neck join above the bust CopyrightIformation:Parnsuprtisrovidedforfrfyouhaveanyquetionsrthinkyoumayhaveoundanrrorleaseemailsuport@feministycmTheentirecontentsfthisateandthenitteddesintwhichiter are subjet to copyrightBy downloading this pattern youhavetheright toprint andusethispatternonlyforyour personalnon-commercialuse.Withouthepermissionof Lizbinanteyoumaynot distributeor sellcopies of this paern Youmay not sellany items produced using the directions in this pattern.
Text-Only Instructions
Refer to page 2 of the pattern for notes and additional information, including gauge.
Sizes
33 (37, 41, 45, 49, 53)" / 83 (93, 103, 113, 123, 133) cm.
Collar
Using smaller needles and long tail cast on, CO 52 (52, 52, 74, 76, 106). Row 1 will be a RS row. Knit 13 rows. Next row, place markers as follows: k11 (11, 11, 15, 15, 23), pm, k6 (6, 6, 10, 10, 13), pm, k18 (18, 18, 24, 26, 34), pm, k6 (6, 6, 10, 10, 13), pm, k11 (11, 11, 15, 15, 23).。 Knit 2 rows.
Raglan Set Up
Row 1 (RS): k1, [(yo, k1) to 1 st before m, k1, yo, slm, k1] 4x. (yo, k1) to last st, k1. Row 2 (Ws): k1, p to last st, k1. Switch to larger needles. Row 3: [k1, (k2tog) to m, slm] 4x, k1, (k2tog) to last st, k1. Row 4: k1, (yo, k2tog) to m, slm, [k2, (yo, k2tog) to m, slm] 3x, k2, (yo, k2tog) to last st, k1. Row 5: k1, (yo, k2tog) to m, yo, slm, [k1, yo, k1, (yo, k2tog) to m, yo, slm] 3x, k1, yo, k1, (yo, k2tog) to 1 st before end of row, k1. 8 sts inc for all sizes. Row 6: k all sts. 8 sts increased for all sizes.
Raglan Repeats
Row 1 (RS): k1, [(yo, k1) to 1 st before m, k1, yo, slm, k1] 4x. (yo, k1) to last 2 sts, yo, k2. Row 2 (Ws): k1, p to last st, k1. Row 3: k2, yo, k1, (k2tog) to 2 sts before m, k2, yo, slm, k2, yo, (k2tog) to 3 sts before m, k2, yo, k1, slm, k2, yo, k1, (k2tog) to 3 sts before m, k2, yo, slm, k2, yo, (k2tog) to 3 sts before m, k2, yo, k1, slm, k2, yo, k1, (k2tog) to last 3 sts, k1, yo, k2. Row 4: [k2, (yo, k2tog) to m, slm] 4x, k2, (yo, k2tog) tc last 2 sts, k2. Row 5: k2, yo, k1 (yo, k2tog) to 1 st before m, k1, yo, slm, k1, yo, k1, (yo, k2tog) to m, yo, slm, k1, yo, k1, (yo, k2tog) to 2 sts before m, k2, yo, slm, k1, yo, k1, (yo, k2tog) to m, yo, slm, k1, yo, k1, (yo, k2tog) to last 2 sts, yo, k2 Row 6: k all sts Work rows 1-6 3 (4, 5, 5, 6, 6)x, 24 (24, 30, 30, 36, 36) rows worked. . Work rows 1-5 once more.
Separating Sleeves
Next row: k to first m, slm, place sleeve stitches on waste yarn, remove second marker, co6 sts. k to third m, slm, place sleeve stitches on waste yarn, remove fourth marker, Co6 sts. k to end.
Body
Row 1: k1, [(yo, k1) to 1 st before m, k1, slm, k1] 2x. (yo, k1) to last st, k1. Row 2: k1, p to last st, k1. Row 3: k1, [(k2tog) to 1 st before m, k1, slm, k1] 2x, (k2tog) to last st, k1. Row 4: k2, [(yo, k2tog) to m, slm, k2] 2x, (yo, k2tog) to last 2 sts, k2. Row 5: k2, [(yo, k2tog) to m, slm, k2] 2x, (yo, k2tog) to last 2 sts, k2. Row 6: k all sts. Repeat rows 1-6 until piece measures 10.75 (11, 11.25, 11.5, 11.75, 12)" from underarm when stretched ,(approximately 8.75 (9, 9.25, 9.5, 9.75, 10)" unstretched), or to desired length.
Garter Border
Switch to smaller needle. Knit 13 rows, bind off loosely.
Sleeves
Using smaller needle, transfer stitches from waste yarn, pick up 3 sts from underarm cast on, pm to indicate beginning of the round, pick up 3 additional sts and begin working sleeves in garter stitch. Row 1: p all sts. Row 2: k all sts. Repeat rows 1-2 4x (8 rows total), bind off loosely. Gently block sweater: wet blocking is recommended due to the extremely open lace pattern. If desired, add one button to the front of the cardigan (shown at the v-neck join above the bust).


