Palazzo
Difficulty
Intermediate knitters and adventurous not-just-begini
Measurements
Socks as shown are best to wear for EUR 39-40, US 8, UK 5- 6. Cuff width made from 64 sts in a textured pattern will depend on gauge. A change in yarn or needle will offer an adaptable cuff width. Foot length and width will be adaptable.
Yarn
Any solid or semi-solid sock yarn in fingering weight. Sample shown: Atelier Zitron Trekking Tweed (75% wool /25% polyamide), 420m/459yrs100g.
Notions
A set of double pointed needles or two circular needles or one longer circular needle, just as you prefer, in 2,25mm (US 1) or whatever size will give you your desired gauge. A tapestry needle to weave in ends
Gauge
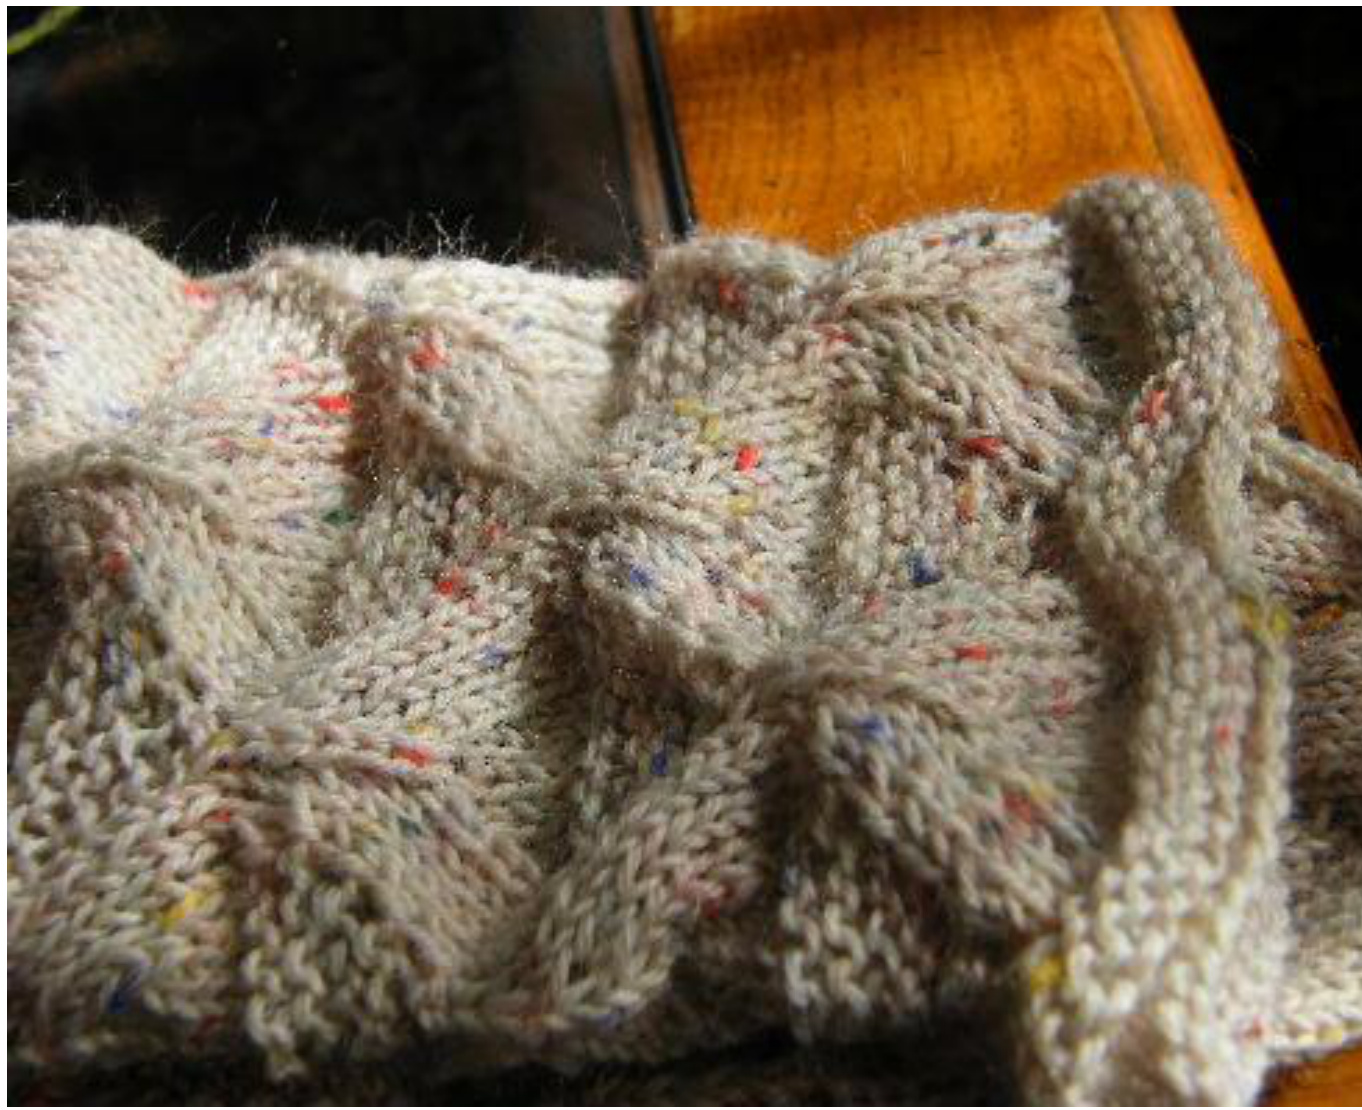
Work 34 stitches and 44 rounds to measure 4x4ins, 10x10cm, in St.st. Palazzo offers a pleasant and interestingly busy texture for the leg. A smooth transition into a more linear texture at the instep makes for an overall coherent and wearable design.
Instructions
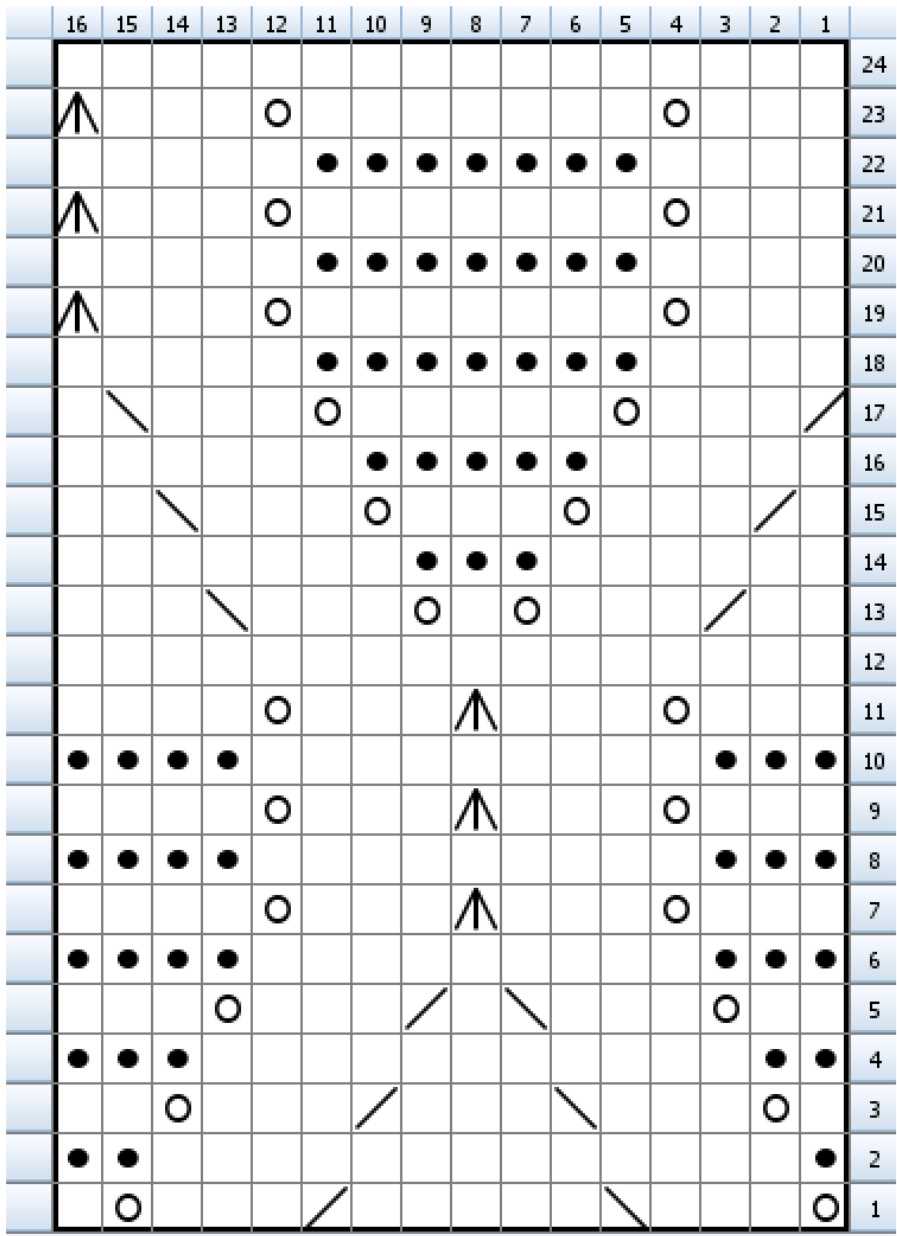
Cuff: Cast on 64 sts using the Twisted German Cast on (TGCo). Make sure, you do this evenly and not too tight. If you don't know how to do this Cast on (CO), here is a video-link: http://www.youtube.com/watch?v=BfFadEumBak Or choose any CO you like as long as it is a nicely structured one to give a handsome structured edge and above all, some elasticity for the so Arrange sts along your choice of needles: Dpns: 16 sts on 1st needle, 16 sts on 2nd needle, 32 sts on 3rd needle. Circulars: 32 sts on each needle. Magic loop: all on one needle with convenient loops as you go. Join for working in the round. Knit 3 rounds. Purl 3 rounds. Knit 3 rounds. According to Chart A work rounds 1-24 twice. If you prefer a longer leg, add one or more pattern repeats.
Heel:
We are working a conventional heel with heel-flap, heel turn and gussets, a heel that in Germany is called "Herzchenferse". Do not ask me why someone thinks there are heart shaped details, but this is the name and as I gave you a CO with German in it I wanted to give you a heel that is very popular with Germans knitting the traditional way.
Heel Flap:
The heel flap is worked flat. 1st row: kfb1, k29, kfb1, turn, 2nd row: slip 1, p31, k1, turn. 33 sts. The added sts are selvedge sts. ng 33 sts on holder or spare needle or simply on the other side of your Magic Loc RS rows: k WS rows: k1, p31, k1 Work 26 rows total for heel flap, ending with a WS row.
Heel turn:
K18, ssk, k1, turn Sl1, p4, p2tog, p1, turn Sl1, k5, ssk, k1, turn Sl1, p6, p2tog, p1, turn Sl1, k7,ssk, k1, turn Sl1, p 8, p2tog, p1, turn Sl1, k 9, ssk, k1, turn Sl1, p 10, p2tog, p1,turn Sl1, k 11, ssk, k1, turn Sl1, p12, p2tog, p1,turn Sl1, k13, ssk, k1, turn Sl1, p14, p2tog, p1,turn Sl1, k15, ssk, k1, turn, Sl1, p16, p2tog, k1,turn, stop. There are 19 sts left on this needle. Put stitches from holder back on needle(s). This will be the instep.
Gussets:
Gusset stitches will be picked from the selvedge stitches or between selvedge and knit stitch. Slip 1, k 18, pick up and knit 14 stitches from selvedge (one every two rows). 23 sole sts. Work instep as follows: k1, on next 32 sts follow chart. 33 sts. Pick up and knit 14 stitches from selvedge as before. 14 more sts for the sole.
| This is a moment to stop and rearrange your stitches on your chosen needle(s). At the same time this might be a short demo on how to handle stitch count, pattern, heel and gusset size. |
| Ourstitchcountwas64. We need 33 sts for the patterned instep. 31 sts left for sole. |
| We have to decrease (80 - 64 =) 16 sts. Makes for 8 sts to decrease on each side. |
| The first and last stitch at the instep will be a knit stitch. |
| We will use these stitches to make the decreases create a line that continues and accentuates the pattern. |
| This is why we will divide the gusset sts into sole sts and instep sts: 6 sts go to the sole, 8 sts go to the instep. |
| You might do it as follows: |
| gusset - change needle or make loop --- slip 6 from gusset. When using dpns, distribute instep sts ( Return to working in rounds again with instep patterned as set and all other stitches knit. The chart allows for easily doing the decreases in every even numbered row. |
Next round: k to one stitch before first instep stitch, k2tog, follow chart to last instep stitch, ssk, k to end. 2 gusset sts decreased. Next round: work instep as set and k all other stitches se two rounds until all 8 gusset sts are decreased. Row 16 of chart worked . 64 st
Notes on sizing:
If you want to change the heel size, you can shorten or lengthen the heel flap according to your actual heel by working more or less rows. When passing the sock on the heel flap should end just short of the ground. change the number of gusset stitches: Every additional 2 stitches picked up on each side (=4 sts total added) will make for one size bigger. Every 2 stitches picked up less on each side (=4 sts total less) will make for one size smaller. This will lead to more or less decrease rounds and to a different stitch count of the sole stitches. The number of stitches per round will change accordingly. Make a note to remember for the second sock. n any case, keep the number of stitches for the instep as set and adapt the number of the sole stitches to your personal sizing. n any case, work to and stop at round 16 for instep pattern as set and start working the foot chart from there.
Foot:
In any case, check the width after heel and gussets. It should fit your foot with a slightly negative ease. If not, return to resize the heel and gusset as mentioned in the notes on sizing. Work to the point where toes begin following your choice of foot chart for the instep stitches, working instep in pattern and knitting sole stitches. This might be up to 2" ( 4-5 cm) before finished length.
Another Note on sizing:
If you want to adapt in length, this is easily done now. Just continue as set to begin of toes. 4 rows usually make for one size. If you want to change the width of the foot, you might have already changed the number of gusset stitches and decreases. You can still adapt the sole stitch number to any wanted size by further reducing or adding stitches.
Toe:
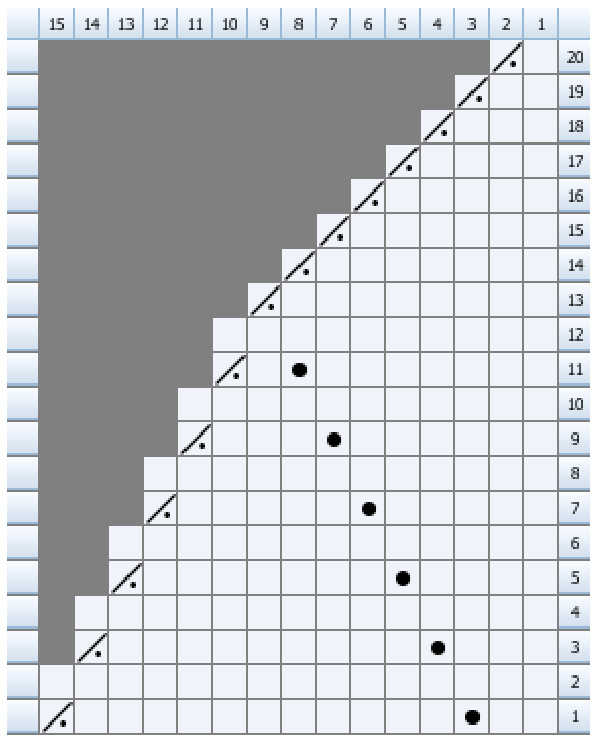
han 64 sts decrease evenly one row before starting the chart, on the sole stitches With less than 64 sts start working according to the Star Toe chart on the instep stitches only. Start following the Star toe chart on the sole stitches as soon as the stitch count is right for round 3,5 or seven. It really can be that easy. tches on your needles follow the chart for the first 16 stitches, repeat three times Round1: \*k2 p1 k11 p2tog rep from \* (60sts) Round 2,4, 6, 8, 10, 12: knit Round 3: \*k3 p1 k9 p2tog rep from \*(56sts) Round 5: \*k4 p1 k7 p2tog rep from \*(52sts) Round 7: \*k5 p1 k5 p2tog rep from \*(48sts) Round 9: \*k6 p1 k3 p2tog rep from \*(44sts) Round 11: \*k7 p1 k1 p2tog rep from \*(40sts) Round 13: \*k8 p2tog rep from\*(36sts) Round 14: \*k7 p2tog rep from\*(32sts) Round 15: \*k6 p2tog rep from\*(28sts) Round 16: \*k5 p2tog rep from\*(24sts) Round 17: \*k4 p2t0g rep from\*(20sts) Round 18: \*k3 p2tog rep from\*(16sts) Round 19: \*k2 p2tog rep from\* (12sts) Round 20: \*k1 p2tog rep from\*(8sts)
Cut yarn at 10" length, pull yarn through remaining stitches, pull tight and weave in ends. Take the time to work a second sock .
Chart A
| yo Yarn Over |
| knit stitch |
| ssk Slip one stitch as if to knit, Slip another stitch as if to knit. Insert lef-hand needle into front oF these 2 stitches and knit them together |
| k2tog Knit two stitches together as one stitch |
| purl puirl stitchi |
| Central Double Dec Slip frst and second stitches together as if to knit. Knit 1 stitch. Pass two slipped stitches over the knit stitch. |
Foot Chart, showing next to no holes
| 33 | 32 | 31 | 30 | 24 | 23 | 22 | 21 | 20 | 19 | 18 | 17 | 16 | 15 | 14 | 13 | 12 | 11 | 10 | 9 | 8 | 7 | 6 | 5 | E | 2 | 1 | ||||||||||
| 2 | ||||||||||||||||||||||||||||||||||||
| MR | M | MR | M | 1 |
[ML(Make 1 Left, Make 1 Front) Pick up the top strand of yarn between the needles from the the front, with the left needle. Knit into the back loop. [MR (Make 1 Right, Make 1 Back) Pick up the top strand of yarn between the needles from the back, with the left needle. Knit into the front loop.
Foot Chart, more lacey
| 333231 | 8Z6Z0E | 59Z | 24 | 23 | 22 | 21 | Z | 19 | 18 | 17 | 16 | 15 | 14 | 13 | 12 | 11 | 10 | 6 | 8 | 6 | 5 | E | 2 | 1 | ||||||||||||||
| 2 | ||||||||||||||||||||||||||||||||||||||
| 1 |
Pattern by MAZ @ (Margarete Dolff), June 2009. All rights reserved. This pattern is for personal, non-commercial use only. All other uses require the express permission of the author. Any reproduction or distribution of this pattern by any media other than a printed copy for personal use only is strictly prohibited.


