HELLO SAILOR! by boknits
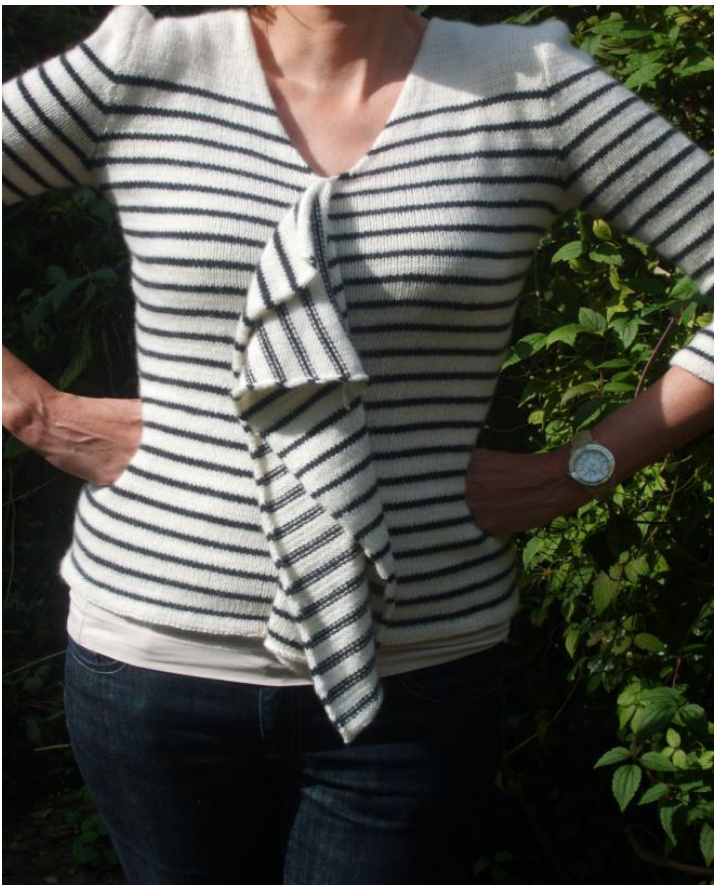
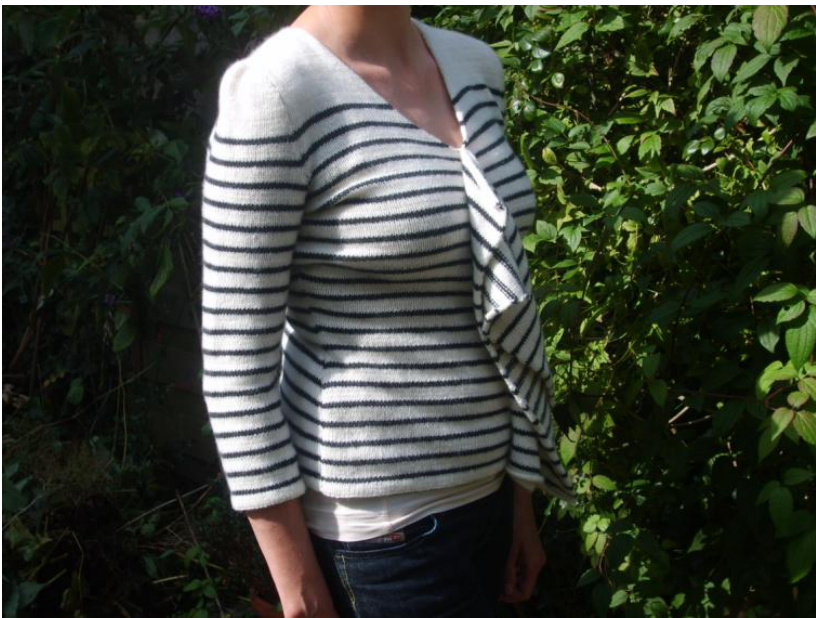
I conceived this sweater on vacation in Brittany - Bretagne. A play on the traditional fisherman's jersy. Hello Sailor! Is a bottom up garment with set-in, 3/4 length sleeves and a cleverly constructed mid-front ruffle. The vintage feel of the sweater is right on trend. The optional Breton stripe adds freshness and visual interest.
Yarn
Colourmart Cashmere fingering 700 (800,900,1000, 1100, 1200, 1300, 1400 yards) cream(A), 200(200, 200, 200) 250, 250, 250, 250) yards charcoal(B), Gauge: 23 st and 36 rows in striped stockinette. Needles 3.5mm 32" circular needles; I use Addi Turbos. Notions 4 stitch markers yarn needle waste yarn Length from neck to hem: 56 (58, 60, 62, 62,62, 62, 62)cm 22 (23, 23.5, 24.5, 24.5, 24.5, 24.5) inches. Armpit to armpit (laid flat and closed): 39 (41, 43, 45, 47,49, 51, 53) cm 15.5 (16, 17, 17.75, 18.5, 19, 20, 21) inches. Model is 1.80m/5'11" and is wearing a lengthened M. Sizes: XS, S, M, L, XL, 1X, 2X, 3X (86, 91, 96, 101, 106, 111, 116, 121) cm (34, 36, 38,40, 42, 44, 46, 48)inch bust circumference.
Stripe Pattern Notes
Striping for bottom up body sizes XS XL: 6 rows cream, 2 rows charcoal Stripe pattern 1x-3x: 8 rows cream,.2 rows charcoal
Design notes
Edging: The edges of the waterfall ruffle are designed to curl. Other edging: the hem and sleeve hems are folded and sewn on. Sleeves: They have a slight fullness in the shoulder Sleeve measurements: I have skinny arms, so if you're more normal-sized, measure your arm circumference and possibly cast on for a bigger size. Sizes 1X-3X: there are optional bust darts for your sizing. However, these don't combine with stripes!
Abbreviations
BO bind off CO cast on K knit K2tog decrease one stitch by knitting two stitches together P purl PM place marker RS right side, or outside of
garment
ssk slip 2 st from left to right needle as if to knit, then slip left needle in front of those loops: knit 2 tog and transfer to right needle.
Body:
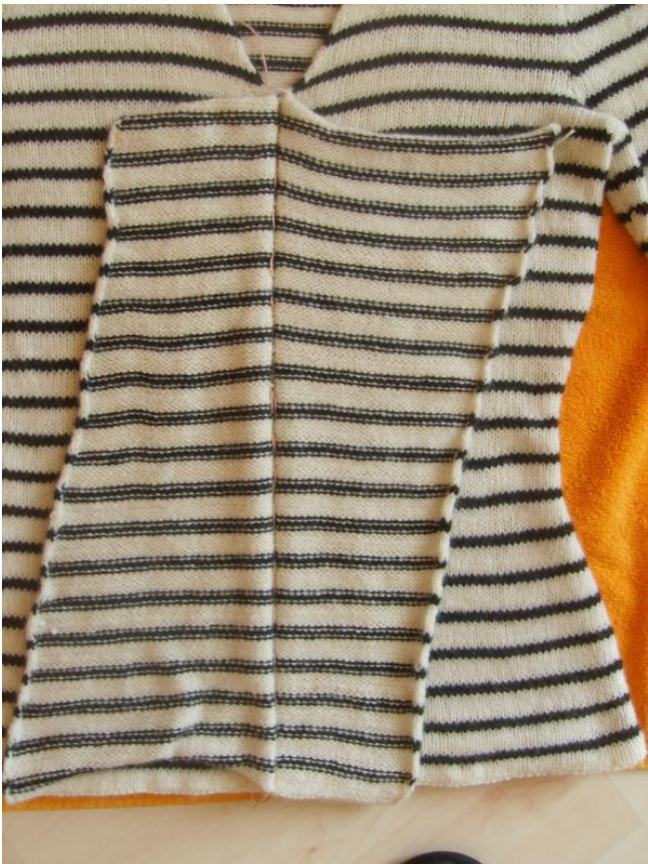
With circular needle 3.5mm CO 34 (34,34,34, 36, 36, 36, 36) stitches, place Marker (ruffle marker), CO 48 (51, 54, 57, 60, 63, 66, 69) stitches, place M in different color (waist marker), CO 96 (102, 108, 114, 120, 126, 132, 138) place M (second waist marker), CO 48 (51, 54, 57, 60, 63, 66, 69) st, CO 12 st, place M (second ruffle marker). WS wrong side, or inside of garment SDLL(Standard decrease left leaning): 3 stitches before waist marker, ssk, k 1, slip waist marker. This video might be helpful. SDRL(Standard decrease right leaning): slip waist marker, k 1, K2T.. Check out this youtube tutorial. TW Turn work NB: The two front parts have different amounts of stitches. This is because the ruffles are not symmetric.
| co | XS | s | M | L | XL | 1X | 2X | 3X |
| left ruffle | 12 | 12 | 12 | 12 | 12 | 12 | 12 | 12 |
| Left front | 48 | 51 | 54 | 57 | 60 | 63 | 66 | 69 |
| back | 96 | 102 | 108 | 114 | 120 | 126 | 132 | 138 |
| Right front | 48 | 51 | 54 | 57 | 60 | 63 | 66 | 69 |
| right ruffle | 34 | 34 | 34 | 34 | 34 | 36 | 36 | 36 |
| total body | 192 | 204 | 216 | 228 | 240 | 252 | 264 | 276 |
| total with ruffles | 238 | 250 | 262 | 274 | 286 | 300 | 312 | 324 |
Knit 6 rows stockinette in A, then one purl row on RS. This is the fold-back hem. Continue in stockinette stripe, starting with 6 rows in A. (Striping sizes XS- XL: 6 rows cream, 2 rows charcoal; Stripe pattern 1x-3x: 8 rows cream, 2 rows charcoal)
Left Ruffle Increase:
Knit 2, M 1, at once for each stripe sequence or every 6, (8) rows
Right Ruffle Decrease:
Knit to 4 stitches before the edge, K2tog, k 2, once for each stripe sequence or every 6, (8) rows
At the same time:
Knit in the stripe pattern for 10 cm (4")
Start Waist Decreases:
Knit to 3 stitches before first waist Marker SDLL, slip marker K2, SDRL. Repeat. Repeat decrease 3 more times at every 4th row. Stitch count for fronts and back (not counting ruffle) is 176 (182, 194, 206, 212, 218, 226, 238) sts.
Waist
Here is where you can lengthen or shorten your garment. Knit without decreasing until your garment measures 18 (19,20, 21, 23, 23, 23, 23) cm (8 ") from the hem. If you need a longer garment, add one or two more stripes. If you are shorter in the body, knit one or more fewer stripes.
Start waist increase
Knit to 3 st before waist marker: MiR, k 1, slip waist marker, kl, M1L. Repeat. Repeat 3 more times every 4th row. Stitch count for fronts and back (not counting ruffle) is 192 (204, 216, 228, 240, 252, 2642, 276) sts. Optional horizontal bust darts (sizes XL - 3x, or if you have a bigger bust for your size). Knitting experience needed, as you will have to customize this to your own body. N.B. Only if you don't use the stripe pattern! Striping and short rows don't match. Knit/purl: Keep to stockinette stitch, knitting as the stitches present themselves to you. Depending on your bust size, you can start at the beginning of these instructions, or on later rows. Remember to end on the same spot (10, 15, 20,or 25 stitches from the edge) that you started. This is an example of how to do a bust dart; you can make it bigger by adding more short rows or move it farther away from the 'side seam'. At start of bustline ( measure your own), starting from mid front edge: a. Knit/purl ruffle stitches, k/p until 10 before end of front, TW, YO, k/p to edge; b. Knit/purl ruffle stitches, k/p 15 before end of front (\*picking up YO and next stitch and knitting/purling together, keeping the YO loop at back of work\*), TW, YO, k/p to edge; Divide for body at waist markers when body is 37 (39, 41, 43, 45, 45, 45, 45) cm (adjusted to your own length if you shortened or lengthened at the waist). Knit to first waist Marker, put rest of the stitches on stitchholders, scrap yarn or another circular needle. Continue with left front and left ruffle. Front Armhole shaping
| CO | XS | S | M | l | XL | 1X | 2X | 3X |
| RS row 1 | 5 | 5 | 6 | 6 | 6 | 7 | 8 | 8 |
| RS row 3 | CC | 3 | 3 | 3 | 3 | 4 | 4 | 4 |
| RS row 5 | 2 | 2 | N | 2 | 2 | 2 | 2 | 2 |
| RS row 7 | 1 | 1 | 1 | 1 | 1 | 1 | 1 | 1 |
| RS row 9 | 1 | 1 | 1 | 1 | 1 | 1 | 1 | 1 |
| RS row 11 | 1 | 1 | 1 | 1 | 1 | 1 | 1 | 1 |
| RS row 13 | 0 | 0 | 0 | 1 | 1 | 1 | 1 | 1 |
| RS row 15 | 0 | 0 | 0 | 0 | 0 | 1 | 1 | 1 |
At the same time: After 6 rows, or in the stripe pattern: at the end of the 6 A rows, cast off ruffle stitches to ruffle marker. Continue on with front.
Neck Decreases:
On RS, at 4th row after binding off ruffle, knit 2, ssk (or left leaning decrease for combination knitters), knit to end. For left side: knit to 4 stitches before edge, k2tog (or right-leaning decrease for combination knitters), k2. Decrease at neckline every 4 rows until armhole is 10 cm (4") inches high, then decrease every 6 rows. At the same time: When the armhole is 10 cm(4") inches high, or after three ful stripes, continue in color A. At 18 (18, 19, 20, 21, 22, 22, 22) cm, cast off for shoulder (start from the armhole side): On each of the next 3 alternate rows(RS for left front, WS for right front), cast off 8 (9, 10, 11, 12, 13, 14, 15) stitches.
Back:
Pick up back stitches between waist markers and continue with armholes and shoulders as for front. Back Armhole shaping
| Bind off | XS | S | M | XL | 1X | 2X | 3X | |
| row1+2 | 5 | 5 | 6 | 6 | 6 | 7 | 8 | 8 |
| row 3+4 | CC | 3 | 3 | 3 | CC | 4 | 4 | 4 |
| row 5+6 | 2 | 2 | 2 | N | N | 2 | 2 | 2 |
| row 7+8 | 1 | 1 | 1 | 1 | 1 | 1 | 1 | 1 |
| row 9+10 | 1 | 1 | 1 | 1 | 1 | 1 | 1 | 1 |
| row 11+12 | 1 | 1 | 1 | 1 | 1 | 1 | 1 | 1 |
| row 13+14 | 0 | 0 | 0 | 1 | 1 | 1 | 1 | 1 |
| row 15+16 | 0 | 0 | 0 | 0 | 0 | 1 | 1 | 1 |
When the armhole is 10 cm(4") inches high, or after three full stripes, continue in colorA. Start shoulder shaping at 18 (18, 19, 20, 21, 22, 22, 22) cm, cast off for shoulder (start from the armhole side): On each of the next 3 alternate rows(RS for left front, WS for right front), cast off 8 (9, 10, 11, 12, 13, 14, 15) stitches.
For the neck, cast off the remaining stitches.
Right front and right ruffle: mirror instructions for right front and right ruffle. (RS becomesws)
Sleeves:
CO 46, 48 (51, 54, 57, 60, 63, 67) stitches. Connect the set-up row, joining to work in the round, being careful not to twist the stitches. Place a Marker at the join. Continue with magic loop method, short length circular needle or dpns, or knit flat with straight needles if you prefer. Use stripe pattern and knit sleeves in desired length, increasing 2 stitches every 6 rows 13 (13, 13, 13,14,16, 18) times at stitch marker, ending up with 72 (74, 76, 78, 80, 84, 90, 96) stitches. The jog in the seam will be hidden by your arms, but of course you could try a jogless stripe.( last 2 minutes Of video). Sleeve cap shaping
| Bind off | SX | S | M | L | XL | 1X | 2X | 3X |
| row 1+2 | 6 | 6 | 6 | 6 | 6 | 7 | 7 | 8 |
| row 3+4 | 4 | 4 | 4 | 4 | 4 | 4 | 4 | 4 |
| row 5+6 | 1 | 1 | 1 | 1 | 1 | 1 | 1 | 1 |
| row 7+8 | 1 | 1 | 1 | 1 | 1 | 1 | 1 | 1 |
| BO at both ends, repeat every 4 rows | 1 | 1 | 1 | 1 | 1 | 1 | 1 | 1 |
| At 15cm/6 inches, BO at both ends | 1 | 1 | 1 | 1 | 1 | 1 | 1 | |
| BO at both ends | 1 | 1 | 1 | 1 | 1 | 1 | 1 | 1 |
| BO at both ends | 2 | 2 | 2 | 2 | 1 | |||
| BO at both ends | 2 | 2 | 3 | 4 | ||||
| BO at both ends | 2 3 | 2 3 | 2 3 | 2 3 | 2 3 | 2 3 | 3 4 | 4 4 |
Oboknits design. This pattern is for unlimited personal use. Do not distribute or sell this pattern, or sell a garment you produced with this pattern. For any question, contact bo.binnerts@gmail.com Pagina 6
| 12 | 12 | 12 | 12 | 12 | 12 12 | 12 |
At the same time, continue in stripe pattern until 4 black stripes have been knit, continue in color A ( to match body).
Finish:
Sew shoulder seams with mattress stitch. Close arm seams if you knit them flat, otherwise sew in arms while slightly easing in the fullness at the top of the sleeve. Ruffle finishing: With a blunt needle and contrasting waste yarn, baste a row of big loose stitches between the ruffle stitchmarkers at the front on both sides. This should be a straight line in the same stitch on all the rows. Put the ruffle parts together ( wrong sides in) on those baste lines and tack into place with spare circular needles, pins or stitchholders, or even another loosely basted seam. With your main color, now sew the two ruffles together with a backstitch. This is a more sturdy stitch than mattress stitch, because there will be some stress on this seam.
Weave in loose ends. Soak, block lightly if you wish, and enjoy!


