TTSS (Towel Topper Sans Selvedge)
| I have seen quite a few patterns for knitted towel |
| toppers, but many of them end up looking VERY |
| homemade on the back. Now I like homemade, but |
| I still like my projects to look nice and not like |
| someone with poor eyesight in a dark room threw |
| them together. So, this towel topper pattern will |
| have your towel looking almost as nice on the back |
| as it does on the front. You won't have to look at any |
| ugly selvedge or raw edges on the back. Please |
| keep in mind that I am not a professional designer |
| or pattern writer. But, I will do my best to explain thingsclearlyandwillincludeplentyofpictures |
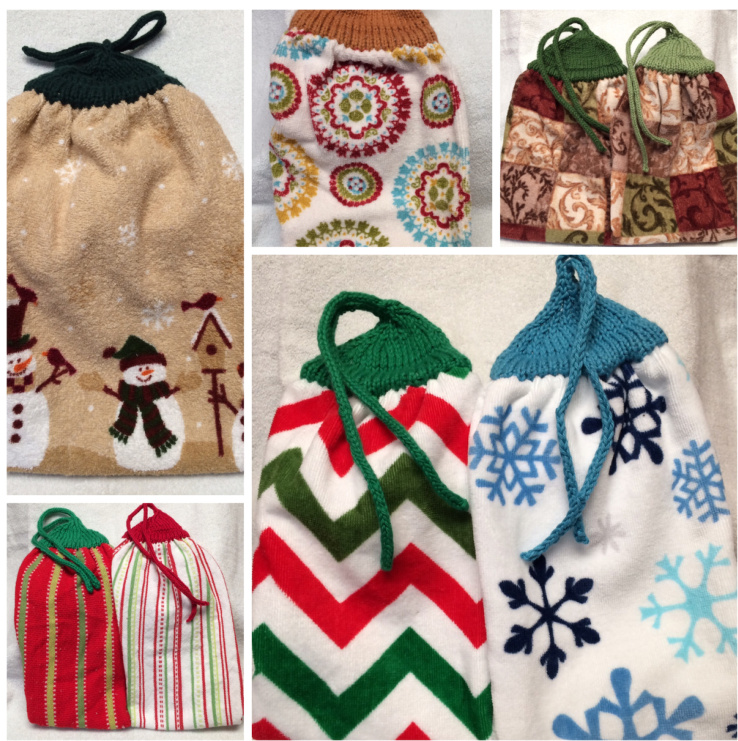
Stockinette versus Garter
You can do your topper all in garter stitch (all knit), partially garter or in stockinette, whatever is your preference. lo the family side rows in purl. Here are some pictures of different
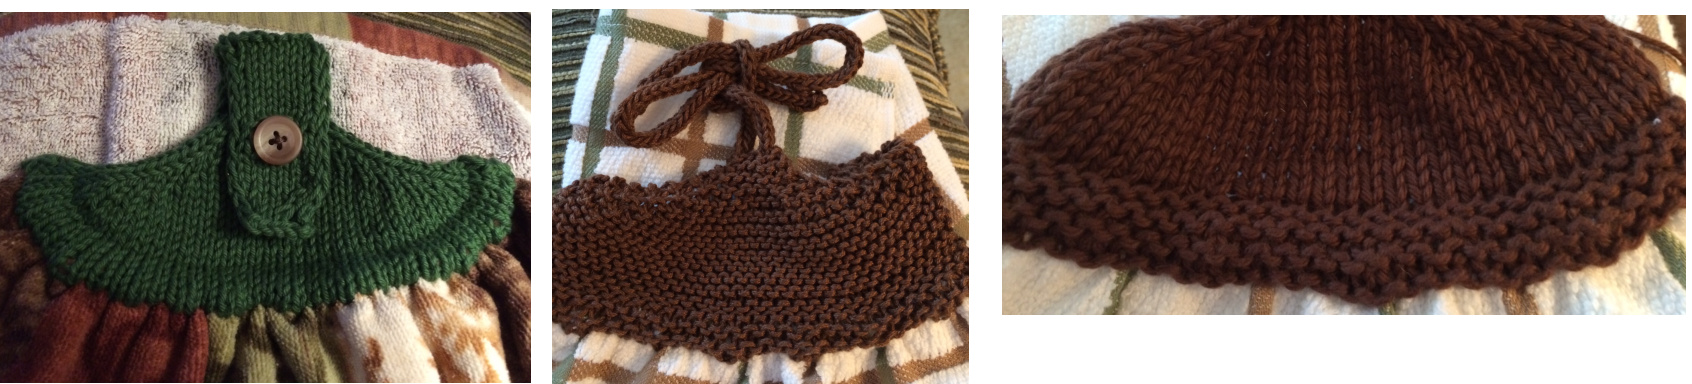
Button Holder versus iCords
You'll notice some of my pictures have a button to hold the towel on a handle. Although those look very pretty when the towel is laying flat, I didn't like the way they pulled when they were hanging so I pulled them out and reworked them with iCords. I like thinner iCords, and do only 3 stitches with no bigger than a #2 size DPNs (double pointed needles). TTSS (Towel Topper Sans Selvedge)
| Pre-KnittingPreparation: | |
| x x o s n | |
| Now, turn down and do a hem along the cut edge. It doesn't have to be nice and neat or even using the right color thread. | |
| You are going to completely cover this hem. Do it close to the edge and I'd recommend a zig zag type stitch to reduce any | |
| do this for you. Or even better, this is a good excuse to get a sewing machine! | |
| If you absolutely can't get access to a sewing machine, I would imagine cutting the towel with pinking shears (zig-zaggy | |
| enclosedinyourknitting,butyoudon'twantittofrayandshedlittlethreadsafteryouwashit. | |
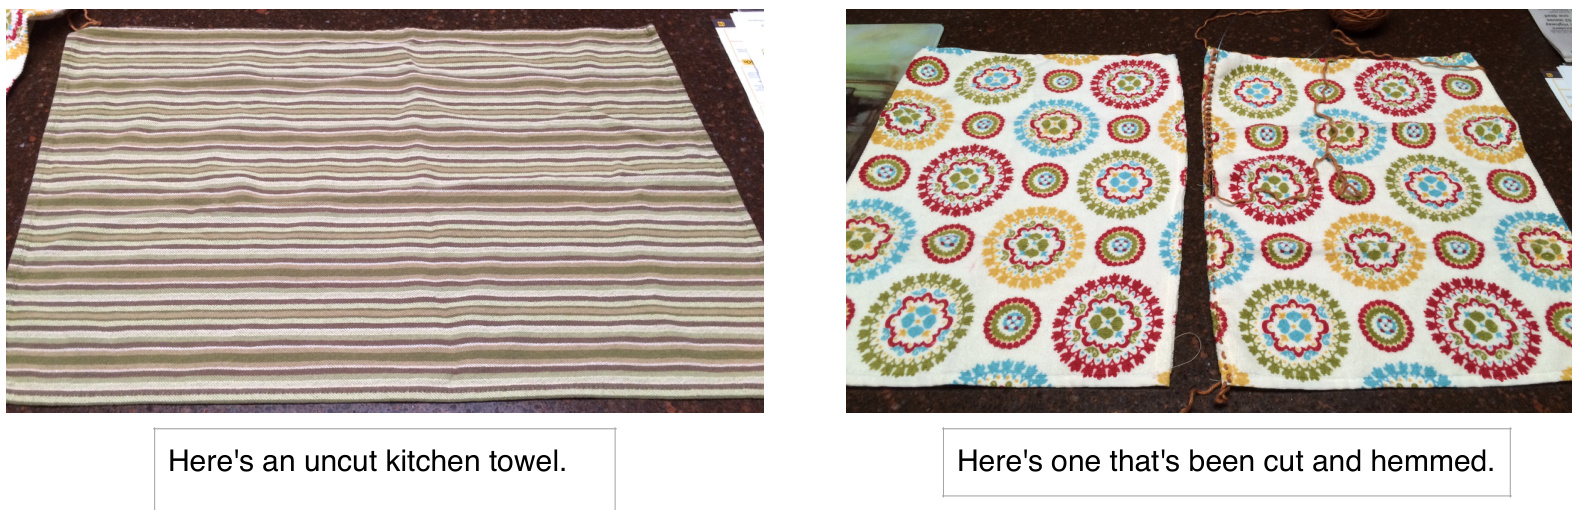
| Supplies | ||||
| 1. 2. | Half of a kitchen towel, prepared as discussed above 4 working needles, size #4 or #5 | |||
| (when I say 4 working needles, I personally prefer two circular needles, long enough to work back and forth - say 24" - but 4 straights would work too) | ||||
| Your goal is to have the knitting cover up the hem, so smaller needles will look better. | ||||
| With a worsted weight cotton, I like a #4 and I knit fairly tightly. Personal preference. | ||||
| 3. | a sharp tapestry needle for the initial threading | |||
| 4. | a blunt tapestry needle for weaving in ends and sewing up sides | |||
| 5. | a safety pin | |||
| 6. | a stitch holder or piece of scrap yarn (big enough to hold 3 stitches) | |||
| 7. | 2 DPNs(double pointed needles) size #2 or smaller | |||
| 8. oh yeah - yarn I recommend 100% cotton, either worsted (which covers the towel better) or DK | ||||
| easily. I don't know how much yarn you need, but not much, it's a good stashbuster. | ||||
TTSS (Towel Topper Sans Selvedge)
| Terms | |||
| k | knit | ||
| k2tog | and knit them together | ||
| SSK | your right needle - do this knitwise (like you were going to knit them). Take your left needle | slip, slip, knit - using your right needle, slip the first two stitches from your left needle onto | |
| and go through the front of both of these slipped stitches, wrap the working yarn around | |||
| the right needle and knit them together (there are many, much better explanations of how to doSSK online.) | |||
| companysideandfamilyside | |||
| Some towels have a nice side and a not-so-nice side while others look the same on both | |||
| sides. Since sometimes I will be talking about the "right" meaning the right hand side of | |||
| the towel, not necessarily the "right" side of the fabric, here's what we're gonna do. | |||
| The "company" side of the towel is the pretty side and the side where the hemmed portions | |||
| don't really show. The "family" side is where you can see the hem. | |||
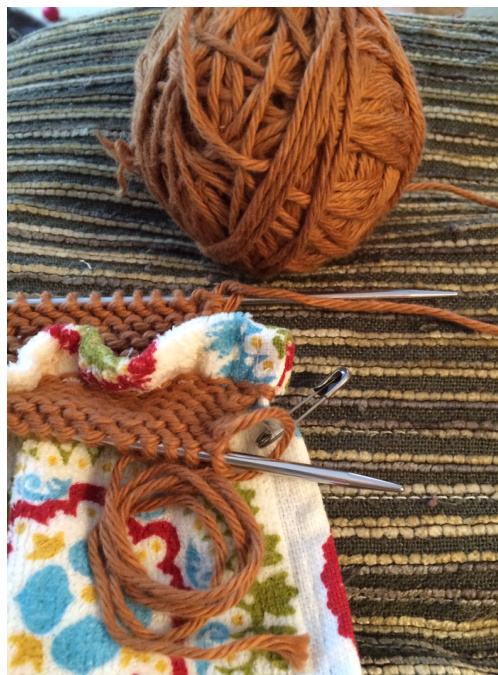
| Here's a picture showing the hem on | |||
| the family side. | |||
| 3needlejoin | This is where you are knitting 2 stitches together, but instead of them being side by side, |
| 1 is in front of the other. Not hard at all, and I'll explain it when we get to it. | |
| iCord | Thisisessentiallyaknittedcord.I'lltrytoexplain itwhenweg get to it in the pattern. |
| It is not hard at all and there are many online videos if you get stuck. |
TTSS (Towel Topper Sans Selvedge)
| 1. | Thread the sharp tapestry needle with your yarn. Hold the towel with the company side facing you and the hemmed |
| portion at the top. Put a safety pin on the right side of the towel. |
| 2. | Coming from the family side (the back) on the right edge, |
| come through the fabric, pulling your yarn through. | |
| You want tobe near the edge (later you are going to | |
| tuck that little corner edge in and sew it down with | |
| your yarn thread). You also want to be BELOW the hem. | |
| We are going to knit and completely cover this hem up. |
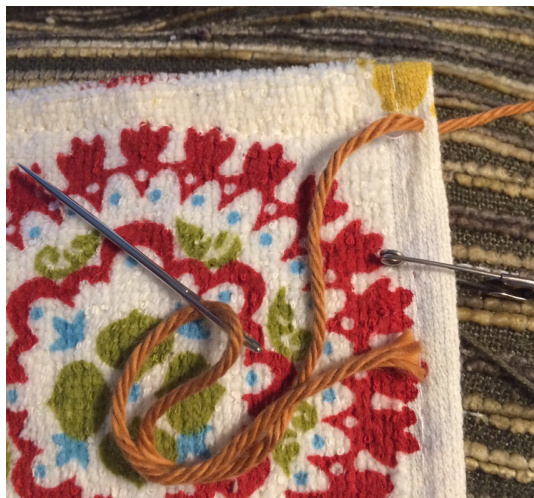
3. | Pull through enough yarn to have roughly twice the width of the towel to work with.
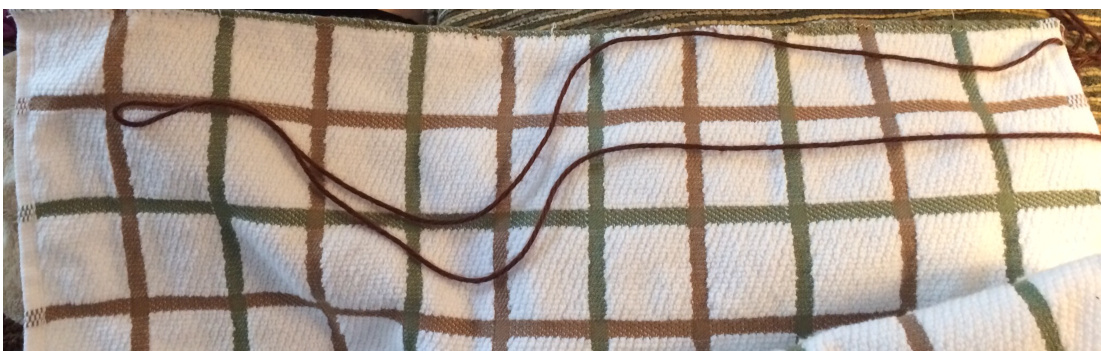
4. Now do a running thread (in and out, in and out) all the way across the width of the towel. It doesn't matter how many times, but you want them to be fairly close. You'll use these to knit stitches. I usually end up with about 45 stitches but it does NOT matter. You just want them to be close enough so that your knit stitches aren't stretched out. You don't need to make them super snug. When you pick up the stitches on the back, it'l get very tight anyway. When you get to the end, do a last stitch close to the edge again, then turn the cloth over and do one stitch on the family side just to kind of hold the yarn in place (neatness is not vital). Cut the yarn, leaving a tail about 10" so you can use it to sew up the side later.
TTSS (Towel Topper Sans Selvedge)
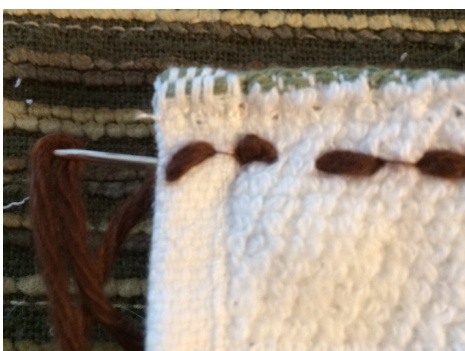
stitch to hold yarn on family side last running stitch on company side
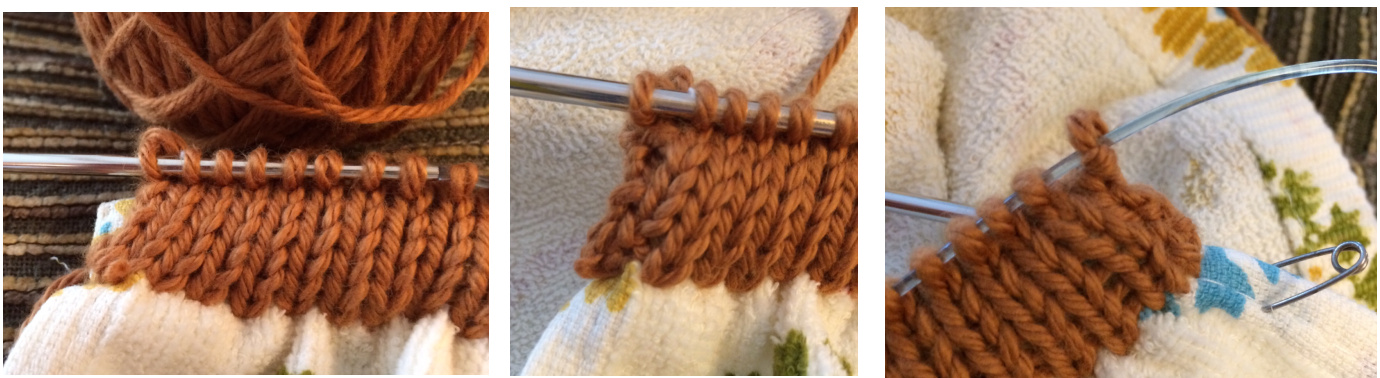
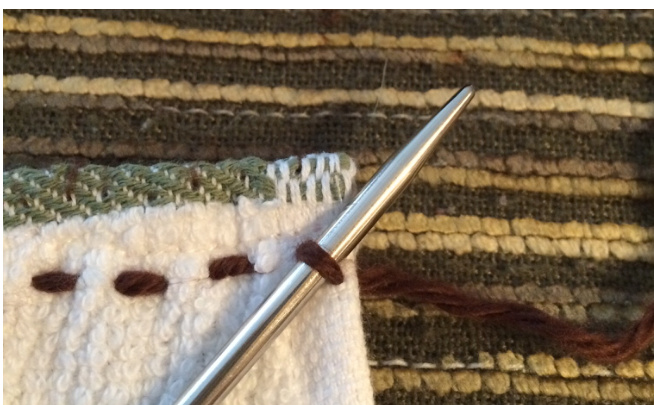
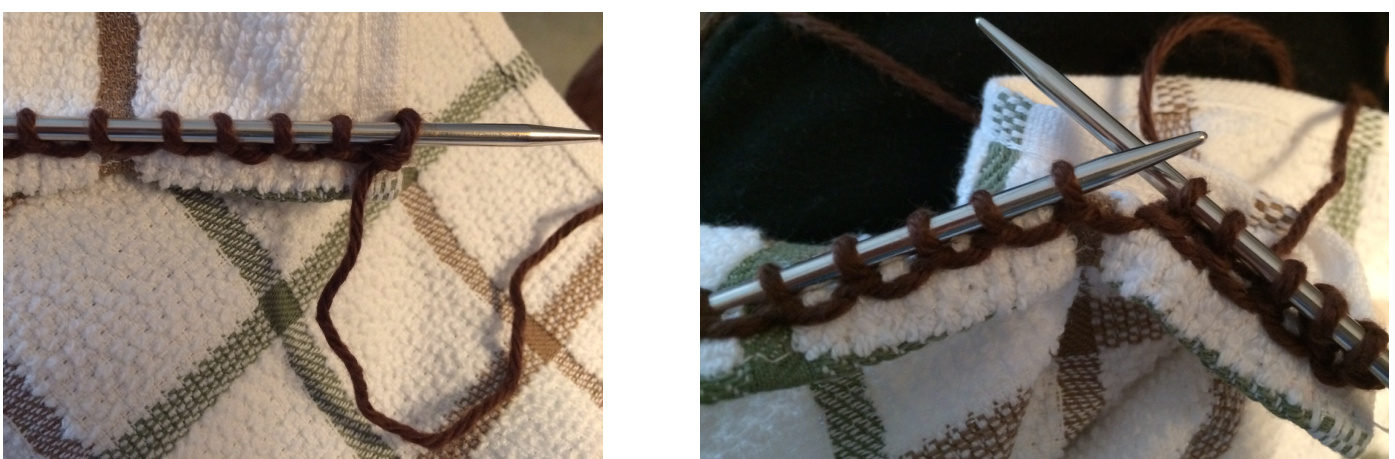
| Knitting Your First Row on the Company Side | ||
| 1. | Now go back to the right edge on the | |
| company side (where you put the safety | ||
| pin). Take your left needle and put it thru that | ||
| first flat running stitch. | ||
| 2. | Insert your right needle thru the |
| stitch on the left needle and using the | |
| working yarn connected to the yarn ball | |
| (and which should be attached to the first | |
| running stitch)knit that stitch. |
| You'll now have 1 stitch on your right | ||
| 3. | needle and none on your left. Insert your | |
| left needle into the next flat running stitch, | ||
| and using your right needle, knit that stitch. | ||
| Do this all the way across. The number of | ||
| stitches on your right needle will grow but | ||
| the left needle has to pick up that flat | ||
| running stitch every time. | ||
TTSS (Towel Topper Sans Selvedge)

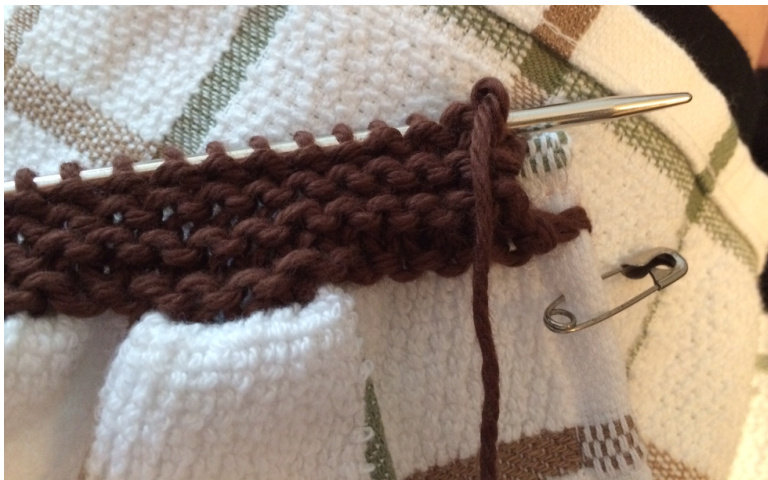
1.| Turn the work over (actually almost upside down) and purl (or knit for garter) back to the beginning.
Continue to knit (on company side) and purl (on family side) back and forth until you have
| enough rows to COMPLETELY cover the hem. | |
| (usually takes me 6 or 8 rows) | |
| Remember, if you want garter, do all knit. | |
| If you want stockinette, do purl on the | |
| family side rows. | |
| Cut yarn, leaving about 10" tail. | |
| Justleavethesestitchesontheneedlewhile | |
| youworkthefamilyside. | |
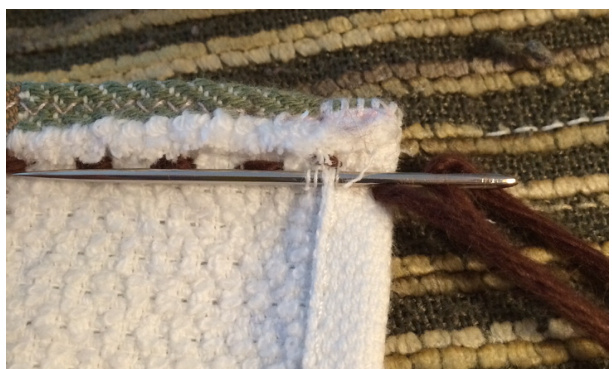
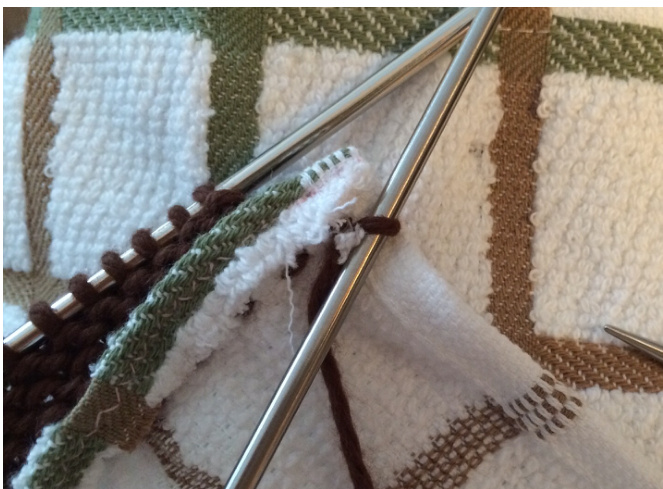
| Knitting the Family Side Rows | ||
| 1. | Turn towel over sofamilyside isfacingyou | |
| (safety pin will be to your left). | ||
| 2. | Using your other knitting needles, insert the left | |
| needle into the first flat running stitch. | ||
| The flat running stitches on this side will | ||
| be MUcH tighter, so a good pointy knitting | ||
| needle ishelpful. | ||
| 3. | Just like you did on the company side, take your | |
| right needle and insert it into the stitch on the | ||
| left needle. Using the ball yarn (which you'll | ||
| remember you cut when you finished the company | ||
| side rows),knit this stitch. | ||
4 Continue like this all the way across.
| 5. | Continue knitting back and forth on the | |
| family side until you have enough rows to | ||
| COMPLETELY cover the | ||
| the hem. End so that you are back at the | ||
| safety pin edge. | ||
| (usually takes me about 7 or 9 rows) | ||
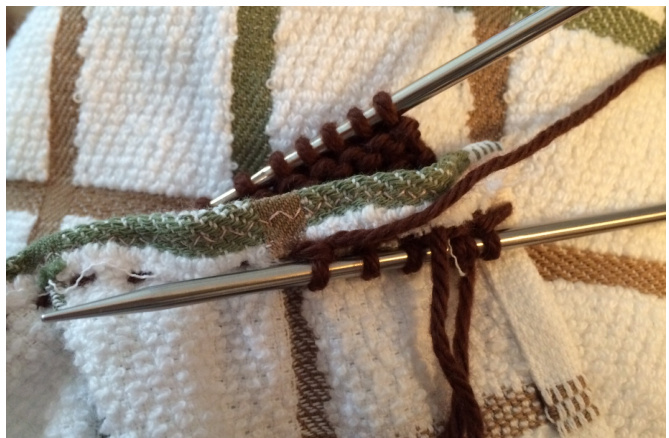
| You'll now have completed rows on | ||
| the company side on one needle, and | ||
| completed rows on the family side on | ||
| another needle. Your working yarn wil | ||
| be on the right, on the family side needle. | ||

TTSS (Towel Topper Sans Selvedge)
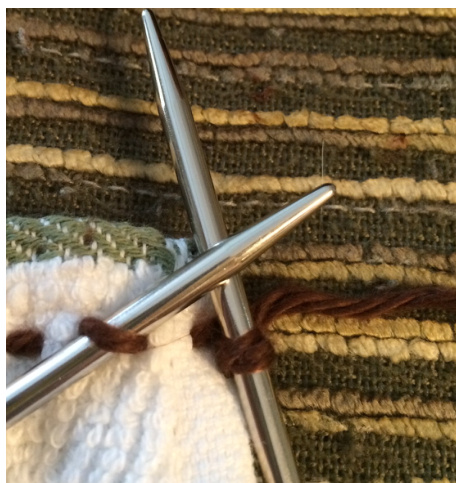
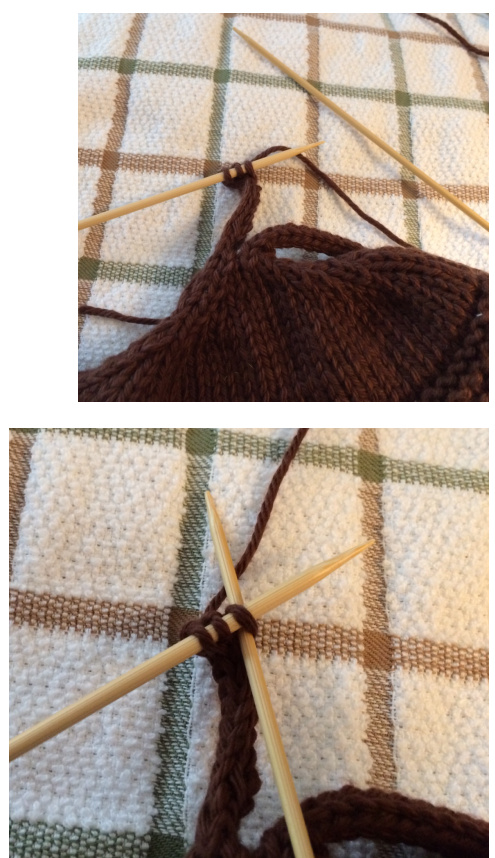
| Joining the Family and Company Side Rows - The Three Needle Join | ||||||
| If you ever done a three needle bind off, this will be familiar to you (we will be doing the knit 2 together part, but not the bind | ||||||
| off part). This isn't hard and Ill try to explain it, but if I'm not clear, check out some you tube videos on the three needle | ||||||
| bind off and it'll makemoresense. | ||||||
| Hold the towel with the company side facing you, safety pin to the right, both needle points pointed toward safety pin edge. | ||||||
| 1. | Hold the two needles parallel, with tips pointing right. | |||||
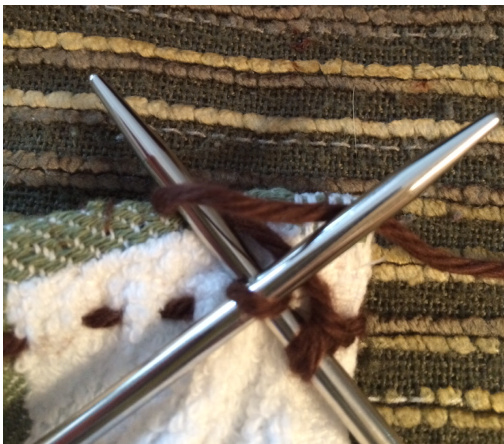
| 2. | Using another needle (I just use the connected circular needle on the company side), go through the first stitch | |||||
| s nn n | ||||||
| them front toback. | ||||||
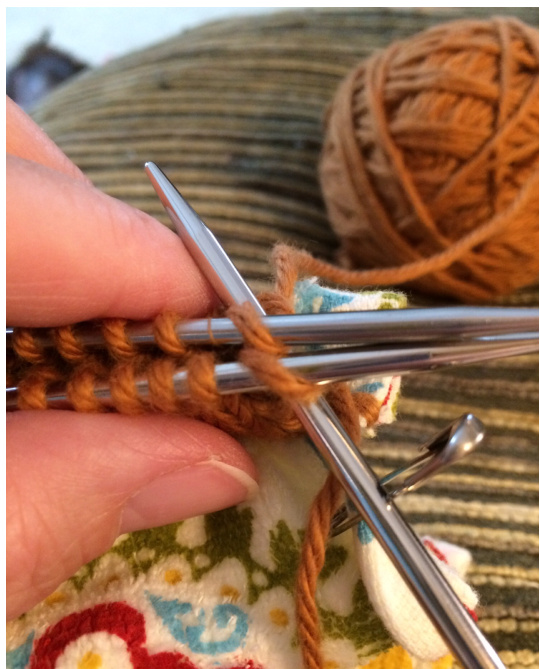
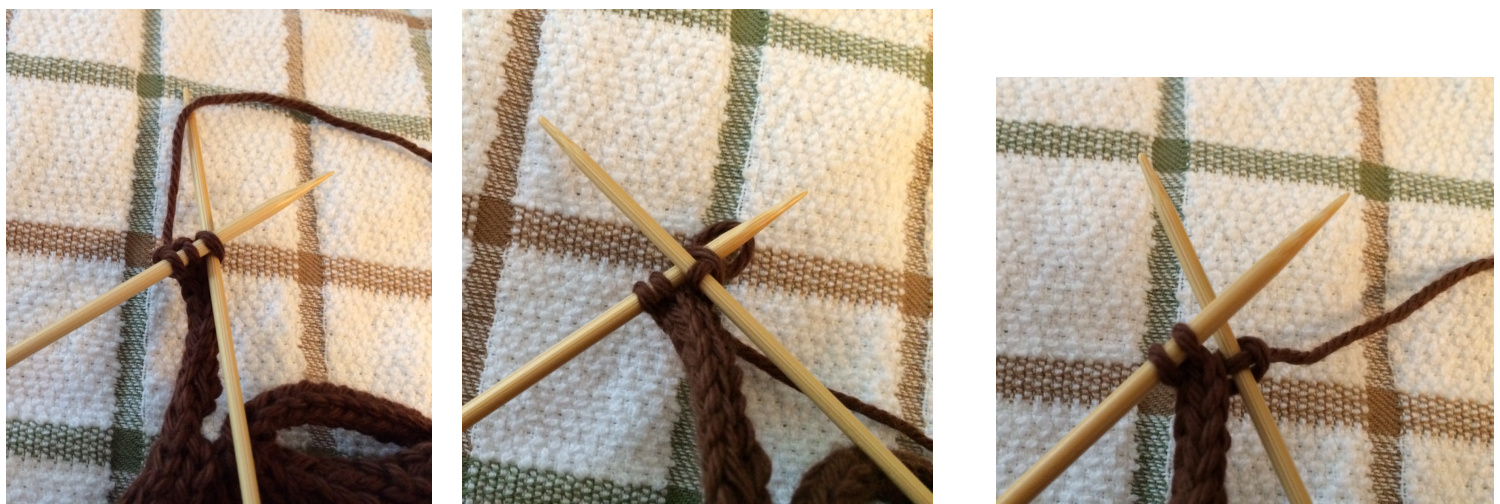
3.Youll now have one stitch on the right needle. Insert the right needle tip through the first stitch on the company side needle, through the first stitch on the family side needle and knit them together. Continue doing this to the end of the row.
What you are basically doing is enclosing that hemmed edge in between two portions of knitting.

| When you are getting close to the end, look to see if you have the same number of stitches on both the front | ||
| andbackneedles. | ||
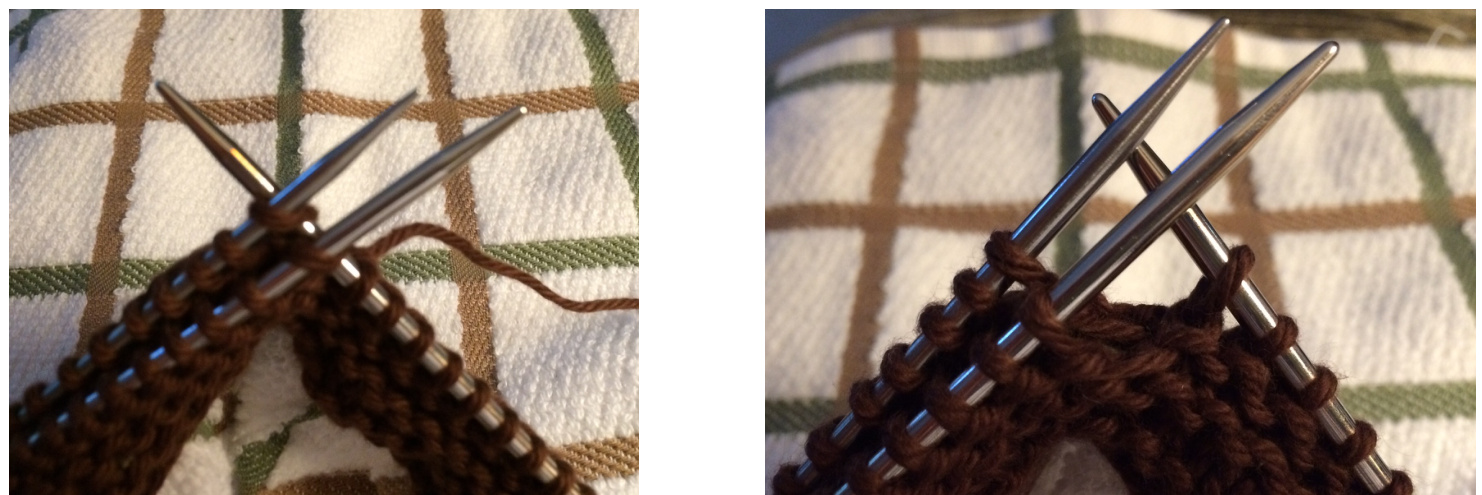
| DON'T PANIC if you have a different number of stitches on the needles. Just do a side by side k2tog in addition to your | ||
| left to work on the front needle. Go through the first stitch on the front needle, go through the 2nd AND 1st stitches onthebackneedleandknitall3together. | ||
TTSS (Towel Topper Sans Selvedge)
So here Ihad 12 stitches on the front but only 10 on the back. So Iwent through 2 stitches on the front needle and only 1 stitch on the back and knit them all together.
Here I had more stitches on the back so went through 1 stitch on the front, 2 stitches on the back and knit
| all 3 together. | ||||

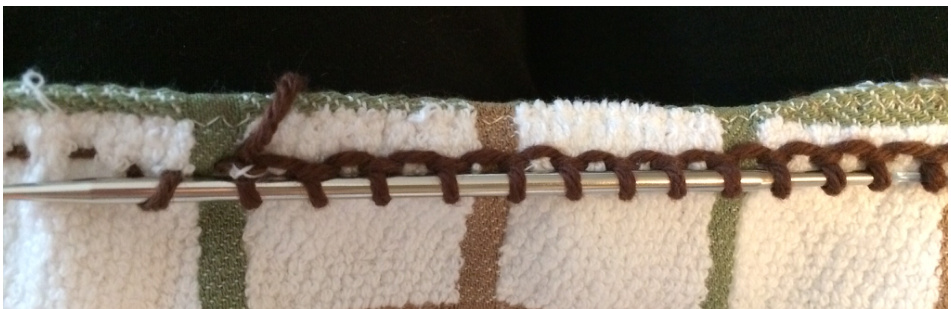
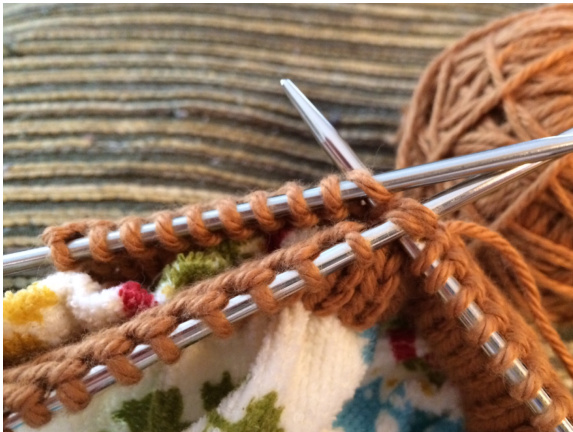
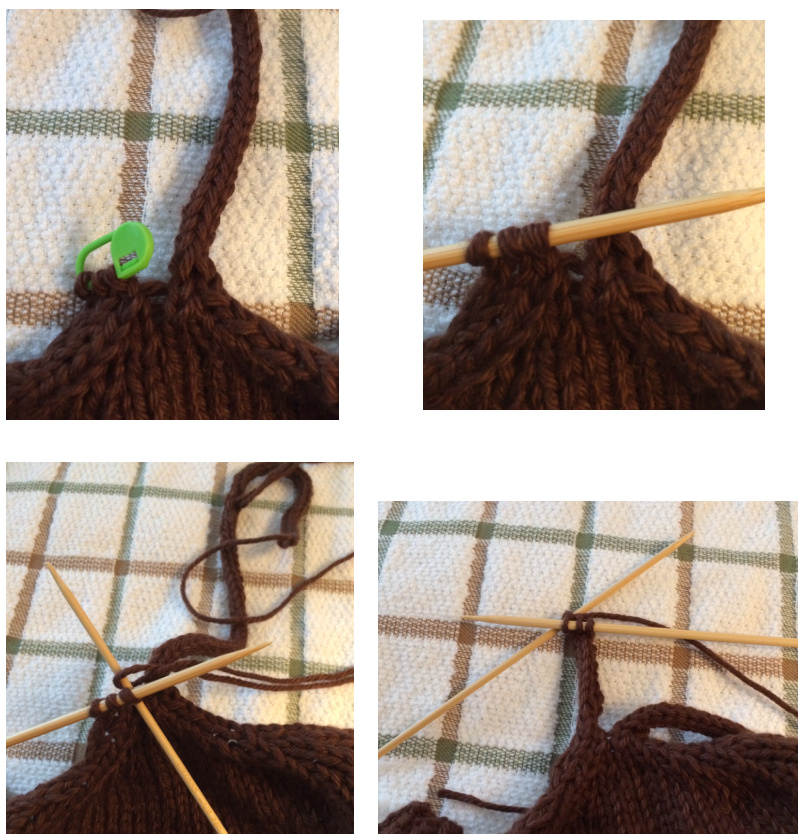
Once you have finished this joining row, you will have enclosed the hem (except for the little corner edges which we
| will deal with below). | ||||
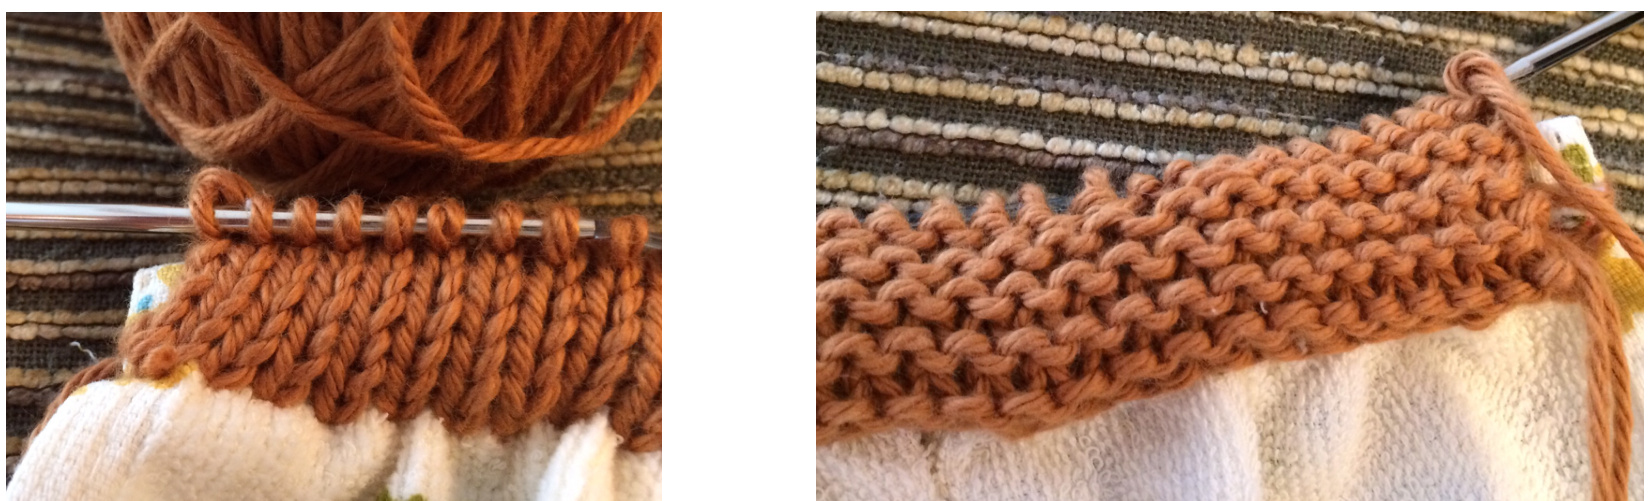
Here are some pictures from the company side (stockinette) and family side showing your enclosed hem.
TTSS (Towel Topper Sans Selvedge)
| family sides will be united in perfect harmony. Don't worry about the little corners of towel poking out | ||||
| oneachside,we'llsewthoseinattheend. | ||||
| companysideisfacingyou. | ||||
| Addinglengthanddecreases | ||||
| DecreaseRow1 | sl-1 purlwise with yarn in front, move yarn to back | ||
| k1 k2tog k2tog | |||
| knit to last 6 | |||
| k2tog k2tog k2 | |||
| DecreaseRow2 | sl-1 purlwise with yarn in front | ||
| for stockinette | purl to last stitch, then k1 | |||
| for garter move yarn to back and knit to end | |||
Repeat Decrease rows 1 and 2 until you are down to around 14 or 16 stitches
| Decrease Row 3 | sl-1 purlwise with yarn in front, move yarn to back | ||
| k1 k2tog | |||
| knit to last 4 | |||
| k2tog k2 | |||
| DecreaseRow4 | sl-1 purlwise with yarn in front | ||
| for stockinettepurl to last stitch, then k1 | |||
| for garter move yarn to back and knit to end | |||
| IF YOU HAVE AN ODD # of stitches, doextraK2tog in middle of a row toget to an even number | |||
| Repeat Decrease rows 3 and 4until you have6stitches | |||
TTSS (Towel Topper Sans Selvedge)
| If you don't know how to do an iCord (they are super easy) Ill try to explain them here. But there are MANY good | |||
| resourcesonlinethatcanexplainitwell ifyouhavetrouble. | |||
| Pick up one of your DPNs and knit the first 3 stitches. Place the last 3 stitches on a stitch holder or piece | |||
| ofscrapyarn,we'll knit themlater. | |||
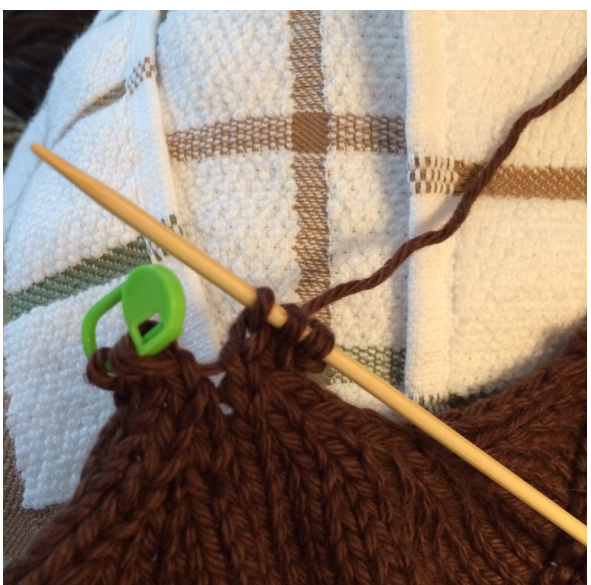
| How to work an iCord | ||
| 1. | You haveworkedyour3stitches. | |
| You are just about to slide thelast | ||
| stitch off of the left needle. | ||
| You slide that last stitch off of | |
| the left needle. | |
TTSS (Towel Topper Sans Selvedge)
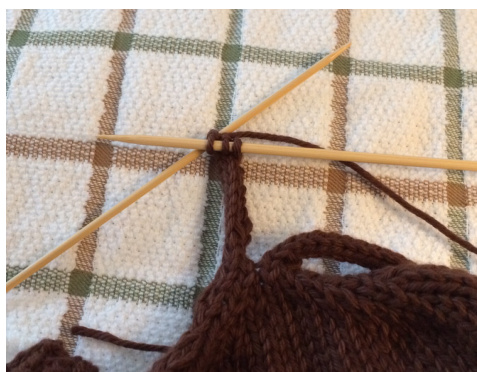
| 2. | Slide those 3 stitches to the other | |
| end ofthe DPN.Takewhatwas yourleft | ||
| needle and move it over to begin | ||
| knitting with again. | ||
| Insert needle intofirst stitchyou slidover. | |
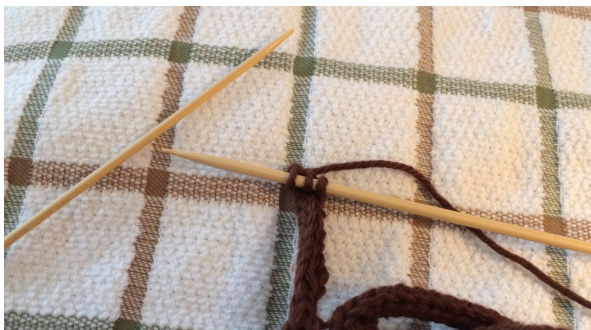
| The working yarn is going to seem | |
| weirdbecauseitiscoming acrossthe | |
| backofthe3stitches,butthatiswhat | |
| youwant. | |
Use that working yarn to knit the 1st stitch and then the other 2 stitches. Repeat over and over until 10" long. Every few rows, give the growing cord a little tug to keep it nice and snug.
Bind offlike you normally would, just remember that first stitch after you've done the iCord Slide is going to seem a little strange. Cut yarn and pull through, leaving a tail long enough to sew in.
TTSS (Towel Topper Sans Selvedge)
| SecondiCordTie | ||
| 1. | Putthe3heldbackstitchesonaDPN | |
| Using the yarn ball thread, begin working | ||
| aniCordonthose3stitches. | ||
| Work until it's about the same length as | ||
| the other iCord (about 10"). | ||
| Bind off, cut yarn and pull through last | ||
| stitchleavingenoughtailtoweavein. | ||
| FinishingUptheiCords | ||||
| You can thread the tail end of the iCordbackdown through theiCord and then trim it. | ||||
| I usethe tail at thebottom of the iCords(whereI had to attach theyarn tostart the second iCord) tosewand | ||||
| reinforcethebasesoftheiCordsalittlebit,thenweaveitinandtrim. | ||||
| Sewinginthecorners | |||
| Go back now to the two edges of the towel where those little corners arepoking out.You'll haveyarn ends at each side | |||
| (one side will have two ends). Use those to tuck the corners in between the knitting and sew them up. Weave in the | |||
| decidedlater it waseasiertodo it afterI wasdonewith all theknitting.) | |||