One Day at a Time (ODAAT)
Skill Level: Easy
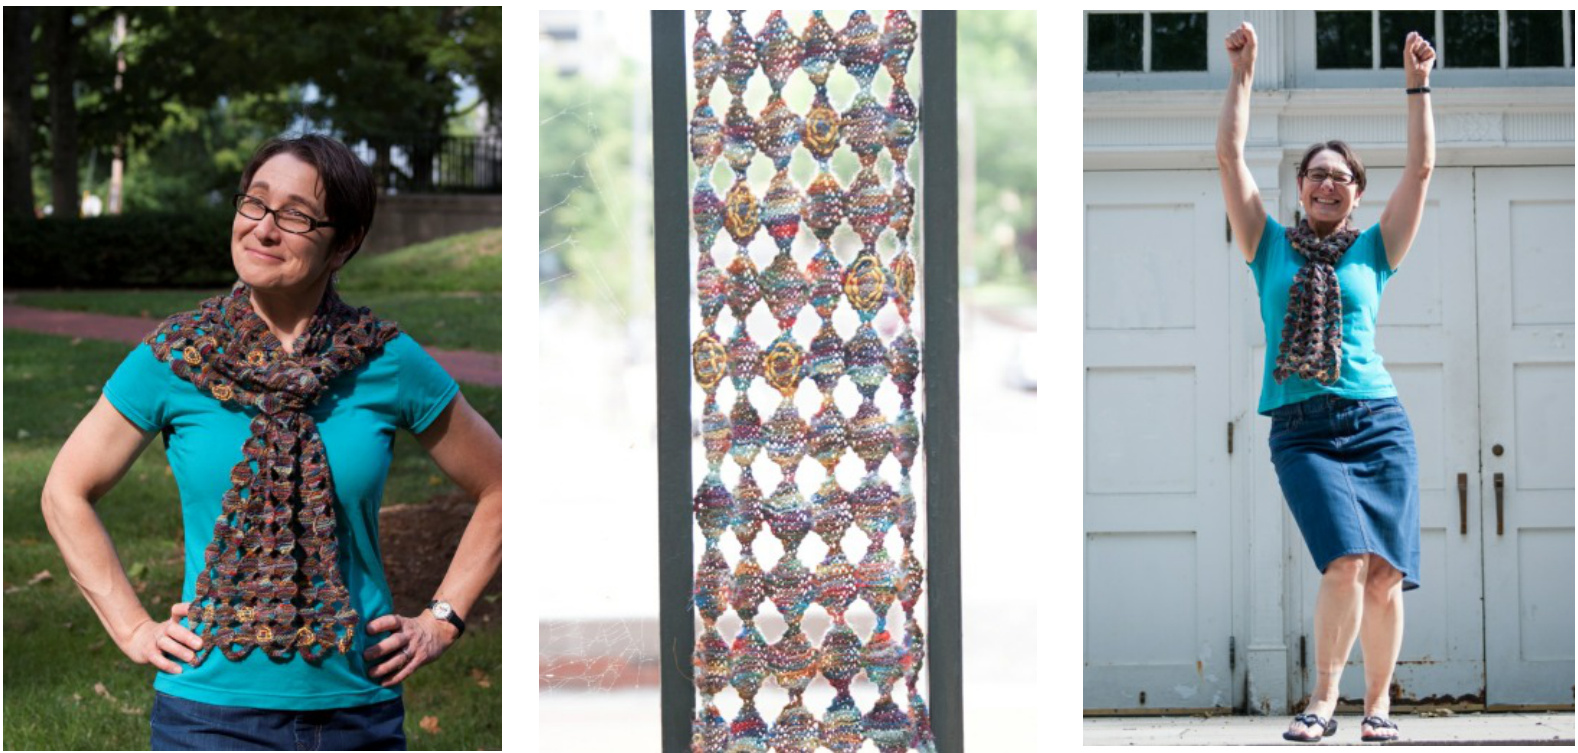
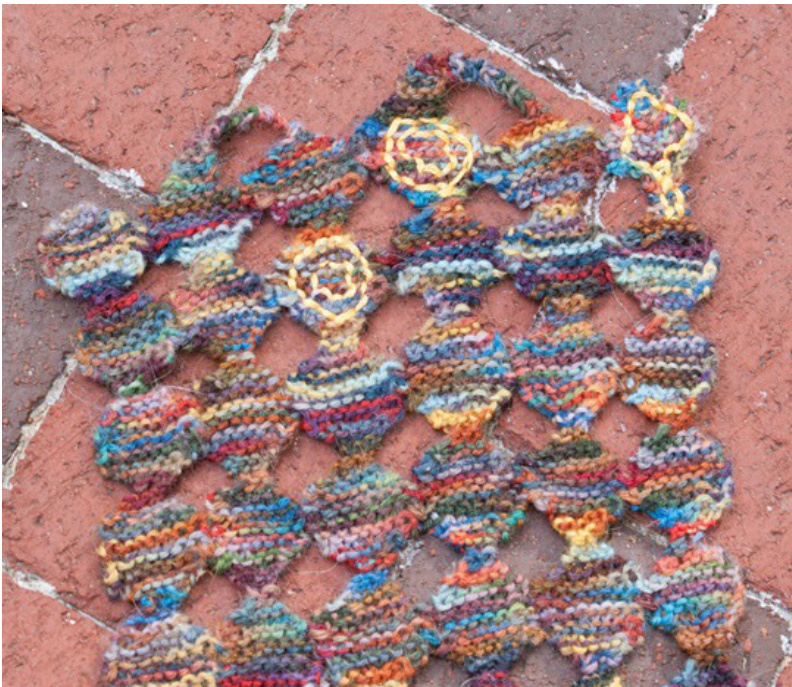
We all have significant dates in our lives when we find ourselves remembering events from years past. But, for recovering alcoholics and addicts, anniversaries are a huge deal. As the oneyear anniversary of a loved-one's sobriety approached, I knew I wanted tocommemorate that yearin a way that celebrated each individual daily accomplishment. So, I found 2 skeins of luscious hand-painted sock yarn and started making circles\*—one for Every Single Day of sobriety. In making this scarf I truly came to realize the magnitude of what a year means when you look at it one day at a time. Every Single Day is work. Every Single Day is a victory. Every Single Day is treasured. Every Single Day is a cause for celebration. Every Single Day adds up..One Day At A Time...to create something amazing. The last position on the scarf is not a circle—-but rather an arrow which points with hope to the next year. A final (optional) touch is to embellish the circles that mark one-month anniversaries with rustic embroidery. No matter what the future holds, this scarf is tangible proof of a year's worth of sobriety...for which I am most proud and grateful. \*See "Reversible Knitting" by Lynne Barr Techniques Used: Knit, k2tog, S2KPO, picking up stitches
Jodie Gordon Lucas
www.QueenieKnits.com For pattern support contact: Queenie@QueenieKnits.com Ravlery ID: jodiemom
OVERVIEW
Below is a brief, optional overview of what is involved in the making of this design forknitterswhofind thebigpicturehelpful.These are NoT directions-merely a sneakpeakofwhat is to come. Each individual circle begins with 2 stitches, increases to 8 stitches and then decreases back to 2 stitches. The first tier of the scarf is created by making a long strip of connected circles. A narrow strip allows for a U-turn. On the next tier(and each successive tier) the widest point of each circle is connected to the circle below it by picking up a stitch in the lower circle and knitting the final stitch of the upper circle together with it. From there, continue to make circles joined to the row before, then work a U-turn and continue until you reach the final position o n the scarf. The arrow begins with a strip 3 stitches wide to what would be the mid-point of the circle. Then, cast on stitches on each side and finish as you would the circle.
Dimensions:
8 inches by 96 inches after light blocking
Yarn:
Misti Alpaca Hand Paint Sock Yarn; 437 yds/400 m per 100 g skein; Pico; 2 skeins. Used 138 g (603 yards). DMC Coton Perle [100% Mercerized Cotton; 27 yds/ 25 m per 5 g skein]; 725; 1 skein. Needles: Every knitter's gauge is unique. Use whatever size needles needed to meet gauge. 1 set US #1/2.25 mm double-point needles OR 1 24-inch US #1/2.25 mm circular needle Notions: tapestry needle Gauge: 32 sts / 44 rows = 4 inches in stockinette stitch; 27 sts / 48 rows = 4 inches in garter stitch
INSTRUCTIONS
Watch carefully..things can easily become twisted and it's easy to skip a circle.Confirm after every tier that the number of circles in that row is correct and there are no twists.
Foundation Tier, Days 1 through 61
CU 2 sts. Row 1 [RS]: Kfb 2x. 4 sts. Rows 2 through 5: Kfb, kto end of row. 1 st increased each row, 8 sts on final rep. Rows 6 through 11: K8. Rows 12 through 15: K to 2 sts from end, k2tog. 1 st decreased each row, 4 sts on final rep Row 16: K2tog 2x. 2 sts. Repeat Rows 1 through 16 another 59 times. Repeat Rows 1 through 15 once more. Hang a U-ey Work begins on the RS. Rows 1 through 4: K4. Row 5 [RS]: K2, k2tog. 3 sts. Rows 6 through 13: K3. Row 14 [WS]: K1, k2tog. 2 sts. Rows 15 through 22: K2.
Successive Tiers of 61 days
When working successive tiers, the circles in the current tier connect to the circles in the previous tier. For example, the circle for day 62 will connect to circle 61 in the foundation tier (then 63 to 60, 64 to 59 and so forth). Row 1 [RS]: Kfb 2x. 4 sts. Rows 2 through 5: Kfb, kto end of row. 1 st increased each row, 8 sts on final rep. Row 6: K8. Row 7: K8, hold current circle adjacent to the previous tier so that rows are aligned. PUK 1 stitch between 2 garter ridges on the edge of the existing circle in the previous tier. Row 8 [WS]: K2tog, k7. Row 9: K8, PUK a stitch along the edge of the existing circle in the tier below between the next 2 garter ridges. Row 10: K2tog, k7. Row 11: K8. Rows 12 through 15: K to 2 sts from end, k2tog. 1 st decreased each row, 4 sts on final rep Row 16: K2tog 2x. 2 sts. Repeat Rows 1 through 16 another 60 times. \* Repeat from \* to \* another 3 times, 305 days total.
Final Tier of 60 days and 1 arrow
Work as for previous tiers but work only 60 reps of the circle pattern. In place of final circle work arrow as follows: Row 1[RS]: Kfb, k1, 3 sts. Rows 2 through 5: K3. Row 6: Cast on 3 with knit on method, k6. Row 7: Cast on 3 with knit on method, k9, hold arrow adjacent to thefinal circlein the previous tier so that rows are aligned.PUK 1 stitch between 2 garter ridges on the edge of the existing circle in the previous tier. Row 8 [WS]: K2tog, k7. Row 9: K8, PUK a stitch along the edge of the existing circle in the tier below between the next 2 garter ridges. Row 10: K2tog, k7. Row 11: K3, S2KPO, k3. 7 sts. Rows 12, 14 and 16: Knit. Row 13: K2, S2KPO, k2. 5 sts. Row 15: K1, S2KPO, k1. 3 sts. Row 17: S2KPO, 1 st. Break yarn and draw through remaining stitch.
FINISHING
Steam to block. Use DMC pearlized cotton to embellish signifi cant days with embroidery. In the scarf pictured the one-month anniversaries are embellished asfollows: Cut 3 feet of pearlized cotton and thread onto a tapestry needle. Hold thread doubled. From the back, insert needle into the circle one-eighth inch from the edge. Pull through until 2 inches of thread remain on the wrong side of the work. Work short basting stitches (over, under, over) around the circumference of the circle being sure that the final stitch is an "over" that ends where the original stitch began. Work around the circle again using same holes as the first round. This time the stitches will show under, over, under. When second pass is complete make a second circle inside the first in the same way. To finish: on wrong side make small stitches around the 2 inches of thread left at the beginning of the first circle. Be sure stitches are close together,do not show on theright side and following the line of the embroidery. Once thread ends are secure take needle under the stitches tacking down the ends and pull through to secure. Snip both ends of the thread close to the tacking stitches.
ABBREVIATIONS
co Cast On k knit k2tog knit 2 stitches together kfb knit into the front and back of the same stitch PUK Pick up and knit rep(s) repeat(s) RS right side S2KPO Slip 2 stitches as if to k2tog, k1, pass slipped stitches over st(s) stitch(es) St st StockinetteStitch WS wrong side


