Toe Up Self Striping Mock (Mystery Sock) Clue#1
Designed by Margie Dougherty NOTE: This pattern is written to be needle independent. You may use one small circular, two longer circulars, 4 or 5 double points, or magic loop (or a combination thereof.) I use stitch markers to tell me where the beginning of the round (BOR) and the MOR are. If you knit with two circs or DPN's you may not need to use the markers.
MATERIALS:
Fingering weight sock yarn, self striping, 100 grams or about 375-425 yards. Divide the skein into two equal size skeins, matching the stripe repeat if you want to use every yard of yarn and have matching socks. If you don't care and want to live dangerously, just start knitting with one skein. NOTE: If you want to use a solid colored yarn for the heels and toes, it's allowed. You may use the solid color just for the toes, just for the heels, or both. You will need less than 50 grams of yarn for the toes and heels, but perhaps more than 50 grams of the self striping yarn. Needle Size: 2.25 mm (or size to get gauge) Gauge: 8 stitches and 14 rounds = 1" in stockinette stitch Row gauge is not as important as stitch gauge. Other: Short length of waste yarn about the same weight as your yarn, for the provisional cast on. I like to use white cotton crochet thread because it comes out easily w/o leaving bits of fiber behind, and also won't bleed dye onto your yarn. Two stitch markers to indicate BOR and MOR (optional). I like to make my EOR marker different than any other markers I might be using.. SKA July 2014 M0CK, Copyright 2014 by Margie Dougherty. all rights reserved Yarn needle to weave in ends Size: Medium 8" leg circumference. The length is customizable. If you want to make your sock larger or smaller, either change your gauge (use heavier weight yarn with same size needle for a larger sock, or lighter weight and/or smaller needle for a smaller size sock) or change the cast on numbers.
ABBREVIATIONS:
BOR: Beginning of round (aka EOR for end of round) MOR: Middle of round, to differentiate between the patterned instep and the sole of the sock. K2TOG: Knit two stitches together to decrease by one stitch or close a gap SKP: Slip a stitch purlwise (with yarn held as if to purl). Knit 1 stitch. Pass the slipped stitch over the knit stitch (one stitch decreased). NOTE: I have used SKP in this design, but you may use an SSK decrease instead if you prefer it. The bind off will use an SSK. W & T Wrap and Turn: Knit to the stitch before the stitch to be wrapped. Slip the stitch from the left needle to the right needle. Bring the yarn forward between the two stitches. Slip the same stitch back to the left needle. Turn the work and knit that stitch, which will now have a wrap of yarn around it to fill the gap made when you turned & knit back without knitting the stitch.
PATTERN DIRECTIONS:
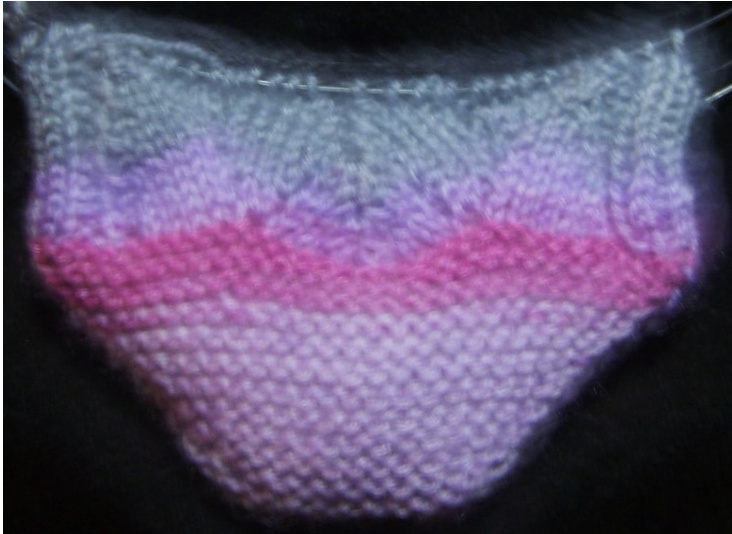
Using waste yarn, make a provisional cast on of 32 stitches. you will be knitting the garter stitch toe cap flat, not in the round. you will knit short rows using one less stitch per row until you have 10 stitches in the center of the toe, then you will start adding stitches back and knitting the 2nd half of the toe. With project yarn, K32 across the provisonal stitches, turn. K31, wrap last st and turn (wrap= yarn to front, slip 1 purlwise, slip stitch back to leftneedle) K30, wrap next st and turn (on front side, wrap= yarn to front, slip 1 purlwise, turn (yarn is now in back) and slip stitch back to left needle) K29, wrap next stitch and turn K28, wrap next stitch and turn Continue in pattern until you work the row K10, wrap and turn Next row: K11, wrap and turn the wrapped stitch Turn SKA July 2014 M0CK, Copyright 2014 by Margie Dougherty. all rights reserved Next row: K12, wrap and turn the wrapped stitch Turn Next: K13, wrap and turn the wrapped stitch Turn Next: K14, wrap and turn the wrapped stitch Turn Continue, working 1 more st each row until all sts have been worked, ending with a front side row. you should now have a pretty little garter stitch toe cap with 64 stitches. Place marker (PM) to indicate BOR/EOR.
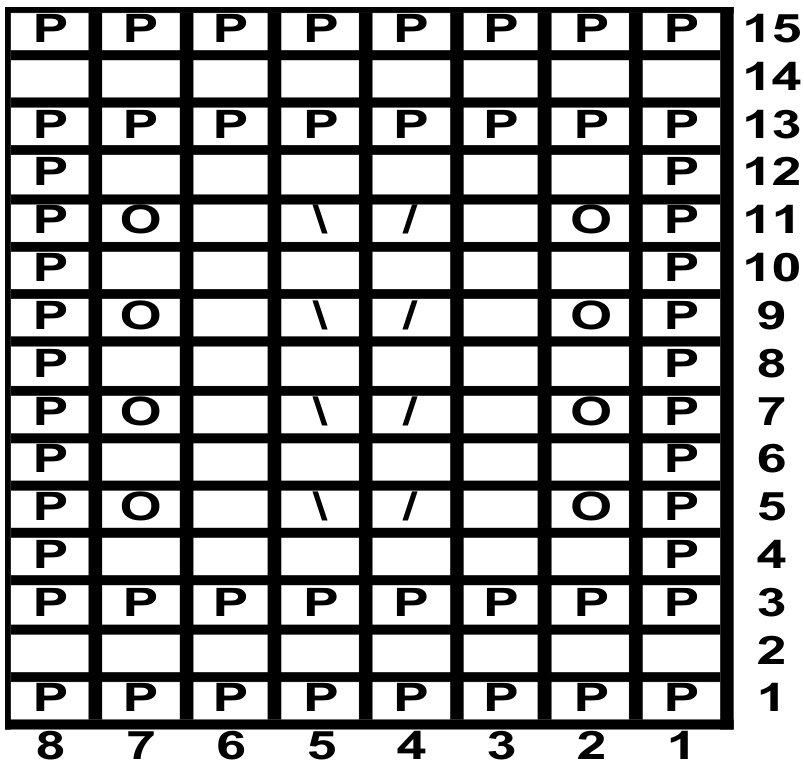
Remove provisional cast on yarn and place those 32 live sts on needle(s), PM to mark middle of round (MOR). Knit to EOR. 64 sts Knit in pattern stitch until the sock leg measures 1 -2" less than your foot length, minus 10%. INSTEP PATTERN STITCH: (32 stitch, 12 round repeat) R 1: K2, P2, K2TOG, yO, K5, yO, K3, SKP, K2TOG, K3, yO, K5, yO, SKP, P2, K2, (instep), K32 (sole) R 3: K2, P2, K2TOG, K5, yO, K1, yO, K2, SKP, K2TOG, K2, yO, K1, yO, K5, SKP, P2, K2, K32 (sole) R 5: K2, P2, K2TOG, K4, yO, K3, yO, K1, SKP, K2TOG, K1, yO, K3, yO, K4, SKP, P2, K2, K32 (sole) R 7: K2, P2, K2TOG, K3, yO, K5, yO, SKP, K2TOG, yO, K5, yO, K3, SKP, P2, K2, K32 (sole) R 9: K2, P2, K2TOG, K2, yO, K1, yO, K5, SKP, K2TOG, K5, yO, K1, yO, K2, SKP, P2, K2, K32 (sole) R11: K2, P2, K2TOG, K1, yO, K3, yO, K4, SKP, K2TOG, K4, yO, K3, yO, K1, SKP, P2, K2, K32 (sole) Even rounds: Knit around all 64 stitches, purling the 4 purl stitches on the instep. SKA July 2014 M0CK, Copyright 2014 by Margie Dougherty. all rights reserved Repeat rounds 1 through 12 as many times as you need to achieve the desired foot length. Stop knitting after completing round 12. This is the end of Clue #1.Wait until next week and Clue #2 to keep going. FOOTPATTERNCHART Knit one repeat of the pattern on the instep, and knit the sole in stockinette.
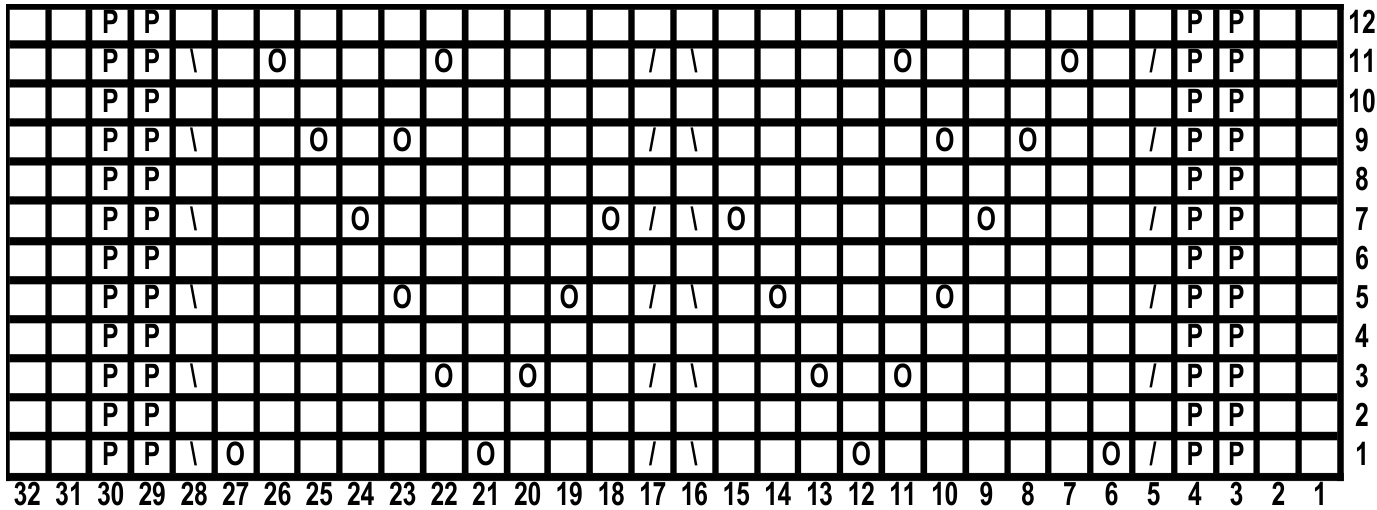
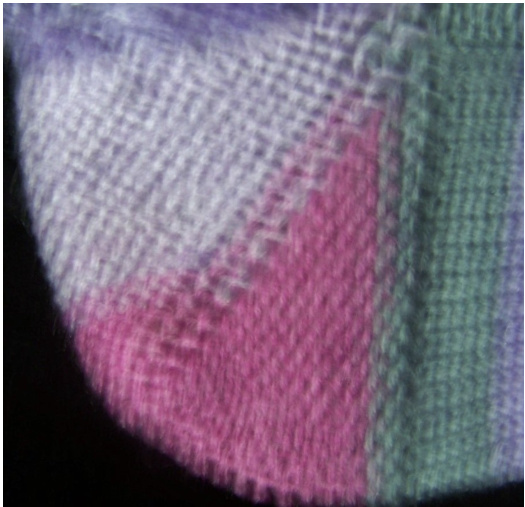
Chart Key: P= Purl /= K2TOG \=SKP O=yo Empty spaces on the charts are knit. CLUE # 2: SHORT ROW HEEL: Knit on 36 stitches This heel measures 1.75", so you should start it approximately 2" before the end of your foot measurement. If you want to knit it slightly deeper, to make a 2" deep and high heel, you can knit to just 6 or 4 unwrapped stitches before starting the increases. Make sure it's an even number or the heel will be lopsided. Remember to start the heel slightly earlier if you choose the deeper option, or your sock foot will be too long. To adjust the number of the heel stitches to 60% of the total, knit 2 stitches after the BOR marker, then turn your work. The heel will be knit back and forth on the next 36 stitches, while the 28 instep stitches remain on hold. This sock has a garter stitch short row heel. It's a very easy heel to knit, and it looks good, besides being very cushy under your feet. The heel is knit exactly the same as the toe, only you don't have any stitches on waste yarn and it is oriented 90° from the toe so it look square. NOTE: If you want to keep knitting in a specific stripe pattern, leave your working yarn hanging and knit the heel with a second strand, perhaps pulled from the other end of the ball. Now would also be the time to change to your solid contrast color if you plan to use it. With 36 stitches on the heel section of the sock, wrong side facing: (WS) Knit across 35 stitches, W & T the last stitch. Knit across 34 stitches, W & T. Knit across 33 stitches, W & T. Continue to knit back and forth on the sole/heel needle, wrapping and turning one more stitch on each row, until you have 14 wrapped stitches on each side of the 8 unwrapped center stitches. Begin to knit the second half of the heel. (WS) Knit 9, W & T. This will be a previously wrapped stitch. Don't lift the wrap and hide it, just knit the stitch. The garter stitch pattern will hide those wraps. Knit 10, W & T. Knit 11, W & T. Keep repeating the pattern of: Knit XXX stitches, W & T, until you have knit every stitch (and rewrapped every other stitch). Do not wrap and turn the last stitch of the heel, or you will be knitting back to the side which has already been wrapped twice and have no stitch to wrap and turn. I picked up the bar between the heel stitch and the first instep stitch and knit it together with the last heel stitch. Drop the 2"d strand of yarn if you used it, and pick up your main strand ready to knit the leg. This is the new beginning of the round. Wait until next week and Clue #3 to keep going.
CLUE #3 LEG PATTERN
32 stitch repeat, 12 rounds
Knit leg pattern repeat 2X around the sock tube. Make sure your purl stitches are purled over the purl stitches from the foot chart. If you notice, the leg chart has been moved to the left two stitches to accomodate the twisted stitches. The 24 stitches after the two purl stitches: stitches 3-26, are the held instep stitches. You may once again need to redistribute stitches on your needles to accommodate the twisted stitches. I like to start knitting on each needle with a knit stitch, so my needles are arranged so that the first 2 stitches of the round are the last two on the needle, then I start with a marker and stitch #3. Knit 6 repeats of the leg pattern. You may knit more if you want added length (and have enough yarn.)
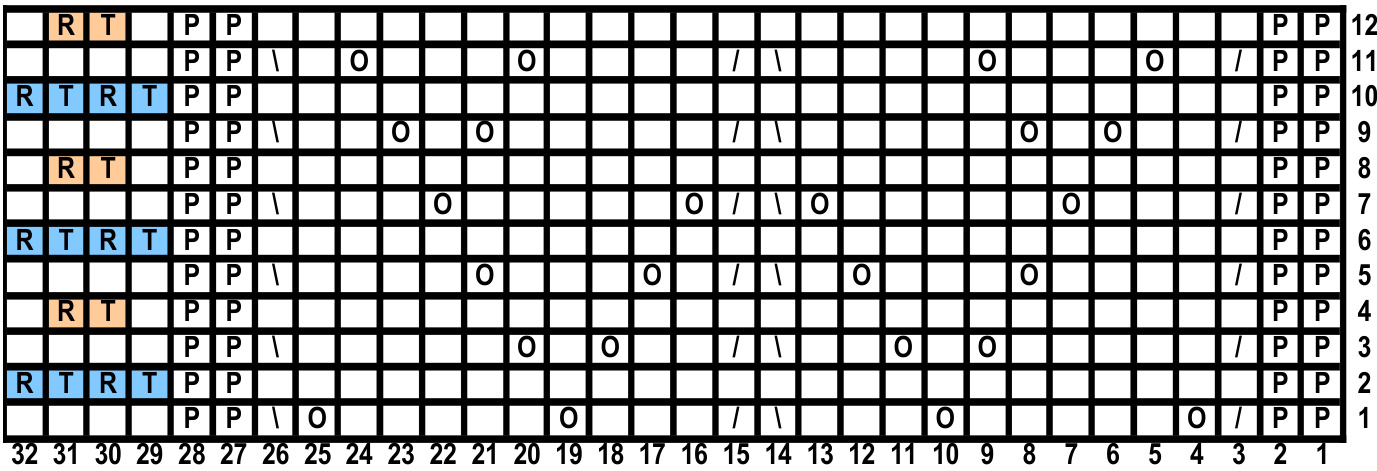
Chart Key: Empty spaces on the charts are knit. P= Purl /= K2TOG \= SKP O= yo RT= Right Twist: K2TOG, but leave both stitches on left needle, then insert needle in first stitch again and knit. Slip both stitches to right needle as you finish the 2nd knit stitch. This is done over two stitches. NOTE: If you need more room in the leg than you did in the foot, you can add 4 purl stitches, one between each pair on the chart. If you need to add more than 4 stitches, I would suggest doing a K1P1 pattern instead of the P2 or P3 pattern, keeping the lace pattern and the spiral rib pattern centered. The last bit of the sock will need an 8 stitch repeat, so be prepared to decrease or increase 4 stitches before beginning clue # 4 if you add 4 stitches to the leg. Vait until next week and Clue #4 to keep going and finish the sock.
CLUE #4 EDGING
Knit the edging chart repeat 4 times around the sock tube. NOTE: If you've added stitches to the purl areas, make sure the total number of stitches is a multiple of 8 for the edging pattern to work. Edging: 8 stitch repeat Round 1: Purl Round 2: Knit Round 3: Purl Round 4 and rounds 6, 8, 10, 12: \*P1, K6, P1\* repeat between \*'s 4 times Round 5: \*P1, YO, K1, K2TOG, SKP, K1, YO, P1\* repeat between \*'s 4 times Round 7: \*P1, YO, K1, K2TOG, SKP, K1, yO, P1\* repeat between \*'s 4 times Round 9: \*P1, yO, K1, K2TOG, SKP, K1, YO, P1\* repeat between \*'s 4 times Round 11: \*P1, YO, K1, K2TOG, SKP, K1, YO, P1\* repeat between \*'s 4 times Round 13: Purl Round 14: Knit Round 15: Purl Bind off using this method: K2TOG TBL, replace stitch on left needle and repeat until all stitches are bound off. Insert your needle into the first stitch bound off, pick up a stitch, slip both stitches to left needle, lift last stitch over stitch just picked up, cut yarn and pull it through last stitch. Weave in loose ends. Wash your socks and lay flat to dry. Chart Key: Empty spaces on the charts are knit. P= Purl /= K2TOG \= SKP O=yo Alternate Leg Pattern Round 1: (and all odd rounds): \* K7, P2, K14, P2, K7\*, repeat between \*'s once Round 2: \* K1, YO, K2, SKP, K2, P2, K2, K2TOG, K2, yO, K2, yO, K2, SKP, K2, P2, K2, K2TOG, K2, YO, K1\*, repeat between \*'s once Round 4: \* K2, YO, K2, SKP, K1, P2, K1, K2TOG, K2, YO, K4, YO, K2, SKP, K1, P2, K1, K2TOG, K2, yO, K2\*, repeat between \*'s once Round 6 \* K3, YO, K2, SKP, P2, K2TOG, K2, YO, K6, YO, K2, SKP, P2, K2TOG, K2, yO, K3\*, repeat between \*'s once Round 8\* K1, SKP, K2, yO, K2, P2, K2, yO, K2, K2TOG, K2, SKP, K2, YO, K2, P2, K2, YO, K2, K2TOG, K1\*, repeat between \*'s once Round 10: \* K2, SKP, K2, YO, K1, P2, K1, yO, K2, K2TOG, K4, SKP, K2, yO, K1, P2, K1, yO, K2, K2TOG, K2\*, repeat between \*'s once Round 12: \* K3, SKP, K2, YO, P2, YO, K2, K2TOG, K6, SKP, K2, YO, P2, YO, K2, K2TOG, K3\*, repeat between \*'s once