Pollinate!
a mystery sock pattern by revi.
Sizes: Small(Medium, Large): circumference approximately 7 (8, 9 in (18 (20.5, 23) cm), slightly stretched Gauge: 36 sts x 48 rounds = 4 inches (10 cm) in stockinette stitch Yarn: one skein 100 grams) fingering weight yarn;sample socks are knitted with Hiwasse Creek Dyeworks Lodge Sock (80% SW merino/10% cashmere/10% nylon; 435y (400m) / 100g) in Yellow Brick Road Needles: 2.25mm (US 1) or size needed to obtain gauge —- use whichever nedles you like best for kniting a small circumference in the round; a spare circular needle is handy for cast-on option A Notinastryefgrafinstithmaer, crht hinasiil sizetyrkittin nes cast-on option B), cable needle (optional)
Pattern Notes:
· Instructions are written in the following format: Small (Medium, Large). · Sizes given refer to the circumference of the actual socks, not the feet they will be worn on. Choose a size with enough negative ease to fit you comfortably. Please bear in mind that these socks are lacy, and open lacework is inherently quite stretchy. The following skills/techniques are used to knit these socks: - Judy's Magic Cast On (JMCO) — Jeny Staiman has created a helpful tutorial on her blog: http://curiousknitter.blogspot.com/2011/02/judys-magic-cast-onla-jeny.html. - Three needle join Skeincharmer's Elastic Crocheted Cast On — she has provided an excellent photo tutorial: http://www.ravelry.com/projects/skeincharmer/elastic-crochetedcast-on. -Knitting, purling, and knitting through the back loop Basic increases and decreases Cables (with or without a cable needle) Kitchener stitch for grafing the toes
Abbreviations:
dpn's: double pointed needles EoP: Eye of the Partridge stitch JMCO: Judy's Magic Cast On k: knit k2tog: knit two stitches together (decrease) LH: left hand m: marker m1: make one stitch (increase) p: purl pm: place marker RH: right hand RS: right side sl: slip sm: slip marker ssk: slip, slip, knit (decrease) st(s): stitch(es) tbl: through the back loop wyib: with yarn in back wyif: with yarn in front WS: wrong side YO: yarn over
first clue!
In this clue you will complete the cuff and begin the leg of your sock. The stitch count in the cuff can easily be adjusted to achieve a better fit. If you choose to work Option A, you will need an even number of stitches on each needle. If you decide on Option B, your total stitch count needs to be a multiple of four. In either case, be sure to bring your total stitch count to 64 (72, 80) during round 1 of the leg.
Option A: Picot Turned Hem
With the spare circular needle set up for magic loop, use JMCO to cast on so there are 64 (72, 80) sts on each needle (128 (144, 160) loops altogether). The bottom needle contains the stitches you will be working; slide the stitches from the top needle onto the cable and set them aside for now. Rotate work so that the bottom needle is your LH needle, and with your main needles knit across these 64 (72, 80) stitches. Turn work and purl one row. Turn work and knit one row, distributing the stitches across your needles so you can join to work in the round. At the end of this row, do not turn work. Join in the round, being careful not to twist, and knit four more rounds. Next round - form the picots: Work (yo, k2tog) around. Knit 8 more rounds even.
Tips on Technique
·You can also work the cast on with two separate needles instead of just one. Remember that the bottom needle is the one which will be worked first, and cast on accordingly. You may find it helpful to place markers on the bottom needle while you are casting on, to identify where the breaks between the needles will be when you join in the round. (See Recommended Stitch Distribution in the greyboxbelow.) When you turn the work to join in the round, make sure the purl bumps are on the inside and the work is not twisted. After working the three needle join, you will have a small gap from the flat knitting. Sew this shut, then pull the tail through to the inside of the hem. If you prefer it, you can also join in the round right at the end of the first knitted row. While you knit that first row, distribute your stitches across the working needles, then join in the round and knit 6 more rounds even. This method has the advantage of not leaving a gap, but the first couple of rounds can be quite fiddly on account of the cable with the held stitches. Next round - join the hem: Fold your knitting so the stitches on the needle are lined up with the held stitches on the circular cable, with the held sts on the inside. Slide the held stitches from the cable onto the needle tip. They should not all go on the needle at once; instead only load as many sts onto the needle as you have on your working needle. Now work (knit together one stitch from the front needle with one stitch from the back needle) around. If you haven't already done so, place a marker to denote the start of round. Congratulations, your first cuff is complete!
Recommended Stitch Distribution:
for Magic loop/two circular needles: place 32 (36, 40) sts on each needle. for 4 dpn's: place 32 (36, 40) sts on needle 1, and 16 (18, 20) sts each on needles 2 and 3. for 5 dpn's: place 16 (18, 20) sts on each needle.
Option B: Ribbed Cuff
Using a crochet hook of a similar size to your knitting needles, make a slip knot. Resting the crochet hook perpendicularly on top of the LH needle with the working yarn in front, bring yarn over the crochet hook and around the needle (counterclockwise), then pull it through both loops on the crochet hook (the YO and the slip knot) - one stitch cast onto LH needle. Repeat this process until there are 64 (72, 80) stitches on the LH needle, then transfer the last loop from the crochet hook onto a RH needle. Work one row of (k1 tbl, p2 tbl, k1 tbl), then arrange the stitches on your needles so you can join to work in the round. To avoid having to slip a whole bunch of stitches, distribute the sts across your needles whilst you work the setup row. Being careful not to twist at the join, slip the first st (this was the last loop on the crochet hook) over to the end of theround. First round: work (k1 tbl, p2, k1 tbl) to last 2 sts, k2tog tbl. Rounds 2-16: (k1 tbl, p2, k1 tbl) around. If you prefer a shorter or longer cuff, simply work in the established ribbing until the cuff has reached your desired length. Congratulations, your first cuff is complete!
Now begin the leg:
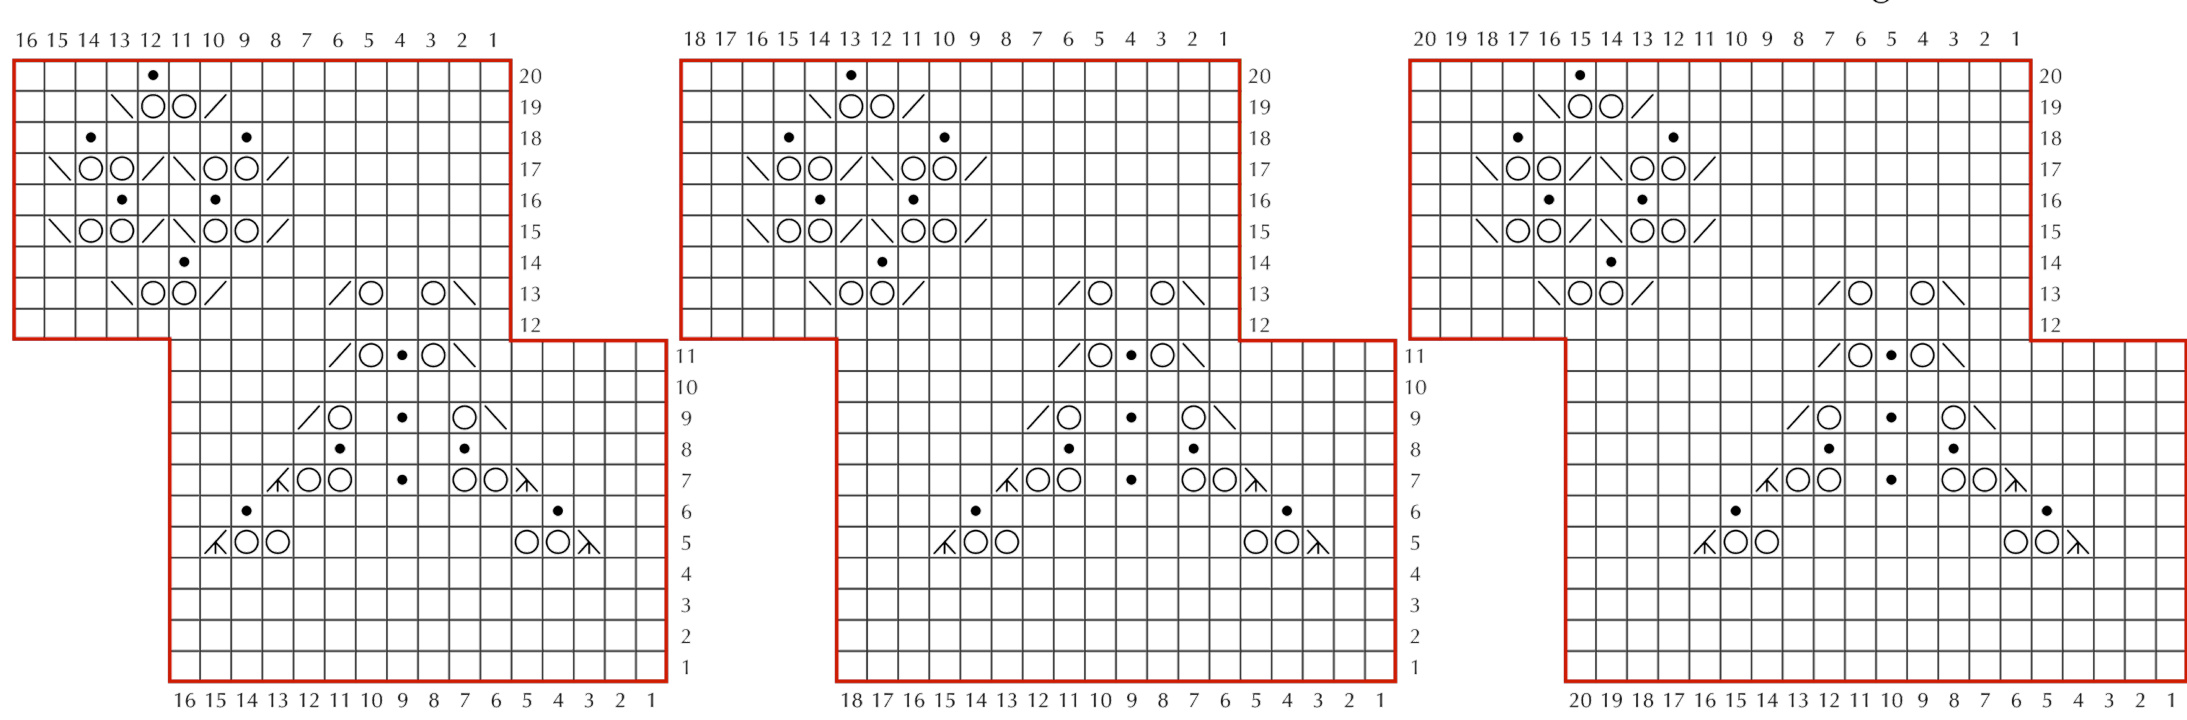
Referring to the appropriate chart for your size, work rows 1-20 of Chart A. Each line of the chart repeats four times around the sock to complete the round. Notice that on round 12 the start of round shifts five sts to the left. After you complete round 11, continue using the same needle to knit the next 5 sts. You are now at the new starl of round; redistribute the stitches across the rest of your needles so that pattern repeats remain together (see Recommended Stitch Distribution in the grey box above) and work through the rest of Chart A. pattern repeat Stitch Key knit purl k tbl: knit through the back loop yo: yarn over Tips on Technique If you are having trouble with the k3tog's and the sssk's, try working them as follows: ·for k3tog: knit the next st, then slip it purlwise back to the LH needle. Pass the next two sts from the LH needle over the stitch, then slip it back to the RH needle. for sssk: [slip 1 knitwise] twice, knit the next stitch, then pass the two slipped sts over. k2tog: knit two sts together ssk: [slip 1 knitwise] twice, knit the 2 slipped stitches together through the back loop k3tog: knit three sts together ssk: sip 1 knitwise three times, knthe sliped stitches together through the back loop
Chart A (small)
Chart A (medium)
Chart A (large)