Shellsuit
This is a turtle set for newborns that I dreamt up while making a Sheldon as gift for a friend's baby shower. It consists of a shell-patterned cardigan with matching longies for your Sheldons and summer dress for your Shellys. It's topped off with an animal themed hat, and I think that Not an Artist's Mittens pattern is perfect for completing the turtle transformation. Needles to say, a matching Sheldon (Ruth Homrighaus) is a must!
Materials
1 skein of Lion Brand Pound of Love (or equivalent yarn) for C1, shown in Denim. 1 skein of Lion Brand Pound of Love (of equivalent yarn) for C2, shown in Turquoise. [I used less than a skein of C1, and even less than that of C2: you'll have enough for a blanket leftover!] US 7 and Us6 circular or double point needles. (Circular are easier for cardigan, double points are easier for buttonholes, dress, and are absolutely necessary for the longies). Tapestry needle. Baby-safe stuffing/batting (for hat and matching Sheldon). Longies only: 4 markers and stitch holder. 3 buttons for cardigan (optional)
Pattern
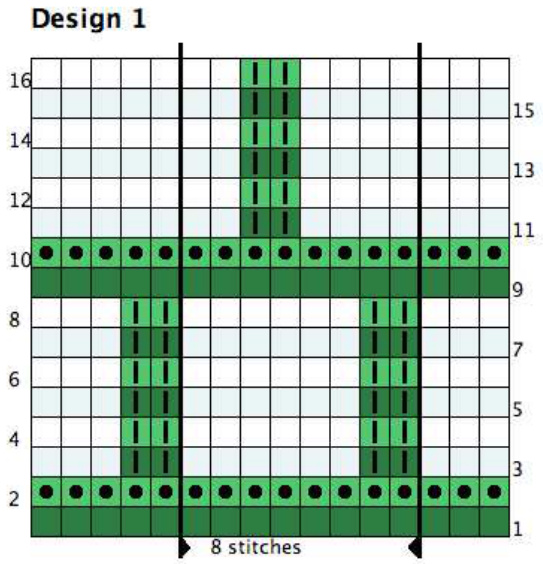
Honeycomb lattice stitch Stitch for sweater, multiple of 8 + 4. Stitch for dress, multiple of 8 (see diagram) Row1 (RS): Row2 (WS): Rows 3, 5 and 7: Rows 4,6, and 8: Using C1, K across. K across. Change to C2, K1 \*Sl2 wyib as if to knit, K6. Repeat from \* until 3 stitches remain. Sl2 wyib as if to knit, K1. P1, Sl2 wyif as if to purl. \*P6, Sl2 wyif as if to purl. Repeat from \* until 1 stitch remains. P1. Change to C1, K across. Change to C2, K1. \*K4, Sl2 wyib as if to knit , K2. Repeat fron \* until 3 stitches remain. K3. Rows 9 and 10: Rows 11, 13 and 15: Rows 12, 14 and 16: P3. \*P2, Sl2 wyif as if to purl, P4. Repeat from \* until 1 stitch remains.
Cardigan
Back
US6, CO 44 stitches in C1. Work K1P1 ribbing for 1 inch Change to larger needles. Work Honeycomb Lattice pattern. Work for 6 inches from end of ribbing, ending after a Row 2. BO all stitches.
Front Right Panel
US 6, CO 24 stitches in C1. Work K1P1 ribbing for 1 inch. Change to US7 needles. Work k1P1 ribbing in C1 for first 4 stitches of every RS row, last 4 stitches of every WS row. Work in Honeycomb Lattice pattern outside of ribbing. When changing colours, wrap previous colour over new colour on WS of work (twisting the yarns) to prevent holes (see link). After working two repeats less than worked on back panel, start decreases as follows: Decrease Row 1: KiP1 twice in C1, SSK using colour appropriate for the Honeycomb Lattice pattern row you are on, work in pattern to end of row. Decrease Row 2: Work in Honeycomb Lattice pattern until last 4 stitches. K1P1 twice in C1. Continue decrease rows until 17 stitches remain. Continue working until piece measures 6 inches from end of ribbing. Knit 1 row in C1 (unless the last row you worked was Row 1, 2, 9 or 10) BO all stitches in C1.
Front Left Panel
Wind off a small ball of C1. You will use this to do the button band ribbing. Using main ball of C1 and US6, CO 24 stitches. Work K1P1 ribbing for 1 inch. Change to Us7 needles. RS: Work in Honeycomb Lattice pattern until last 4 stitches. With small ball of C1, K1P1 twice. WS: With small ball of C1, KiP1 twice. Work in Honeycomb Lattice pattern to end of row. After working two repeats less than worked on back panel, start decreases as follows: Decrease Row 1: Work Honeycomb Lattice pattern to last 6 stitches. K2tog using colour appropriate for the pattern row you are on. Using small ball of C1, KiP1 twice. Decrease Row 2: K1P1 twice in C1. P2tog using appropriate colour of yarn for the pattern row you are on. Work in Honeycomb Lattice pattern until end of row. Continue working until piece measures 6 inches from end of ribbing. Knit 1 row in C1 (unless the last row you worked was Row 1, 2, 9 or 10) BO all stitches in C1.
Sleeves (make 2)
With smaller needles and C1, CO 24 stitches. Work K1P1 ribbing for z". Switch to larger needles and work stockinette stitch. When piece measures 1.5", increase one stitch on both ends of work. Increase one stitch on both sides of piece every " until there are 30 stitches. When piece measures 5", BO all stitches loosely.
Finishing
Seam shoulders with C1. Seam sleeves in place and then seam sides. Add optionals button loops as follows: at each of 2", 3" and 4" from bottom pick up 2 stitches from behind buttonhole band on WS using larger dp needles. Work I-Cord for 1.5", BO both stitches leaving 5" tail. Use tail to sew BO end to CO end. At corresponding point on opposite button-band, securely attach buttons.
Dress
With larger needles, CO 64 stitches in C1. Working in the round, purl 1 round, knit 1 round, purl 1 round. Starting at round 3, begin honeycomb pattern+, omitting the edging stitches (i.e. working only within arrowheads). Work honeycomb pattern for 2 pattern repeats. Switch to C1. Purl 1 round, knit 1 round, purl 1 round. Beginning stockinette stitch, increase 12 stitches evenly around. Work stockinette for 6". Purl 1 round, knit 1 round, purl 1 round. BO all stitches loosely. Make straps as follows. Fold dress in half longways. With WS facing, pick up and knit 6 stitches one inch from left side on front of dress. Work K1P1 ribbing for 4" and BO all stitches, leaving a 9" tail. Darn strap to WS 1' in from left side on back of dress. Repeat on right side. The top of the dress will curl down on itself unless blocked. I highly recommend steam blocking the piece to stop this from happening (see link below).
Longies
\*With larger double point needles and C1, make first leg as follows. Using Magic Cast On (see link below), cast on 4 stitches total (2 on each needle). Working in the round, knit 1 round. First increase Kfb 4 times Second increase [Knit 1, Kfb] 4 times. Third increase [Knit 2, kfb] 4 times. Continue increasing as established until there are 56 stitches. Knit 4 rounds in stockinette. Work decreases as follows: First decrease rnd [Knit 12 stitches, K2tog] 4 times. Second decrease rnd [Knit 11 stitches, K2tog] 4 times. Third decrease rnd Knit 1 round even. Continue these three decreases rounds as established until 32 stitches remain. Change to smaller needles and work KiP1 ribbing for 1". Change to larger needles and work stockinette until leg measures 5" from top of ribing. \* Break yarn and keep stitches on a holder. Repeat leg instructions from \* to \* for right leg, don't break yarn. Work gusset as follows. Knit all stitches of second leg. Place marker #1. Using backward loop method (see links below), CO 8 stitches. Place marker #2. Knit all stitches of first leg from holder. Place marker #3. Using backward loop method, CO 8 stitches. Place marker #4. Work gusset decreases as follows. First Round Knit all stitches. Second Round Knit to marker#1. Slip marker #1, SSK, knit to 2 stitches before marker #2, K2tog. Knit to marker #3. Slip marker #3, SSK, knit to 2 stitches before marker #4, K2tog. Work these rounds until two stitches remain between each pair of markers. Knit all but 1 stitch of second leg. SSK with last stitch before marker #1 and first stitch after marker #1. Place marker #1 after SSK just worked. K2tog with first stitch before marker #2 and first stitch after marker #2. Discard marker #2. Knit around to last stitch before marker #3. SSK with last stitch before marker #3 and first stitch after marker #3. Discard marker #3. K2tog with first stitch before marker #4 and first stitch after marker #4. Discard marker #4. Work stockinette until piece measures 1" from gusset tip\*. Work first optional short row as follows (see link). Knit to marker #1. Knit 15 stitches. Turn. YO. Purl to marker #1. Slip marker. Purl 15 stitches. Turn. YO. Knit to first yO. K2tog with next stitch. Knit around until last stitch before second YO. SSK. Work stockinette until piece measures 2.5" from gusset tip. Work another optional short row. Work stockinette until piece measures 4" from gusset tip. Work final optional short row. Continue in stockinette until piece measures 5" from gusset tip. Change to small needles and work KiP1 ribbing for 1". BO all sts loosely.
Finishing
Seam crotch. Weave in all loose ends. I recommend using rolling up a sock into a ball shape, stuffing into foot and steam blocking the foot into a round shape.-
Hat
With smaller needles and C1, CO 56 stitches. Work in the round with K1P1 ribbing for 1". Switch to larger needles and work stockinette until piece measures 5" from CO. Work decrease rounds as follows. Round 1: [Knit 6, SSK] 7 times. Round 2: Knit around. Round 3: [Knit 5, SSK] 7 times. Round 4: Knit around. Round 5: [Knit 4, SSK] 7 times. Round 6: Knit around. Round 7: [Knit 3, SSK] 7 times. Round 8: Knit around. Round 9: [Knit 2, SSK] 7 times. Round 10: Knit around. Round 11: [Knit 1, SSK] 7 times. Round 12: Knit around. Round 13: SSK 7 times. Cut 9" tail of yarn and with tapestry needle, weave through the remaining 7 sts. Secure yarn and weave in loose ends.
Optional Antennae\*.
Make 2: Using US6 double point needles and C1, CO 10 stitches leaving a 9" tail. Working in the round, knit 10 rounds. (Kfb, Knit 4) twice. Knit 4 rounds. Cut yarn leaving a 5" tail. With tapestry needle, weave yarn through all stitches, tail.
Links and Notes
+ Remember when working in the round, the RS will always be facing you. For rounds 2 & 10 of honeycomb lattice pattern, purl. For rounds 4, 6, 8, 12, 14, 16, slip stitches as if to purl with yarn held in back (if you slip them as if to knit, they will become overly twisted and may even snap). sButtons are a choking hazard. Attach securely, or better yet, omit altogether. Do not leave newborns unattended or sleeping in cardigan with buttons. I recommend using a distinct colour for marker #1. It lets you know when to start decreases and will become the round marker after the gusset is finished. ¥ Marker #1 marks the rear of the piece. Always measure from the rear gusset tip. \*I know... Turtles don't have antennge! Not An Artist's Miittens http://www.knitty.com/ISSUEwinter08/PATTmiittens.php
Ruth Homrighaus's Sheldon
http://www.knitty.com/ISSUEwinterO6/PATTsheldon.html A really nice video for working with multiple colours of yarn: http://www.berroco.com/video/intarsia_basics.html A great tutorial about short rows: ht+p://sameknit.blogspot.com/2007/04/yarn-over-short-rows.html Instructions for steam blocking acrylic yarn: http://beadknitter.blogspot.com/2009/03/you-can-block-acrylic.html MagicCastOn h++p://www.kni+ty.com/ISSUEspring06/FEATmagiccaston.html Backward Loop Cast On http://www.knittingdaily.com/blogs/howto/archive/2008/05/15/backward-loop cast-on.aspx


