Mini Sea Turtle
By Lori Savichunas of Caddyshack Creative
a.
Supplies
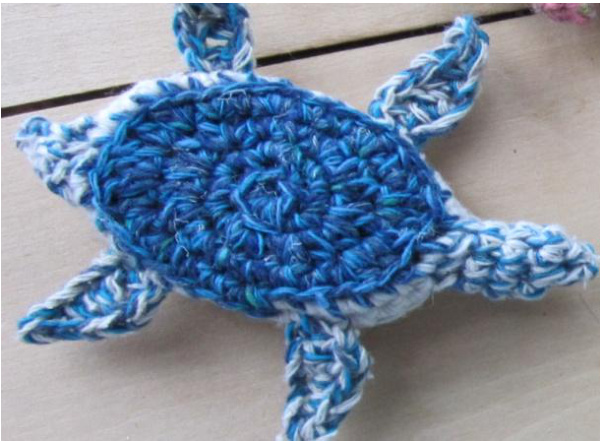
Hook-2.75 mm Blue/Green Sock Wool - approx. 6-7 g / 25-30 yards Contrasting/Lighter Shade Sock Wool remnant for belly Alternatively, your choice of yarn paired with suggested hook size on label. Try your own colour expressions too. See photos (a) and (b). Seed beads for eyes (not recommended for infants) Polyfill tostuff
Instructions
Dec = Decrease one sc by working 2 sc tog. Inc= Increase one sc by sc twice in same stitch BLO=Back Loops Only End of round - Sl st in 1st st of rnd, ch 1 Start the next rnd in the same st you finished into with the sl st. \* indicates this action.
Shell Back and Sides
1. Ch 2, sc 6 into 2nd st from hook, \*(6) 2. 2 sc in each st of rnd, \* (12) 3. (Sc & % DC in 1st st, 2 % DC in next two sts, % DC & sc in next, 2 sc), Repeat, \* (20) 4. 2 sc, (sc & % DC in next st, 2 % DC in next, 2 DC in next, 2 % DC in next, % DC & sc in next), 2 sc, 2 sc in next st, 2sc, repeat (), 2 sc, 2 sc into last st of rnd, \* (32) 5. Side Start - Sc complete rnd in BLO, \* (32) Photo a. shows a colour change option here. 6. Sc complete rnd in both loops again, \* (32) 7. In BLO - Dec, 3 sc, Dec, (Dec, 3 sc) 5 times, sl st into 1st st of rnd and fasten off. Weave in end.
Neck and Head
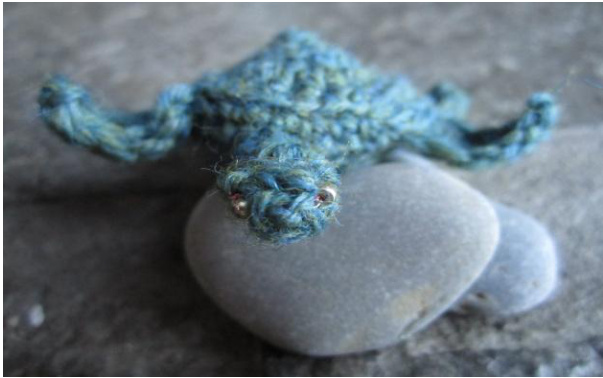
Note: Do not finish each rnd for the tiny neck and head. Work continuously around. Neck and Head Continued.. 1. Starting at the front centre and one row up from bottom, sc into 8 stitches in a circle for the neck base. 2. Sc complete rnd (8) 3. Head Start -3 Sc, Inc 2,3 sc (10) Effectively, Inc in the top middle two stitches. Adjust accordingly, for your stitch placement in the original neck base. 4. Dec 2,2 sc, Dec 2 (6) 5. Dec 3, sl st and pull through to fasten off at centre bottom (Turtle's chin). I like to finish by pulling the loose end of yarn through into the head/neck cavity with a little tug. You can sew on a couple tiny glass beads for eyes at this point.
Tail
Row 1 - At top edge of backend, attach yarn at one side and evenly sc into 4 stitches, turn Row 2 - Sc into 2nd st from hook, sc, turn Row 3 - Sc into 2nd st from hook, pull through loop to fasten off. Weave end discreetly through the tail to finish.
Flippers (make 4)
Row 1 - Ch 6, turn Row 2 - Sl st into 2nd ch from hook, sc, % DC, DC, % DC Pull through loop to fasten off. Leave a 15cm/6" tail for attaching onto body side. When attaching flippers, balance your placements at the sides and position each flipper so that its natural curve works toward the back end. This will help your little Turtle swim. Belly (may be omitted, if electing to use the turtle as a brooch or appliqué) In a contrasting or lighter shade, follow the Shell Back instructions...Rnds 1 to 3. Rnd 4 - (Inc, 3 sc) five times and finish row with a sl st into the 1st st of the round Pull through to fasten off. Reserve a tail about 20cm/8' to sew the belly onto the base. Lightly stuff the body before closing the opening. Voila!


