Difficulty Level:
Simple knitting with some sewing experience required
Materials needed:
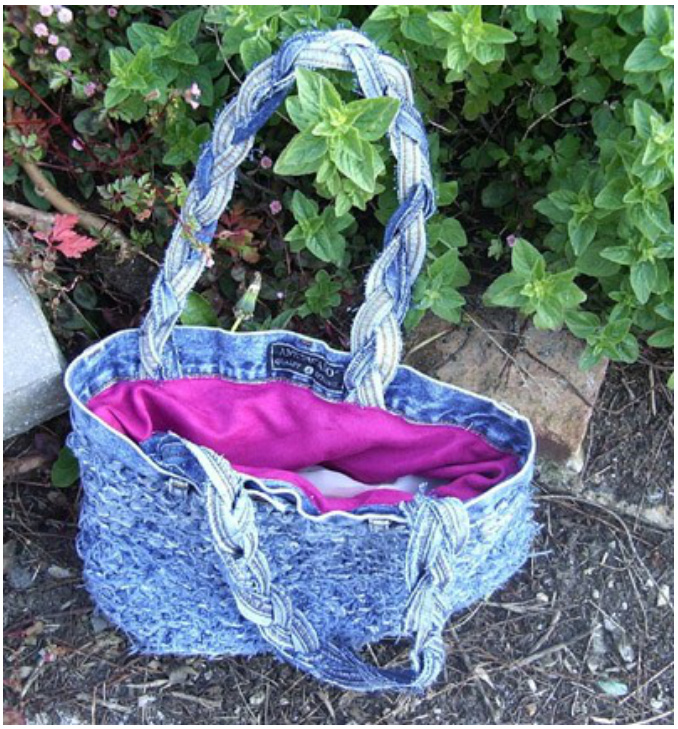
To make a bag of 32 inches circumference: 3 Pairs of old denim jeans - the softer the fabric the better, it is easier to knit with. A small amount of yarn in a similar colour to the denim. If you don't have anything in your stash that will do, a skein of tapestry wool or embroidery cotton will be fine. You are going to sew with it not knit. A circular 8mm (US size 11) needle 32 inch (80cm) long $\%$ yd $(50\;\mathsf{c m})$ fabric of your choice to line the bag Sewing thread to match the fabric Sturdy sewing needle Sharp scissors, pins etc. If you have any problems with the pattern do not hesitate to contact me and I will see what I can do to help you. Like wise if you should find any errors in the pattern please let me know so that I can correct them The idea for this bag came to me when I was faced with a pair of beloved jeans that could not be mended and I could not bear to throw away. Having seen a bag on the Internet made from strips of cotton I wondered if it might be possible to do the same thing with denim. Having cut various widths of fabric and done a bit of initial experimenting I decided it could be done but would need more fabric than could be provided even by a pair of my jeans. A quick rummage at a local jumble sale and a design was born. Because of the thickness of the finished fabric the main body of the bag is knitted in simple garter stitch and then attached to the reserved waistband from a pair of jeans. The straps are made from reserved seams so as much of the jeans as possible has been recycled. Make this bag your own. It can be worn as it is, dressed up with a belt, or thread a scarf through the belt loops to get the boho look. Change the size or shape to suit you. Make the straps longer or shorter as you prefer. The pattern is very simple, so adjustments can be made quite easily. Injeanius
by Janine Le Cras
JANINE LE CRAS EMAIL: JANINE@CWGSY.NET RAVELRY: GUERNSEYGAL BLOG: HTTP://GUERNSEYGAL.TYPEPAD.COM/ KNITTING_ON_AN_ISLAND/
Yarn substitutes :
Why not try using other fabrics such as corduroy or heavy wool
Sizes:
One size approx 32 inches (81.5cm) circumference and 11 inches (28cm) deep (This bag was made using the waistband from a pair of 32 inch waist jeans.)
Gauge:
5 st and 14 rows measured over 10cm (4 inches) in garter stitch
Stitch Instructions :
This pattern is worked entirely in garter stitch on circular needles. This means that you need to work alternate rows of plain and purl knitting to achieve this effect. Pattern: Before beginning to knit this pattern you are going to have to make your yarn! First of all choose the pair of jeans that you are going to keep the waistband from to make the top of the bag. Measure 1 inch (2.5cm) down from the bottom of the waist band and mark a line all around. Cut along this line (you should be able to cut straight through the zip between teth). Put this on one side and don't lose it! Cut all the inner seams (the ones with the double stitching) off the pairs of jeans keeping as much length as possible - you don't know yet how long you are going to want your handles. Put these seams on one side with the waistband. Cut the remaining pieces of denim into strips approx $\%$ inch (1.5cm) wide down the length of the legs. Don't be tempted to make these strips thinner, they will fray so much when you knit with them that they will disintegrate. Believe me I know, I tried! To knit a bag of this size you will need approximately 160 yards (150m) of "yarn". when you have all your yarn strips cut you can now knot them all together using any simple knot that you prefer. It doesn't really matter what knot you use, I did mainly reef knots but I think a few granny knots slipped in there somewhere. As long as they are secure that is all that matters. If you wish at this stage you can wash the yarn in a cool wash to remove the denim dust before you start to use it. I would put it in a pillow case or laundry bag to keep the lint out of the filters in your washing machine. To dry it, either put it out on the line on a sunny day or put it in the tumble dryer. Now you are finally ready to start to knit Using the simple thumb or single cast on method and an 8mm (Us 11) circular needle, cast on 70 stitches. Don't worry about any knots from the joined fabric strips these can dealt with later. Making sure that there is no twist, join the stitches into a ring and place a stitch marker to indicate the beginning of the row. Beginning with a knit row work alternate rows of knit and purl without any shaping until the bag measures 10 inches (25cm) in length finishing with a purl row. Wherever possible try to keep the knots in the fabric in the inside of the bag unless you wish to make them a decorative feature.
Shaping:
On the next row slip the first 3 stitches of the row onto a stitch holder. Knit 29 st, cast off the next 6 st knit 29 st to the last 3 st of the row cast off these 3 st and the 3 st that you placed on a stitch holder. This will give you two sets of 29 st. Place one set of these stitches on a spare needle or piece of waste yarn. Continue on the remaining 29 st knit 4 rows garter st going backwards and forwards. Place these stitches on a piece of waste yarn. Repeat this with the other 29 st.
Finishing:
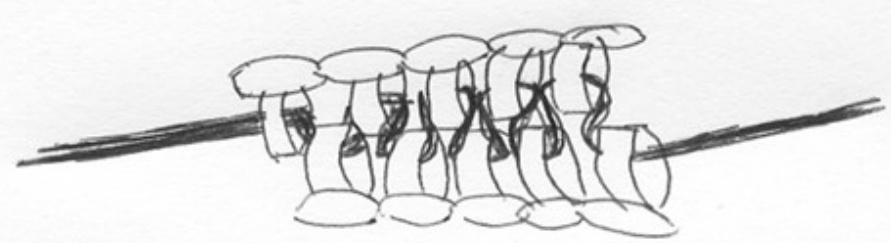
To finish the bag you first need to close the bottom. To do this, thread a sturdy needle with a double thickness of the matching yarn that is approximately 30 inches (75cm) long Line up both sets of stitches so that they are opposite each other. Take one stitch at a time alternately from each set of stitches and thread them onto this piece of yarn, leaving a tail of at least 6 inches at the beginning. With the tail ends of the piece of yarn sew up the two small seams at the base of the bag using whip stitch on the inside of the bag. To attach the waistband to the bag Use the sturdy needle and more of the matching thread; backstitch the knitted portion of the bag to the waistband by stitching between the cast on edge and the first row of knitting which should be $\%$ inch (1.25cm) below the finished edge of the waistband.
Attaching the handles:
Plait (braid) the reserved seams in two sets of three. Attach these handles 3 inches (8cm) in from the edges of the sides of the bag by firmly back stitching them in place just below the waistband using the matching yarn. See the schematic for exact placement.
Attaching the lining:
Cut a piece of fabric 35 inches (89cm) wide and 11 inches (28cm) deep. With the right sides of the fabric together sew a $\%$ inch (1.25cm) seam along the bottom and up the side of the fabric to create a bag. Slip this lining into the denim bag with the seamed side up against the denim and pin in place just below the finished bottom edge of the waistband. Slipstitch the lining in place, using sewing thread that matches the lining fabric. Diagram to show method of joining the two sets of stitches
Schematic
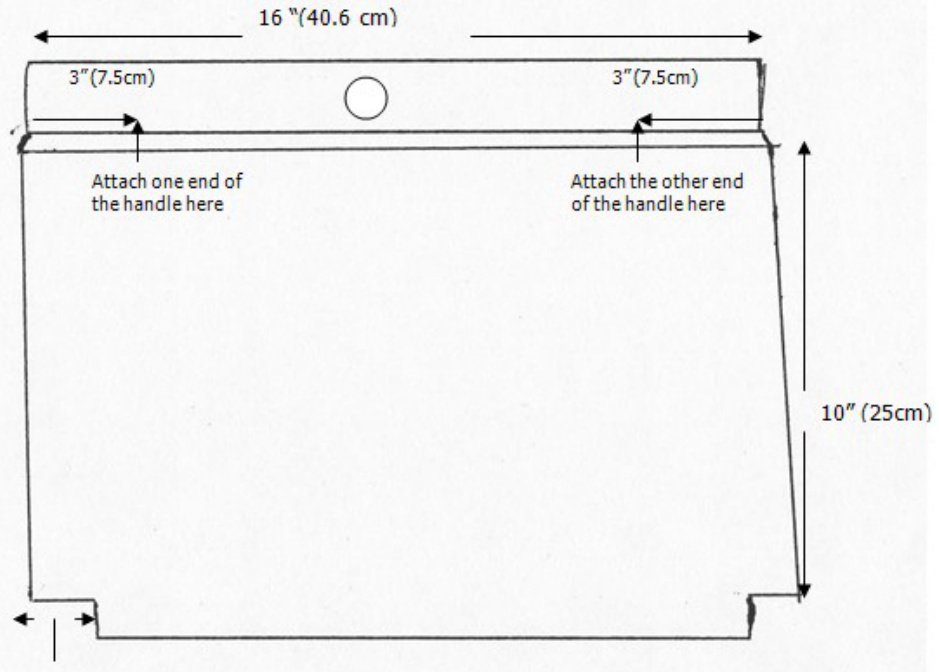
Bag Front View 1.5 "(4cm) The placement of the other handle is the same on the back.


