Caneel Heels
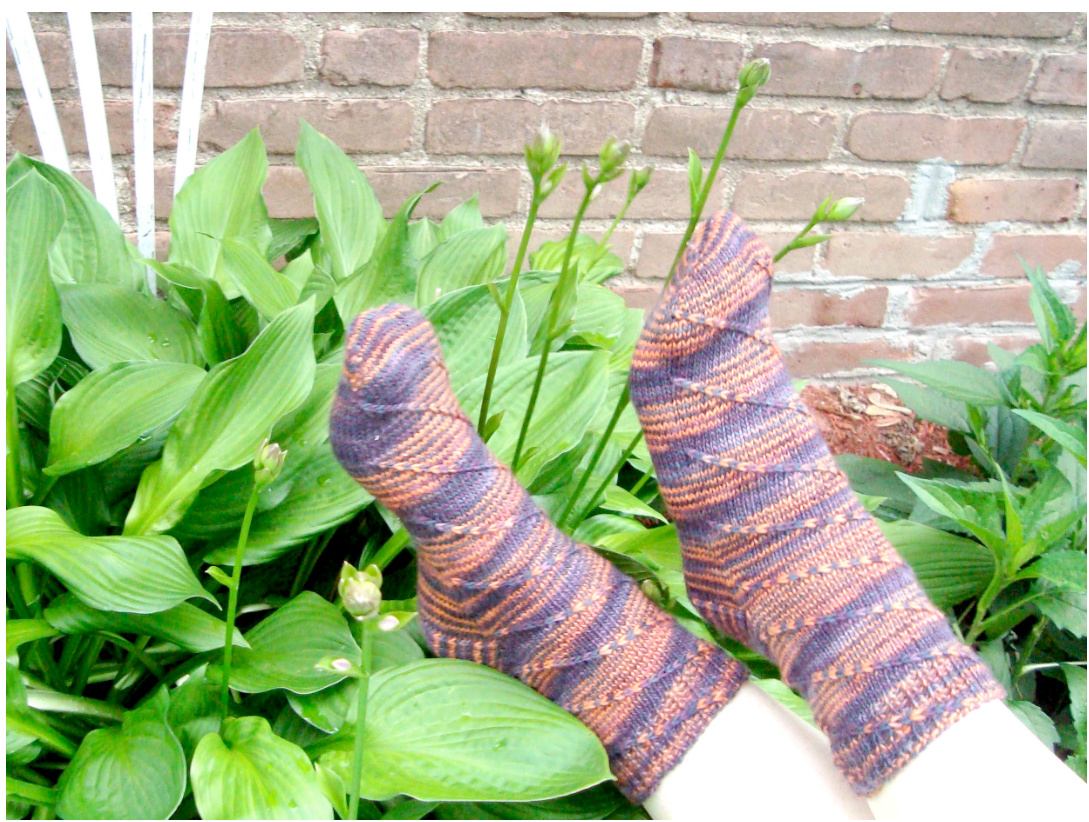
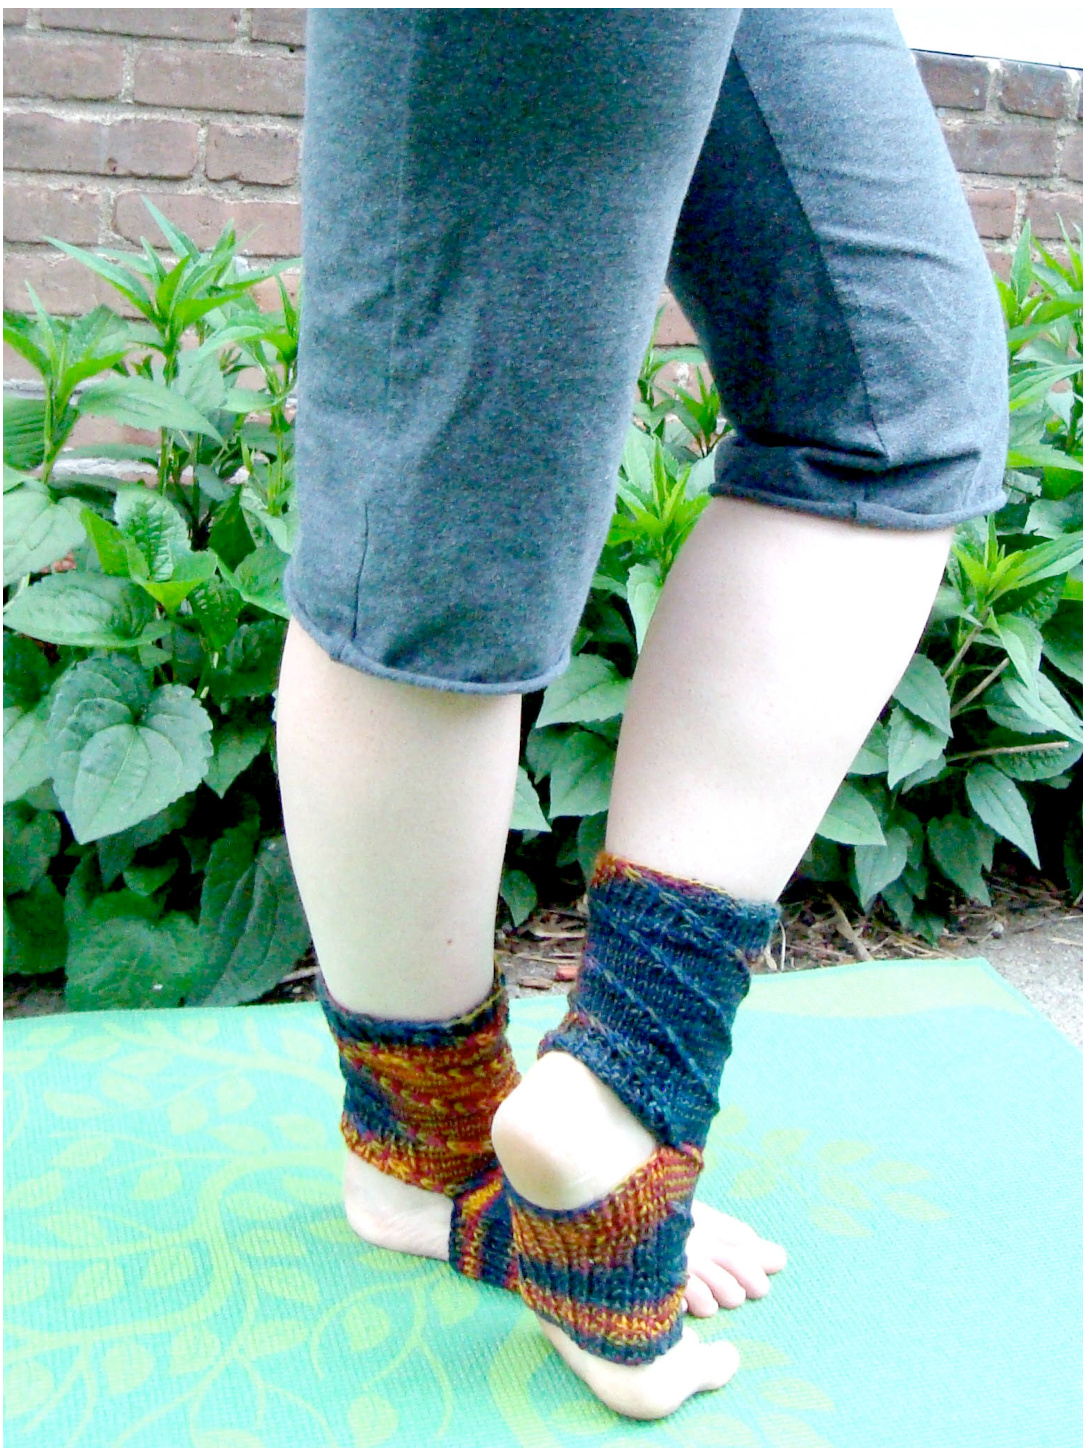
When I discovered the world of local yarn stores, natural fibers and hand-painted yarns, I went sort of mad buying up as much as I could, especially sock yarns! However, most of the sock patterns that I liked overly competed with these vibrant colourways. So, I ended up using monochromatic yarns, in order to see the texture. What to do with all these great, colorful skeins? The answer came to me during an arduous hike, in sweltering heat, up Caneel Hill on the island of St. John's. As we worked our way around and around the winding hills on the way to the summit, we were able to enjoy all the wonderful colors of the flora and faunae. To translate this winding journey of the Caneel Trial into a foot-warmer, I made a winding pattern around the instep and leg. Back in Massachusetts, the chilly winter inspired me to extend the pattern to a full sock. Like a expedition up and down a hill, the full sock is made from the toe up, while the foot-warmer is made from the cuff down. SIZING S ,M, L (Both shown in M) FINISHED MEASUREMENTS Foot Circumference: 7,8, 9 inches. Foot length is adjustable to fit. GAUGE Fingering weight/US1: 28 sts/40 rows $=4"$ in stockinette stitch Sport weight/US3: 20 sts/28 rows $=4"$ in stockinette stitch
MATERIALS
Fingering Weight Sock shown in 100purewool.com Merino Fingering: $100\%$ Merino; 440yd/ 402m per 100g skein; color: Dances; 1 skein Sport Weight Sock shown in Blue Moon Fiber Arts Socks that Rock Mediumweight: $100\%$ Merino; 380yd/347m per 155g skein; color: Farmhouse; 1 skein 1 set US 1/2.5 mm double-point needles or 1 set US 3/3.5 mm straight needles (see below)
SPECIALIZED TECHNIQUES
Magic cast onmethod Elizabeth Zimmerman's sewn bind off method Long-tail cast onmethod TL: twist left. Insert the needle into the back loop of second stitch from behind. Yarn over and pull through loop without sliding stitch off needle. Knit first stitch on needle through front loop. Pull both stitches off needle.
OTHER NOTES
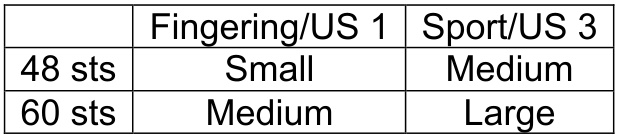
The sizes are generated from a combination of Needle Size/Yarn Weight versus number of stitches (after increases). Pattern instructions are written for 48 or 60 stitches.SeeTableBelow:
The pattern is written as Needle#1 representing the instep sts, and Needle #2 representing the sole sts. However, to avoid yarn stretching, carpal tunnel and general upset, I recommend using 4 or 5 needles. Be aware that using more needles will require moving the stitches back and forth over the needles during the twist stitches.
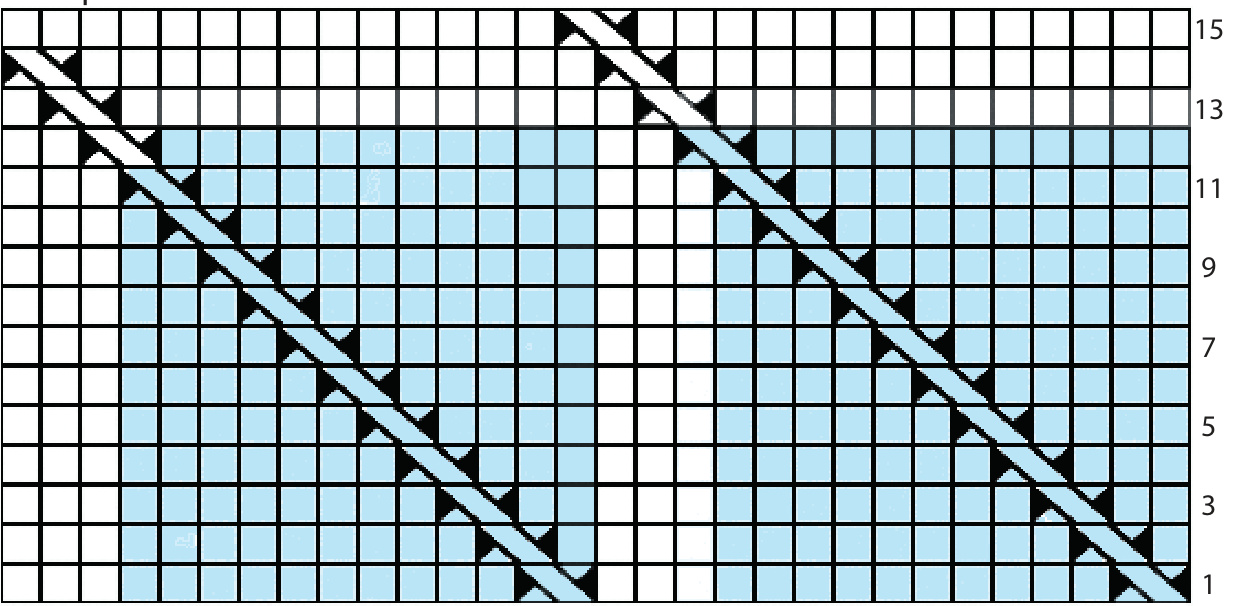
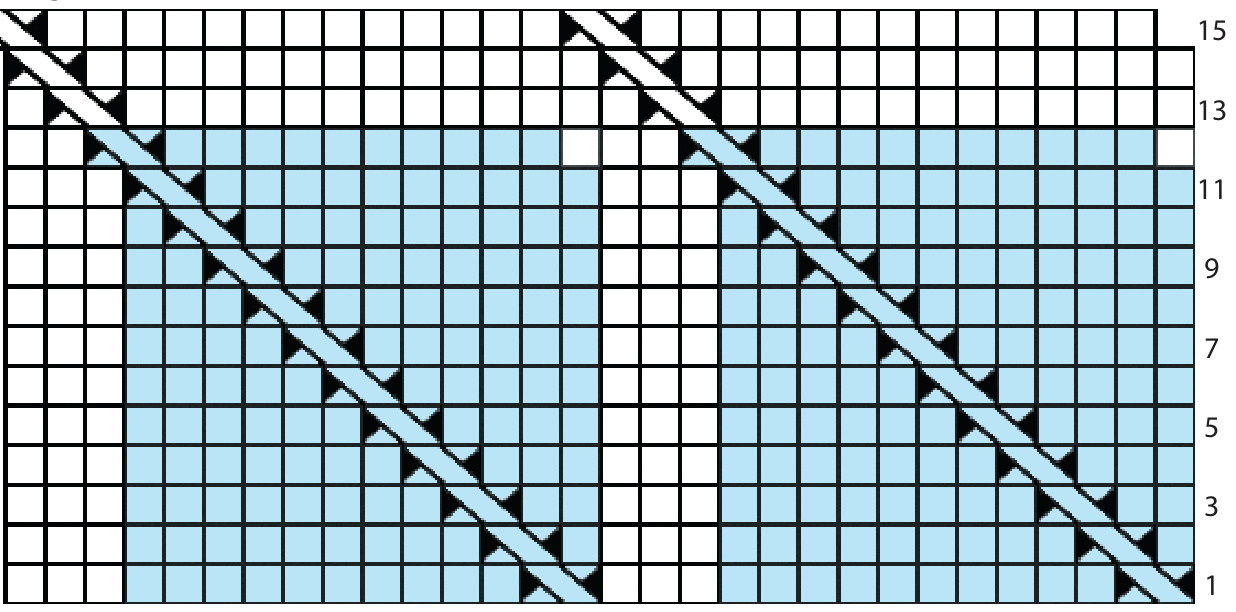
Twist Pattern
For instep, the pattern is worked on Needle #1 only. For Needle #2, work stockinette (full sock), or K1P1 ribbing (foot-warmer). For the leg and cuff, work the twist pattern on both needles. For the cuff, work the twist pattern but do k1p1 ribbing outside of the TL's (see chart). The 60 stitch pattern is written in rounded brackets. Rnd 1: [TL, K10 (13)] twice. Rnd 2: [K1, TL, K9 (12)] twice. Rnd 3: [K2, TL, K8 (11)] twice. Rnd 4: [K3, TL, K7 (10)] twice. Rnd 5: [K4, TL, K6 (9)] twice. Rnd 6: [K5, TL, K5 (8)] twice. Rnd 7: [K6, TL, K4 (7)] twice. Rnd 8: [K7, TL, K3 (6)] twice. Rnd 9: [K8, TL, K2 (5)] twice. Rnd 10: [K9, TL, K1 (4)] twice. Rnd 11: [K10, TL, K0 (3)] twice. Rnd 12 : 48 stitch size only: Instep - K11, TL, K11 Leg/Cuff - Move first st of needle #2 to needle #1. Move first stitch of needle #1 to needle #2. [K10, TL,] twice. Move what is now the first stitch of needle #1 back to needle #2. Move what is now the first stitch of needle #2 back to needle #1. Continue to Round 1. Do not work rounds 13 to 15. Note: the TL in the next Round 1 will involve the stitch you just knitted. 60 stitch size only: [K11, TL, K2] twice. Rnd 13 : [K12, TL, K1] twice. Rnd 14 : [K13, TL] twice. Rnd 15: Instep - K14, TL, K14 Leg/Cuff - Move first stitch of needle #2 to needle #1. Move first stitch of needle #1 to needle #2. [Knit 13, TL] twice. Move what is now the first stitch of needle #1 back to needle #2. Move what is now the first stitch of needle #2 back to needle #1. Toe Using Magic Loop CO method, CO 24 (28) stitches. You should have12 (14) stitches on each of needle #1 and needle #2.) Work toe increases. Rnd 1: Knit. Rnd 2: On each of needle #1 and #2, kfb, knit to before last stitch, kfb. Work these increases 6(8) times. 48(60) stitches total.
Instep
Knit 1 round even. Begin instep pattern on Needle #1. Work stockinette st on Needle #2. Work to 5.25" less than desired foot size (the average woman's foot is US 8, a length of 10.625").
Gusset Increases
Continuing Instep Pattern along Needle #1, work gusset increases on Needle #2 asfollows: Rnd 1: K1, YO, knit to before last stitch, YO, K1. Rnd 2: K1, K1 tbl, knit to before last stitch, K1 tbl, K1. Work these increases 7 (9) times. 62 (78) stitches total
Heel Turn
Work Needle #1 in pattern. Make a note of the pattern round you are on. On needle #2, K12 (15), pm. Row 1 (RS): SSK, K12 (16), pm. Turn. Row 2 (WS): P2tog, p to marker. Turn. Continue these decreases between the 2 markers until 6 stitches remain between the 2 markers. You should have the RS facing you. Pick up heel flap stitches as follows: Sl1, K5 (5), Pick up 8 (11) stitches from decrease edge of heel turn before the marker. Turn. Sl1, P13 (16), pick up 8 (11) stitches from decrease edge before the marker. 22 (28) stitches between markers, 70 (78) stitches total.
Heel Flap
Row 1: Sl1, K across to last st before marker. SSK with last stitch before marker and first stitch after marker. Row2: \*Sl1, P1. Repeat from \* across to last stitch before marker. P2tog with last stitch before marker and first stitch after marker. Repeat these rows 11 (14) times, until 1 stitch remains either side of the markers. You should have the WS facing you. Turn, Sl1, knit to the end of Needle #2. Remove markers. 48 (60) stitches total.
Leg
Work the Twisted Leg pattern on both Needles #1 and #2. Start on the round after the one you left off to start the heel turn. Continue to desired leg length, ending after round 11 (15) Work one repeat of the Twisted Instep pattern, with K1P1 ribbing in-between the TLs. BO all stitches using Elizabeth Zimmerman's sewn bind off method. ... And Down the Other Side (Foot-warmer) Cuff Using the long-tail method, CO 48 (60) sts. Divide stitches onto Needle #1 and Needle #2, which will be the instep and sole respectively. Closing the circle without twisting the stitches, knit 1 round even. Work one set of the Twisted Cuff pattern.
Leg
Begin Twisted Leg pattern on both Needles #1 and #2. Work to desired length, ending on Rnd 15. For the next 1 inch, work Needle #1 in Twisted Instep pattern and Needle #2 in the corresponding rounds of the Twisted Rib pattern. Work Needle #1 in pattern. BO all 24 (30) stitches of Needle #2.
Instep
Work next round of Twisted Instep pattern along Needle #1. CO 24 (30) stitches on Needle#2. Continue Twisted Instep pattern along Needle #1 and K1P1 ribbing along Needle #2 until piece measures 7.5 inches less than desired foot length. Work one repeat of Twisted Instep pattern, with K1P1 ribbing in between the TLs along needle #1. Continue K1P1 ribbing along Needle #2. Bind off all stitches using Elizabeth Zimmerman's sewn bind off method. Both Patterns Make a second sock or foot-warmer. Finishing Weave in loose ends and block if desired.
Twisted Instep
Twisted Leg
Knit 60 st pattern only TL 48 and 60 st patterns


