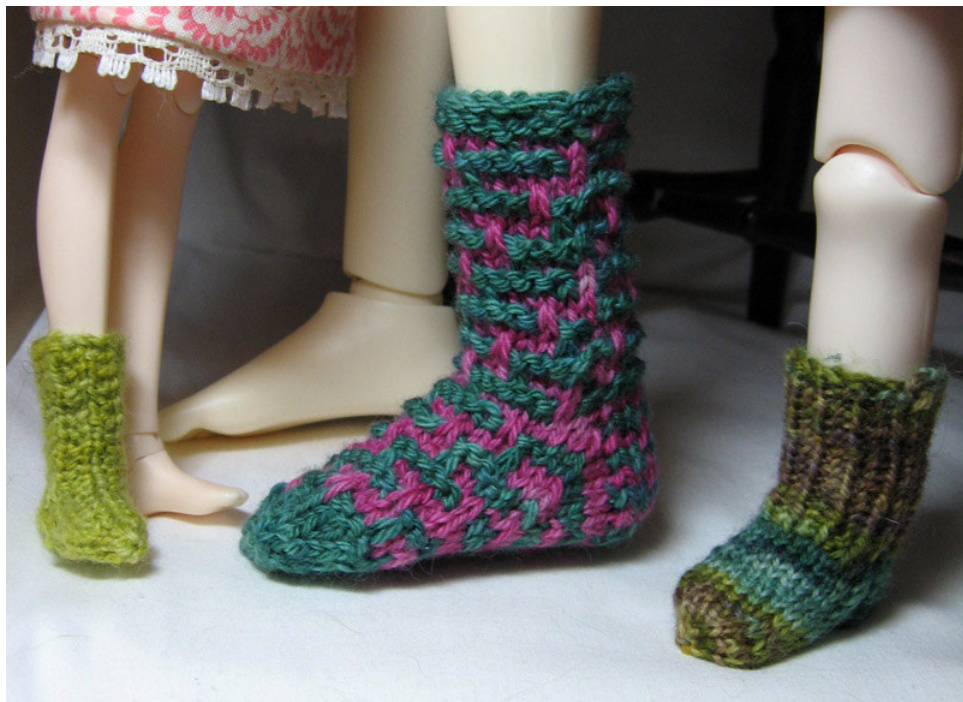
This pattern will guide you through a method of knitting doll socks on two circular needles, starting with the cuff. The pattern begins with a general method and continues with some examples of specific designs for socks - the three shown above.
General Notes
Begin by determining the diameter and the distance above the top of the foot of your dol's leg at the point you want it to reach up to. Also measure the ankle at its narrowest, and the girth of the foot. If the smallest of these numbers is within $10\%$ of the largest, you will not need to make any adjustment. If it's much above that, you will probably want to make some decreases between the top of the sock and the bottom. You willalso need to know the gauge you get with your combination of yarn, needles and pattern stitch. Note, too, that if your pattern stitch tends to curl, you may want to use a flat stitch for the very top. Four rows of K1, P1 rib will handle most problems with these socks. (In fact ribing patterns make very pretty doll socks.)
Multiply your gauge per inch times the diameter of the top of the sock in inches. Now adjust this to an exact multiple of your pattern stitch. Cast on this number of stitches. Divide these stitches between two circular needles and join for working in the round. Work until the piece is the length of the distance to the top of the sock from the top of the foot. Try it on at this point - you may find that you would like it to be a bit longer. When you like the look you get when the current tube is resting on the top of the foot, continue to the heel.
Heel Flap
Work on half the stitches, or a few less if that is more convenient. You can work in any stitch that you like. Heel stitch makes the socks look more genuine, but you don't really have to worry about wear on socks for these folks. You will be working back and forth. You definitely want to slip the first stitch of each row. You wil work until the flap is equal to the thickness of the foot, ending with a wrong-side row. Keep in mind that the longer the flap is, the more stitches will need to be decreased in the gusset portion. I would go for a flap slightly less than the height of the foot rather than more. So, to sum up, here are therules: Determine your number of stitches as half the total stitches (rounding down if needed). An even number of stitches is recommended. Select a pattern stitch. Work back and forth in that pattern on the selected number of stitches in the pattern stitch chosen until the flap length is the thickness of the foot, or a little less, ending with a wrong-side row.
Turn Heel
Now you are going to make the crescent that goes under the heel. For a dolls sock, the crescent is very small. There is really only one decision to make - how many stitches should you work on the first row? I will give you a rule of thumb: if the total number of stitches on your heel is 11 or less, begin row 1 with half the total heel stitches, rounded up if you have an uneven number of stitches. Between 12 and 19 stitches, work half the stitches plus 1. Above this number, work 2 more. Here is what you do. Row 1: slip 1, knit one less than the number of stitches determined above, SSK, K1, turn. Depending on how many stitches you started with, you may have some unworked stitches remaining at the end of the needle at the time you turn, or you may not. Row 2: Slip 1, then purl until there are 3 stitches plus the number of stitches you left unworked at the first end remaining on the needle. (You are centering the heel, so you will need to purl the two stitches you just finished, plus any stitch you worked past the center, then the same number of stitches past on the other side.) Now purl 2 together, purl 1 and turn. There must be the same number of stitches left unworked at this end. Row 3: Slip 1, then knit until you are 1 stitch before the gap you created when you turned before. SSK, K1, turn. Row 4: Slip 1, purl until you are 1 stitch before the gap, P2 tog, P1, turn. Continue working rows 3 and 4 until there are no unworked stitches remaining. You may need to skip the K1 and P1 at the end of the last repeat of rows 3 and 4.
Foot
You are going to start working in the round again. Begin by knitting across the stitches that remain from your turned heel. You are now at the edge of the heel flap. Pick up 1 stitch in each of the slipped stitches at the beginning of heel flap rows, then 1 more in the area just before the instep. You are now at the beginning of the instep stitches on your other circular needle (or on two dpns if that's what you're using.) Knit across the instep stitches. Switch back to your other needle and pick up one stitch in the area right near the instep stitches, then pick up the stitches slipped at the beginning of the heel flap rows. Knit across the rest of the stitches on the heel needle.
Gusset
You now have half your original stitches on the instep needle and rather more on the heel needle (which has become the sole needle.) You need to decrease some stitches on the sole. This is done by repeating the following two rounds: Round 1: Work desired pattern across instep stitches. On sole stitches, K1, SSK, knit until three sole stitches remain, K2 tog, K1. Round 2: Work desired pattern across instep stitches. Knit all sole stitches. Do this until the number of sole stitches matches the number of instep stitches. Work on stitches as established until you are at the point where you need to start the toe.
Toe
To determine where to start the toe, you wil need to know the number of rounds you are getting per inch. There are three possible toe lengths mentioned in this pattern. Length 1: Number of stitches is less than 16 and is an even multiple of 3. In this case, you need just 3 rounds for the toe, which is worked as follows: Round 1: (K2 tog, K1) around. Round 2: Knit even. Round 3: Knit 2tog around. Length 2: You will work a 5 round toe in the following two situations: A. Number of stitches is less than 16 but not an even multiple of 3. In this case, you will work as folows: Round 1: Decrease stitches as needed to get to an even multiple of 3 stitches. Round 2: Knit even. Continue with the three rounds as in length 1. B. Number of stitches is greater than or equal to 16 and is an even multiple of 4. Work as follows: Round 1: (K2 tog, K2) around. Round 2: Knit even. Continue with the three rounds as in length 1. Length 3: You will work a 7 round toe if the number of stitches is greater than 16 and not an even multiple of 4. Work as follows: Round 1: Decrease stitches as needed to get to an even multiple of 4 stitches. Round 2: Knit even. Continue with the five rounds as in length 2, option B.
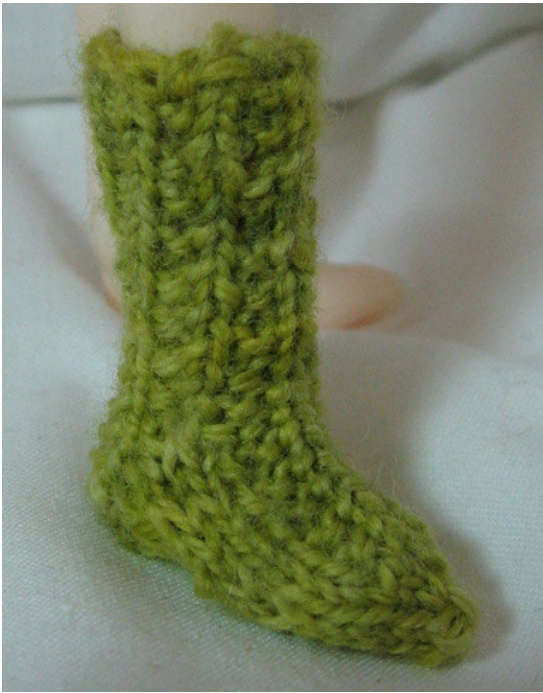
Example 1 - Basic Ribbed Socks for Petite Ai Edith
Edith has legs which are about $z\;^{1}\!/\!_{4}^{\;^{\,\ast}}$ in diameter, her feet are 2" around, and about 1 12" long. I decided to make her a pair of very basic socks in fingering weight yarn on size 0 needles. I was getting about 10 stitches to the inch in K1, P1 ribbing, so I decided to begin by casting on 24 stitches.
Cast on 24 stitches and divide among the number of needles you want (l use 2 circulars). Work in K1, P1 ribbing for 1 3/8" or to desired length of leg.
Heel Flap
Work back and forth on 12 stitches in Eye of Partridge, as follows: Row 1: (SI 1, K1) across. Row 2: Sl1, purl across. Row 3: SI1, K1, (K1, Sl1) 4 times, end K2. Row 4: Repeat row 2. Work 10 rows of flap, ending with a purl row.
Turn Heel
Row 1: Sl1, knit 6 stitches (you've worked half of 12 plus 1), SSK, K1, turn. Two stitches remain unworked. Row 2: Sl1, Purl 3 (there are 5 stitches left on the left needle), P2 tog, P1, turn. Two stitches remain unworked on this end. Row 3: Sl 1, K4, SSK, K1, turn. (No stitches left) Row 4: Sl1, P5, P2 tog, P1, turn. There are 8 stitches on your needle. Turn.
Foot
Slip 1, knit the 7 remaining stitches on your needle. You are now at the edge of the heel flap. Pick up 1 stitch in each of the slipped stitches at the beginning of heel flap rows, then 1 more in the area just before the instep. You are now at the beginning of the instep stitches on your other circular needle (or on two dpns if that's what you're using.) Knit across the instep stitches (which were previously ribbed). Switch back to your other needle and pick up one stitch in the area right near the instep stitches, then pick up 5 stitches slipped at the beginning of the heel flap rows. Knit across the rest of the stitches on the heel needle. You now have 12 stitches on the instep needle and 20 on the heel needle (which has become the sole needle.) Since the foot on the Petite Ai is relatively short, we are going to work the gusset decreases every row, instead of every other row as is standard practice. So, repeat the following row: Knit across instep stitches. On heel needle, knit 1, SSK, knit to within three stitches of end of needle, K2tog, K1. Do this until there are 12 sole stitches as well as 12 instep stitches. Trying this on, I decided the whole foot could afford to be smaller, so I did the following. Next row, knit around. Next row, (K1, SSK, K6, K2 tog, K1) twice (once on instep and once on sole.) Knit around on remaining 20 stitches 4 times. Arrange stitches so you have 8 stitches on one needle and 12 on the other. Toe Round 1: (K2, K2tog) across (15 stitches remain). Round 2: Knit even. Round 3: (K1, K2tog) across (10 stitches remain). Round 4: Knit even. Round 5: K2tog across. Cut yarn and pass through remaining stitches twice. Work in all ends.
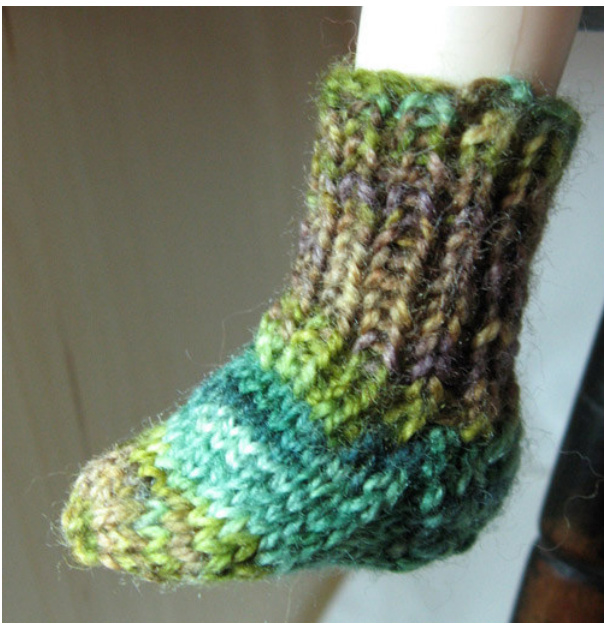
Example 2 - Sand Stitch Socks for Souldoll Jandi
Jandi is about Barbie sized, though her feet are flat. She is small enough that I decided to do my measurements for this pattern in centimeters. Her ankles and the girth of her foot match at 3 cm. However, the width of her leg 3 centimeters above the top of the foot is 4 cm, so I decided to build in some calf shaping on this one. I was knitting on my 000 (1.5mm) needles using fingering weight yarn, and my gauge was 4 sts / cm.
My initial calculation indicated that 4 cm at 4 sts/cm would require casting on 16 stitches. 1 decided to use the Sand Stitch, as follows: Row 1: Knit across. Row 2: (K1, P1) across.
Cast on 16 stitches. Divide the stitches into 6 stitches (the front of the sock) and 10 stitches (the back of the sock). Work even in Sand Stitch for 1 cm, ending with row 2. Next row:
Work even across the front of the sock. For the back of the sock, K3, SSK, K2tog, K3. Work 3 rows even on 14 sts. Next row: Work even across the front of the sock. For the back of the sock, K2, SSK, K2tog, K2. Work even until piece measures 3 cm, ending with row 1.
Heel Flap
Work across instep stitches, then begin working back and forth on the back of the sock stitches. Row 1: SI 1, P1, K1, P1, K1, P1. Row 2: SI 1, purl across. Repeat these 2 rows a total of 3 times.
Turn Heel
Row 1: K3, SSK, K1 Row 2: P2, P2tog, P1 (4 stitches remain). Turn.
Foot
Knit across 4 stitches. Pick up 4 stitches along side of heel flap. (12 stitches on back of sock.) Gusset decrease row: K1, SSK, knit to three stitches from end of heel stitches, K2 tog, K1. Next row: Knit across. Repeat previous two rows until 6 stitches remain on sole. Continue in pattern on instep, continue knitting sole stitches until sole measures 2 cm. Toe (K2 tog, K1) around. Knit even. K2 tog around. Cut yarn and pass through remaining stitches twice. Work in all ends.
Example 3 - Mosaic Sock for SD Girl
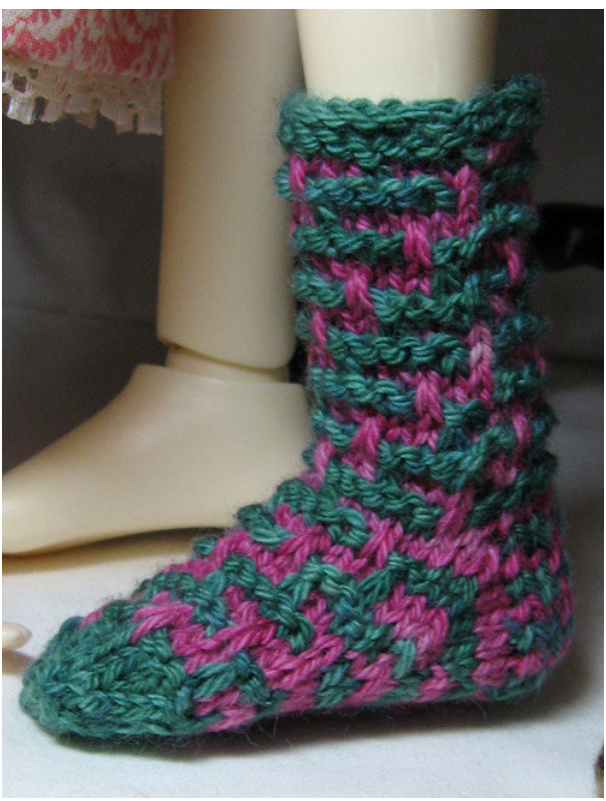
My girl has an ankle girth of $\ge\sqrt{2}/4^{"}$ and is also $\ge\sqrt{2}/4^{"}$ around the foot. I decided I wanted the sock to reach $z\;^{1}\%^{\ast}$ above the top of the foot, so I measured there and found her leg was 3" around. This was close enough to ignore the differences in girth. My gauge over the mosaic pattern was 8 sts per inch in fingering yarn on number 1 needles. The stitch count I came up with was 22, but my pattern stitch is a multiple of 6 stitches, so I went with 24 stitches.
Row 1: With CC, K2, sl 1, K3.
Row 2: With CC, repeat row 1. Row 3: With MC, K5, sl1. Row 4: With MC, P5, move yarn to back and sl 1. Row 5: With CC, sl 1, K5. Row 6: With CC, repeat row 5. Row 7: With MC, K3, sl 1, K2. Row 8: With MC, P3, move yarn to back and sl 1, P2. Row 9: With CC, K5, sl1. Row 10: With CC, repeat row 9. Row 11: With MC, K1, sl1, K4. Row 12: With MC, P1, move yarn to back and sl 1, P4. (Note - this pattern is easily remembered once you notice that when you are working with CC, you slip the first st from the last MC group, and working with MC, you slip the center stitch of the last 5-stitch CC group.)
Cuff
Cast on 24 stitches. Move 12 of these stitches onto a second circular needle of the same size. I always move the stitches to the points of both needles with the not-yet joined end out and then switch the first stitch on each of the needles for the join. Knit 1 row, purl 1 row in your main color. Then begin knitting in pattern stitch, as given above. Work two complete repeats of the pattern, then rows 1-4 once more.
Heel Flap
Begin working back and forth on 12 stitches. I used two-color eye of partridge, as follows: Row 1: With CC, (sl1, K1) across. Row 2: With CC, sl1, purl across. Row 3: With MC, sl1, K1, (K1, sl1) across, end K2. Row 4: With MC, sl1, purl across. Work 3 complete repeats (total) of this pattern plus rows 1 and 2 once more.
Turn Heel
WithMC, Row 1: Sl1, K6, SSK, K1, turn. (Two stitches remain unworked). Row 2: Sl 1, P3, P2 tog, P1, turn. (Two stitches remain unworked on this end, too). Row 3: SI 1, K4, SSK, K1, turn. (No stitches left) Row 4: Sl 1, P5, P2 tog, P1, turn. There are 8 stitches on your needle. Turn.
Foot
You are about to start working in the round again. With CC, knit the 8 stitches on your needle. Then pick up and knit 8 stitches along the side of the heel, one in each slipped stitch. You are now back to the instep stitches. Pick up your mosaic pattern where you left off. You are ready for row 5, which is a CC row. At the end of the instep stitches, pick up 8 stitches along the other side of the heel and knit across the 16 stitches already on the heel needle. You are now back to the heel stitches, and it's time to work a gusset decrease row. K1, SSK, K6. Pick up MC, and knit to within 3 stitches of end of heel, K2tog, K1. (22 heel stitches remain.) Work instep stitches in pattern on this and following rows. Next heel row and alternate heel rows from here on: Knit across heel stitches with color used on the last row. Next gusset decrease row: K1, SSK, K3, pick up CC, knit to within 3 stitches of end of heel stitches, K2 tog, K1. (20 heel stitches remain.) Next gusset decrease row: K1, SSK, K1, pick up MC, knit to within 3 stitches of end of heel stitches, K2 tog, K1. (18 heel stitches remain.) Next gusset decrease row: K1, pick up CC, SSK, knit to within 3 stitches of end of heel stitches, K2 tog, K1. (16 heei stitches remain.) Next gusset decrease row: Pick up MC, K1, SSK, knit to within 3 stitches of end of heel stitches, K2 tog, K1. (14 heel stitches remain.) Final gusset decrease row: Pick up CC, K1, SSK, knit to within 3 stitches of end of heel stitches, K2 tog, K1. (14 heel stitches remain.) Now work even (in pattern on instep stitches, in two-row stockinette stripes on the sole) until you are V2" from the end of the foot, or $z\;^{1}\%^{\ast}$ for my doll. (Il had 20 rows after the heel turn was completed.)
Toe (worked in MC)
Row 1: (K2 tog, K2) across. 18 stitches remain. Row 2: Knit Row 3: (K2 tog, K1) across. 12 stitches remain. Row 4: Knit. Row 5: K2 tog across. 6 stitches remain. Cut yarn and pass through remaining stitches twice. Work in all ends.


