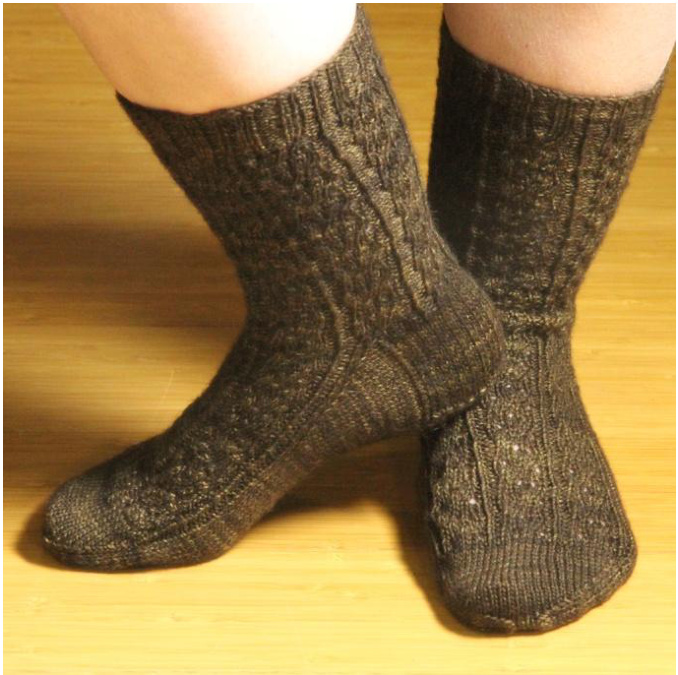
Catherine Thompson
Finished Size
■ Medium: unstretched 7 %"; stretched 9"; circumference, stretched, at cuff 11"; foot length as desired; height from heel to top of cuff 8 %". ■ Large: unstretched 8 %"; stretched 10"; circumference, stretched, at cuff 12"; foot length as desired; height from heel to top of cuff 8 %".
Materials
·1 skein MadelineTosh Sock
Notions
■ 2 US 1 (2.25mm) circular needles, double points or single circular, or size to obtain gauge. Tapestryneedle Markers (optional)
Gauge
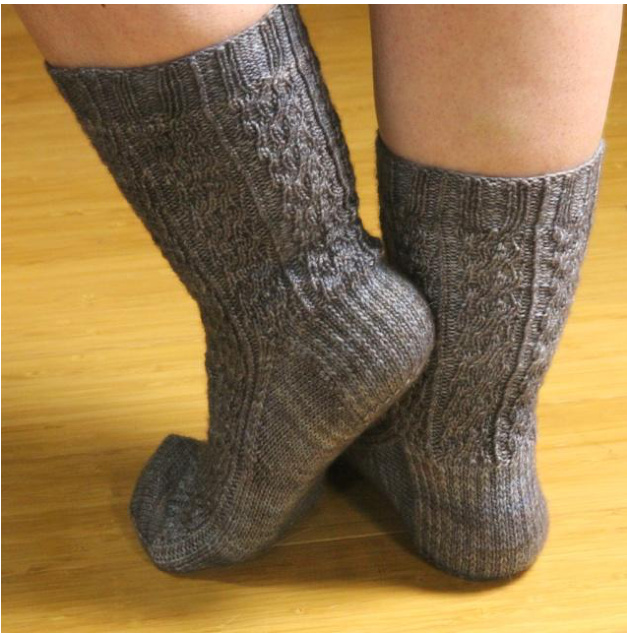
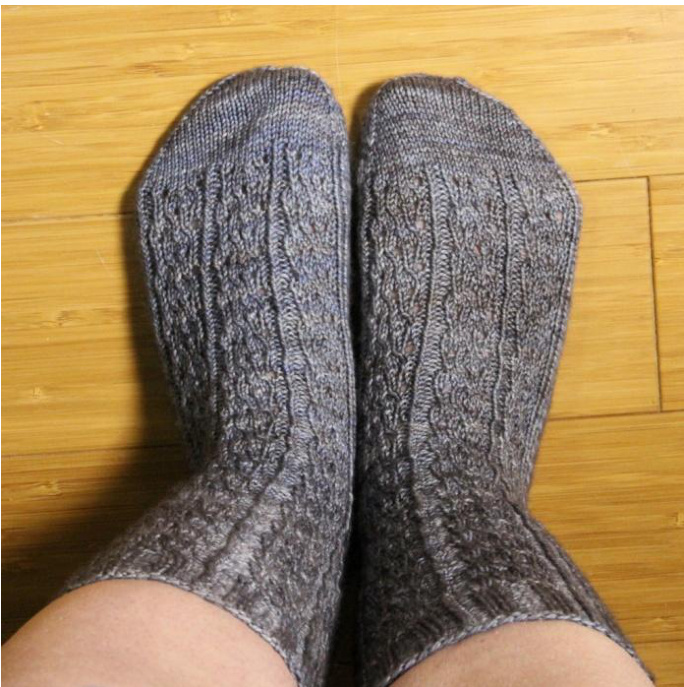
In stockinette, 17 stitches / 2"; 24 rows / 2 inches Note:All photos are of themedium size sock
| Symbol | Definition |
| K | Knit |
| Kn | Knit n stitches,where nis the number ofstitchestobeknitted |
| K2tog | Knit 2 together |
| M1 | Make 1.Forthispatternyou maychooseeitherrightorleft. |
| P | Purl |
| Pn | Purl n stitches, where n is the numberofstitchestobepurled |
| P2tog | Purl2together |
| SL 1 | Slip 1 purlwise |
| SSK | Slip 1 as if to knit, slip a second stitch as iftoknit,insert theleft handneedleintothefrontof the twoslipped stitchesandknit thesetwostitchestogether |
| tbl | Throughthebackloop |
| wyib | With yarn in back |
| wyif | Withyarn infront |
Pattern

Leg
Cast on
Cast on63(72) stitches using the German twisted cast on or other stretchycast on.Join to work in the round.Place markers every 9 stitches,if desired.
Cuff
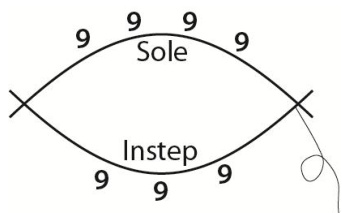
Figure 1 - Medium Sock Stitch Arrangement Using the Cuff Chart (see last page), knit 14 rounds or until cuff is 1" to 1 %" in length.
Medium
Arrange stitches so that there are 27 stitches on the instep needle(s) and 36stitches onthe sole needle. Start of round is the start of the instep needle.
Large
Arrange stitches so that you have 36 stitcheson the sole needle(s) and 36 stitches on the instep needle(s)
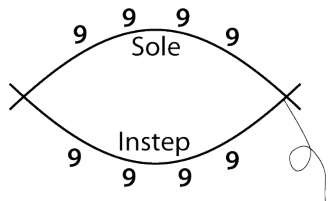
Figure 2 - Large Sock Stitch Arrangement Start of round is the start of the start of the instep needle.
Leg Body
Repeat Leg Chart until the leg measures 6"or until your desired length, ending with row 4 or 8 of the chart. If you are knitting the medium sock, on your last row,

increase 1in the second pattern repeat on the sole, using a M1. (Note: the last 4(6) stitches of the last round do not need to be worked as they will be slipped to the instepneedlewhen setting up for the heel.)
Heel
Heel Flap Setup
The stitches need tobe rearranged so that stitches 1-6 of the leg chart are centered on the front of the leg.
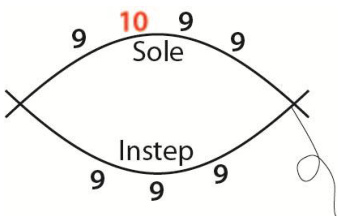
Figure 3- Medium Sock Stitch Arrangement after Increase
Medium
Rearrange stitches as follows: Move the last 4 stitches of the round (end of sole stitch needle) to the beginning of the instep needle. Move 1 stitch from the beginning of the sole needle to the end of the instep needle.
Starting needle layout
Sole needle(s): 9 10 9 9 Instep needle(s): 9 9 9
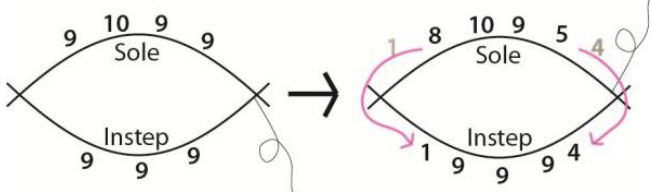
Figure 4 - Medium Heel Setup
Layout after Rearranging Stitches
Sole needle(s): 8 10 9 5 Instep needle(s): 1 9 9 9 4 You now have 32 sole and 32 instep stitches.
Large
Rearrange stitches as follows: Move the last 6 stitches of the round (end of instep needle) to the beginning of the sole needle. Move the last 6 stitches from the end of the sole needle to the beginning instep needle. We are shifting the startofround6stitches
Starting needle layout
Sole needle: 9 99 9 Instep needle: 9 999
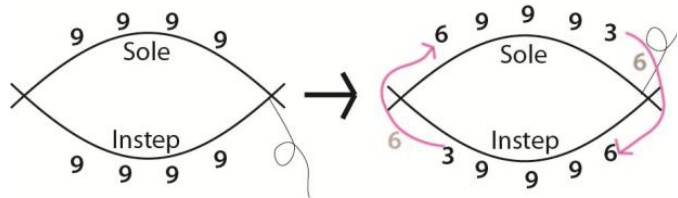
Figure 5 - Large Heel Flap Setup
Layout after Rearranging Stitches
Sole needle: 6 9993 Instep needle: 3 99 9 6 You now have 36 sole and 36 instep stitches.
Heel Flap
Turn work, starting heel flap on the WS. Row 1: SL 1 wyif, P to end of row; turn. Row 2: \*SL 1 wyib, K1\*, repeat from \* to \*, to end of row; turn. Repeat rows 1 & 2 for a total of 17 times or 34 rows in the heel flap, then repeat row 1 one more time, ending with a WS row. (35 rows total)
Heel Turn:
Row 1 (RS): SL 1 wyib, K 18(20) stitches, SSK, K1; turn. Row 2 (Ws): SL 1 wyif, P 7(7) stitches, P2tog, P1; turn. Row 3(RS): SL 1 wyib, K to 1 stitch before gap created by turn on previous row, SSK (1 stitch before gap and 1 stitch after gap), K1; turn. Row 4(Ws): SL1 wyif, P to 1 stitch before gap created by turn on previous row, P2tog (1 stitch before gap and 1 stitch after gap),P1; turn. Repeat rows 3 & 4 until all stitches have been worked. You should have 20(22) stitches upon completion.
Gusset
Pickup Row
SL 1 wyib, K 19(21) (end of heel turn), pickup and knit tbl 18 stitches along the edge of the heel flap (in the slipped stitches), then pickup 1 stitch on each side of the gap between heel flap & instep, and knit the 2 pickups together tbl (19 stitches). Depending on where you ended your leg, you will start knitting the instep at row 1 or 5. Use the instep chart appropriate to your size, knit the next row, repeating the pattern repeat 3 times. Pickup 1 on each side of the gap between the instep & heel flap, then knit the 2 pickups together tbl, pickup and knit tbl 18 stitches along the heel flap. Distribute the stitches as appropriate to your needles. Start of round is now the beginning of the heel.
Gusset Decreases
Continue knitting from the appropriate instep chart, repeating the pattern repeat (red outline) 3 times. Round 1: K to 2 stitches before the instep K2tog, knit the next patternrow;SSK,K to end of round Round 2:Kto instep;knit next pattern row;Kto end of round Repeat rounds 1 & 2 a total of 12 times, then repeat round 1 once. You should have 32(36) sole stitches. Note: If you have 31solestitchesyouprobablyforgottheM1inthelastleg row.Ifyou aresatisfiedwithyourheel,youcanadd thestitch now.Thenumberofsolestitchesmustequalthenumberof instepstitchestostartthetoe.
Reset Start of Round
Knit to start of instep. Set as beginning of round.
Foot
Continue knitting the next pattern row on the instep and stockinette on the sole until 1 %"(2") before your desired foot length, ending with round 4 or 8. If you ended the pattern before you reached the correct toe starting point, continue knitting in stockinette to reach your toe starting position. Note:If you are knitting the Medium sock and have 31 sole stitches, you will need to increase one stitch on the sole before continuing with the toe.
Toe
Round 1: K1, SSK, K to 3 stitches before end of instep, K2tog K; K, SSK, K to 3 stitches before the end of the second needle (end of sole stitches), K2tog, K. 60 (68) stitches remain. Round2&3:Ktoendofround Round 4:Repeat round 1.56(64) stitches remain. Round 5:K to end of round Repeat Rounds 4 & 5,5(6) more times.36 (40) stitches remain. Repeat Round 1, 6(7) more times, 12 stitches remain, 6 sole stitchesand6instepstitches.
Finishing
Cut yarn leaving an 8" tail. Using tail, close the toe with the Kitchener Stitch. Weave in ends & block. Knit second sock to match the first.
Calculating your Toe Length Based on RowGauge
About half way through the foot of your sock, measure your stockinette row gauge on the sole of the sock. This value is used to calculate the length of your sock's toe. The medium toe specified in thispattern has 21 rows; if your row gauge is 12 rows / inch, then your toe will be 21/12"or 1 %" long. Stop yourfoot 1 %"before your total sock length. Try on your sock and stretch it about %". You want a little negative ease for a good fit. Measure from this point to the tip of your toe and if it's 1 %", start the toe.Hint: Ifyou aren't sure about the toe fit, thread alifelinebeforestartingthetoe.
This written pattern, charts and photographs are copyrighted by the author. Do not sell or publish this pattern (in printed or electronic form). You may make copies for your personal use. You may share copies with friends, but encourage them to add it to their Ravelry library so they will receive pattern updates. You may use this pattern for limited commercial purposes. · You may sell socks created from this pattern where you have knitted the garments yourself (no contract knitters, out sourcing, or mass manufacturing) · You may use this pattern to teach a class or as part of a knit along. You may not charge for this pattern, but you may charge to print it. Students should be encouraged to download the pattern themselves whenever possible. This willallow your students to receive pattern updates, should an update be required. · You may use this pattern to produce garments for charity, or to raise funds for charity. If you acquire this pattern via other means (not Ravelry), please add this pattern to your library on Ravelry so that you will receive pattern updates,shouldtheyberequired. You may contact the designer on Ravelry at noliegirl (you will need a Ravelry account to use this link).
Charts
| 6 | 8 | 7 | 6 | 5 | 4 | 2 | T | ||
| 1 |
Cuff Chart

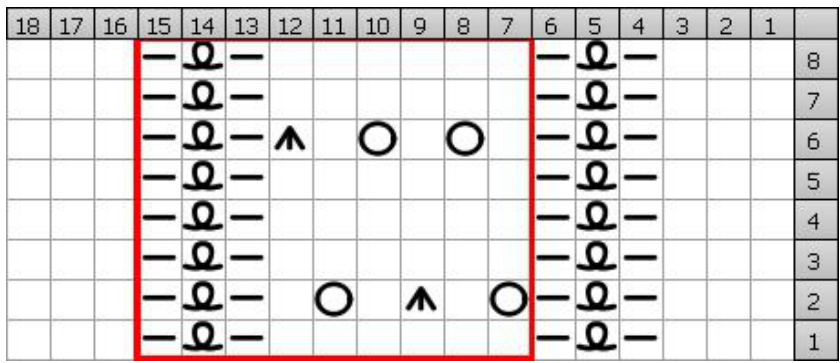
Leg Chart
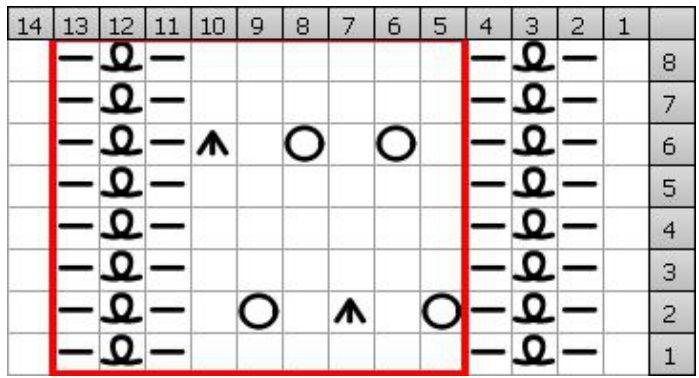
Medium Instep Chart
| Chart Legend | ||
| Symbol | Abbreviation | Definition |
| CDD | Slip 2 as if to knit, K1 pass 2 slipped stitches over | |
| K | Knit | |
| K1 tbl | Knit 1 through the back loop | |
| P | Purl | |
| PatternRepeat | ||
| YO | Yarn Over | |