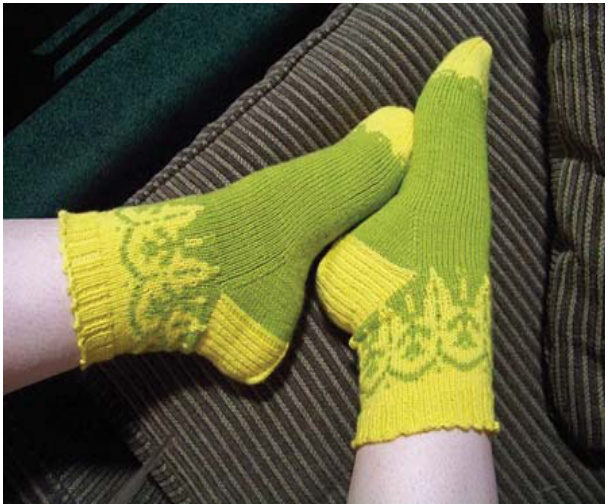
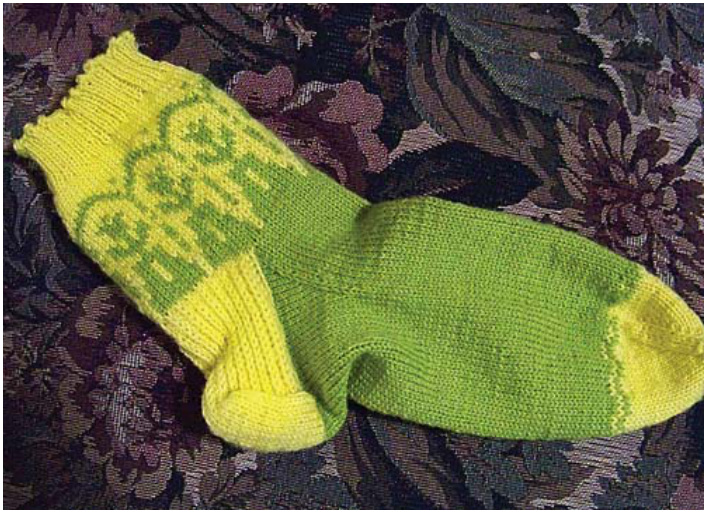
For reference: Socks shown are Average-Wide and the model's feet are a woman's size 9.5 Wide. Her actual right foot measurements are 9- 3/4" long x 4-1/8" wide when standing. The ball of the foot is $10^{\circ}$ around, and the heel/instep is 12-7/8" around at the widest point.
Juliettes
Toe-up Socks with gusset and fap heel Gauge: 8.5-9 st/in. x 12.5 rows/in. Size (Width): Small-Average (Average-Wide) Unstretched and unblocked, cuffs are 3-3/8"(3-7/8") wide measured with sock flat and 4-1/4" high from top of heel. Needle Size: Two $16"$ circulars, US size O or size you need to attain gauge US size O0 dpns or circulars for ribbing Yarn: Simply Sock Yarn, fingering weight sock yarn, $80\%$ wool $120\%$ nylon, 175 yd/50 g per skein MC: 1 skein Fiesta Lime (175 yds) CC: 1 skein Buttercup (175 yds)
Knit Abbreviations:
MC - main color (green) CC - contrasting color (yellow) K - knit ssk - Slip2 knitwise, insert left needle into both stitches in front and knit these 2 st tog BO -- bind off inc -- increase sl - slip purlwise st - stitch tog - together FYl: The yardage of these skeins gave me a little concern, but I did manage both socks in the Average-Wide size with 1 skein of each. I had 8 yds of the MC left over, which could prove to cut it a little close for some people. WS -- wrong side RS -- right side M1 right - Make 1 (increase 1 st) by picking up a st in the row below the next st on left needle. This inc slants right. M1 left -- Make 1 (increase 1 stitch) by picking up a st in the st two rows below the previous st on right needle. This inc slants left. Before starting, check for errata, if any, at http://www.ravelry.com/patterns/library/juliettes
INSTRUCTIONS:
Note: When working with both colors, catch or twist float whenever there is a span of more than 7 st. Stagger these twists from one row to the next (that is, do not line the twists up over each other). Be careful to make floats long enough around the "corners" between needles.
TOE (CC):
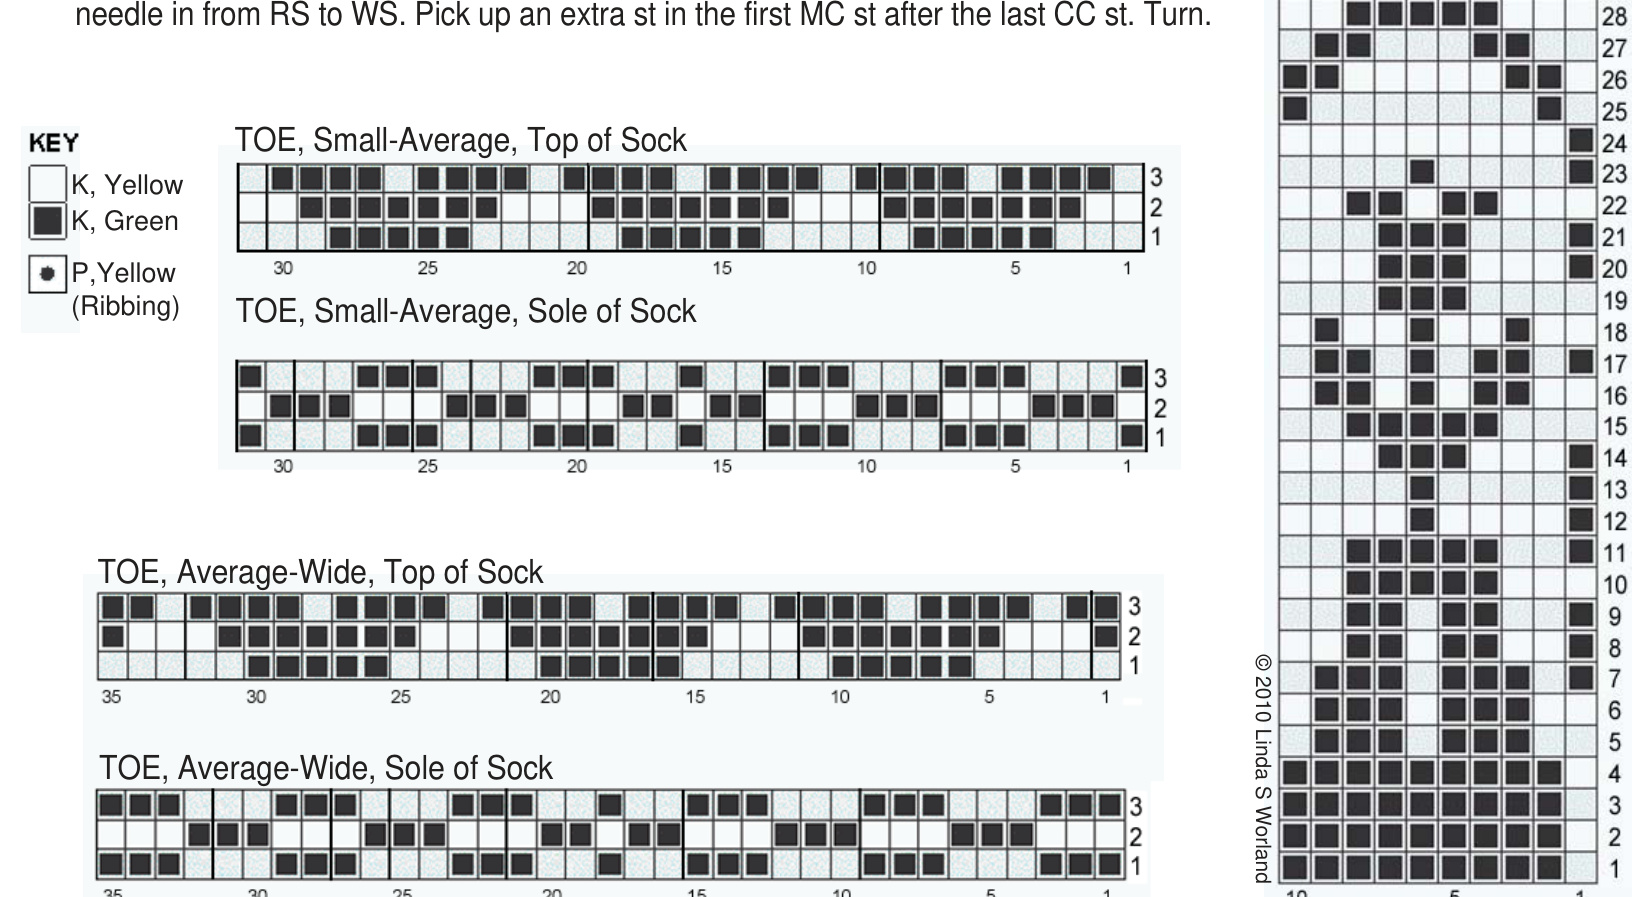
With CC and Judy's Magic Cast-on (or your favorite method), cast on 15 st on each needle. Knit 2 rounds even. Round 1: On each needle, K1, M1 right, K across until 1 st remains, M1 left, K1. Round 2: Work even. Work these two rounds until you have 31(35) st on each needle, a total of 62(70) stitches. Work 2 more rounds even (3 rounds even, total) Next 3 rounds (TOE Chart): Join MC. Using both colors, work Row 1 of TOE-Top-of-Sock and then Row 1 of TOE-Sole-of-Sock for your size. Alternate charts for next two rows. When finished with the TOE chart, drop and cut CC, leaving a tail to weave in later. From here on out, the needle with the 3-scallop design is the top-side needle. The remaining needle is the sole-side needle. BODY OF SOCK (MC) With MC, work even until until sock is 3-1/2" less than desired foot length.| Stop after knitting a cross the top-side needle stitches.
GUSSET (MC):
Round 1: Increase on the sole-side needle only. On sole-side needle: K1, M1 right, K across up to last st, M1 left, K1. On top-side needle: K across. Round 2: Work even on both needles. Repeat these two rounds until you have 51(55) st on the sole-side needle. There will still be 31(35) st on the top-side needle. End after Round 2 (top-side needle will be the last finished). DUTCH HEEL TURN (Setup row in MC, the rest in CC): You will now work back and forth on the sole-side needle only, leaving stitches on top-side needle to rest. Setup Row, RS: On sole-side needle, with MC, K31(35). Turn. Next row, WS: Join CC. Drop and cut MC, leaving a tail to weave in later. Continuing with CC, P11(15). Turn. RS Row 1: Sl1, K10(14). Turn. WS Row 2: Sl1, P10(14). Turn. Repeat these two rows 9 more times until you have a narrow rectangle of knitting with 10 sl st on each side. Next Row, RS: Repeat Row 1, but do not turn. Continuing on RS, PU stitches on edge of rectangle: You will now pick up a total of 10 st in the 10 sl st along lefthand edge of rectangle in this manner: Working from RS to WS, put righthand needle in under both loops of sl st chain formation that is laying flat to WS, wrap yarn around it and pull up a stitch and keep it on the needle. After you have all 10, pick up an extra st in first MC st after last CC st. Turn.
SLIP STITCH HEEL (CC):
RS Row 1: Continuing with CC, K2 tog tbl, K9 tbl, then \*sl1, K1, repeat from \* until 1 CC st remains. SSK last CC st with next MC st from gusset. Turn. From here on out you will always have 31(35) CC heel stitches on the needle. WS Row 2: Sl1, P back until 1 CC st remains, P2 tog last CC st and next MC st from gusset. Turn. RS Row 3: \*Sl1, K1, repeat from \* until 1 CC st remains. SSK last CC st with next MC st from gusset. Turn. Repeat Rows 2 and 3, continuing to use up the MC gusset stitches. Stop after working Row 2 when there is 1 MC st, 31(35) CC sts, 1 MC st on the sole-side needle.Turn to work across RS of heel aga CUFF (CC & MC, Cuff Chart): Both sizes, next RS Row: Leaving righthand MC st on the sole-side needle, sl1, K1 across in pattern, ending SSK last CC st with the last MC st on the lefthand side. You will now begin knitting in rounds again. Decreases described below take place in Rows1&2(Row 1) of chart but are not shown in the chart. Small-Average size only, Dec Round 1: Beginning with top-side needle, join MC and K1. Switch to CC and begin CUFF chart. Repeat chart three times on the top-side needle. When you next meet the lone MC st on the sole-side needle, knit the MC st and the next CC st tog, using MC. Switch to CC and begin CUFF chart again, repeating chart three times on the sole-side needle. Dec Round 2: With top-side needle, $^{\star}\mathsf{K}2$ tog with CC (counts as st#1 of Row 2 in the chart), and continue as charted. Repeat from \* for sole-side needle. There will be 60 st total, 30 on each needle, 6 repeats total. Average-Wide size only, Dec Round 1: Beginning with top-side needle, join MC, K2. Move the two stitches just knit back onto sole-side needle, switch to CC and begin CUFF chart on top-side needle. When you next meet the lone MC st on the sole-side needle, knit the MC st and the next CC st tog, using MC. Count this as one MC st in the chart. At the end of this round there will be 70 st total, 33 on the top-side needle, 37 on the sole-side needle, 7 repeats total. Round 2: As charted. Both sizes, Rounds 3 through 29: Continue in chart. To encourage looser floats, try turning the sock inside out and work with the floats wrapping around the outside, particlarly around the “corners" between needles. After 8-10 rows of chart, try sock on and make sure you are able to get it over your heel. If you can do this without undue tugging, continue the chart.If not, you will need to rip back and make an effort to give yourself longer floats. If necessary, consider working the cuff with a needle one size larger. Rounds 30 through 36: After last round on chart, cut MC, leaving tail for weaving in. Work 7 rounds even in CC. RIBBING (CC, Ribbing Chart): Using smaller needle, at beginning of the top-side needle for both sizes, begin RIBBING chart. Please note that it is an iregular rib of $^{\star}\mathsf{K}1$ , P1, K2, P1, K1, P1, K2, P1. Repeat from \* around for 13 rounds.
PICOT BIND OFF (CC):
\*Cable cast-on 1 st, BO 4, put the loop of the last bind-off st back on left needle and repeat from \* around. At end, break and pull yarn end through loop of last bound-offstitch. Weave in all ends, tidying and closing up any holes formed where yarn has been joined.


