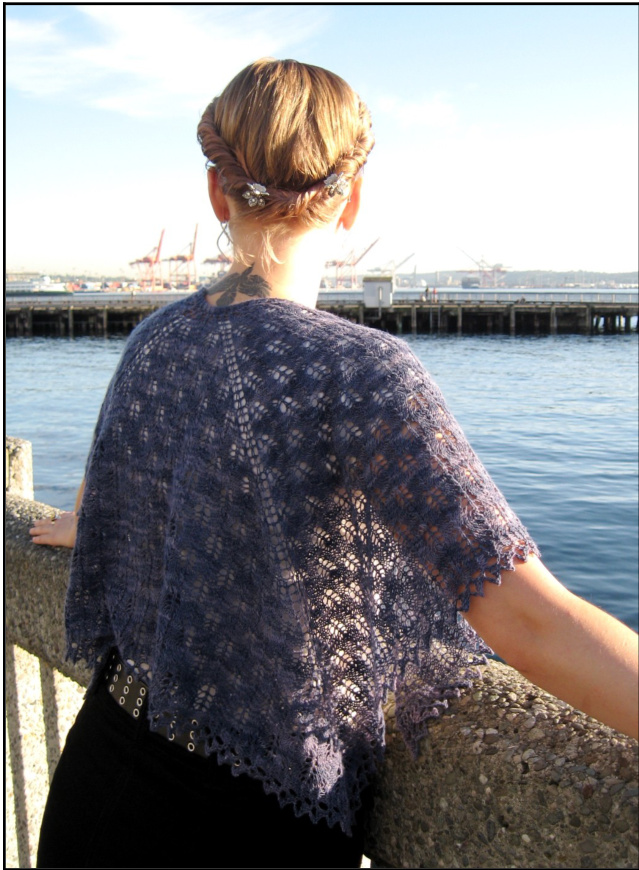
I recently fell in love with lace knitting, but I kept wondering if I was really a "shawl person."I fawned over lovely traditional lace patterns, but could never find a pattern that I really wanted to wear. I could never achieve that certain je ne sais quoi drape with rectangular stoles, which just ended up bunched around my neck like a scarf. Traditional triangular shawls seemed, well, just too traditional. So I designed this shawl with an unusual three-quarter square shape to take advantage of the modern style of a stole and the interesting shaping of shawl. The shape is versatile and easy to wear, even if you are draping challenged like myself. Unlike a triangular shawl, the back edge is straight across so it emphasizes your waist instead of your bum. The pattern is knit from the top down, with a simple lace border knitted onto the bottom edge. Both the main body lace pattern and the border pattern are easily memorized; I knit mine almost entirely while on the bus or while sipping a glass of wine with my knitting group. SIZE One size
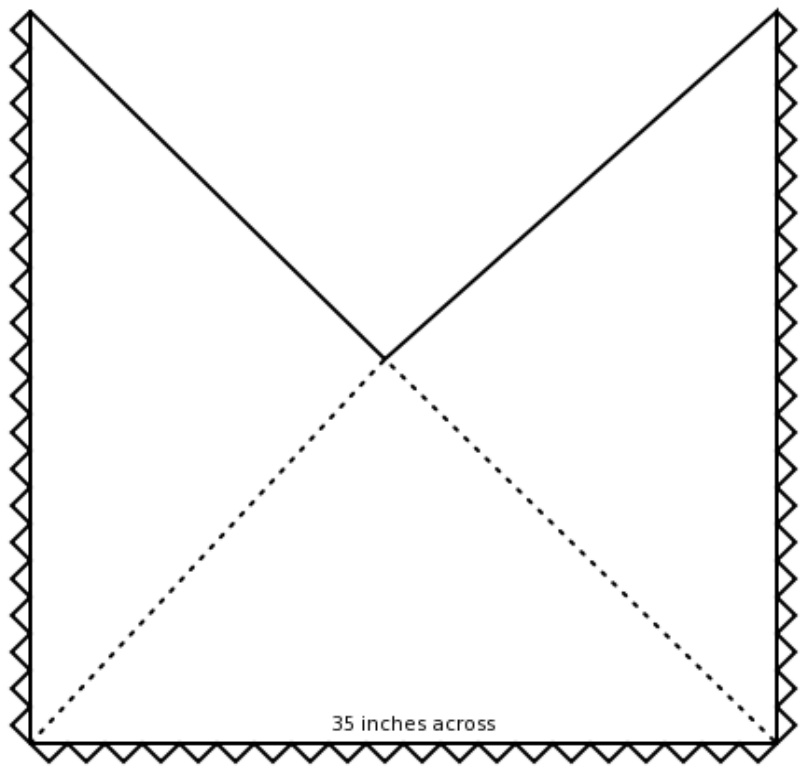
FINISHEDMEASUREMENTS 35 inches square
MATERIALS Hand Jive Knits Nature's Palette Silk and Wool Lace-Weight [70% wool, 30% silk; 655 yd/599 m per 100g skein]; color: Lupine; 1 skein 32-inch US #2/3.0mm circular needle 4 stitch markers Blocking wires or pins Blocking mats GAUGE 22 sts/30 rows = 4" in stockinette stitch (blocked)
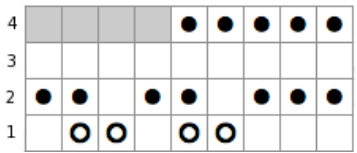
CHART KEY
knit purl yarnover ssk k2tog sll, k2tog. psso
PATTERN NOTES
Correct gauge is not essential for this project, but if you do not get gauge I highly recommend buying a second skein to be safe. The shawl shown required approximately 645 yards. If you are substituting a different yarn, I recommend that you knit and block several swatches in the lace pattern to find the needle size that looks best with your particular yarn. Because the lace motif grows by at least 50% when blocked, it's very important to block your swatch to get an accurate idea of how the shawl will look when finished. Keep this in mind later if you start to worry that the shawl will be too Small. The pattern is worked from the back of the neck down. Instead of one vertical column of increases like a traditional triangular shawl, this pattern is shaped with two diagonal columns of increases. The edging is knitted on to the bottom edge by working perpendicular to the shawl body and joining it by knitting one stitch of the edging together with the one stitch of the body on specified rows.
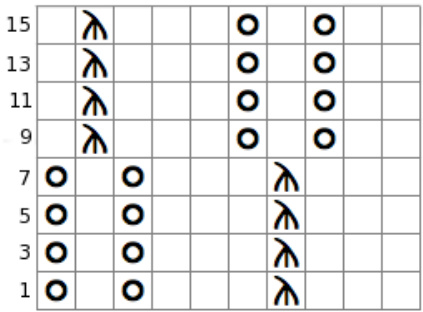
Flickering Flames Motif
Worked back and forth over a multiple of 10 sts. Row 1: K3, sl1, k2tog, psso, k3, yo, k1, yo. Row 2: P all sts. Repeat the last 2 rows 3 times more (a total of 4 times). Row 9: K2, yo, k1, yo, k3, sl1, k2tog, psso. Row 10: P all rows. Repeat the last 2 rows 3 times more (a total of 4 times). Chart does not display wrong-side purl rows.
PATTERN
Garter stitch tab cast-on
Using waste yarn, CO 3 sts with a provisional cast-on method. Rows 1-22:Knit. Row 23: Rotate strip clockwise to pick up and knit 11 sts along left edge of tab. Remove waste yarn from provisional cast-on and place 3 sts on left needle. Knit 3. (17 sts total) Row 24: K3, p to last 3 sts, k3.
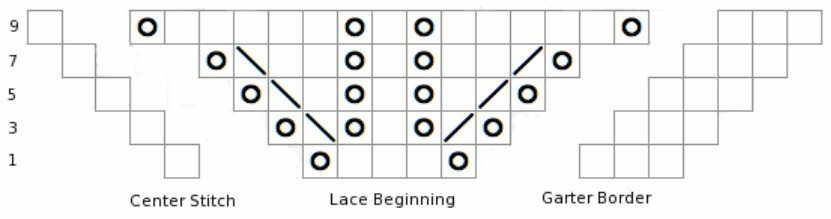
Begin lace pattern
Refer to the written instructions or to the chart below. Row 1: K3, [yo, k3, yo, pm, k1, pm] twice, yo, k3, yo, k3. Row 2 (and all even rows): K3, p until 3 sts remain, k3. Row 3: K3, [yo, k2tog, yo, k1, yo, ssk, yo, sm, k1, sm] twice, yo, k2tog, yo, k1, yo, ssk, yo, k3. Row 5: K3, [yo, k2tog, k1, yo, k1, yo, k1, ssk, yo, sm, k1, sm] twice, yo, k2tog, k1, yo, k1, yo, k1, ssk, yo, k3. Row 7: K3,[yo, k2tog, k2, yo, k1, yo, k2, ssk, yo, sm, k1, sm] twice, yo, k2tog, k2, yo, k1, yo, k2, ssk, yo, k3. Row 9: K3, [yo, k5, yo, k1, yo, k5, yo, sm, k1, sm] twice, yo, k5, yo, k1, yo, k5, yo, k3. Wrong-side rows are not shown on the chart below. To work wrong-side rows, k3, purl to last 3 sts, k3. Each lace motif makes up one of the three triangles that shape the shawl.
Main shawl body
Row 11: K3, [yo, k2tog, yo, k1, yo, (k3, sl1, k2tog, psso, k3, yo, k1, yo)\* until 2 sts before marker, ssk, yo, sm, k1, sm] twice, yo, k2tog, yo, k1, yo, (k3, sl1, k2tog, psso, k3, yo, k1, yo)\* until 2 sts before marker, ssk, yo, k3. Row 13: K3, [yo, k2tog, k1, yo, k1, yo, (k3, sl1, k2tog, psso, k3, yo, k1, yo)\* until 3 sts before marker, ki, ssk, yo, sm, k1, sm] twice, yo, k2tog, k1, yo, k1, yo, (k3, sl1, k2tog, psso, k3, yo, k1, yo)\* until 3 sts before marker, k1, ssk, yo, k3. Row 15: K3, [yo, k2tog, k2, yo, k1, yo, (k3, sl1, k2tog, psso, k3, yo, k1, yo)\* until 4 sts before marker, k2, ssk, yo, sm, k1, sm] twice, yo, k2tog, k2, yo, k1, yo, (k3, sl1, k2tog, psso, k3, yo, k1, yo)\* until 4 sts before marker, k2, ssk, yo, k3. Row 17: K3, [yo, k5, yo, k1, yo, (k3, sl1, k2tog, psso, k3, yo, k1, yo)\* until 5 sts before marker, k5, yo, sm, ki, sm] twice, yo, k5, yo, k1, yo, (k3, sl1, k2tog, psso, k3, yo, k1, yo)\* until 5 sts before marker, k5, yo, k3. Repeat rows 11-18 14 more times, ending with a wrong-side row (503 sts). Including the set-up rows, there should be 16 vertical repeats of the lace motif along the edge of the shawl. Wrong-side rows are not shown on the chart below. To work wrong-side rows, k3, purl to last 3 sts, k3. Repeat the center lace chart as many times as necessary to reach the marker.

Lace Edging
The edging is knit perpendicular to the main body of the shawl. To join the edging to the body, you knit one stitch of the edging together with one stitch of the shawl body as you knit. After you set up the edging, carefully read how and on what rows to join the edging to the body before you begin.
Set up edging
Turn work so right-side faces you. Row 1 and 2: K3 and turn. Row 3: K3, do not turn. As with the garter stitch tab cast-on, rotate the small tab of garter stitch and pick up and knit 2 sts along left edge. You now have 5 sts on your right needle set up for the lace edging.
How to join the edging
On right-side (even) rows, work the edging pattern as written until one stitch remains on the right needle, then sli to the left needle and k2tog. On wrong-side (odd) rows, with yarn in front sl1 from the shawl body to the left needle, then bring yarn to back and k2tog. Work the rest of the row as Written. The edging is joined on every row of the shawl, except near the corners. Near the corners, the edging is joined only on right-side (even) rows to provide additional shaping. Read the following paragraphs carefully before you begin the edging. When you begin the edging at the first corner, join only on even rows for two full repeats of the lace edging (this corresponds to 4 sts of the shawl body). Continue working edging, joining on every row until 4 sts remain before the first marker on the shawl body. Then work four full repeats of lace edging. (corresponds to 8 sts of body), joining only on even rows. Repeat this again at the second marker. Continue joining the edging on every row until only 7 sts remain on shawl body (including the garter stitch border). Work edging, joining on only even rows across all remaining sts. You should be on Row 4 of the edging when all body sts are worked. Instead of working as written, BO all sts.
Loop lace edging
Turn work so the wrong side of the shawl is facing you and begin loop lace edging. On odd (wrong-side) rows, the shawl body will be on the right side of the chart. On even (right-side)rows, the shawl body will be on the left. Row 1: K3, yo twice, k1, yo twice, k1. Row 2: K2, p1, k2, p1, k3. Row 3: K9. Row 4: Bind off 4 sts, k4. Remember that the chart does not indicate how to join the edging to the shawl body. Carefully read the description above that indicates how and on what rows to join the edging. Note: this chart indicates all rows.
FINISHING
Weave in all ends and wet block to 35 inches (89 cm) square. If you use blocking wires or string, thread through the column of yarn overs on the diagonal edges. For the points of the lace edging, it is easier to use individual pins.


