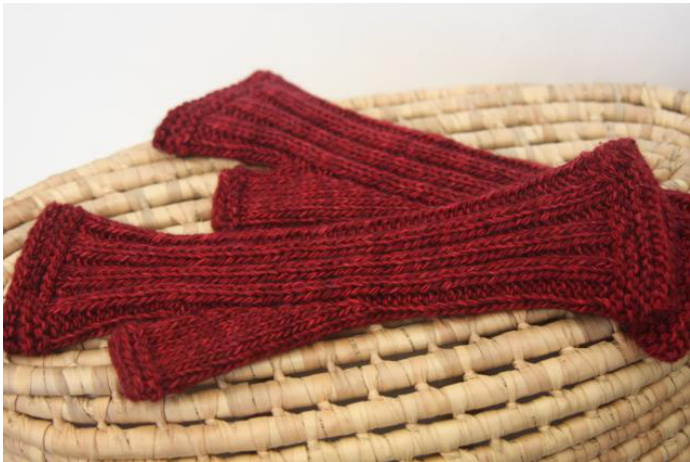
goldilocks mittens
by taylor smith When I first saw fingerless mittens, I thought, "How silly. My fingers will freeze."What I discovered after trying a pair is that I wear them much more than my regular mittens because I can do just about everything without having to take them off. It's surprising how warm they keep my hands. I like the ribbing because it gives a nice snug fit but not too tight, not too loose, just right...thus the name, goldilocks mittens. yarn - madelinetosh tosh merino light - about 63 grams knitting with 2 strands held together
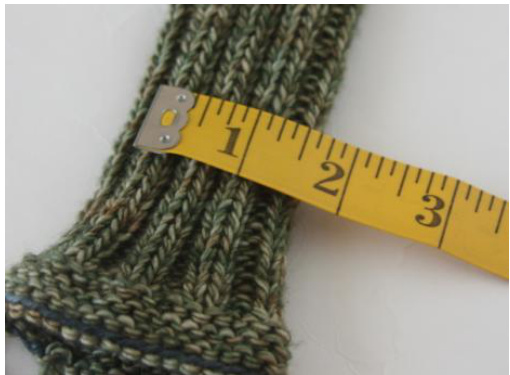
needles - DPNs, or circular needles for preferred method US size 7 (4.5 mm) US size 4 (4.0 mm) for cast on (two held together) I made these to fit snugly on my hands. my hand measured around knuckles = about 7 %" my wrist = 6" Size can be adjusted by casting on more or less stitches in multiples of 4 or changing needle size. gauge - measured over ribbing, unstretched, unblocked 10 stitches = 1.25" (Please excuse this unconventional way of measuring gauge.) I put the tape measure over 3 knit ribs (10 stitches) without stretching the fabric at all.
Directions:
garter stitch edge
Long tail cast on 32 stitches over two size 4 needles held together. (I used Old Norwegian/twisted German cast on.) Join in the round. round 1-knit round 2 - purl Repeat rounds 1 & 2 twice. (total of 3 purl ridges) round 7 - knit
ribbing - wrist section
[K2, P2] repeat to end of round. Repeat this round for about 4" or desired length. Note: I think this revised method makes a smoother transition between the increases and the stitches next to them since they are all knit stitches. In other words, the M1R and M1L increases have knit stitches both before and after rather than having the increase stitches next to a purl stitches. The other method from the first version of pattern is below at the end of the pattern.
thumb gusset section
round 1 - [K2, P2] to last 2 (purl) stitches, PM (place marker), K2, PM. These last K2 stitches are on purl stitches in the previous row. round 2 - [K2, P2] to 2 before marker, K2, SM (slip marker), M1R, K2, M1L, SM. round 3 - [K2, P2] to 2 before marker, K2, SM, K to marker, SM. round 4 - [K2, P2] to 2 before marker, K2, SM, K to marker, SM. Repeat rounds 2, 3, and 4 until you have 14 stitches between the markers (ending with round 4). Next round: [K2, P2] to 2 before marker, K2, remove marker, slip 14 thumb gusset stitches to stitch holder or waste yarn (remove other marker), cast on 2 stitches (backwards loop method).
ribbing - hand section
Continue [K2, P2] ribbing for about 2 %" (or desired length).
garter stitch edge
Repeat garter stitch rows like beginning rounds. round 1 - knit round 2 - purl Repeat rounds 1 & 2. (total of 2 purl ridges) Last round: knit Bind off. thumb (2 methods, your choice) Note: Method 1 is how I think this is usually done. Here's what I do, which is Method 2. I pick up 6 stitches instead of 2. On the next row, I decrease 4 stitches. This helps close gaps and puts less strain on where the thumb section joins the hand section.
Method 1
Divide thumb stitches onto 2 or 3 needles. Join yarn (leaving a long tail\*). Knit 14 stitches, pick up 2 stitches (previously cast on stitches from when you ended the Thumb Gusset Section.) 16 stitches on needles.
Method 2
Divide thumb stitches onto 2 or 3 needles. Join yarn (leaving a long tail\*). Knit 14 stitches, pick up 6 stitches from hand section. Next round - K 13, SSK twice, K2tog twice. 16 stitches on needles. \* Leaving some extra length here will give you yarn to close any gaps that may show up.
thumb - continued (both "picking up"methods)
Knit 4 or 5 rounds or to desired length.
garter stitch edge
round 1- purl round 2-knit Repeat rounds 1 and 2 one more time (for a total of two purl ridges.) Bind off. Second mitten is the same. No difference in right and left. You can contact me on Ravelry if you have questions, find mistakes or need help with the pattern. My Rav ID is nightmorning. Hoping these keep your hands nice and warm..just right. Revision: Jan. 25, 2012 thumb gusset section added gauge information This is from the first version of the pattern. Both ways work fine. I prefer the one above.
thumb gusset section
round 1 - [K2, P2] to last 4 stitches, PM (place marker), K2, PM, P2. round 2 - [K2, P2] to marker, SM (slip marker), M1R, K2, M1L, SM, P2. round 3 - [K2, P2] to marker, SM, K to marker, SM, P2. round 4 - [K2, P2] to marker, SM, K to marker, SM, P2. Repeat rounds 2, 3, and 4 until you have 14 stitches between the markers (ending with round 4). Next round: [K2, P2] to marker, remove marker, slip 14 thumb gusset stitches to stitch holder or waste yarn (remove other marker), cast on 2 stitches (backwards loop method), P2.


