begs for Casy Toe-Up Socks
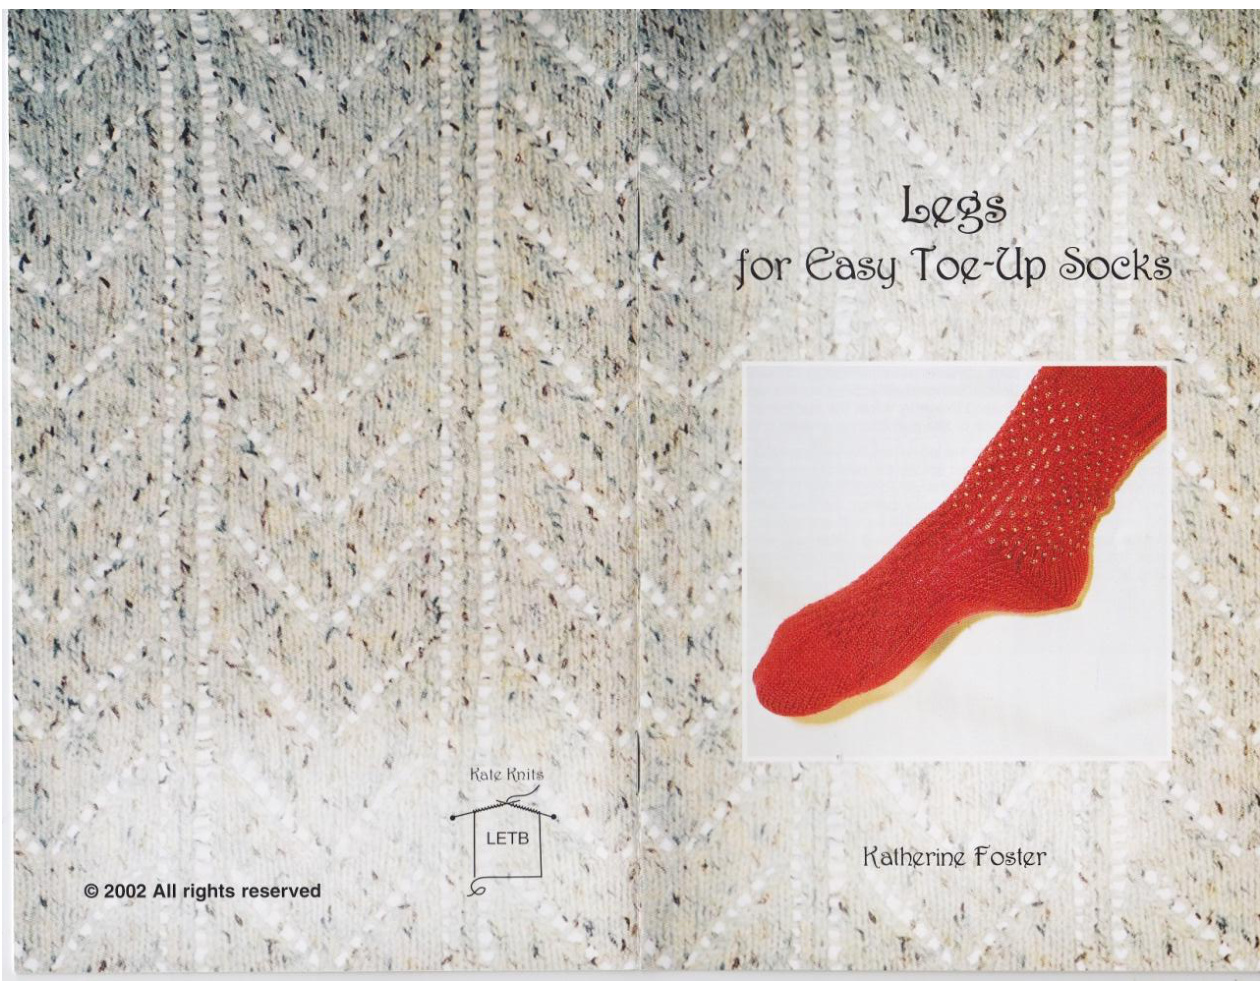
Katherine Foster
Legs for Easy Toe-Up Socks
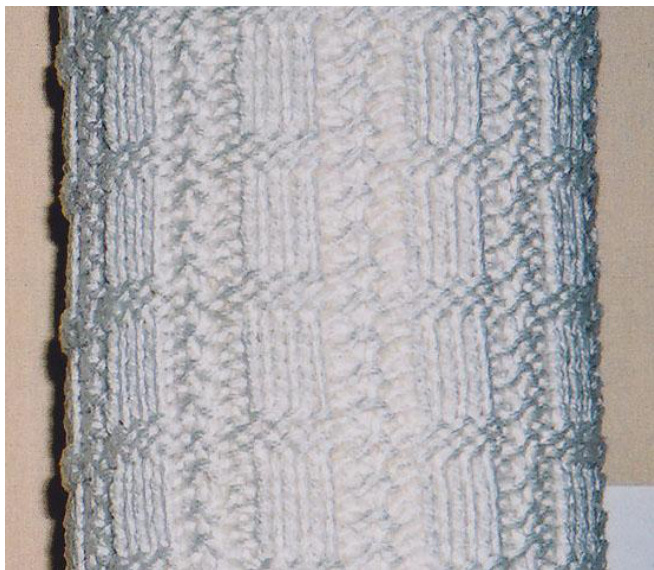
As a companion to Easy Toe-Up Socks, this booklet presents a selection of decorative stitch patterns suitable for sock legs. The instructions are arranged for circular knitting and include both written and charted directions. Each design is accompanied by an indication of stitch count adjustments if your sock is one of the 4 sizes in the Easy Toe-Up Sock booklet. Some of the designs include suggestions for a ribbed upper cuff as well as possible variations of the design. The designs here can also be used on top-down socks but you'll need to turn the picture upside-down to see howthey will appear. As mentioned in Easy Toe-Up Socks, decorative stitch patterns can be knitted on the instep of the sock as well. When adding a design, consider that the pattern may require a partial repeat at the end so that the symmetry of the design is preserved. You may also wish to shift the beginning of the pattern to start somewhere in the middle of the stitch repeat in order to have the design centered attractively on the top of the foot. If the adjusted pattern doesn't fit evenly within the number of stitches, it can be edged with one or two purl stitches or even a P, K, P. In making the transition to knitting the leg, when the instep pattern will be worked all around all stitches, knit across the heel stitches and work any edge stitches as set, knit across the instep according to the pattern as set and continue in pattern until partway through the heel stitches. Place the beginning of the round marker here so that any discontinuity of pattern caused in the transition from one round to the next will be at the back of the sock and not in a more visible location. Continue with the next round of the pattern.
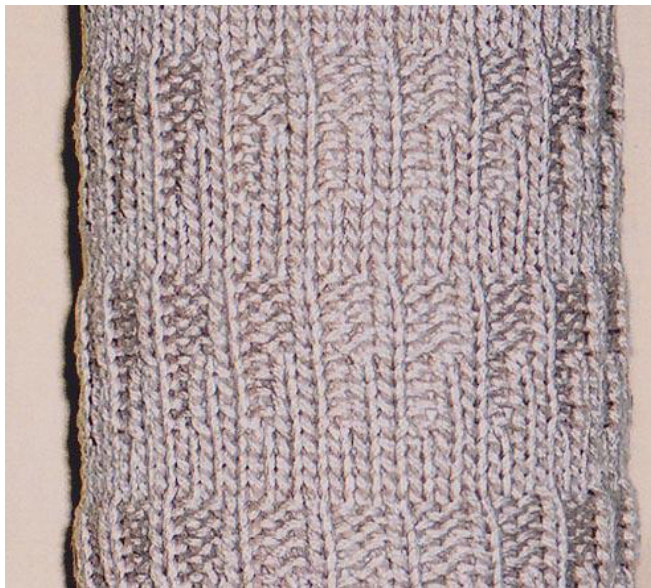
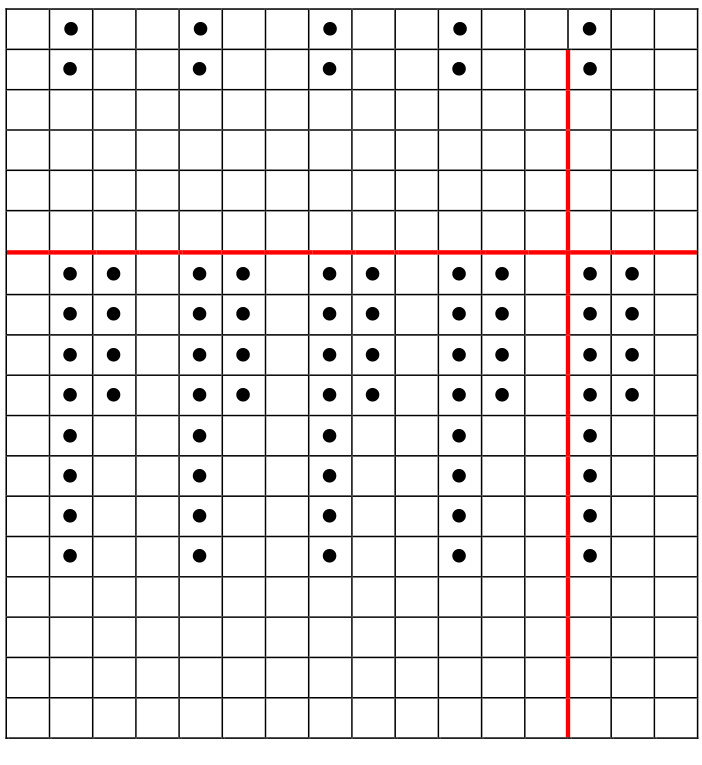
Rib Design 1
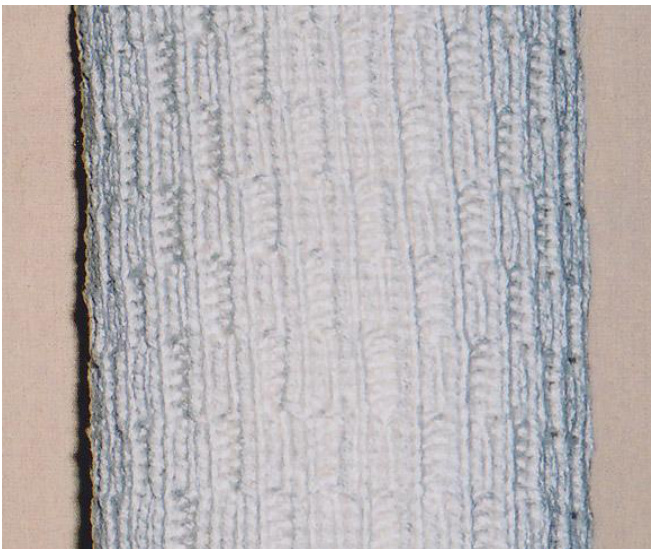
This offset rib pattern will provide a little added elasticity to the leg. An upper cuff in single rib (K1, P1) is recommended to finish off the top of the sock.
10-round pattern:
| Multipleof4sts: | 68st | nostitchcountadjustment |
| 72st | no stitch count adjustment | |
| 52st | no stitch count adjustment | |
| 54st | increase2to56sts | |
Rounds 1- 5: (K3, P1) repeat around Rounds 6 - 10: (K1, P1, K2) repeat around
Rib Design 2
This diagonal rib pattern adds no additional elasticity to the leg. A ribbed upper cuff is necessary to finish off the top of thesock.

| Multipleof5sts: | 68st | decrease 3 to65 sts |
| 72st | decrease2to70 sts | |
| 52st | decrease 2 to 50 sts | |
| 54st | increase1to55sts | |
10-round pattern:
Round 1: (P3, K2) repeat around Round 2: Knit Round 3: (P2, K2, P1) repeat around Round 4: Knit Round 5: (P1, K2, P2) repeat around Round 6: Knit Round 7: (K2, P3) repeat around Round 8: Knit Round 9: (K1, P3, K1) repeat around Round 10: Knit
This rib pattern will provide a little added elasticity to the leg. An upper cuff in (K2, P1) rib is recommended to finish off the top of the sock.
| Multipleof3sts: | 68st | increase 1 to 69 sts |
| 72st | nostitchcountadjustment | |
| 52st | increase2to54sts | |
| 54st | nostitchcountadjustment | |
Rib Design 3
12-round pattern:
Rounds 1 - 4:Knit Rounds 5 -8: (K2, P1) repeat around Rounds 9 - 12: (K1, P2) repeat around
Moss Rib Design 1
This moss rib pattern will provide added elasticity to the leg. An upper cuff in triple rib (K3, P3) is optional. Multiple of 6 sts:
| 68st | decrease e2to66sts |
| 72st | nostitchcountadjustment |
| 52 st | increase2to54sts |
| 54 st | nostitchcountadjustment |
2-round pattern:
Round 1: (K3, P3) repeat around Round 2: (K4, P1, K1) repeat around
Moss Rib Design 2
This moss rib pattern will provide a little added elasticity to the leg. An upper cuff in triple rib (K3, P3) is recommended to finish off the top of the sock.
| Multipleof6sts: | 68 st | decrease e2to66sts |
| 72 st | no stitchcountadjustment | |
| 52st | increase2to54sts | |
| 54st | nostitchcountadjustment |
8-round pattern:
Round 1: (K3, P3) repeat around Round 2: (K3, P1, K1, P1) repeat around Round 3: as Round 1 Round 4: as Round 2 Round 5: as Round 1 Round 6: as Round 2 Round 7: Purl Round 8: (P4, K1, P1) repeat around
Knit and Purl Design 1
This knit and purl pattern adds no additional elasticity to the leg. A ribbed upper cuff is necessary to finish off the top of thesock.
| Multipleof3sts: | 68st | increase 1 to 69 sts |
| 72st | nostitchcountadjustment | |
| 52st | decrease1to51sts | |
| 54st | nostitchcountadjustment | |

4-round pattern:
Rounds 1-3:Knit Round 4: (K1, P2) repeat around
Variations:
Work as a 5-round pattern, repeating Round 4 Work as a 6 st repeat, 8-round pattern and alternate the purl bars: Rounds 1 - 3: as given Round 4: (K1, P2, K3) repeat around Rounds 5 - 7: Knit Round 8: (K4, P2) repeat around ork as a 6 st repeat, 10-round pattern by repeating Rounds 4 and 8 in above variatic
Knit and Purl Design 2
This knit and purl pattern adds no additional elasticity to the leg. A ribbed upper cuff is necessary to finish off the top of thesock.
| Multipleof6sts: | 68 st | decrease 2 to 66 sts |
| 72st | nostitchcountadjustment | |
| 52st | increase e2to54sts | |
| 54st | nostitchcountadjustment |
12-round pattern:
Round 1: (P1, K2, P2, K1) repeat around Round 2: Knit Round 3: (K2, P2, K2) repeat around Round 4: Knit Round 5: (K1, P2, K3) repeat around Round 6: Knit Round 7: (P2, K2, P1, K1) repeat around Round 8: Knit Round 9: as Round 5 Round 10: Knit Round 11: as Round 3 Round 12: Knit
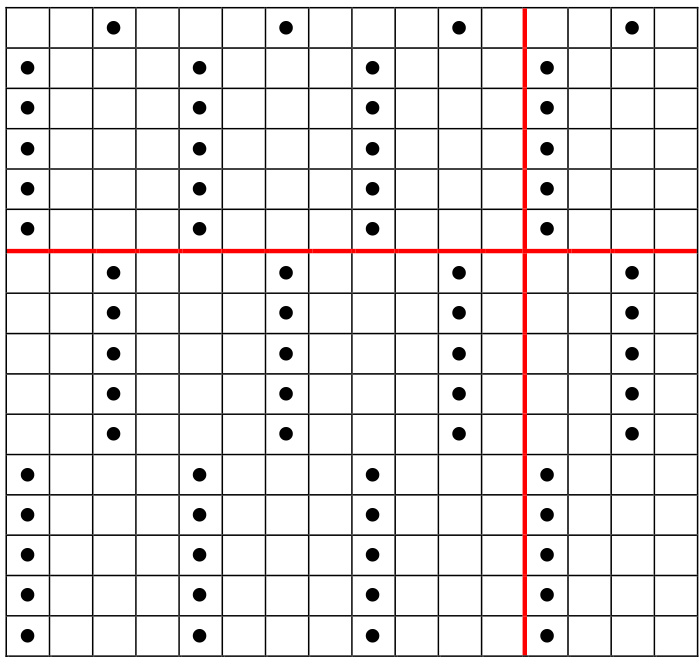
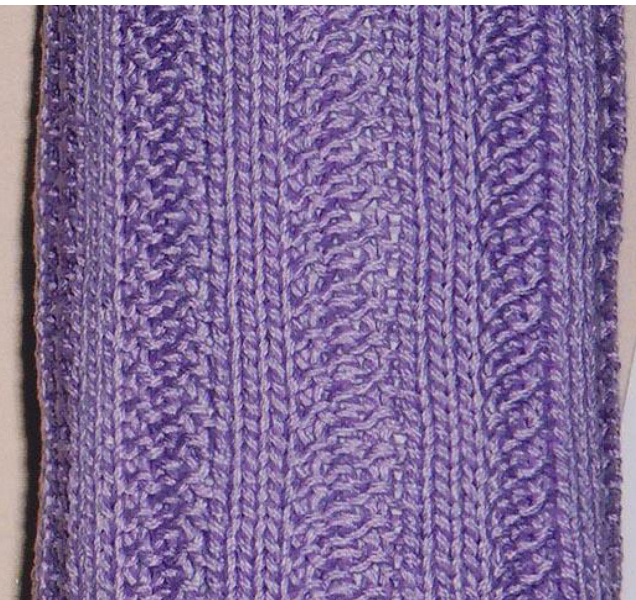
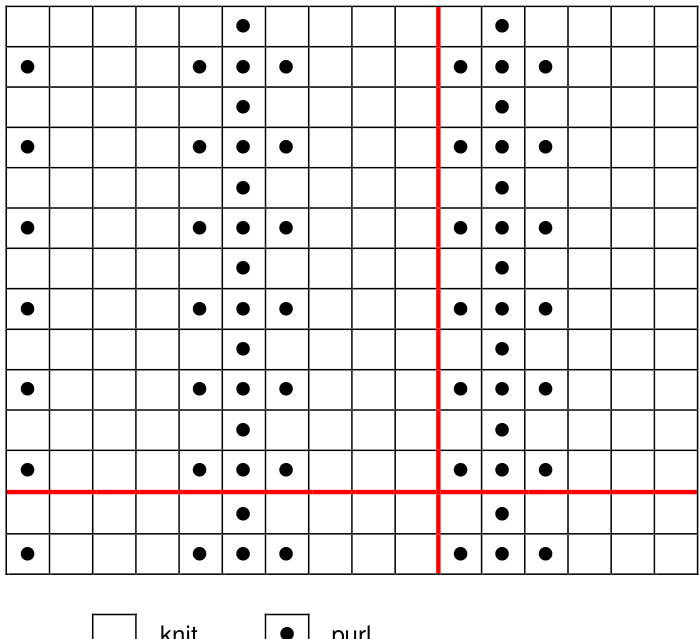
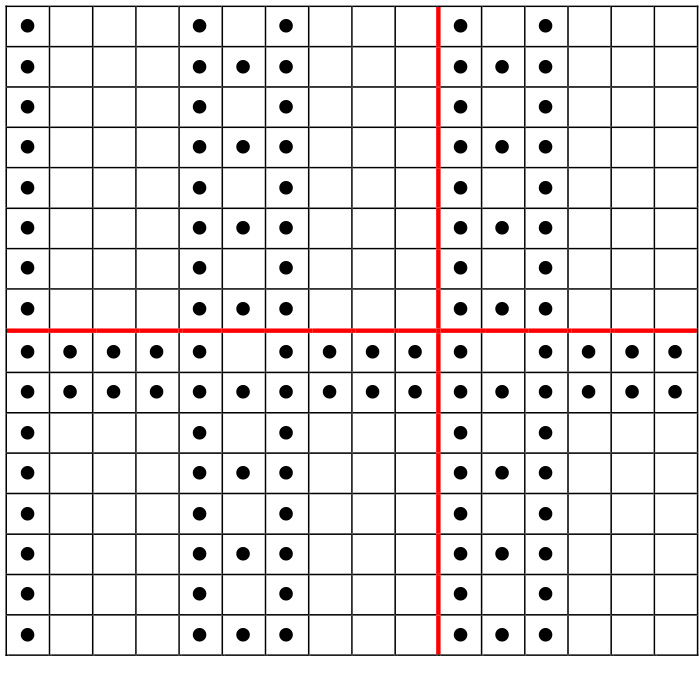
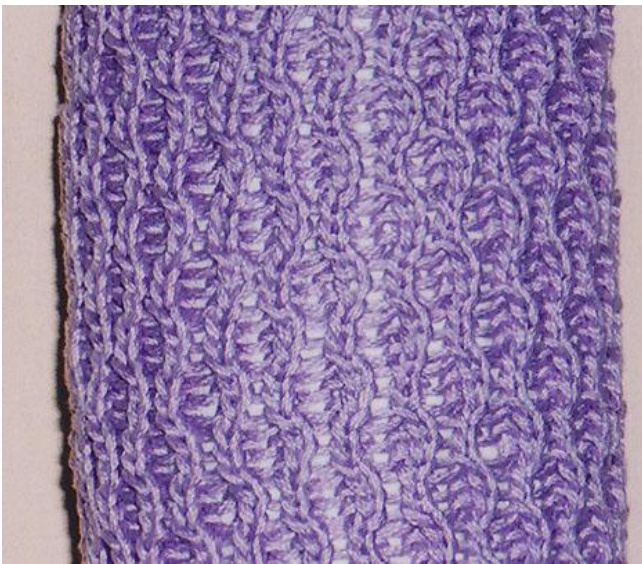
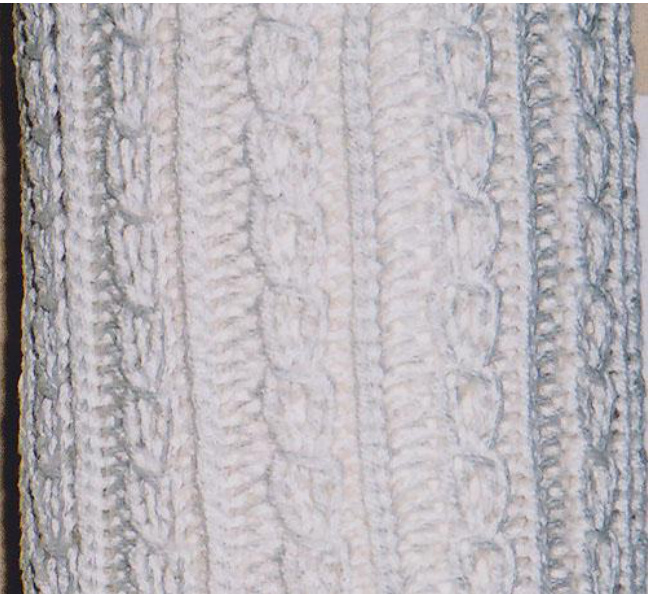
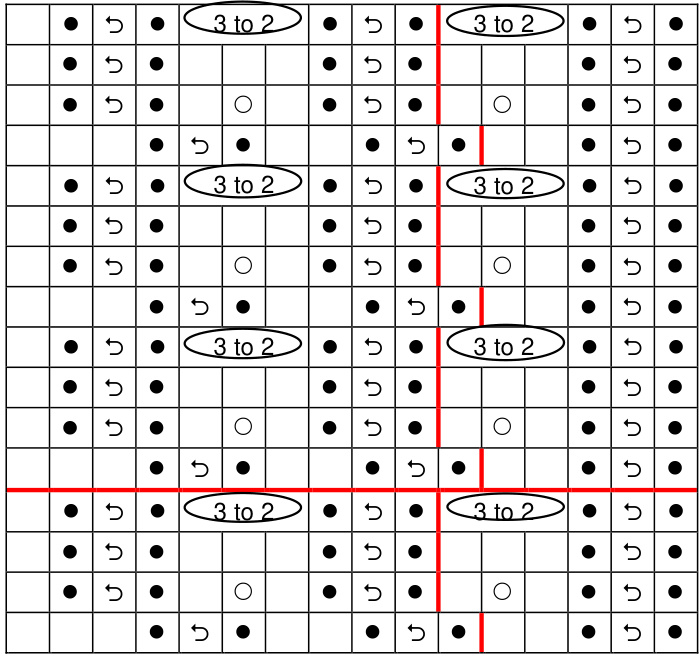
Cable Design 1
This honeycomb cable pattern will provide a little added elasticity to the leg. An upper cuff in double rib (K2, P2) is recommended to finish off the top of the sock. This stitch pattern will pull the yarn tightly so I recommend increasing the needle size by .50 mm (2.75 mm or 3.50 mm if following basic sizes in Easy Toe-Up Socks booklet).
Multiple of 4 sts:
| 68st | nostitchcountadjustment |
| 72 st | nostitchcountadjustment |
| 52st | nostitchcountadjustment |
| 54st | increase2 2to56sts |
6-round pattern:
Rounds 1 -2: (P1, K2, P1) repeat around Round 3: (TR, TL) repeat around Rounds 4 -5: (K1, P2, K1) repeat around Round 6: (TL, TR) repeat around
| \TL\ | /TR/ | \TL\ | /TR/ | \TL\ | /TR/ | \TL\ | /TR/ | |||||||||||
| /TR/ | \TL\ | /TR/ | \TL\ | /TR/ | \TL\ | /TR/ | \TL\ | |||||||||||
| s | ||||||||||||||||||
| \TL\ | /TR/ | \TL | /TR/ | \TLV | /TR/ | \TL\ | /TR/ | |||||||||||
| /TR/ | \TL\ | /TR/ | \TL\ | /TR/ | \TL\ | /TR/ | \TL\ | |||||||||||
| \TL\ | /TR/ | \TL\ | /TR/ | \TLV | /TR/ | \TL\ | /TR/ | |||||||||||
| . | ||||||||||||||||||
knit purl /TR/ \TL\
Stitch Abbreviations:
TR Twist Right - slip next st to cable needle and hold to back of work, K1 then P st from cable needle. Note: this st can be done without a cable needle by knitting into the front of the 2nd st on left needle, then purling into the front of the 1st st and then slipping both sts off the left needle. TL Twist Left - slip next st to cable needle and hold to front of work, P1 then K st from cable needle. Note: this st can be done without a cable needle by juggling the sts: insert point of right needle into back of 2nd st on left needle. Slip 1st and 2nd sts off left needle then catch the 1st st with point of left needle. Slip that 1st st back to the left needle and P1, K1. It's a bit awkward at first but once you get the hang of it, it's a lot less tedious than using a cable needle.
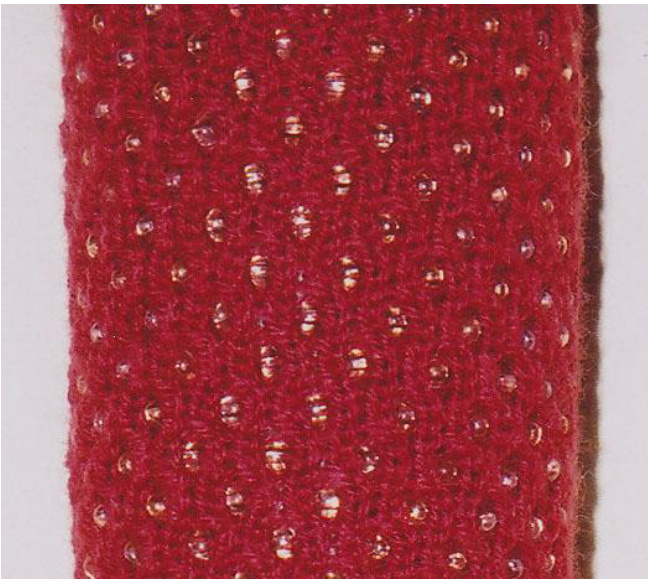
Beaded Variation
The honeycomb cable pattern looks fabulous with beads knitted in. The increase in needle size to 2.75 mm is definitely required for this variation. In these socks I used size 6, O-shaped beads with Phildar "Preface" 4-ply sock yarn. A size 5 bead might have a larger hole, making it easier to thread onto the sock yarn, and not be too large for the weight of the yarn. The 6-round pattern is worked as indicated with beads added between the 2 purl sts on Rounds 1 and 4, beginning with Round 4 as follows: Round 4: (K1, P1, position bead here, P1, K1) repeat around Round 1: (position bead here, P1, K2, P1) repeat around
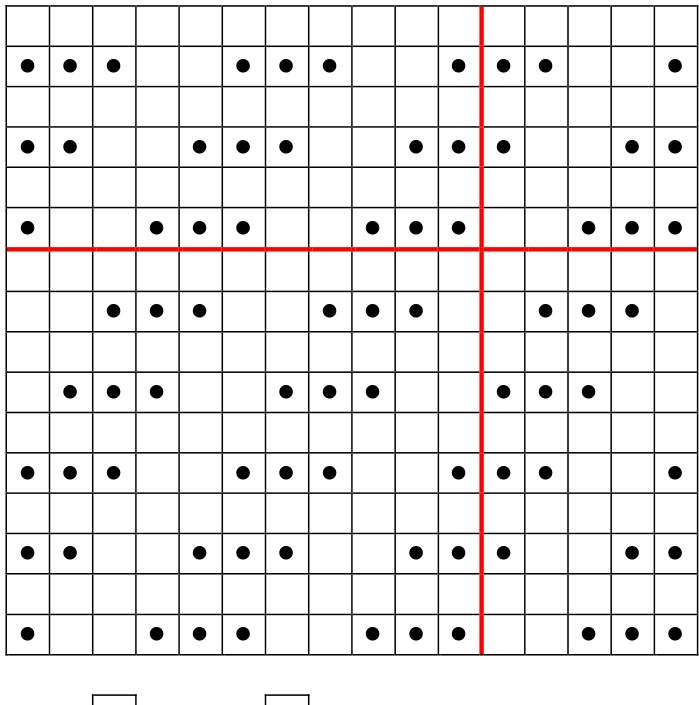
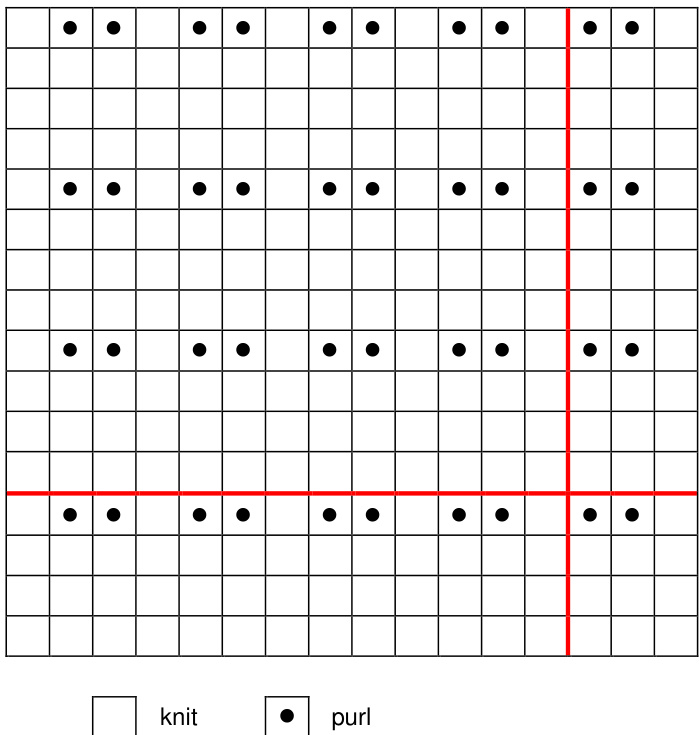
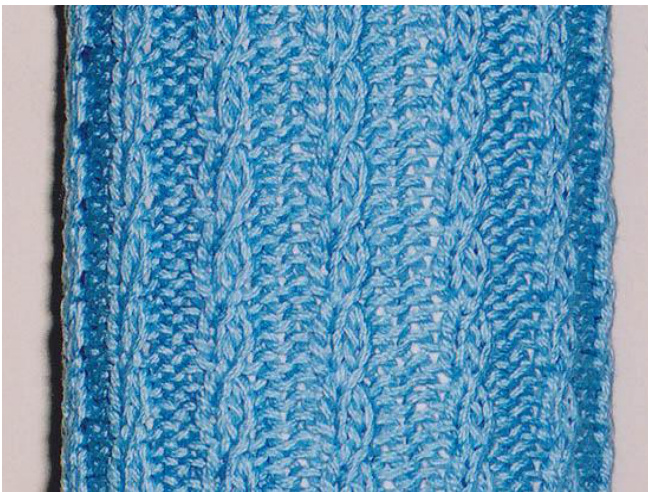
Cable Design 2
This mini cable pattern will provide a little added elasticity to the leg. An upper cuff in double rib (K2, P2) is recommended to finish off the top of the sock.
| Multipleof4sts: | 68st | nostitchcountadjustment |
| 72st | no stitch count adjustment | |
| 52st | no stitch count adjustment | |
| 54st | increase2to56sts | |
4-round pattern:
Rounds 1- 3: (K2, P2) repeat around Round 4: (TR, P2) repeat around
| g | /TR/ | /TR/ | /TR/ | /TR/ | ||||||||||||
| . | ||||||||||||||||
| /TR/ | . | /TR/ | /TR/ | /TR/ | ||||||||||||
| /TR/ | . | . | /TR/ | . | /TR/ | /TR/ | ||||||||||
| . | . | |||||||||||||||
| g | g | g | g | |||||||||||||
| . | /TR/ | /TR/ | . | /TR/ | /TR/ | |||||||||||
| . | ||||||||||||||||
| . | . | |||||||||||||||
knit purl /TR/
Stitch Abbreviation:
slip next st to cable needle and hold to back of work, K1 then P st from cable needle Note: this st can be done without a cable needle by knitting into the front of the 2"d st on left needle, then purling into the front of the 1st st and then slipping both sts off the left needle.
Cable Design 3
This mock cable pattern will provide a little added elasticity to the leg. An upper cuff in single rib (K1, P1) is recommended to finish off the top of the sock.
| Multipleof5sts: | 68st | increase2to70sts |
| 72st | increase3to75sts | |
| 52st | increase3to55sts | |
| 54st | increase 1 to 55 sts | |
4-round pattern:
Round 1: (P1, K1tbl, P1, K2) repeat around Round 2: (P1, K1tbl, P1, K1, YO, K1) repeat around Round 3: (P1, K1tbl, P1, K3) repeat around Round 4: (P1, K1tbl, P1, 3-to-2) repeat around
te: This pattern involves an increase in Round 2 that is not decreased until Round 4 Single rib for the upper cuff should begin after Round 2 or 3 so that the twisted knit stitches line up evenly with thecuff ribbing. Stitch abbreviation: K1tbl knit 1 through the back loop, which twists the stitch 3-to-2 Slip 1 knitwise, K2, pass slipped st over the K2
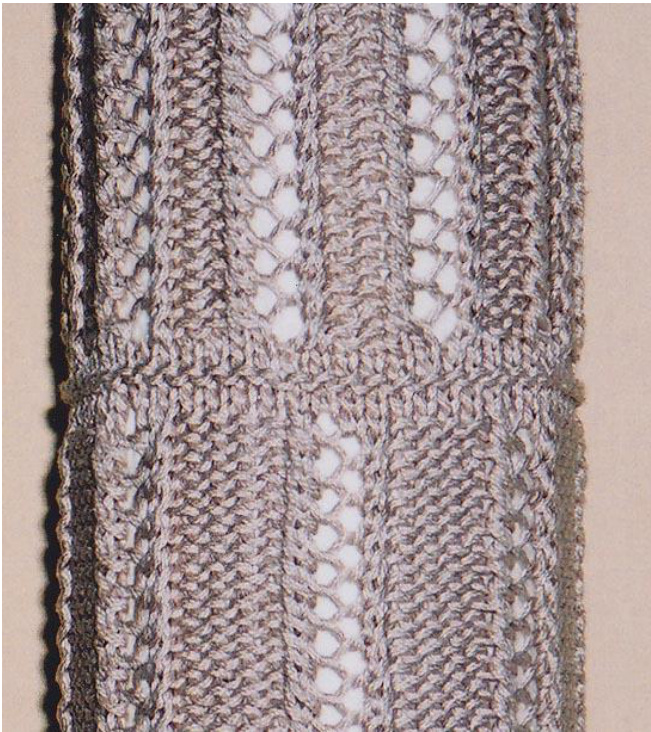
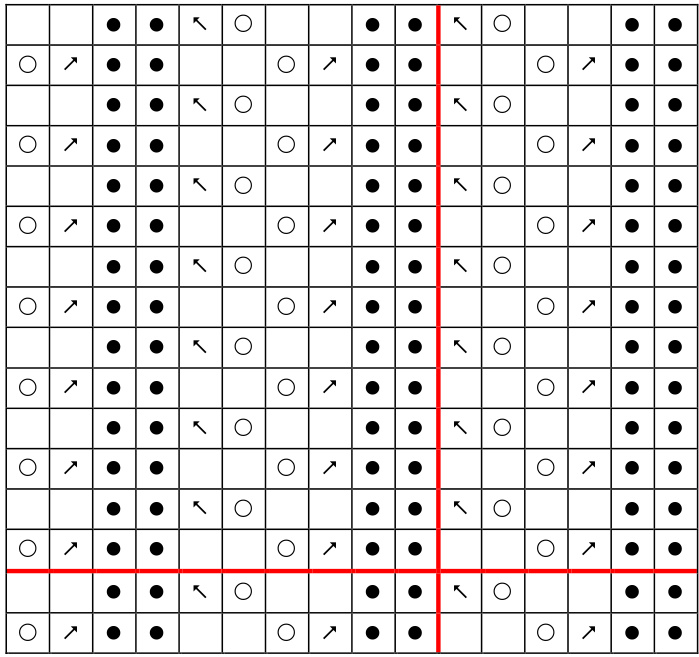
Lace Design 1
This lace pattern adds no additional elasticity to the leg. A ribbed upper cuff is necessary to finish off the top of the sock. Multiple of 4 sts:
| 68st | nostitchcountadjustment |
| 72 st | nostitchcountadjustment |
| 52 st | nostitchcountadjustment |
| 54 st | decrease e2to52sts |
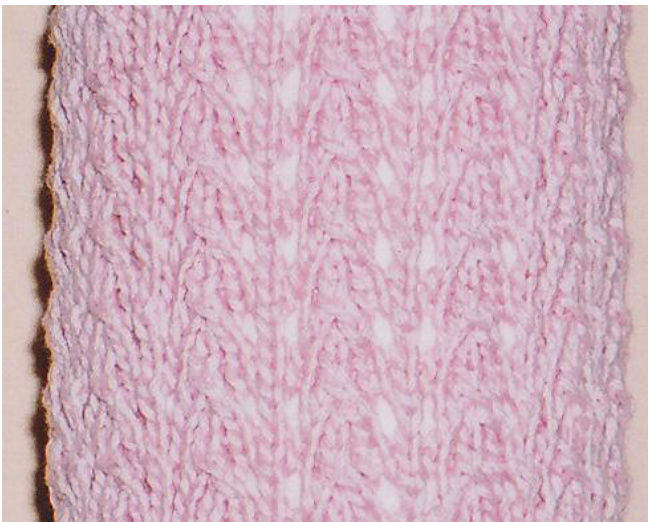
4-round pattern:
Round 1: Knit 4 Round 2: (K1, YO, K3, YO) repeat around Round 3: Knit 6 Round 4: (K2, SK2PO, K1) repeat around
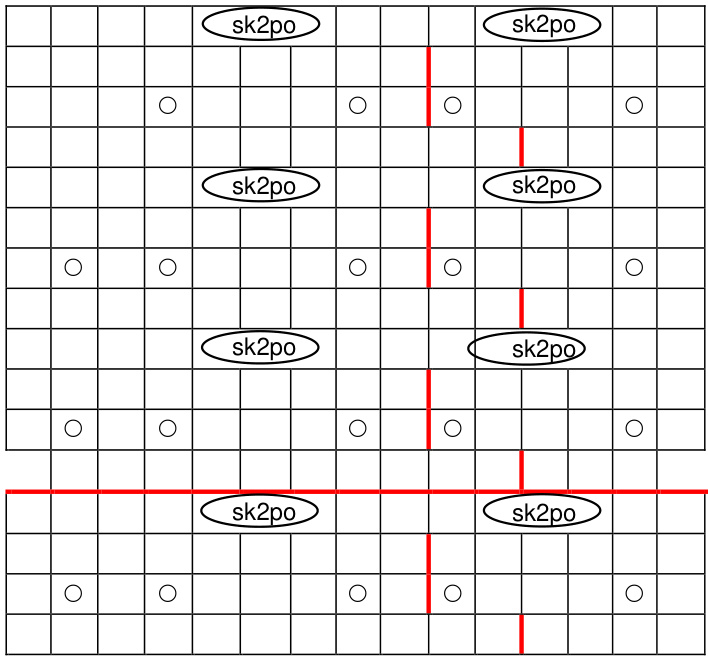
knit YO sk2po te: This pattern involves an increase in Round 2 that is not decreased until Round 4 Single rib for the upper cuff should begin after Round 1 or 4 so that the stitches line up evenly with the cuff ribbing.
Stitch Abbreviation:
SK2PO Slip 1 knitwise, K2 together, pass slipped st over the K2tog
Lace Design 2
This lace pattern will provide a little added elasticity to the leg. A ribbed upper cuff is recommended to finish off the top ofthesock.
| Multipleof6sts: | 68st | decrease 2 to 66 sts |
| 72st | nostitchcountadjustment | |
| 52st | increase2to54sts | |
| 54 st | nostitchcountadjustment |
Round 1: (P2, K2tog, YO, K2) repeat around Round 2: (P2, K2, YO, SKPO) repeat around
2-round pattern:
knit purl k2tog skpo Wide-spaced variation: Increase to a multiple of 8 stitches and work a P4 column instead of P2. Stitch Abbreviations: K2tog Knit 2 together SKPO Slip 1 knitwise, K1, pass slipped st over the K1


