Manly beach vest
An original knitwear design by Justine Turner Please swatch carefully and read all instructions prior to starting, and check measurements.
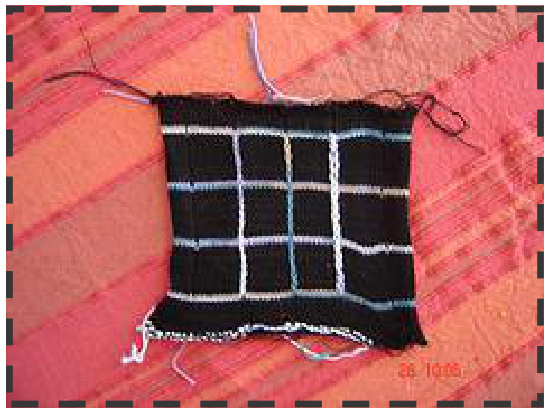
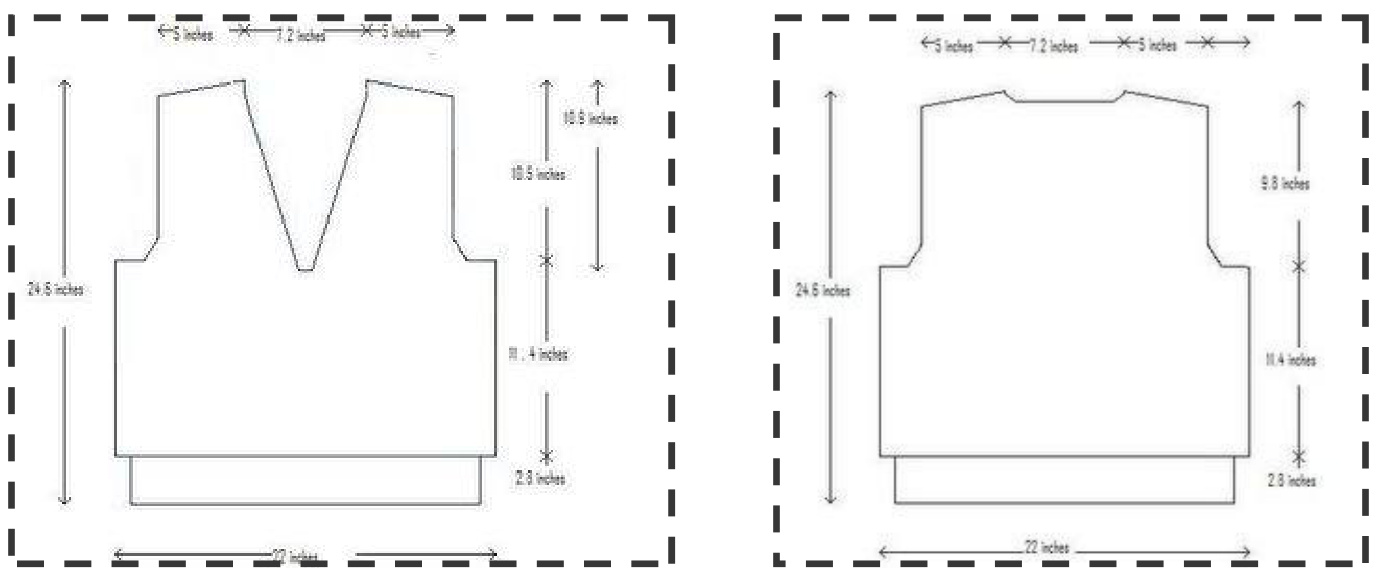
I have included diagrams, and suggest that you measure your man and draw your own diagrams and adjust the pattern to suit. Being machine knitters I know you can do that! IYarn: I used 3 ends laceweight, try 3 ply, a light 4 ply, whatever to get tension right. -I used Patons Patonyle as my contrast colour; a multicolored yarn adds a lot of extra impact without so much concentration as using different yarns. I also think Ithat agrey fluffy or slubby yarn would look good with the black. Have a play! ITension: 32.0 sts by 46.0 rows. IOver pattern: after knitting rib, transfer sts to MB and place every 15th needle in non.working position (start from $^{\prime\prime}{0}^{\prime\prime}$ and work out, one of the $\mathbf{\Phi}^{\prime\prime}\mathbf{0}^{\prime\prime}\mathbf{s}$ should be in nwp) place the . st. on the adjacent needle. Work 20 rows Main colour (MC) and then 2 rows contrast colour (CC). I Pattern $=$ stripes and ladders while knitting,then hook up the ladders after knitting to creI ate boxes. I Main Tension (MT) 5 I Ribber tension 3.5 IFinished garment measures: IChest: 43.0 [Armhole: 18.0 Front Neck Depth: 10.7 , Body Length: 24.6 BALK: 1. Using ribber and T 3.5 cast on (use broken toe cast on) 173 sts in MC in 1x1 rib. Rib 38 rows. Transfer sts to main bed, increasing 1 st(s) evenly across the row to 174 sts total. COR. 2. Change to MT 5, reset row counter to 0. Commence pattern. Work 134 rows. COR. 3. Armhole shaping. Cast off 13 sts at beginning of next 2 rows. COR. Dec 1 st at each end of every alternate row for 12 rows. Total 148 rows with 136 sts remaining. Continue straight until 244 rows total. 4. Shape neck. COR Place cente 50 sts onto WY 43 sts each side. 5. Right neck. LH needles in HP. Dec 1 st at neck edge every row 5 times, until 38 sts remain. At the same time,at row 244, start shoulder shaping. 6. Shoulder shaping. Cast off onto waste yarn 9 sts at armhole edge twice, then 10 sts at armhole edge twice. Cast off on WY. Total 252 rows. 7. Left neck. COL. Work as for right neck, reversing shapings. Designed by Justine Turner 2005 Web: www.justjussi.com Email: justine@justjussi.com Errata and techniques: www.justjussi.com FRONT: 1-2 Follow steps 1 and 2 as for back for 128 rows. COR. 3. Divide for neck. Cast off center 8 sts. 83 sts each side. Place LH needles in HP, to work right neck. 4. Shape neck. Dec 1 st at neck edge of next row, then every 4th row 13 times. then every 5th row 12 times. 5. Armhole. (At row 134). Dec for armhole at right end, as for back. Complete neckline shaping until 38 sts remain. Then work 3 row(s) even. Total 244 rows. 6. Shoulder shaping. Cast off as for back. 7. Left neck. COL. Work as for right neck, reversing shapings.
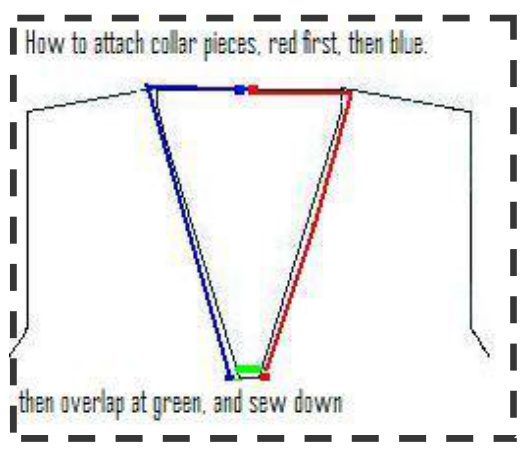
SHOULDER SEAMS: 1. Place shoulder sts from WY onto main bed, right sides together, using MC knit 1 row at MT then 1 row MAx T, cast off loosely. Complete the other side. Both shoulders finished. V FRONT NECK SINGLE BAND COLLAR: Worked in 2 pieces. 1. Cast on 120 sts on ribber using broken toe cast on, 1 x 1 rib. 2. With T3.5, rib 14 rows. Transfer sts to MB, work 1 row at MT. With wrong-side facing, pick up and hang front neck along collar sts, from centre back, to front centre. (See diagram) 3. Work the left side the same way as the right, to match. 4. Carefully handsew the collar side sts down at centre front, overlapping left and front. ARMHOLE RIBBING: 1. Cast on 170 sts with broken toe cast on, 1x1 rib. Work 8 rows, transfer to main bed, work 1 row MT. Re-hang armhole along length wrong side facing you, pick up sts evenly. 2. Work 1 row MT, 1 row MAx T, cast off loosely. 3. Work other side to match. 1. Complete pattern by using a wool needle or bodkin to chain stitch down the ladders left by the non-working needles, using CC (practice this on your tension swatch first!!) 2. Sew side seams using invisible seam. Sew any remaining seams. 3. Darn in all loose ends. Broken Toe cast on. My favourite $_{1\times1}$ rib cast on, great for socks as is neat and stretchy (Ils a bit like a hand knit cable cast on) Thanks to Patty-Anne Lea Set needles for 1x1 ribbing Tension 0/0 Ribber carriage bottom lever on II Carriages on L, Knit across from L to R Add comb and weights Separate ribber carriage and run it across from R to L, dropping the ribber Sts (This is the broken toe bit if it doesn't work!) Re join carriage Knit across from R to L On KM push in L part button, on ribber; push down R part button (see ribber manual) Knit 3 rows Change to correct rib tension Undo part buttons Knit rib After you have finished garment, gently pull on the loop at one end of the caston edge (one end has a loop, the other has the yarn end) the yarn end should come thru the cast on edge, and leave you with a beautifully tidy and stretchy edge.