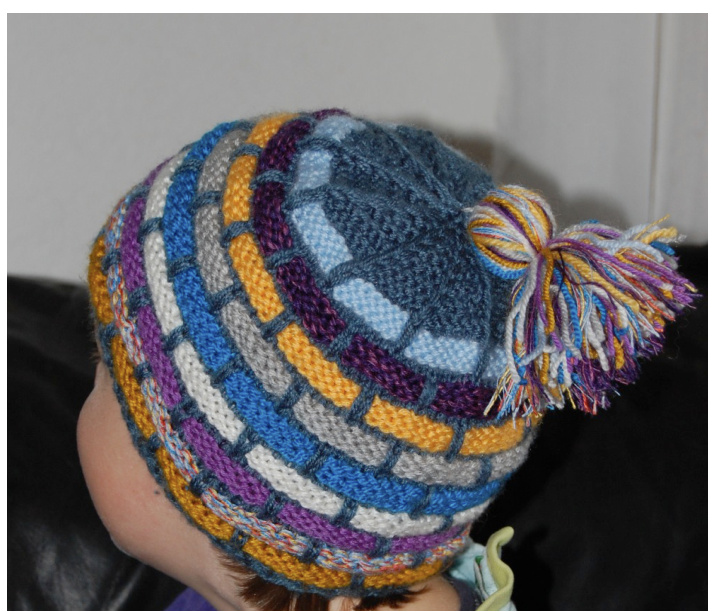
Brick Hat
by Corinne's Knits
Descziption
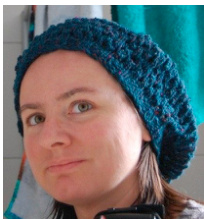
This hat is perfect for beginners. It looks quite advanced, but only one colour is ever worked on a given round, making it really easy to knit. The different variations make it versatile. Several variations are possible, all the < brick layers > can be worked in the same colour, each one can be a different colour or several colours can be repeated, whatever takes your fancy! The crown can be left as is, finished with an i-cord loop, a pompom or - my favourite - a tassel. All these variations will give the hat different looks.
Ditticulty
Easy
Yazn
Colour A: 56[60,75,83,95) m / 62[66,82,90,104) yards Colour B: 75(80,100,110,122) m / 82(88,110,121,134) yards of worsted weight yarn
Tlotions
Needles
4mm (US 6) circular needle or size 4mm (US 6) DPNs or size needles needed to obtain gauge Accessories Darning needle
lecessazy Skills
Knitting in the round, st markers, sl sts
Tauge
21 sts and 30 rows = 10cm / 4" in reversed st st
SiEs
Size 1: Premie - Circ 26-36 cm (10-14") Size 2: Baby/Toddler - Circ 36-46 cm (14-18") Size 3: Child (S) up to age 4/5 approx. - Circ 46-54 cm (18-211%4") Size 4: Child (L)/Woman (S) - Circ 50-57 cm (20-221/2") Size 5: Woman (L)/Man - Circ 53-61 cm (21- 24”)
About the Designez
Corinne is the mum of two boys who takes great inspiration in them for her designs. She loves to design fun, modern looking patterns. Her patterns can be found on Ravelry on the Corinne's Knits designer page or on her blog: corinnesknits.wordpress.com. For pattern support, email: corinnesknits@googlemail.com.
Ilotes
To make the directions simpler, I will assume only 2 colours are used to knit the hat, where A is the 《 mortar 》 colour and B the 《 bricks 》 colour.
Stitch Pattezn
The colour pattern using slipped stitches is described in the directions. Make sure you always use the same colour for the 《 mortar > or colour A, as it will give it unity. As for the 《 bricks > or colour B, you can use only one or several, a perfect way to use leftovers.
Directions
With circular needle or DPNs, cast on 72 (80, 88, 96, 104) sts with colour A. Being careful not to twist, join in the rd with circular needle or distribute sts evenly on DPNs. pm to mark beginning of rd.
All sizes:
Work two rds of 1x1 ribbing (\*K1, P1\*) K 1 rd. Sizes 1, 3 & 5: Change to colour B. \*K7, sl st pw wyib\* repeat until end of rd \*P7, sl st pw wyib\* repeat until end of rd Repeat last rd (P rd) 2 more times Change to colour A. K 2 rds. Change to colour B. K3, sl st pw wyib, \*K7, sl st pw wyib\* repeat to last 4 sts, K4 P3, sl st pw wyib, \*P7, sl st pw wyib\* repeat to last 4 sts, P4 Repeat last rd (P rd) 2 more times Change to colour A. K 2 rds. You have just made 2 《 brick layers > Repeat these 2 layers another 2 (3, 4) times, finishing with the 2 K rds in colour A. You now have 6 (8, 10) 《brick layers 》 Change to colour B. \*K7, sl st pw wyib\* repeat until end of rd \*P7, sl st pw wyib\* repeat until end of rd Repeat last rd (P rd) 2 more times Change to colour A. K 1 rd. On the next rd, pm as follows: \*K8, pm\* repeat until end of rd Sizes 2 & 4: Change to colour B. K3, sl st pw wyib, \*K7, sl st pw wyib\* repeat to last 4 sts, K4 P3, sl st pw wyib, \*P7, sl st pw wyib\* repeat to last 4 sts, P4 Repeat last rd (P rd) 2 more times Change to colour A. K 2 rds. Change to colour B. \*K7, sl st pw wyib\* repeat until end of rd \*P7, sl st pw wyib\* repeat until end of rd Repeat last rd (P rd) 2 more times Change to colour A. K 2 rds. You have just made 2 < brick layers > Repeat these 2 layers another 3 (4) times, finishing with the 2 K rds in colour A. On the second K rd, pm as follows: \*K8, pm\* repeat until end of rd. You now have 8 (10) < brick layers >
Czown
\*P to 1 st before marker, sl st pw wyib\* repeat until end of rd \*K to 2 sts before marker, K2tog\* repeat until end of rd Repeat these 2 rds until you have 18(20,22,24,26) sts left \*P to 1 st before marker, sl st pw wyib\* repeat until end of rd \*K2tog\* repeat until end of rd. You should now have 9(10,11,12,13) sts left. Sizes 3, 4 & 5 only: Repeat last rd. You now have 6,(6,7) sts (If you want to finish the hat with an i-cord, check alternative finishing below before breaking the yarn) Break yarn. With darning needle, weave the yarn through the remaining sts. Pull tight and secure on the inside of the hat. Weave in loose ends and block.
Finishing
There are several ways to finish this hat. The simplest way is to leave it as is. You can also make a little i-cord loop, it's a good option, especially for small babies who will be lying down most of the time, as a tassel of pompom would be in the way.
i-cord loop
When you have the last 9(10,6,6,7) sts, make an extra 2(2,1,1,1) rd/s, by K2 tog across the rd, you now have 3(3,3,3,4) sts. K an i-cord of 15 rows (or desired length): Place your 3(3,3,3,4) sts on a DPN with the last st knitted (where the working thread is) on the left of the needle. K all 3(3,3,3,4) sts. Don't turn the needle but slide the sts to the other side of the needle. The working thread should now be on the st furthest to the left of the needle again. Repeat until you have knitted 15 rows (or desired length). Break yarn. Weave yarn through darning needle and attach the end of the i-cord in the centre of the hat. Secure and weave yarn in.
Tassel or pompom
Finishing your hat with a tassel or a pompom will give it a different touch. If you don't know how to make a tassel, check this link out: http://www.nezumiworld.com/crochet_057.htm For a pompom, check : http://www.kid-craft-central.com/pom-poms.html
| FV OT4DTN3Z 99H | ||
| Circ- Circumference | Kfbf - Knit in the front, back & | Sl - Slip |
| unstretched | front of the stitch (inc 2 sts) | Sl M - Slip marker/s |
| Dec - Decrease | M - Marker/s | SSK - Slip, Slip, Knit |
| DPN(s) Double pointed | M1 - Make 1 | st(s) - Stitch(es) |
| needle(s) | P - Purl | st st - Stocking Stitch |
| Inc - Increase | P2tog-Purl two stitches | (Stockinette) |
| K - Knit | together | tbl - through back loop of st |
| K2tog - Knit two stitches | PM - Place marker | WS - Wrong side |
| together | pw - purl wise | wiyb - with yarn in back |
| Kfb - Knit in the front and back of the stitch (inc. 1 st) | PU - Pick up | wiyf - with yarn in front |
| Rd - Round | ||
| RS - Right side | YO - Yarn over | |


