Mosaic Sampler Scarf
Designed by Reena Meijer Drees www.knitbettersocks.blogspot.com blocked dimensions 8"x58" Equipment: 3.5mm-4.5mm 40" circular needle or 2 shorter circulars, size depends on personal gauge. Scarf body done flat; edging picked up and knit on one or two circs. 4 stitch markers. Ingredients: a total of 200g DK yarn (^100-120m/50g) = 50g colour CC1, 50g colour CC2, 100g MC. Alpaca is nice for this project because it has a very nice drape and is very soft against the neck. Example shown in KnitPicks Andean Treasure 100% baby alpaca; MC = midnight heather, CC1 = embers heather, CC2 = fog heather Gauge: 30 sts = 6 inches; not critical but scarf will be wider if executed in heavier weight yarn. Note that I knit loosely; a 3.5mm needle - which is what I used - might be too small for some. Upsize your needles to give a slightly drapier fabric than for, say, a hat or sweater. Basic Idea: each mosaic pattern is done as a 6" square, with 6 rows of garter separating the units. At no time do you use more than a single colour per row. After the scarf body is knit, stitches all around the edge are picked up and a mitred garter edge is knit on. This involves using one or two long circular needles and is rather a pain; however, only 6 rows of knitting are done. Edge finish: Every first stitch is slipped purlwise, with yarn held in front of the work. Every last stitch is knit. This produces a "chain selvedge" which is nice for picking up stitches, later. The edge stitches are not included in the charts or instructions for the squares. When changing colours at the beginning of a row, slip the first stitch PW WYiF (in the old colour) and start the new colour with the first pattern stitch. Colours can be carried up the sides for a few rows, but longer "floats" are unsightly and should be cut, and darned in later. Cast on: cast on 32 stitches. This includes 2 edge stitches and 30 stitches for the body of the scarf.
Square #1 "Peas and Carrots":
Setup: K1R in CC1. Pattern starts on purl (WS) row; see the chart in Figure 1. (Remember the edge stitches! Slip Pw wYiF your edge stitch first, then start on the chart. When done the pattern row, you'll have one edge stitch remaining; knit it. ) Repeat the section in the "repeat" box until you don't have enough stitches left to do another full repeat, then do the stitch(es) remaining in the chart. Do 5 repeats of the whole chart. The scarf is now about 6" long. Purl 1 R in CC1 and break yarn. Transfer all stitches back to the other needle by slipping them PW. The (broken) working yarn should be at the "wrong end" of your needle. With the RS of the scarf facing you, attach MC and knit 6 rows, don't forget your edge stitches! This produces 3 garter "ridges".
Figure 1: peas and carrots
Square #2 "Bean Sprouts":
Start on row one of chart #2 and do 2 complete repeats. Remember the edge stitches, which are not included in the chart below. Then knit rows 1-9 again or until block is approx. 6" long.
Figure 2: Bean Sprouts K6R in MC to make 3 garter ridges.
Square #3 "Tiny Brocade":
Setup: K 1R in CC1. Start chart below (starts on a purl row).Remember your edge stitches, which are not included in the chart.
Figure 3: Tiny Brocade epeat for approximately 6", ending with R8. End with an additional purl row in CC1 Then K6R in MC to make 3 garter ridges.
Square #4 "Switching Yard":
Follow the chart. I'm not going to remind you about those edge stitches again, OK? Once the two prep rows are done, repeat rows 1-4 until the square reaches approximately 6" in length.
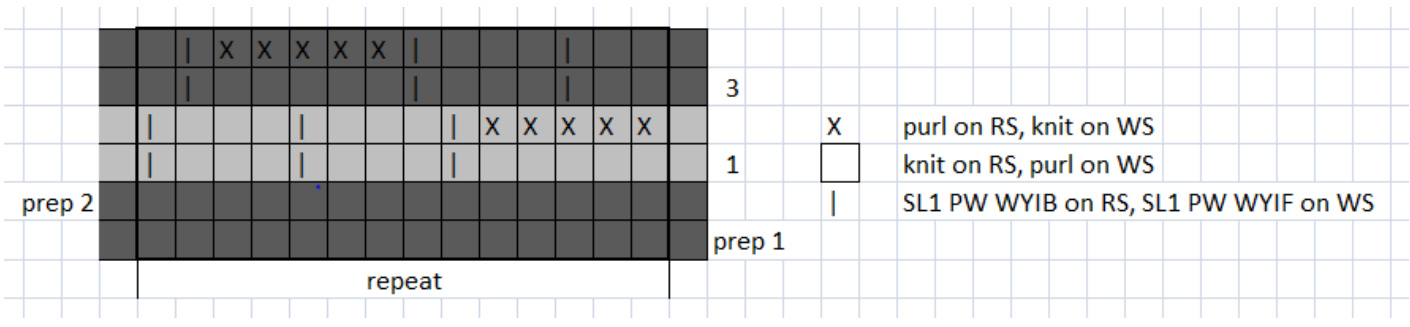
Figure 4: Switching Yard chart Finish with R2, then switch to MC and K6R to make 3 garter ridges.
Square #5 "Little Bricks" variation:
Start right away with row 1 of the chart.
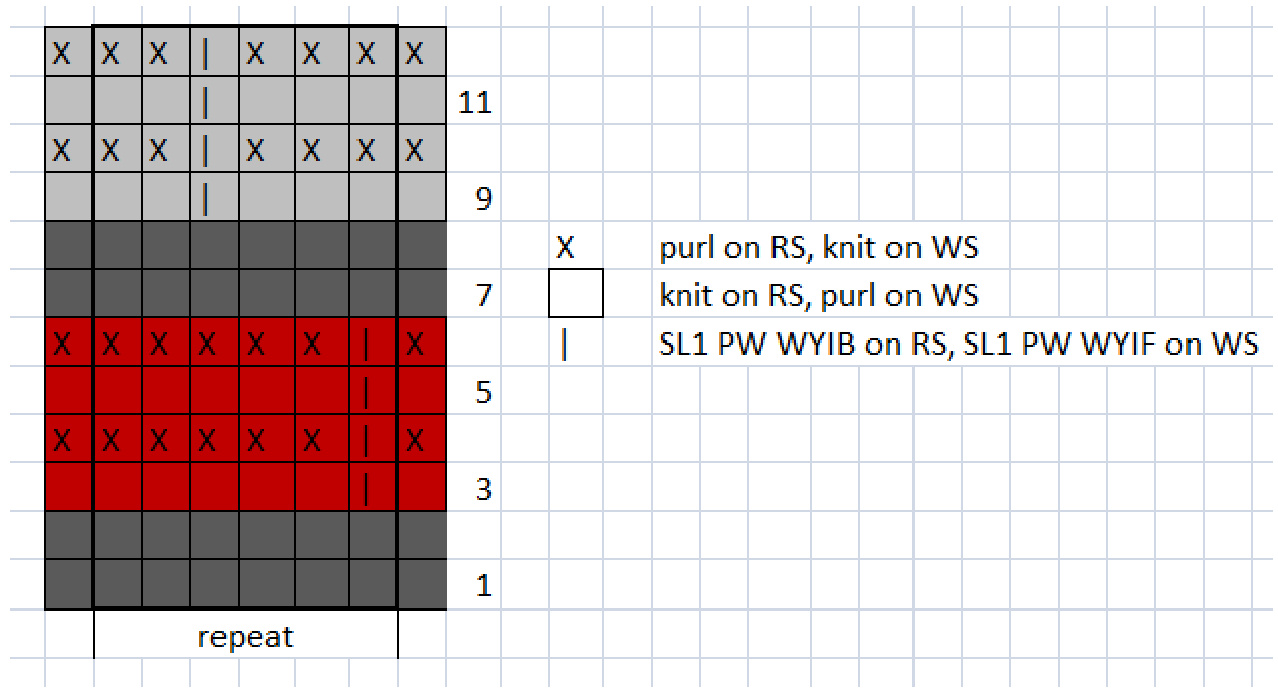
Figure 5: Little Bricks (variation) t 3 times, and then knit the first 8 rows again. Square will be approximately 6" long. Then K6R in MC to make 3 garter ridges.
Square #6 "Eye-of-Patridge" variation:
K1R in CC2, P1R in CC2. Start chart and knit for 6". End with R4. K6R in MC to make 3 garter ridges.

Figure 6: Eye-of-Partridge variation
Square #7 "Kansas":
Switch to CC2 and start on the prep rows of the chart.
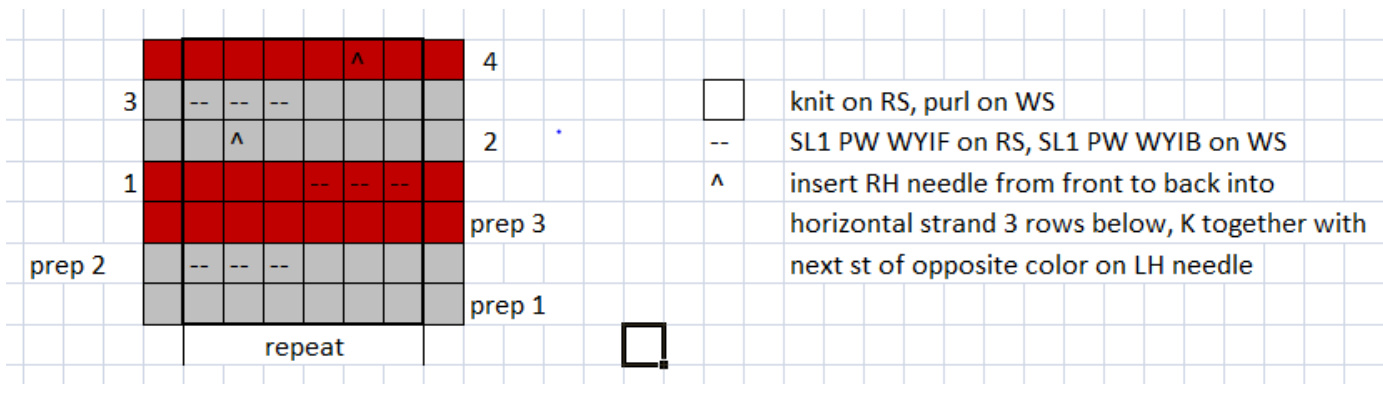
Figure 7: Kansas End with R4, when square is approximately 6" long. Purl back in CC1. K6R in MC to make 3 garter ridges.
Round 8: 3 CH, \*(3 DC, 2 CH, 3 DC) 2 CH from the precious round, 2 DC in first DC
Repeat rows 1-24 of the chart twice, the rows 1 and 2 again in MC. K6R in MC to make 3 garter ridges.
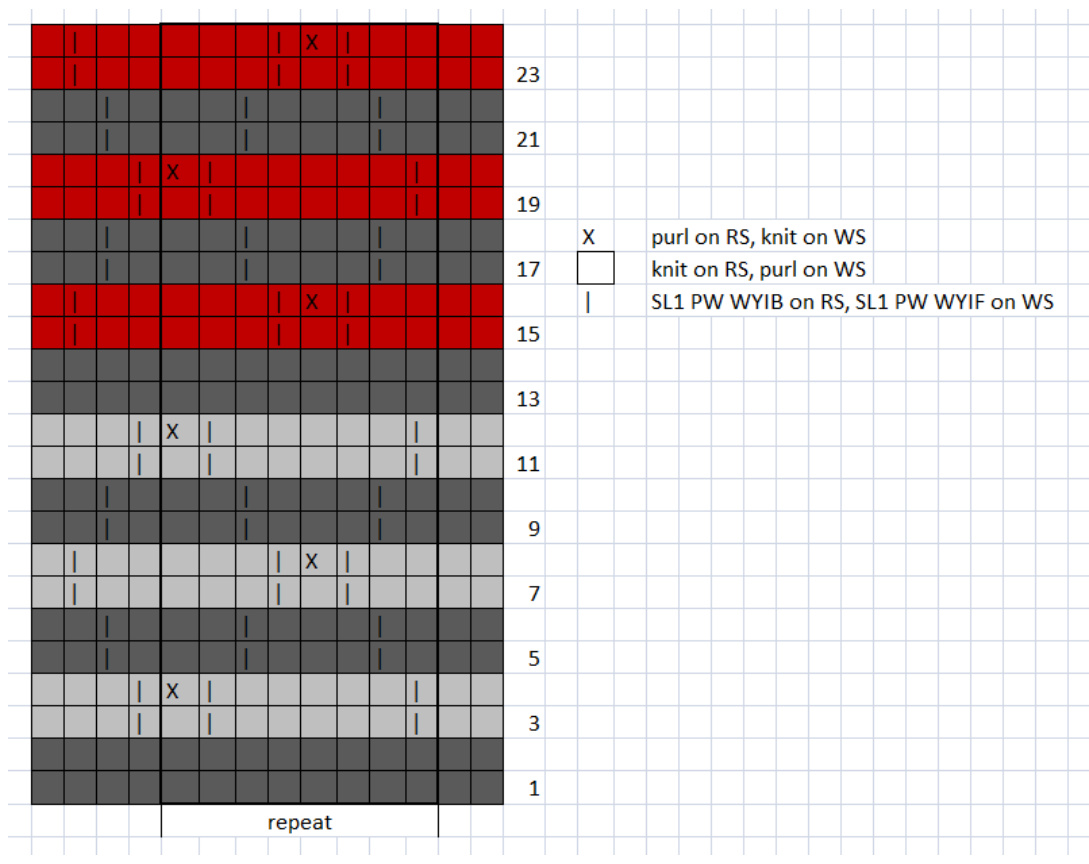
Figure 8: Dotted Links
Square #9 "tri-colour fleur-de-lys":
K1R, P1R in CC1. Start Row 1 of chart. Knit chart until square is approximately 6" high. End with row 10. K1R, P1R in CC1.
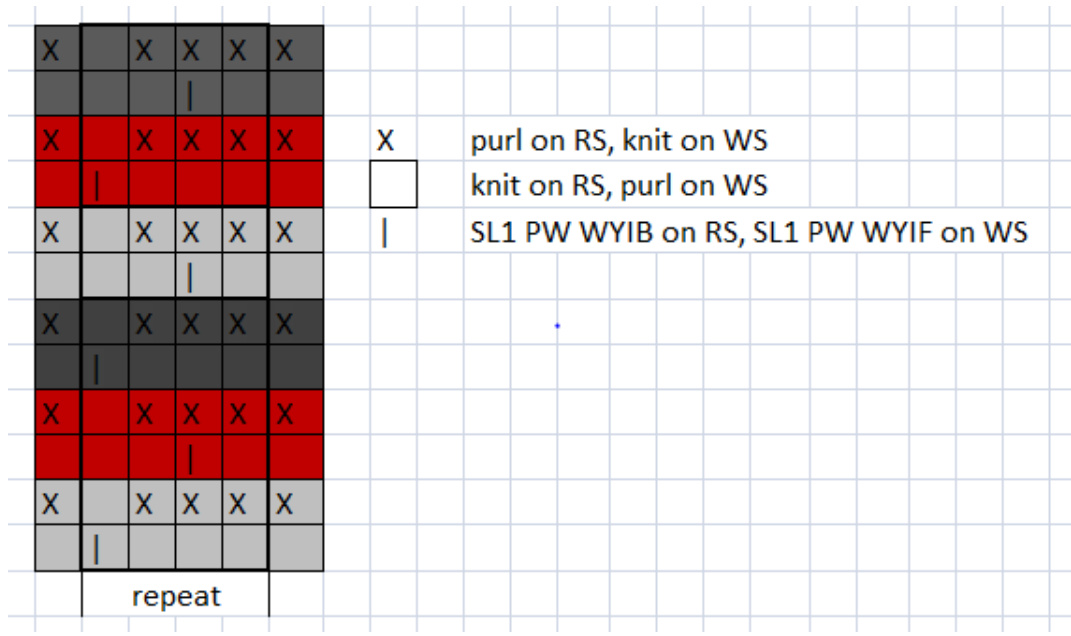
Figure 9: Tri-colour Fleur-de-Lys You are done with the scarf body.
Scarf Border
Change to Mc. Using a circular needle, knit across end of scarf. Put a marker on your RH needle, and pick up and knit one stitch exactly in the upper left corner of the scarf. Turn the corner and pick up and knit one stitch in each "link" of the selvedge chain along the left side of the scarf. This gives 1 stitch to pick up for every 2 rows of knitting. When you reach the bottom edge, place an other marker, and pick up and knit a stitch "in the corner". If you are using 2 circulars (because your single one isn't long enough), now is the time to start with the 2nd one. Continue around the corner to pick up and knit stitches along the bottom edge. At the next corner, first place a 3'd marker, and then pick up and knit a stitch "in the corner", and continue up the selvedge, knitting a stitch into each link of the selvedge chain. This edge will be trickier because of the colour changes, but try to pick up one stitch for every two rows of knitting. On the last corner, place a 4th marker before picking up and knitting a stitch in the corner one last time. R1, R3, R5: [P to marker, slip marker, K1] repeatedly. R2, R4: [K to marker, M1, slip marker, K1, M1] repeatedly. R6: bind off very loosely, using a Russian Bind-off: 1. Knit two stitches 2. Transfer both stitches back to the left needle 3. K2tog 4. Knit next stitch 5. Slip both stitches to left needle and knit them together
Abbreviations:
PW purlwise (refers to how to push the RH needle into the stitch; from back to front, as if to purl) KW knitwise (refers to how to push the RH needle into the stitch; from front to back, as if to knit) WYIF with yarn in front (move working yarn to the side facing you prior to executing stitch) WYIB with yarn in back (move working yarn to the back of the work prior to executing stitch) SLx slip x stitches (do not knit them) from the LH needle to the RH needle K1Rknit one row P1Rpurl one row MC main colour (black in example) CC1 contrast colour #1 (red in example) CC2 contrast colour #2 (grey in example) RS right side of finished scarf (may be different from “front of the work") Ws wrong side of finished scarf (may be different from “back of the work") [] instructions in brackets are repeated until you run out of stitches in the row


