The Tanner Hat
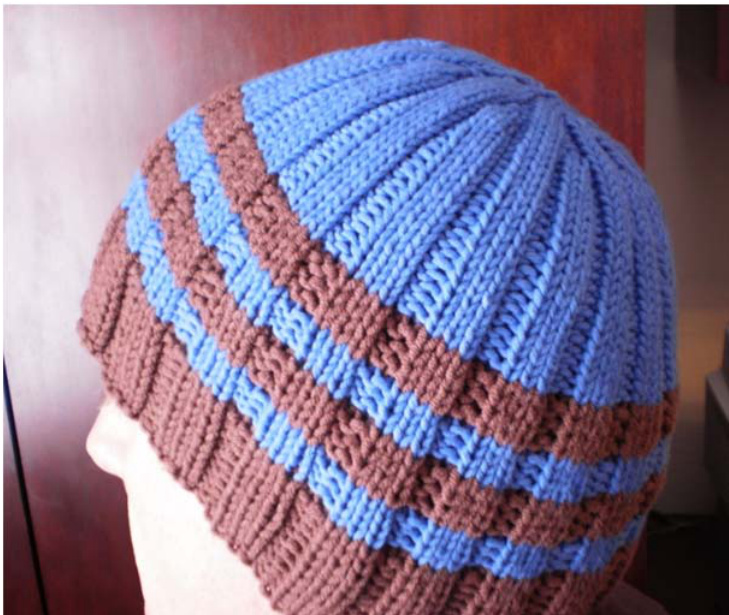
@ 2011 Gina Johnson This pattern gives you instructions on how to avoid the jag in joining in the round, making nice looking, jogless stripes in ribbing and has a really nice decrease pattern that doesn't look messy. The name is for Tanner, a 14 year old who had a rare form of lymphoma. (He's now cancer free and walks with a cane.) He needed hats, and so I made him one, but wasn't happy with the decreases. Too many purl stitches made the top look messy. So I messed around with how I wanted the hat to look until I got a hat that looks great. Feel free to get creative with striping! (See how nice those stripes are?) I'm not charging for this pattern, but Tanner's family has some severe financial needs. If you like this pattern (or just want to make a donation) you can make out your tax-deductible check to PUMC. On the memo line write HeartStrings. Mail it to: Parkway UMC Attn: Shaan Tippet 5801 New Territory Blvd. Sugar Land, TX 77479-5754
Supplies:
62 g or 2 % oz SOFT Aran weight yarn. For this hat, I used (CC) Baby Bee Hushabye Solid (chocolate) (>1/4 skein) and (MC) Nashua Handknits Cilantro (delft blue) >1 ball. These two yarns are about as identical as can be! Size 8 Circular needles with flexible cable for magic loop or DPNs or 2nd set of size 8 circs. (Note: I've also made this with thicker yarn and used size 9 needles, casting on 90 stitches and beginning the decreases on row 2 of the instructions.)
Directions:
With US size 8 needles CO 100 stitches with CC. Without twisting stitches, join in the round AND put the firs CO stitch on the left needle and the last CO stitch on the right needle. (This prevents a jog in the bottom of the hat.) Tighten up the last CO stitch and begin! (Trust me! This really works!) Row 1 (and every row except where indicated): \*K3, P2; repeat from \* until end of round. After 9 rows of CC (or whenever you want a stripe), join to knit the MC color and KNiT the whole row (no purls). DO NOT CUT THE FIRST YARN! You will not cut this until the LAST stripe of that color is finished. Just carry it up until you need it again. Next row: SLlP the first stitch of the new color (to avoid a jog in the stripe) and continue with the ribbed pattern, being sure to follow the stitch pattern from the first color. Continue with a total of four rows in Mc, knitting the first (previously slipped) stitch as per the ribbed patterr After 4 rows of CC (or whenever you want to switch colors), join to knit the MC color and KNiT the whole row (no purls). Next row: SLIP the first stitch of the new color (to avoid a jog in the stripe) and continue with the ribbed pattern, being sure to follow the stitch pattern from the first color. (NOTE: You can move the join over to the left one stitch so your rows don't look uneven if you like. I did!) After 4 rows of MC (or whenever you want to change colors), join to knit the MC color and KNIT the whole row (no purls). Next row: SLiP the first stitch of the new color (to avoid a jog in the stripe) and continue with the ribbed pattern, being sure to follow the stitches from the first color. . (You can move the join over to the left one stitch so your rows don't look uneven.) Continue in ribbed pattern until you have about 6 %" total (longer or shorter depending on the size of the hat youwant. Decreases: (I find it helpful to place a stitch marker between pattern repeats.) You're going to slowly eliminate every other rib. Easy peasy. Here's how: row 1: \*K3, P2, K2tog, K1, P2; repeat from \* until end of row (90 sts remain) Row 2: \*K3, P2, K2tog, P2; repeat from \* until end of row (80 sts remain) Row 3: \*K3, P2, P2tog, P1; repeat from \* until end of row (70 sts remain) Row 4: \*K3, P2, P2tog; repeat from \* until end of row (60 sts remain) Row 5: \*K3, P1, P2tog; repeat from \* until end of row (50 sts remain) Row 6: \*K3, P2tog; repeat from \* until end of row (40 sts remain) Row 7: \*K2tog, K1, P1; repeat from \* until end of row (30 sts remain) Row 8: \* K2tog, P1; repeat from \* until end of row (20 sts remain) Row 9: \*K2tog; repeat from \* until end of row (10 sts remain) Row 10: \*K2tog; repeat from \* until end of row (5 sts remain) leaving an 8" tail and weave through remaining 5 stitches to close hole at tol Weave in the ends. Give the hat to someone whose head and heart need warming! (it's okay if that person is YOU!) NOTE: While I've learned many of the techniques in this pattern from various friends, websites and patterns, tutorials for most of the techniques are available at the TECHknitter's website: http://techknitter.blogspot.com/2010/04/revised-unified-index-for.html


