Super Sized Super Saver? Christmas 口D EASY
Introduction
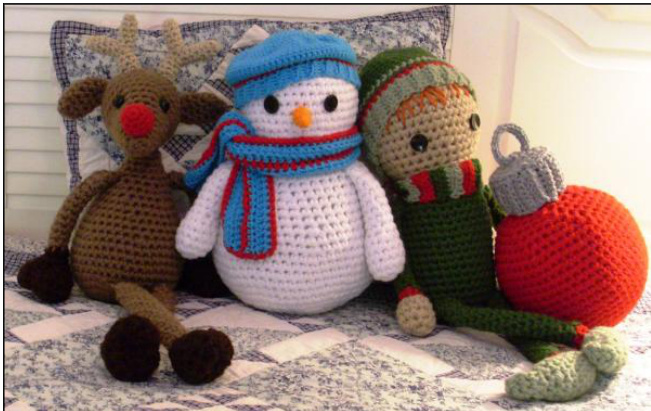
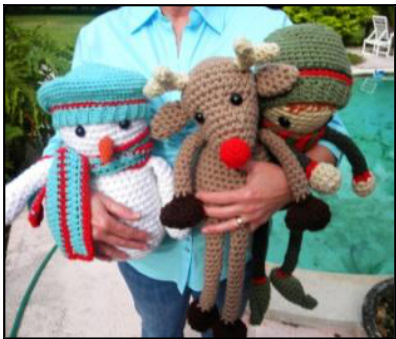
Thank you for purchasing my design booklet. Each SuperSizedpatterninthisbooklethasbeen designed to be completed in just a couple of evenings using worsted weight Red Heart Super Saver? yarn & a super-sized L/8.00 mm crochet hook. Most of the designs entail holding triple strands of yarn for maximum thickness with some accessories being worked with single or double strands.Please note that Red Heart Super Saver? is a very thick worsted weight yarn. If you plan to substitute the yarn brand the thickness will vary greatly and you may need toeitherusea smallerhook,(which will reduce the finished size of the project) or add an additionalstrand. The projects are so fast and affordable, using Super Saver? yarn, that you can make last minute gifts for ALL of your friends and family and the extra large, huggable size is sure to be an eye-catching favorite decoration or toy.
Acknowledgements
This booklet would not have been possible had it not been for the wonderful members of the Testing Pool on Ravelry. Many, many thanks to the following SUPER testers & tech editors (Ravelry user names listed); asdlane, craftylzrd , donnaknitsdolls, firecrystal, , haizle , jnelson8705 (Jessica), msegars (Michelle Segars) ,n8kpl (Glenda Andre'), pandastamper, Rebp, tinfu , tmb99 (Theresa Burg), whenpigsknit, wilmaelee and wizzknits, (Johnny Wizorek) for their patience & expertise in testing these patterns. I could not have managed without them.
Pattern Notes
Please read the patterns all the way through before beginning projects. @Nancy Anderson, yarnjulepsontheveranda.com, AUG 2013 Some yarn amounts are approximations. Make certain to purchase enough yarn to complete your projects as yarn usage can vary among stitchers. Yarn leftovers can be used as stuffing where stuffing camouflage is needed, (see Stuffing Tips below for more information). The projects in this booklet have all been designed using sewn-on buttons for eyes, which are attached after all crocheting is completed. If you choose to use post & washer eyes,(safety eyes), make certain to place them before progressing too far in the pattern. Warning: Please do not ever use buttons or safety eyes for theseprojectsif they are tobe given to a baby as these could work loose & become a choking hazard.Use embroidered eyes only for babies.
Gauge and Stuffing Tips
The larger the hook used in a stuffed toy project, the larger the holes will be in the crocheted fabric, which may allow stuffing to show through. In order to prevent this from ruining your Super Sized project simple stuffing techniques are used to camouflage these otherwise stuffing “peep-holes". First of all, make certain to crochet the projects using a tight gauge. Even with a tight tension there will still be some holes in work with this large gauge. An alternative to using matching dyed wool roving or expensive dyed poly-filler is to hide the stuffing using inexpensive, dark colored knee-high stockings filled with fiber stuffing, which is usually bright white in color and therefore can be very noticeable. There is no need to match thehose to the color of the yarn used. In some cases using black stockings will be sufficient to tone down the white stuffing, as wasthe caseforthebodyof theSuperSized Elfin this booklet. It is advisable to use the stocking doubled since the stocking gets considerably lighter as it is filled with the stuffing. In order to use the stuffing filled stocking, place the doubled stocking inside the portion of the project to be filled. Place fiber filler into stocking until the desired amount of firmness is achieved. Continue stuffing as rounds are completed and tie the stocking off when the desired stuffing is complete. For smaller parts, such as the red reindeer nose or the elf hands, use strands of matching yarn for stuffing. Stuffing with yarn tends to make the item somewhatlesssoftand squishybutcanbeused for larger parts as desired. Sometimes a combination of the fiber filler and yarn strands will work for camouflaging the stuffing while maintaining squishiness. Specific stuffing instructions are outlined within each pattern throughout this booklet.
Dividing Yarn
When possible the easiest way towork these patterns is to draw yarn from 3 different skeins. Where that is not possible, wind off 3 yarn balls consisting of 1/3 of a skein each. A scale may assist in the dividing up of skein into equal portions.
Abbreviations & stitching notes
Beg = begin/beginning Bk Ips = back loops Ch(s) = chain(s) Dec = decrease Hdc = half double crochet Inc = increase Lp(s) = loop(s) Rnd(s) = round(s) Sc = single crochet Sl st = slip stitch St(s) = stitch(es) Tog =together Crochet Rib (work in back loops only): insert hook into the front loop of the crochet st & make st as usual. Complete row & turn.Continue to work in back loops only for number of rows pattern directs. Work in back bumps: working on the back side of the starting chain, notice the bump (loop) in the back. Insert hook through this bump only & make st as usual.
Getting Started
Each pattern begins with a certain number of sc stitches made in a magic loop (or adjustable ring). This can be substituted throughout with “chain 2, work X number of stitches in 2nd chain from hook", making certain to work over yarn tail, so it can be used to close the hole at the beginning of the stitching. I hope you will enjoy crocheting these projects as much as I enjoyed designing them and I look forward to seeing your finished versions. Please feel free to contactmewithquestionsorcommentsat nanderson360@gmail.com&visitme at yarnjulepsontheveranda.com. Finally, this is your pattern, you purchased it. 1 cannotpreventyou fromsellingindividualfinished projects, in fact I encourage it and I hope you make a @Nancy Anderson, yarnjulepsontheveranda.com, AUG 2013 lot of money@. BUT, this is a copyrighted pattern so do not make unauthorized copies or sell my patterns without my express permission.
ELF

Measurement: 24 " tall, top of head to foot, 15" tall seated. RED HEART@ Super Saver ? 7 ozs, 198 g, 364 yds/333 meters - 2 skeins Medium Thyme MC, 1 skein Buff A, 1 skein Frosty Green B , Cherry Red C, tiny amount Carrot for hair. Totalyarn used forpatternmodels:MediumThyme -7.2 ozs, Frosty Green - 3.2 ozs, small amount Cherry Red & Buff.(Please note that this pattern used only a tiny bit of Medium Thyme yarn from the 2nd skein and each crocheter is different & may use moreorless). Crochet hooks: US L/8 mm, US J-10/6 mm. Tapestry needle, stitch marker, (2)1 1/2" diameter black shank style buttons for eyes, 2 black knee high hose, 2 light brown or oatmeal color knee high hose, stuffing.
EIf NOTES
Elf is worked from top downwards using larger hook. Work in un-joined rounds with yarn held tripled unlessotherwiseindicated.Placestitchmarker at beginning of rounds & move up as rounds are completed. Stuff firmly as rounds are completed using black knee high hose, doubled & filled with stuffing for body & tan knee high hose, doubled & filled with stuffing for head. Stuff hands & shoes with matching yarn or matching yarn & fiber combination. Stuff legs & arms very lightly with plain fiber. Use smaller hook for cap & scarf.
ELF HEAD & BODY
Rnd 1: Using A held tripled & L hook, Make 6 sc in magic loop, (6 sts). Rnd 2: \*2 sc in each st around, (12 sts). Rnd 3: \*sc in st, 2 sc in next st; repeat from \* around, (18 sts). Rnd 4: \* sc in next 2 sts , 2 sc in st; repeat from \* around, (24 sts). Rnd 5: \* sc in next 3 sts , 2 sc in st; repeat from \* around, (30 sts). Rnd 6: \* sc in next 2 sts , 2 sc in st; repeat from \* around, (40 sts). Rnd 7-13: Sc in each st around. Rnd 14: \* sc in 2 sts, sc 2 tog; repeat from \* around, (30 sts). Rnd 15: Sc in ea st around. Rnd 16: \* sc in 3 sts, sc 2 tog; repeat from \* around, (24 sts). Rnd 17: Sc in each st around. Stuff with doubled tan knee high filled with fiber. Rnd 18: \* sc in 2 sts, sc 2 tog; repeat from \* around, finishing off A & adding MC at end of rnd, (18 sts). Finish stuffing tan hose & tie off. Rnd 19: Sc in each st around. Rnd 20: \*Sc in 2 sts, 2 sc in next st; repeat from \* around, (24 sts). Rnd 21: \*Sc in 3 sts, 2 sc in next st; repeat from \* around, (30 sts). Rnd 22-24: Sc in ea st around. Rnd 25: \*Sc in 4 sts, 2 sc in next st; repeat from \*around, (36 sts). Rnd 26-34: Sc in ea st around. Rnd 35: Make leg placement loops; sc in 12 sts, sc in back loops only of next 4 sts, (1"t leg placement loops made), sc in both loops for the next 4 sts, sc in back loops only of next 4 sts, (2nd leg placement made), sc in last 12 sts. Rnd 36: \*Sc in 4 sts, sc 2 tog; repeat from \* around, (30 sts). Rnd 37: \*Sc in 3 sts, sc 2 tog; repeat from \* around, (24 sts). Stuff with doubled black knee high filled with fiber. Rnd 38: \*Sc in 2 sts, sc 2 tog; repeat from \* around, (18sts). Rnd 39: \*Sc in st, sc 2 tog; repeat from \* around, (12 sts). Finish stuffing knee high & tie off. Rnd 40: \*Sc in st, sc 2 tog; repeat from \* around, (8 sts) & finish off using yarn end to close hole.
EIf ARMS (make 2)
Rnd 1: Using MC held tripled & L hook, 6 sc in magic loop. Rnd 2: Ch 1, sc in same ch & in all chs around, (6 sts). Rnd 3-14: Sc in each st around, adding C at end of last rnd & finishing off Mc. Stuff arm lightly with fiber filler. Rnd 15: Sc in each st around, finish off C at end of rnd & add A to bk loop. Rnd 16: Working in back loops only for this rnd only, 2 sc in each st around, (12 sts). Rnd 17: Sc in each st around. Rnd 18: \*sc in st, sc 2 tog; repeat from \* around, (8 sts). Stuff using matching yarn strands. Rnd 19: \* sc in 2 sts, sc 2 tog; repeat from \* 2 times & finish off, weaving & trimming yarn at end, leaving yarn ends from beginning rounds for sewing arm to body. Set aside & repeat steps for 2nd arm.
EIf LEGS (make 2)
Rnd 1: Using MC held tripled & L hook, 6 sc in magic loop. Rnd 2-18: sc in ea st around, changing to C & finishing off MC at end of last rnd. Stuff very lightly as rnds are completed. Rnd 19: Using C sc in ea st around, finishing off at end of round. Set aside & repeat steps for 2nd leg.
EIf SHOES (make 2)
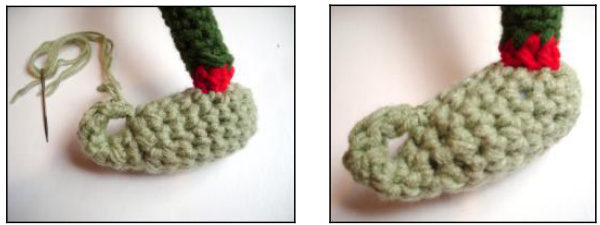
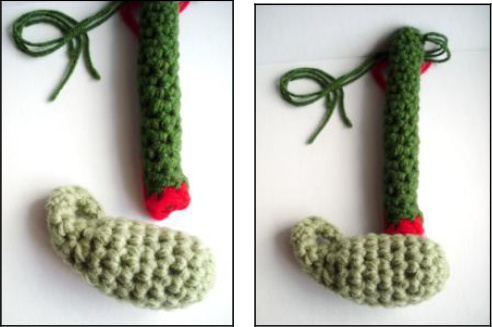
Rnd 1: Using B held tripled & L hook, 6 sc in magic loop. Rnd 2: Working in un-joined rounds, 2 sc in ea st around, (12 sts). Rnd 3-8: Sc in ea st around. Rnd 9: \*Sc in st, sc 2 tog; repeat from \* around, (8 sts). Rnd 10: \*Sc 2 tog, sc in next 2 sts; repeat from \* 2 times, (6 sts). Stuff firmly with matching yarn or combination of matching yarn & filler. Continue stuffing as rnds are completed. Rnd 11: Sc in each st around. Rnd 12: Sc 2 tog, sc in next 4 sts, (5 sts). Rnd 13: Sc in each st around. Rnd 14: Sc in 3 sts, sc 2 tog, (4 sts). Rnd 15: \*Sc 2 tog; repeat from \* 2 times, (2 sts). @Nancy Anderson, yarnjulepsontheveranda.com, AUG 2013 Next Step: Ch 3, beginning in 2nd ch from hook & working in back bumps, sl st in ea ch back bump, sl st into next st & finish off, leaving long yarn end. Thread end through tapestry needle, weave needle through sl sts just made, bringing needle out at the tip. Pull yarn back towards shoe & tack shoe tip in place to form curved toe. Anchor yarn, weaving & trimming end. Set aside & repeat all steps for 2nd shoe. See figures A-C. Figure A- weave yarnendback through tip. Insert in top of shoe about 3" from tip.
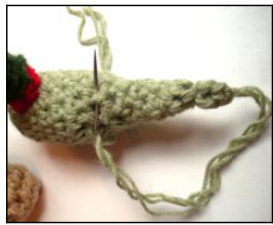
Figure B - Complete stitch, pulling toe tip towards top of shoe to form curled toe. Figure C - finish off yarn.
EIf HAT BAND
Using B held double & J hook, ch 5. Row 1: Beg in 2nd ch from hook & working in back bumps only, for this row only, sc in each ch across, ch 1 & turn, (4 sts). Row 2: working in crochet rib, (back loops only for all rows), sc in each st across, ch 1 & turn. Row 3-45: continue working in crochet rib (as in row 2). Row 46: Ch 1, holding ends of the hatband tog, join the hatband using sl st through the bk loop of the top layer & front loop of the bottom layer, do not finish off but proceed to hat crown instructions.
EIf HAT CROWN
Rnd 1: Ch 1, sc in rows ends around for 46 sts, evenly spaced & join to 1"t st with sl st, adding C at end of rnd, do not finish off B, (46 sts). Rnd 2: Using C, ch 1, sc in ea st around, join with sl st & finish off. Rnd 3: Add Mc, ch 1, sc in ea st around, join with sl st adding B, do finish off MC. Rnd 4: Using B, ch 1, sc in ea st around, changing to MC, finishing off B. Rnd 5-9: Begin working in un-joined rnds, using MC sc in each st around. Rnd 10: \*Sc 2 tog, sc in next 21 sts; repeat from \* 2 times, (44 sts). Rnd 11: \*Sc 2 tog, sc in next 20 sts; repeat from \* 2 times, (42 sts). Rnd 12: \*Sc in 5 sts, sc 2 tog; repeat from \* around, (36 sts). Rnd 13: \*Sc in 4 sts, sc 2 tog; repeat from \* around, (30 sts). Rnd 14: \*Sc in 3 sts, sc 2 tog; repeat from \* around, (24 sts). Rnd 15: \*Sc in 2 sts, sc 2 tog; repeat from \* around, (18 sts). Rnd 16: \*Sc in 1 st, sc 2 tog; repeat from \* around, (12 sts). Rnd 17: \*sc 2 tog; repeat from \* around and finish off, weaving & trimming yarn ends to close hole at top of hat.
EIf COLLAR
Work in 3 color, two row crochet rib stripes, carrying non-working colors loosely along back of work. Using J hook & MC held doubled, ch 7. Row 1: Beginning in 2"d ch from hook & working in back bumps only, for this row only, sc in each ch across, (6 sts). Row 2: Ch 1, sc in back loops only, (crochet rib stitch), now & throughout, changing to C at end of row, do not finish off Mc, (6 sts). Row 3-4: Ch 1, sc in back loops of each st across, adding B to last st, do not finish off C. Row 5-6: Ch 1, sc in back loops of each st across, changing to Mc at end of row. Row 7-30: Repeat 2 row color pattern, working in back loops only & carrying non-working colors along back of work. Row 31: Change to MC sc across & finish off. Weave & trim yarn ends except the ends from Row 30, which will be used to sew color onto neck. Set aside.
EIf FINISHING
Sew shoes to end of legs using yarn ends as shown in photos below, weaving & trimming ends.
Attach legs to remaining loops from rnd 35 of the body instructions as per the following photo.
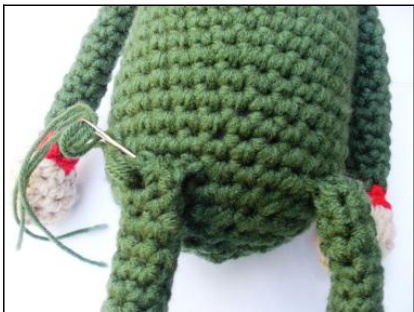
Sew arms to upper sides at rnd 23 of the body instructions, making certain that they are equally situated in conjunction with the placement of the legs.
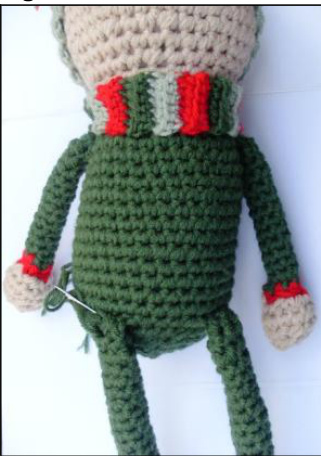
Arm & leg placement. Wrap collar around neck with the seaming edges at the back of the neck. Using yarn end & tapestry needle seam the two ends together and tack the collar in place to prevent shifting. Weave & trim ends.
Embroider hair strands referring to the following photos.
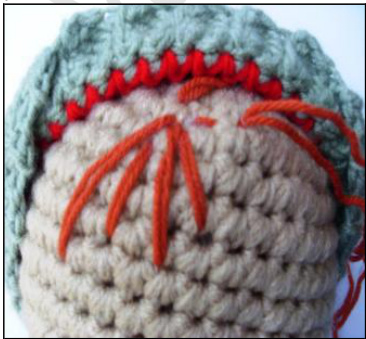
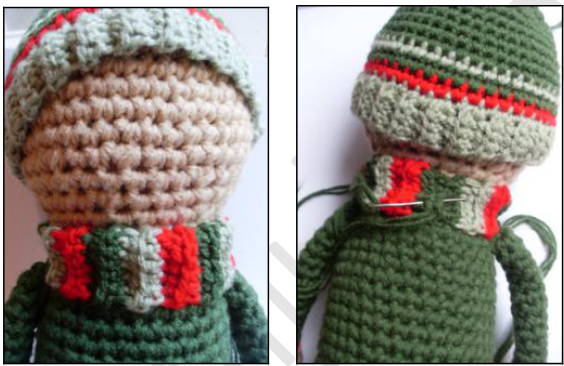
Position hat on head,fold ribbed band back& attachdoubled strandedyarnnear foldedbackhandband,as pictured. Begin making long stitches,randomly placed along would-be hair-line.
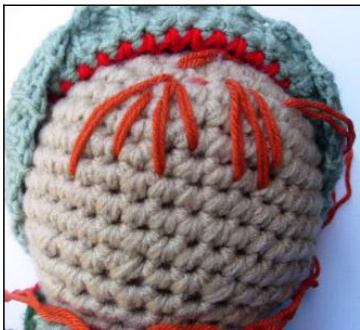
Continue making stitches across forehead.
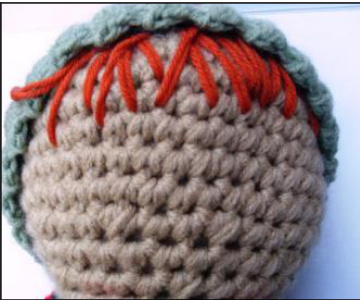
Fold ribbedhatband back down over forehead to check progress. When satisfied with results, finish off hair yarn & tackthehatontothe head using matching hat color. Using yarn end or heavy thread, attach buttons for eyes set about 5-6 sts apart & located approximately 5 rows upwards from the last row of green (at the neck).
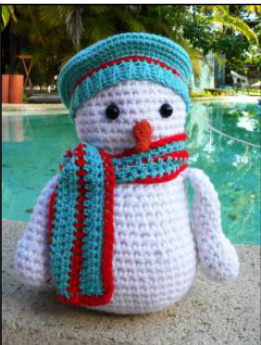
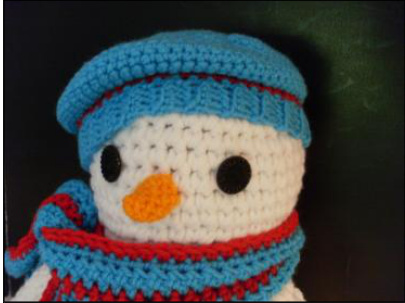
SNOWMAN
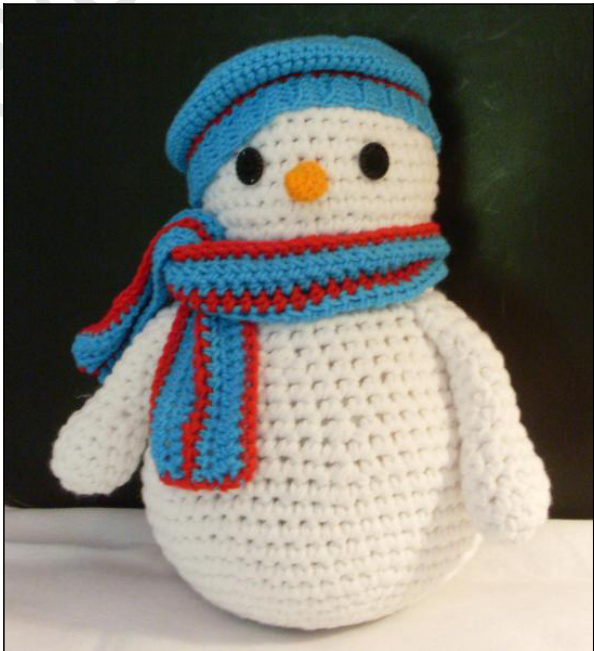
Measurement: 12 %"tall. RED HEART? Super Saver ? 7 ozs, 198 g, 364 yds/333meters - 2 skeins White (MC), 1 skein Aruba Sea (A), Cherry Red (B), small amount Carrot (C). (Please note that Turqua was substituted for Aruba Sea in some of the photos). Total yarn used for pattern model: White - 11 ozs, less than % skein of Aruba Sea & Cherry Red, tiny remnantamountofCarrot. Crochet hooks: US L/8.0 mm, US H-8/5 mm. Tapestry needle, stitch marker, (2)1 1/2" diameter black shank style buttons for eyes, stuffing fiber of choice.
Snowman NOTES
Work in un-joined rounds with yarn held tripled unlessotherwiseindicated.Placestitchmarkerat beginning of rounds & move up as rounds are completed. Use smaller hook for beret & scarf. Snowman is worked for bottom upwards. Arms are completed 1" and are attached as body rounds are worked, as specified in the instructions. Stuff firmly as rounds are completed. There is no need to use the knee high hose stuffing insert due to the similar colors between the snowman & the stuffing.
Snowman ARMS (make 2)
Rnd 1: Using MC held tripled & L hook, Make 6 sc in magic loop, (6 sts). Rnd 2: 2 sc in each st around, (12 sts). Rnd 3-5: Sc in each st around, stuffing as rounds are completed. Rnd 6: \* sc in st, sc 2 tog; repeat from \* around, (8 sts). Rnd 7-14: Sc in each st around, finish stuffing. Next Step: holding both layers tog, sc the opening closed across the top of the arm using 4 sc sts & set aside. Repeat for other arm.
Snowman BODY & HEAD
Rnd 1: Using MC held tripled & L hook, make 6 sc in magic loop, (6 sts). Rnd 2: 2 sc in each st around, (12 sts). Rnd 3: \*sc in st, 2 sc in next st; repeat from \* around, (18 sts). Rnd 4: \* sc in next 2 sts, 2 sc in st; repeat from \* around, (24 sts). Rnd 5: \* sc in next 3 sts , 2 sc in st; repeat from \* around, (30 sts). Rnd 6: \* sc in next 4 sts , 2 sc in st; repeat from \* around, (36 sts). Rnd 7: \*sc in 5 sts, 2 sc in st; repeat from \* around, (42 sts). Rnd 8: \*sc in 6 sts, 2 sc in st; repeat from \* around, (48 sts). Rnd 9: \*sc in 7 sts, 2 sc in st; repeat from \* around, (54 sts). Rnd 10-14: Sc in each st around. Rnd 15: \* sc in 7 sts, sc 2 tog; repeat from \* around, (48 sts). Rnd 16: Sc in ea st around. Rnd 17: \* sc in 6 sts, sc 2 tog; repeat from \* around, (42 sts).Rnd 18-20: Sc in each st around. Rnd 21: \* sc in 5 sts, sc 2 tog; repeat from \* around, (36 sts). Rnd 22-23: Sc in each st around. Rnd 24: Attach arms; hold the row of sts at top of arm together with the working sts of the body, working through all layers, sc in next 4 sts, (in order to attach arm), sc in the next 18 sts, holding 2"d arm together with working sts, sc through all layers of the next 4 sts, sc in last 10 sts, (36 sts). Rnd 25: \* sc in 4 sts, sc 2 tog; repeat from \* around, (30 sts). Rnd 26: \* sc in 3 sts, sc 2 tog; repeat from \* around, (24 sts). Rnd 27: \*Sc in 2 sts, 2 sc in next st; repeat from \* around, (32 sts). Rnd 28: \*Sc in 3 sts, 2 sc in next; repeat from \* around, (40 sts). Rnd 29-35: Sc in each st around. Rnd 36: \* sc in 2 sts, sc 2 tog; repeat from \* around, (30 sts). Rnd 37: \* sc in 4 sts, sc 2 tog; repeat from \* around, (25 sts). Stuff firmly, continue to stuff as rounds are completed. Rnd 38: \* sc in 3 sts, sc 2 tog; repeat from \* around, (20 sts). Rnd 39: \* sc in 2 sts, sc 2 tog; repeat from \* around, (15 sts). Rnd 40: \* sc in 1 st, sc 2 tog; repeat from \* around, (10 sts). Finish stuffing as desired. Rnd 41: \*sc 2 tog; repeat from \* around & finish off, weaving yarn end through sts to anchor. Trim excess yarn. (5 sts).
Snowman NOSE
Rnd 1: Using C single stranded & H hook, 3 sc in magic loop. Rnd 2: sc in st, 2 sc in next 2 sts, (5 sts). Stuff as rnds are completed. Rnd 3: Sc in ea st around. Rnd 4: 2 sc in st, sc in next 4 sts, (6 sts). Rnd 5: Sc in ea st around. Rnd 6: \*Sc in 2 sts, 2 sc in next st; repeat from \* 2 times, (8 sts). Rnd 7: Sc in ea st around, sl st into next st & cut yarn, pulling through st to anchor. Finish stuffing. Leave yarn end from rnd 7 for sewing nose to snowman face. Weave & trim yarn end from rnd 1. Wishing for cooler weather..
@Nancy Anderson, yarnjulepsontheveranda.com, AUG 2013
Snowman SCARF
Using A held single strand & H hook, ch 91. Row 1: Beg in 2nd ch from hook & working in back bumps for this row only, sc in each st across , ch 2 & turn, ( 90 sts). Row 2-3: Hdc in each st across, changing to B at end of row 3, do not finish off A, ch 2 & turn. Row 4: Using B, hdc in each st across, finishing off B at end of row, ch 2 & turn. Row 5: Using A, Hdc in each st across, ch 2 & turn, (90 sts). Row 6: Hdc in each st across, ch 1 & turn. Row 7: Sc in each st across, finish off. Row 8: Add B to any st using sl st, ch 1, sc around the entire piece to form edging. Finish off, weaving & trimming yarn ends.
Snowman BERET HATBAND
Using H hook & A held single strand ch 5. Row 1: Beg in 2nd ch from hook sc in each ch across, ch 1 & turn, (4 sts). Row 2: working in crochet rib, (back loops only for all rows), sc in each st across. Row 3-48: continue working in crochet rib. Row 48: Ch 1, holding ends of the hatband tog, join the hatband using sl st through the bk loop of the Row 48 & front loop of Row 1, do not finish off but proceed to beret crown instructions.
SnowmanBERET CROWN
Rnd 1: Ch 1, sc in rows ends around for 50 sts, evenly spaced & join to 1"t st with sl st, adding B at end of rnd, do not finish off A, (50 sts). Rnd 2: Using B, ch 1, sc in ea st around, join with sl st & finish off yarn. Rnd 3: Using color A (now & for the remainder of the rnds),\*sc in st, 2 sc in next st; repeat from \* around, (75 sts). Rnd 4-10: Sc in each st around. Rnd 11: \*sc in 3 sts, sc 2 tog; repeat from \* around, (60 sts). Rnd 12: \*Sc in 2 sts, sc 2 tog; repeat from \* around, (45 sts). Rnd 13: Sc in each st around. Rnd 14: \*Sc in 1 st, sc 2 tog; repeat from \* around, (30 sts). Rnd 15: Sc in each st around. Rnd 16: \*Sc in 3 sts, sc 2 tog; repeat from \* around, (24 sts). ONancy Anderson, yarnjulepsontheveranda.com, AUG 2013 Rnd 17: Sc in each st around. Rnd 18: \*Sc in 2 sts, sc 2 tog; repeat from \* around, (18 sts). Rnd 19: Sc in each st around. Rnd 20: \*Sc in 1 st, sc 2 tog; repeat from \* around, (12 sts). Rnd 21: \*sc 2 tog; repeat from \* around and finish off, close opening by weaving yarn end through sts. Anchor & trim yarn ends.
Snowman FINISHING
Put hat on head to aid in eye & nose placement. Referring to the photo, securely sew buttons onto face to form the eyes, approximately 5-6 stitches apart on or near rnd 35. Sew carrot nose onto face on or near rnd 32 using yarn end & tapestry needle. Tack beret in place using matching yarn & tapestry needle, as desired. Tie scarf around neck.
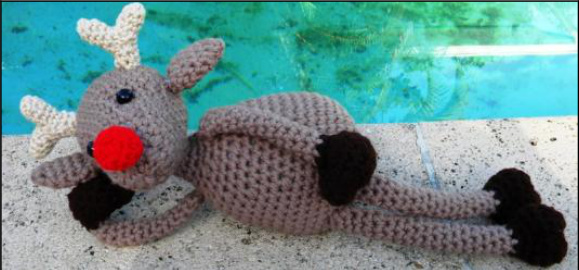
REINDEER
Measurement: 22 %" tall as measured from top of antler to bottom of hoof.
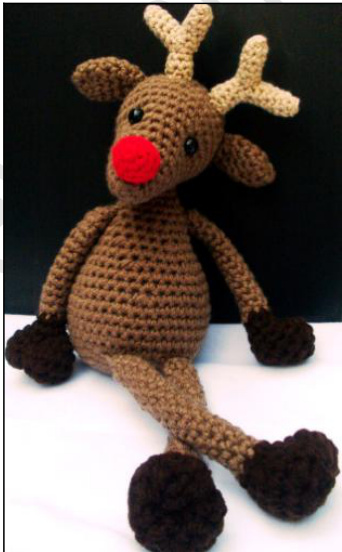
RED HEART@ Super Saver?, 7 oz, 198 g, 364 yds/333 meters2 skeins Café Latte MC, 1 skein Coffee A, small amount Buff B & Cherry Red C. Total yarn used for pattern model: Café Latte' - 8.8 ozs, less than %th skein of Coffee, small amount of Buff &Cherry Red. Crochet hooks: US L/8.0 mm for body, US J-10/6 mm for nose, Us I-9/ 5.5 mm for antlers. Tapestry needle, stitch marker, (2)1" black rounded shank style buttons for eyes, strong hand sewing thread & long, sharp needle for attaching eyes, 4 dark brown knee high hose, stuffing fiber.
Reindeer NOTES
Work in un-joined rounds with yarn held tripled unless otherwise indicated. Place stitch marker at beginning of rounds & move up as rounds are completed. Use I-hook for antlers, J-hook for nose & L-hook for entire body. Reindeer body is worked from bottom upwards. Legs, head & body parts are completed separately & aresewn on usingyarn ends.Arms are worked first & are attached to body by sc as rnd 21 is made. Legs are sewn to front loops left by working back loops fromrnd8. For best results use stuffing insert for head & body to prevent stuffing showing through stitches. Use knee highs doubled to provide maximum camouflage properties. Place dark brown knee high hose into work-in-progress & stuff firmly, as rounds are completed. Use stocking doubled for darker results. Insert is not necessary for arms & legs, which are stuffed lightly. Use matching yarn remnants for stuffing when filling small pieces such as the hooves.
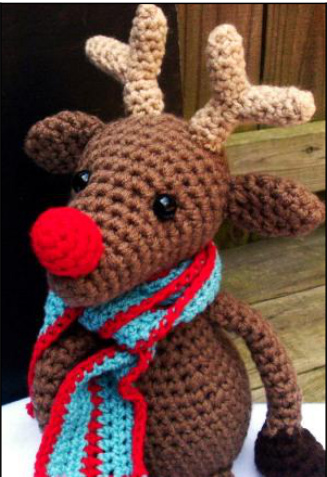
Reindeer wearing optional scarf, (found on Snowman patternpage)
Reindeer ARMS (make 2)
Rnd 1: Using MC held tripled & L hook, Ch 6 in & join with sl st. Rnd 2: Ch 1, sc in same ch & in all chs around, (6 sts). Rnd 3-14: Sc in each st around, adding A at end of last rnd & finishing off Mc. Stuff arm lightly with small amount of fiber. Rnd 15: Sc in each st around. Rnd 16: \*sc in st, 2 sc in next st; repeat from \* around, (9 sts). Rnd 17: \*sc in st, 2 sc in next st; repeat from \* 4 times, sc in last st, (13 sts). Rnd 18: \*sc in 2 sts, 2 sc in next; repeat from \* 4 times, sc in last st, (17 sts). Rnd 19: Sc in each st around. Rnd 20: \*sc in 2 sts, sc 2 tog; repeat from \* 4 times, sc in last st, (13 sts). Rnd 21: \*sc in st, sc 2 tog; repeat from \* 4 times, sc in last st, (9 sts). Stuff hoof using matching yarn remnants to prevent stuffing show-though.. Rnd 22: \*sc in st, sc 2 tog; repeat from \* 4 times, sc in last st, (6 sts). Finish off, weaving & trimming excess yarn. Set aside & repeat steps for other arm.
Christmas in July...
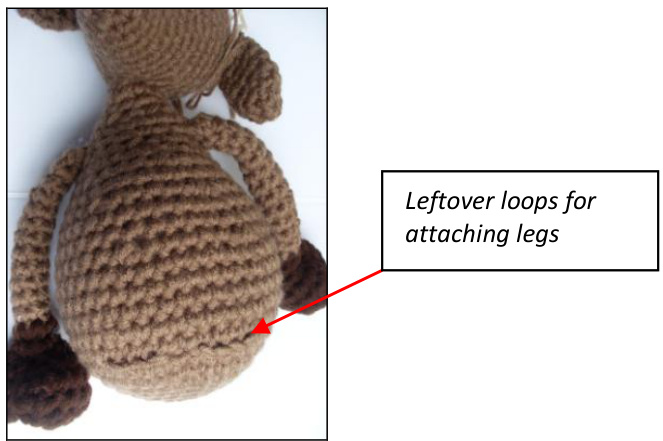
Reindeer BODY
Body is worked from bottom upwards. Rnd 1: Using MC held tripled & L hook, Make 6 sc in magic loop, (6 sts). Rnd 2: \*2 sc in each st around, (12 sts). Rnd 3: \*sc in st, 2 sc in next st; repeat from \* around, (18 sts). Rnd 4: \* sc in next 2 sts, 2 sc in st; repeat from \* around, (24 sts). Rnd 5: \* sc in next 3 sts , 2 sc in st; repeat from \* around, (30 sts). Rnd 6: \* sc in next 4 sts , 2 sc in st; repeat from \* around, (36 sts). Rnd 7: \*sc in 5 sts, 2 sc in st; repeat from \* around, (42 sts). Rnd 8: Make leg placement loops; sc in 16 sts, sc in back loops only of next 4 sts, sc in all loops for next 2 sts, sc in back loops for next 4 sts, sc in all loops in the last 16 sts, (use leftover front loops for sewing legs to body). Rnd 9-12: Sc in each st around. Rnd 13: \* sc in 5 sts, sc 2 tog; repeat from \* around, (36 sts). Rnd 14-15: Sc in ea st around. Rnd 16: \* sc in 4 sts, sc 2 tog; repeat from \* around, (30 sts). Rnd 17: Sc in each st around. Rnd 18: \* sc in 3 sts, sc 2 tog; repeat from \* around, (24 sts). Insert stuffing filled doubled hose, adding additional stuffing as rounds are completed. Rnd 19: Sc in each st around. Rnd 20: \* sc in 2 sts, sc 2 tog; repeat from \* around, (18 sts). Rnd 21: Add arms; sc 6 sts, holding arm together with sts, sc through all layers for the next 3 sts, sc in 6 sts, holding 2nd arm together with sts, sc through all layers for 3 sts, (18 sts). Please note: arm placement may need adjustment. Make certain that arms hang at side, equal distance from leg placement, on both sides. Rnd 22: Sc in each st around. Rnd 23: \*sc in st, sc 2 tog; repeat form \* around, (12 sts). Rnd 24-25: Sc in each st around. Finish off leaving yarn tail for sewing head onto neck & finish stuffing & tie off knee high hose insert.
Reindeer HEAD
Head is worked from the nose to the top (crown) of head. Rnd 1: Using MC held tripled & L hook, Make 6 sc in magic loop, (6 sts). Rnd 2: \* sc in 1 st, 2 sc in next st; repeat from \* around, (8 sts). Rnd 3: \* sc in 1 st, 2 sc in next st; repeat from \* around, (12 sts). Rnd 4-5: Sc in each st around. Rnd 6: \* sc in 1 sts, 2 sc in next st; repeat from \* around, (18 sts). Rnd 7-9: Sc in each st around. Rnd 10: \* sc in 2 sts, 2 sc in next st; repeat from \* around, (24 sts). Rnd 11: \* sc in next 3 sts, 2 sc in st; repeat from \* around, (30 sts). Rnd 12-15: Sc in each st around. Rnd 16: \* sc in next 3 sts , sc 2 tog; repeat from \* around, (24 sts). Insert stuffing filled hose as for body & continue stuffing as needed. Rnd 17.Sc in each st around. Rnd 18: \*sc in 2 st, sc 2 tog; repeat from \* around, (18 sts). Rnd 19: Sc in each st around. Rnd 20: \*sc in 1 st, sc 2 tog; repeat from \*around, (12 sts). Rnd 21: \*sc in 1 st, sc 2 tog; repeat from \*around, (8 sts). Finish stuffing, weave & trim excess yarn.
LEGS (make 2)
Rnd 1: repeat rnd 1 as for arm. Rnd 2-19: Sc in each st around, adding A at end of last rnd & finishing off Mc. Rnd 20: Repeat rnds 15-22 as for arms & stuff using matching yarn remnants.
Reindeer EARS (make 2)
Rnd 1: Using MC held tripled & L hook, 6 sc in magic loop, (6 sts). Rnd 2: \*sc in st, 2 sc in next st; repeat from \* around, (9 sts). Rnd 3-5: Sc in each st around. Rnd 6: \*sc in st, sc 2 tog; repeat from \* around, (6 sts). Rnd 7: Sc 2 tog, sc in next 4, finish off, do not stuff. Weave yarn end through sts to close hole & shape the pointed ear tip, trim excess yarn. Leave yarn end from rnd 1 to sew ear to head. Set aside & repeat steps for 2nd ear.
Reindeer TAIL
ONancy Anderson, yarnjulepsontheveranda.com, AUG 2013 Rnd 1: Using MC held tripled & L hook, Ch 4& join with sl st. Rnd 2: Ch 1, sc in same space & in each st around. Rnd 3-5: Sc in each st around. Finish off after last rnd, do not stuff. Weave yarn end through sts & pull tightly to close hole. Leave yarn end from beginning rnd for sewing tail to body.
Reindeer ANTLERS (make 2)
Rnd 1: Using B held doubled & I hook, ch 6 & join. Rnd 2-5: Sc in each st around, (6 sts). Rnd 6: Ch 3, skip next 3 sts, join with sc to next st, sc in last 3 sts, opening for branch of antler made. Rnd 7: Sc in each ch & st around, leaving antler branch opening just made un-worked, (6 sts). Rnd 8-10: Sc in each st around. Stuff as rnds are completed. Rnd 11: \*Sc 1, sc 2 tog; repeat from \*around & finish off, weaving yarn end through sts to close hole. Do not trim excess yarn from rnd 1. Rnd 12: Attach MC to any ch or st from rnd 6 using a sl st, ch 1, sc in same space & in each ch & st around, (6 sts) . Rnd 13-16: Sc in ea st around. Finish stuffing. Rnd 17: \* Sc in st, sc 2 tog; repeat from \* around & finish off, weaving yarn end through sts to close hole. Leave yarn end from beginning rnd for sewing antler to head.
Reindeer NOSE
Rnd 1: Using C held doubled & J hook, make 6 sc in magic loop. Rnd 2: \*sc in st, 2 sc in next; repeat from \* 3 times, (9 sts). Rnd 3: \*sc in 2 sts, 2 sc in next; repeat from \* 3 times, (12 sts). Rnd 4: Sc in each st around. Rnd 5: \*sc in 2 sts, sc 2 tog; repeat from \* 3 times, (9 sts). Stuff firmly using matching yarn. Rnd 6: \*sc in st, sc 2 tog; repeat from \* 3 times & finish off leaving yarn tail for sewing nose to head.
Reindeer FINISHING
Using yarn end at neck & tapestry needle, sew head to neck.Make certain to orient the head with most of the weight distributed forward so that it will hang properly. To do this, start sewing the head on at rnds 8-10 of the head instructions. Secure yarn, weaving & trimming end. Attach legs to leftover front loops from rnd 8 in the body instructions, using yarn ends. Weave & trim excessyarn.
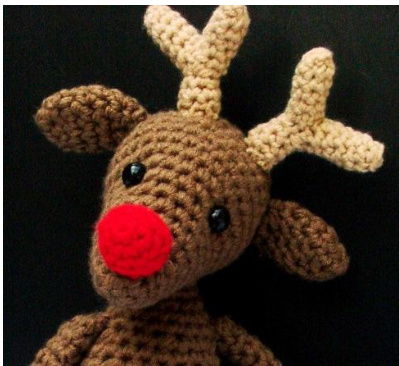
Referring to the following photo, attach ears using yarn end, to the upper sides of the head & the antlers to the middle top, in between the ears. Secure all sewing sts, weave & trim excess yarn. Add button “eyes" using strong thread & long sharp needle. Sew the nose onto the narrow end of the head, using yarn end & tapestry needle.
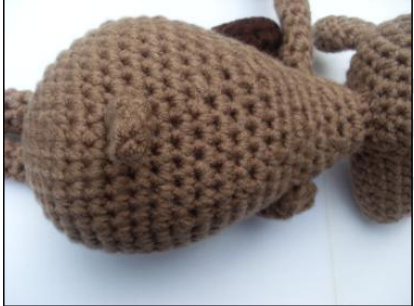
Sew tail to bottom backside using yarn ends.
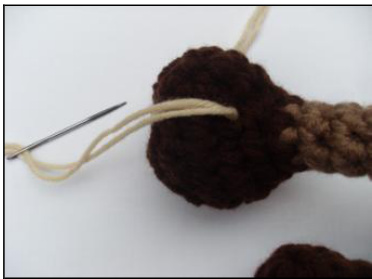
Using matching yarn & tapestry needle to make hoof indentation in the middle of each of the 4 hooves. Please note: light yarn is used in photos for illustration purposes only. Use matching yarn when completing this step.
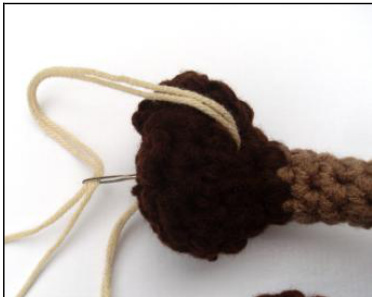
Bring doubled yarn up though upper middle of hoof. Pull tightly, loop around to back side & repeat the process 1 or 2 times pulling tightly to cause the hoof to pucker in the middle.
ORNAMENT
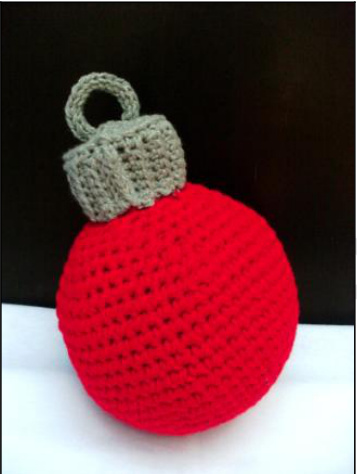
Measurement: 11"tall RED HEART? Super Saver ?(7 oz, 198 g, 364 yds/333 meters), 1 skein Cherry Red MC (Make certain to purchase enough yarn - pattern uses most of1entire skein of Super Saver). Silver or grey worsted yarn, small amount for ornament topper. Crochet hooks: US L/8 mm, US J/ 6 mm hook. Tapestry needle, stitch marker, fiber stuffing & excess matching yarn to use as stuffing, 4" square of cardboard, sharp scissors for making cardboard cutout.
Ornament NOTES
Work in un-joined rounds with yarn held tripled unless otherwise indicated . Place stitch marker at beginning of rounds & move up as rounds are completed. Stuff firmly as rounds are completed using matching yarn mixed with fiber stuffing.
ORNAMENT
Rnd 1: Using MC held tripled & L hook, Make 6 sc in magic loop, (6 sts). Rnd 2: \*2 sc in each st around, (12 sts). Rnd 3: \*sc in st, 2 sc in next st; repeat from \* around, (18 sts). Rnd 4: \* sc in next 2 sts , 2 sc in st; repeat from \* around, (24 sts). Rnd 5: \* sc in next 3 sts , 2 sc in st; repeat from \* around, (30 sts). Rnd 6: \* sc in next 4 sts , 2 sc in st; repeat from \* around, (36 sts). Rnd 7: \*sc in 5 sts, 2 sc in st; repeat from \* around, (42 sts). Rnd 8: \*sc in 6 sts, 2 sc in st; repeat from \* around, (48 sts). Rnd 9: \*sc in 7 sts, 2 sc in st; repeat from \* around, (54 sts). Rnd 10-18: Sc in each st around. Rnd 19: \* sc in 7 sts, sc 2 tog; repeat from \* around, (48 sts). Rnd 20: \* sc in 6 sts, sc 2 tog; repeat from \* around, (42 sts). Rnd 21: \* sc in 5 sts, sc 2 tog; repeat from \* around, (36 sts). Rnd 22: \* sc in 4 sts, sc 2 tog; repeat from \* around, (30 sts). Rnd 23: \* sc in 3 sts, sc 2 tog; repeat from \* around, (24 sts). Rnd 24: \*Sc in 2 sts, sc 2 tog; repeat from \* around, (18 sts). Rnd 25: \*Sc in st, sc 2 tog; repeat from \* around, (12 sts). Finish stuffing with combination of filler & matching yarn. Use matching yarn to fill places where stuffing shows through. Finish off, weaving & trimming yarn end.
ORNAMENT TOP
Using silver yarn held doubled & J hook, ch 6. Row 1: Beginning with 2nd ch form hook & working in back bumps only, for this row only, sc in each ch across, (5 sts). Row 2: ch 1 & turn, sc in bk Ips only across, (5 sts). Row 3-29: Repeat row 3 for 25 rows. Seam ends together to form cylinder; holding edges together, sl st the back Ip of the edge from row 1 & front Ip from edge of row 29 to join & begin working in rounds for the following steps. Rnd 30: Beg working in rnds; ch 1, sc in row ends for 24 sts evenly spaced, join with sl st. Rnd 31: Working in bk Ips only sc in each st around, (24 sts). Rnd 32: \*Sc in 2 sts, sc 2 tog; repeat from \* around, (18 sts). Rnd 33: \*Sc in st, sc 2 tog; repeat from \* around, (12 sts). Rnd 34: \*Sc in st, sc 2 tog; repeat from \* around, finish off, weaving & trimming ends to close hole . ONancy Anderson, yarnjulepsontheveranda.com, AUG 2013
HANGING LOOP
Make hanging loop; using J hook & silver held doubled ch 16. Row 1: Sl st in back loop beginning with 2"d ch from hook. Finish off & set aside.
STUFFING&FINISHINGORNAMENTTOP
Make (optional)cardboardcutout insert for ornament top.Trace around the circumference of the ornament top just made, onto cardboard remnant. Cut out circle, trimming about %" from cutout.
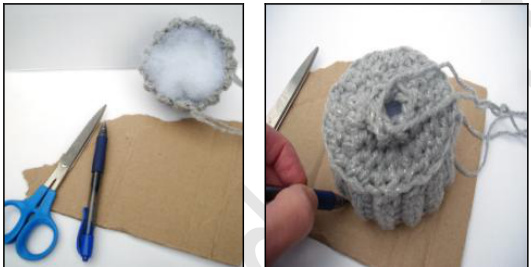
Insert cardboard cutout into ornament top. Add stuffing next.
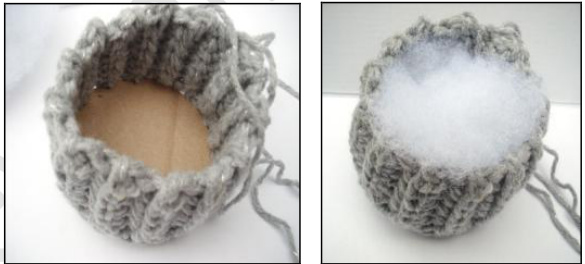
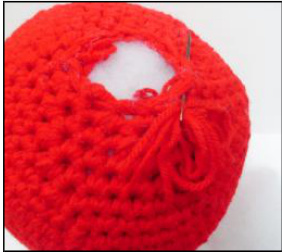
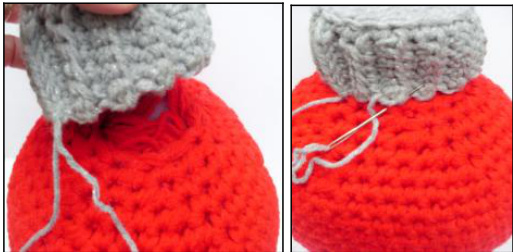
Pin to ornament at top opening & sew securely using yarn end, adding more stuffing as needed before stitching is completed
Sew "hanging loop" onto ornament top as pictured below.(Please note that the ornament hanging loop is not designed to actuallybe used for hanging the ornament).


