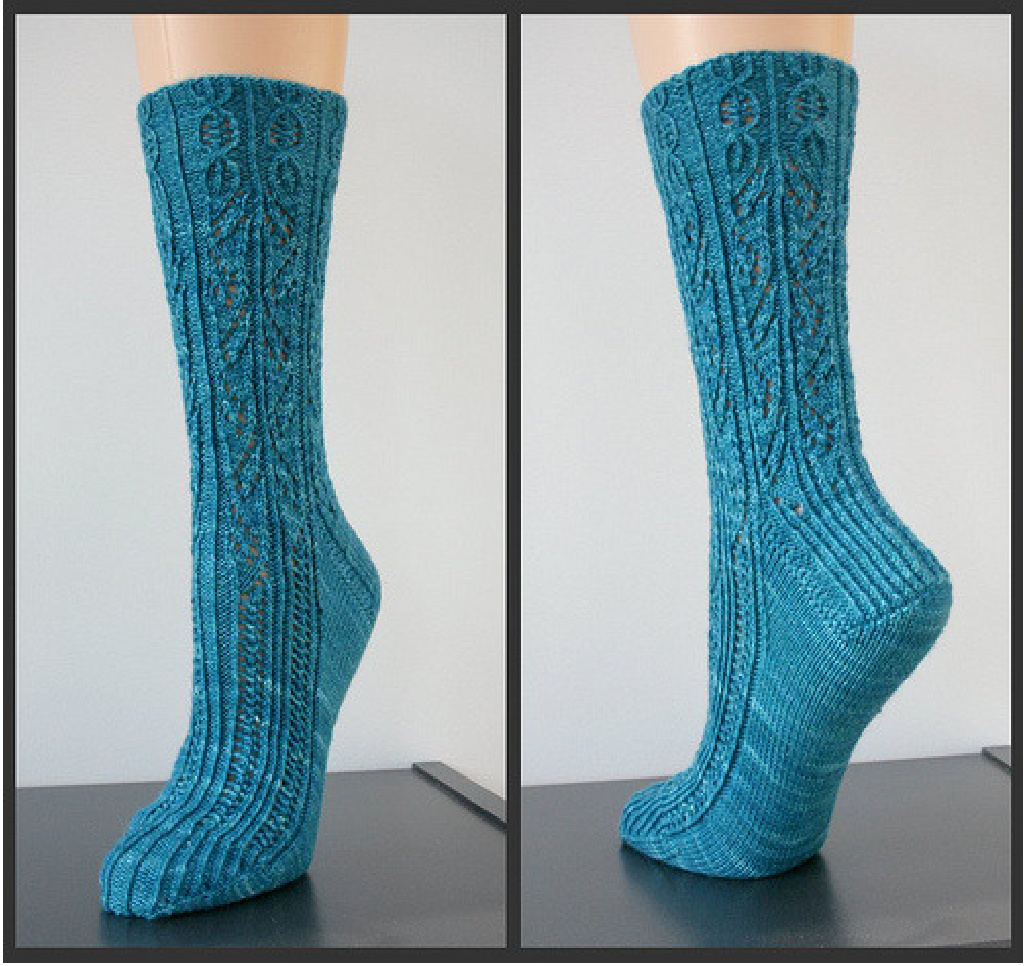
Belle Vitini
by Kristi Geraci
Finished Measurements
S [M, L] leg length 7 inches, 7[8, 9] inches circumference unstretched, $8\,\%$ [10, 11 %] inches circumference moderately stretched. Foot $6\%$ [7%, 8%] inches circumference unstretched, 8 [9 %, 11] inches circumference moderately stretched. Model knit in size M.
Materials
Fingering Weight Yarn. Shown in Pink Dandelion Yarns Nylon Sock, $80\%$ superwash merino wool, $20\%$ nylon, 420 yds per skein, 1 skein, Orinoco Flow. Set of 4 U.s. Size 1 $(2.25\,\mathsf{m m})$ double-pointed needles, or size needed to obtain gauge. Alternatively, use one or two circular needles in appropriate size. · Stitch markers · Cable needle · Tapestry Needle
Gauge
In Stockinette stitch, 32 stitches and 54 rows $=4^{\prime\prime}$ $\left\{10\,{\mathsf{c m}}\right\}$
Abbreviations and stitch instructions
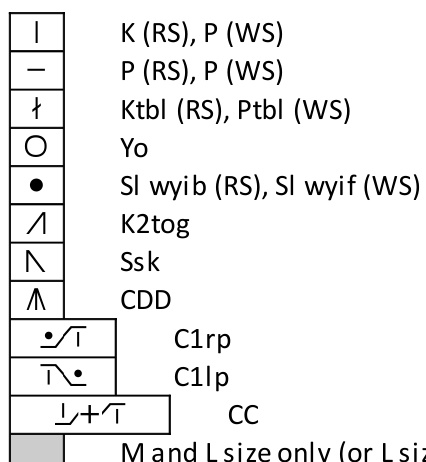
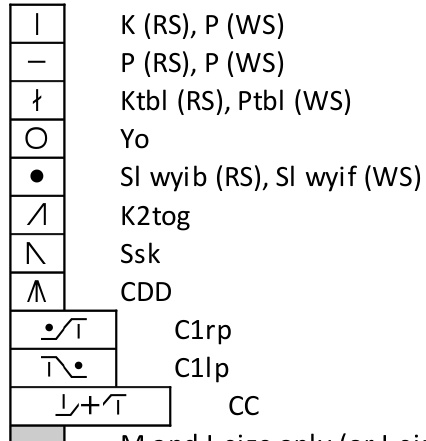
CC - Cable Cross (Slip 2 sts to cable needle, hold cable needle in back of work, k1tbl from LH needle, slip left st from cable needle back to LH needle, hold cable needle in front of work, k1tbl from LH needle, k1tbl from cable needle.) CDD - Centered double decrease (Sl1 knitwise, k2tog, pass slipped st over.) C1LP - Cable 1 left purl (Slip 1 st to cable needle, hold cable needle in front of work, p1 from LH needle, k1tbl from cable needle.) C1RP - Cable 1 right purl (Slip 1 st to cable needle, hold cable needle in back of work, k1tbl from LH needle, p1 from cable needle.) CO - Cast on K- Knit K2tog - Knit two together LH - Left hand M -Marker P- Purl Ssk - Slip slip knit (sl 2 sts knitwise, return to left hand needle and k2tog tbl) Pm - Place marker RH - Right hand RS - Right side Sl - Slip stitch (purlwise unless otherwise stated) Slm - Slip marker St(s) - Stitch(es) Tbl - Through back loop WS - Wrong side Wyib - With yarn in back of work Wyif - With yarn in front of work Yo - Yarnover
Notes:
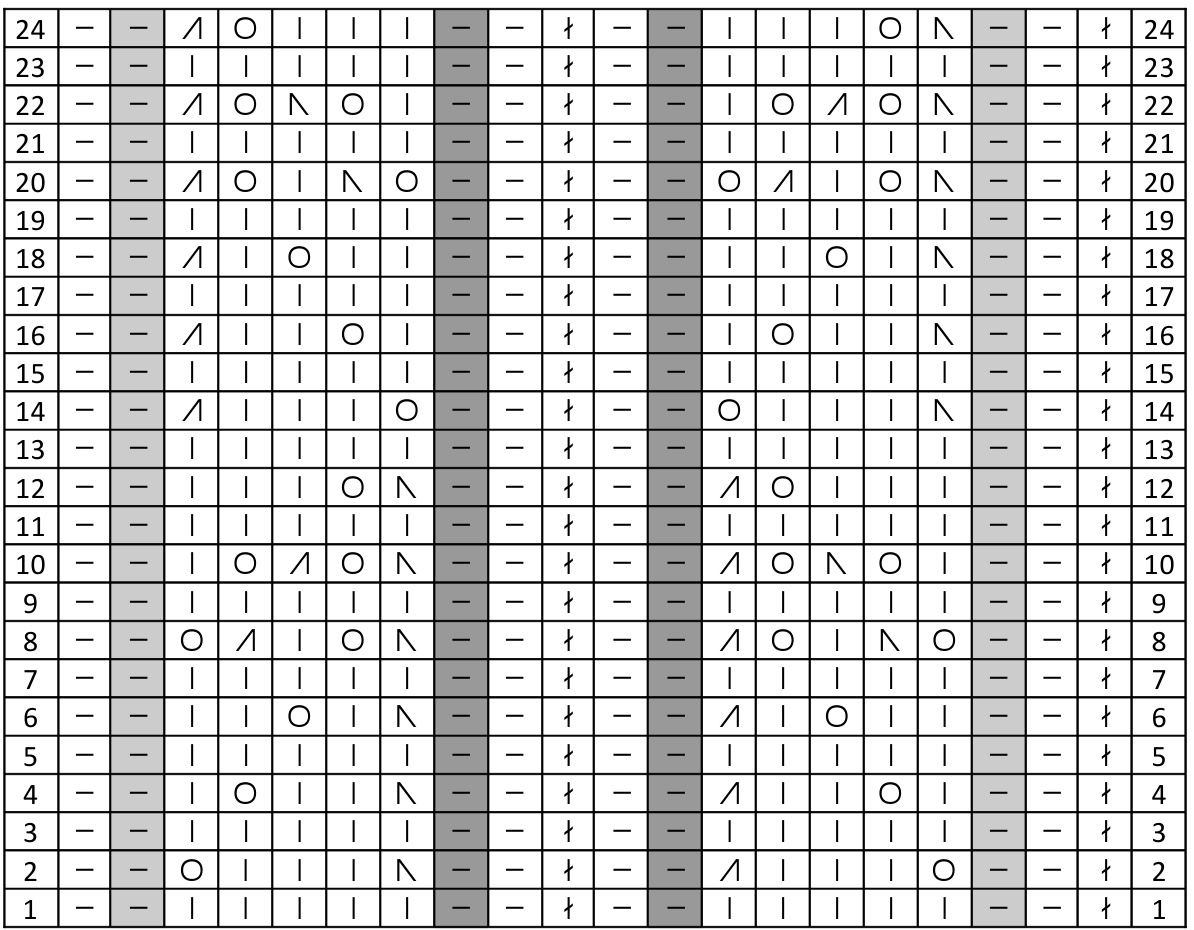
Charts are worked from bottom to top, working each row from right to left while working in round. For heel flap chart, charts are worked from bottom to top, working each RS row from right to left and each Ws row from left to right, following the appropriate RS or Ws instructions for each stitch. You may wish to rearrange stitches on needles rather than use markers.
Cuff:
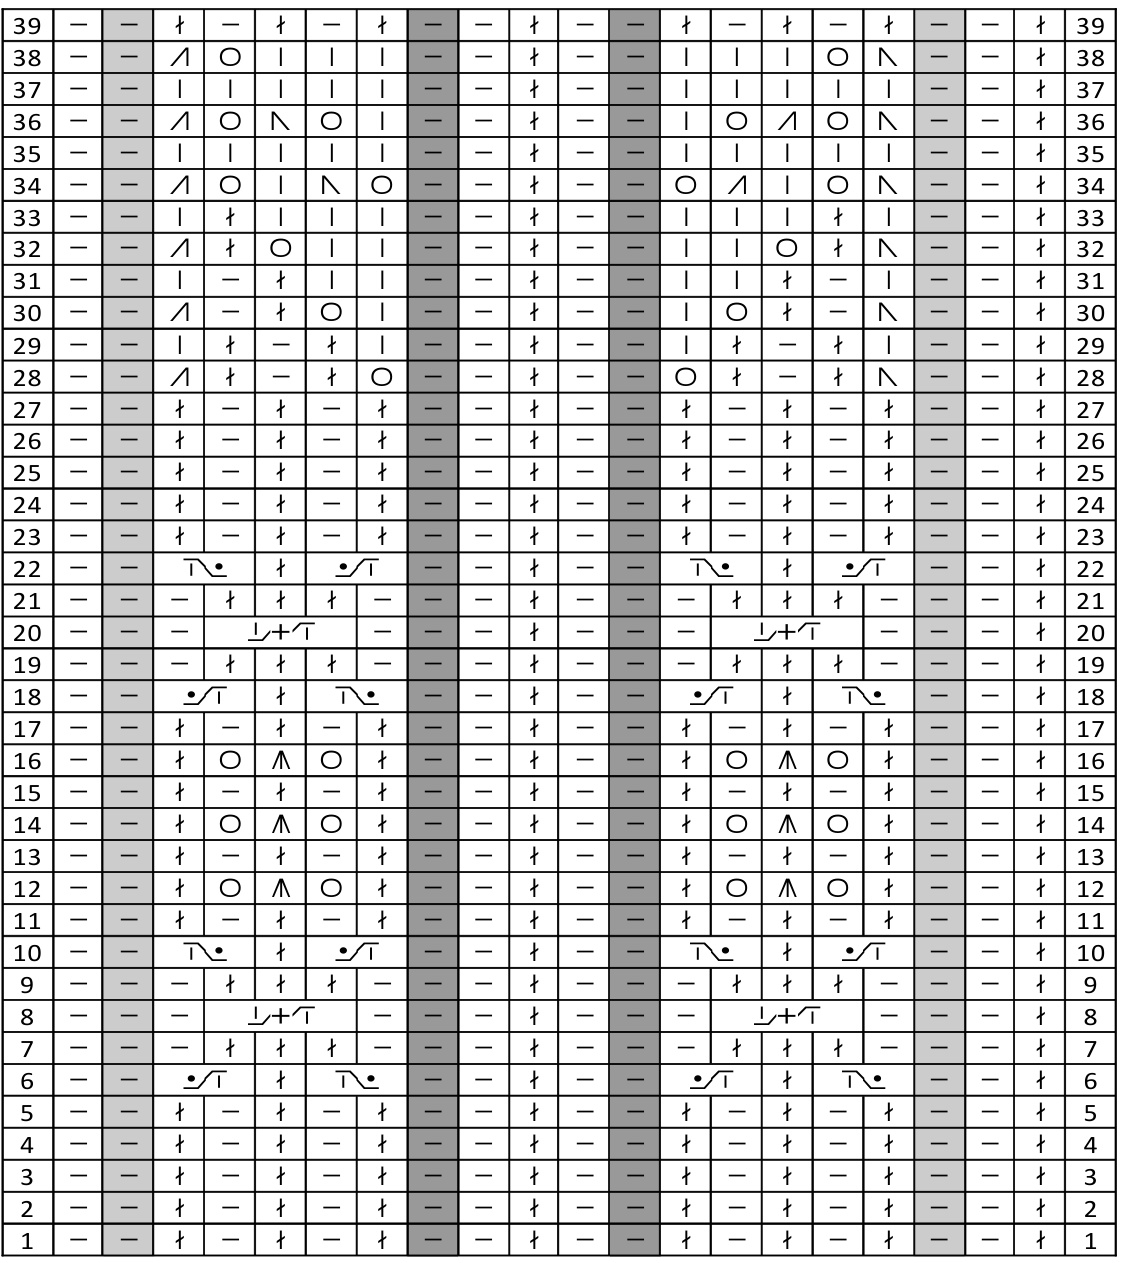
CO 64 [72, 80] sts and arrange sts on needles such that each needle has a multiple of 8 [9, 10] sts. Join sts for working in round, being careful not to twist. Pm for beginning of round. Round 1: Work row 1 of Cuff Chart 4 times to end of round, working only the sts appropriate to size. Round 2: Work next row Cuff Chart 4 times to end of round, working only the sts appropriate to size. Continue in pattern as established, working next appropriate Cuff Chart row until ll39 rows of chart have been worked.
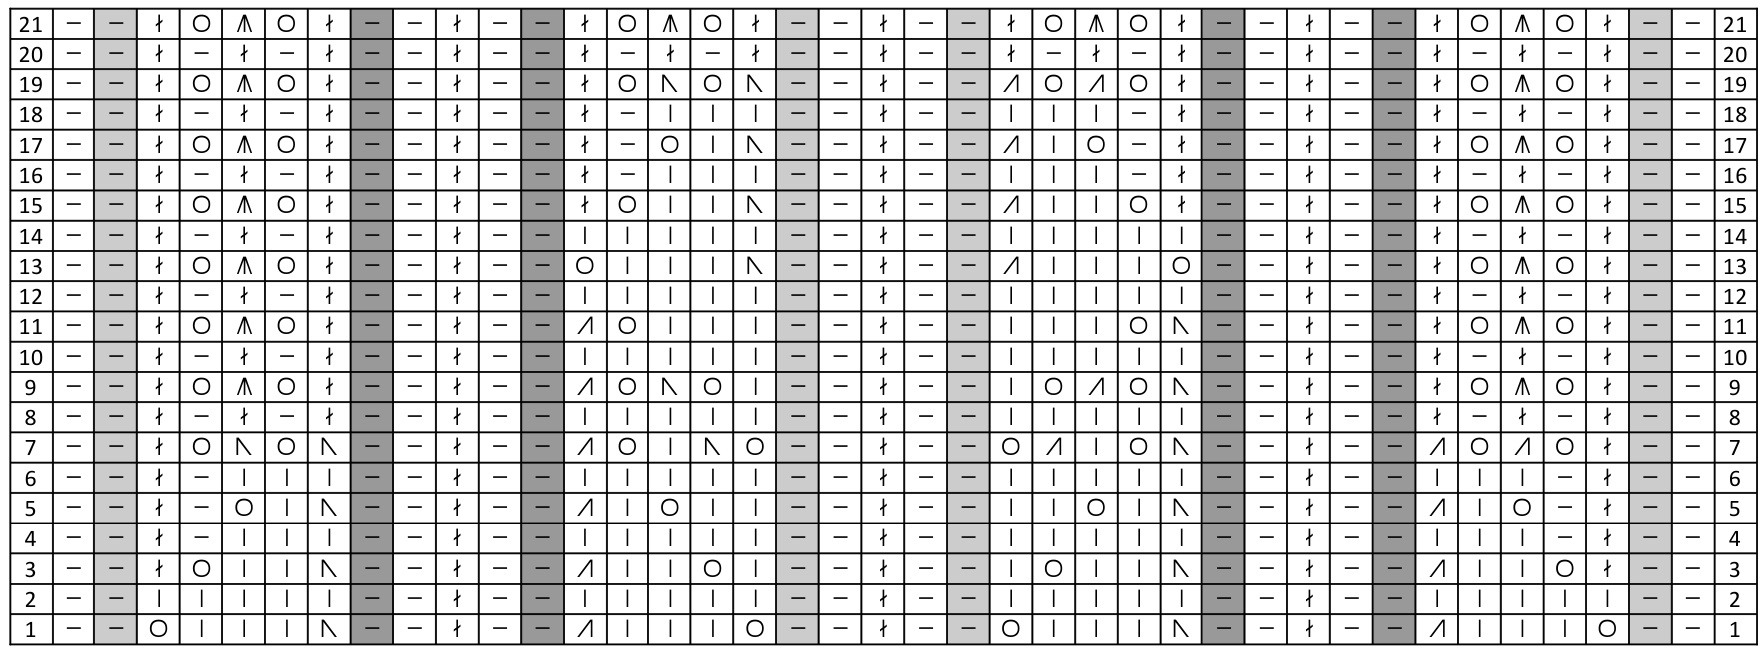
Round 1: Work row 1 of Leg Chart 4 times to end of round, working only the sts appropriate to size. Round 2: Work next row of Leg Chart 4 times to end of round, working only the sts appropriate to size. Continue in pattern as established, working next row of Leg Chart for each round, returning to row 1 after completing row 24. Work leg to desired length, ending by working row 1 or row 13 of Leg Chart.
Heel Flap:
Remove start of round marker. If you ended on row 13 of chart, kitbl, p1[2, 2], k5, p1[1, 2]. Next 33 [37, 41] sts will be worked back and forth for the heel. Hold previous 31 [35, 39] sts for top of foot. Row 1 (RS): Work row 1 of Heel Chart (reading chart from right to left)across sts. Note the difference in the shaded sections if you ended on row 13 of the leg chart. Row 2 (Ws): Work row 2 of Heel Chart (reading chart from left to right) across sts, being sure to follow WS directions for sts. Continue working back and forth in this manner, working each chart row in turn. When chart is finished, work chart row 9 on RS and chart row 8 on WS rows. Continue in pattern as established, working chart row 9 on all RS rows and chart row 8 on all Ws rows until heel flap is 3 inches or desired length, ending after working a Ws row. A longer heel flap will allow for a higher instep. Note that the heel flap will be longer than a heel flap that has slipped stitches would be, because sliped stitches compress the row gauge. Turn work so RS is facing.
Turn Heel:
Row 1: Sl1 wyib, K17 [19, 21], ssk, k1, turn. Row 2: Sl1 wyif, P4, p2tog, p1, turn. Row 3: K to one stitch before gap from previous RS row, ssk, k1, turn. Row 4: P to one stitch before gap from previous WS row, p2tog, p1, turn. Repeat rows 3 and 4 until all stitches have been worked. 19 [21, 23] heel sts remain.
Shape Gusset:
Set up for gusset: Sl1 wyib, k9 [10, 11] across half of heel stitches, pm for beginning of round, then k9 [10, 11] sts to end of heel flap. Knit into each selvedge stitch of the heel flap, and m1 between heel flap and top of foot. Pm for right edge of foot. Work Top of Foot Chart row 1, working only the sts for the appropriate size across held sts for top of foot. Note the changes in the shaded portion if you worked row 13 last on Leg Chart. Pm for left edge of foot. M1 between top of fot and hee flap, knit into each selvedge stitch of the heelflap. K to beginning of round m. Round 1: Knit to 2 sts before right marker, k2tog. Slm, work next row of Top of Foot Chart to left marker. Slm, ssk, knit to end of round. Round 2: Knit to right marker. Slm, work next row of Top of Foot chart to left marker. Slm, knit to end of round. Repeat rounds 1 and 2 until 64 [72, 80] sts remain (33 [37, 41] sts for sole and 31 [35, 39] sts for top of foot). If you reach the end of the chart, continue working rows 20 and 21 of the chart in turn across top of foot. Continue in pattern as established, finishing chart if you have not already, then repeating rows 20 and 21 from Clue 3 Top of Foot Chart until foot measures 2 inches less than desired finished length, ending by finishing a round using row 20 of foot chart. Remove marker for beginning of round and knit to right side marker. This marker is the new beginning of round.
Shape Toe:
Round 1: Work sts as set acrostop of foot (ktblthe ktbls and purlthe purls -there is no lace on the toe). Slleft side m, k1, ssk, knit to 3 sts before beginning of round m, k2tog, k1. 62 [70, 78] sts. Round 2: Work sts as set around. Round 3: K1, ssk, work sts as set to 3 sts before left m, k2tog, k1. Sm, k1, ssk, knit to 3 sts before beginning of round m, k2tog, k1. 4 sts decreased. Round 4: Work sts as set. Repeat rounds 3 and 4 until toe measures 2 inches. Graft top of foot sts to sole sts using kitchener stitch.
Finishing:
Weave in ends and block if desired.
Legend
Legend
M and Lsize only (or Lsize only on heel and top of foot, if you end on row 13 of leg chart) Lsize only (or M and Lsize only on heel and top of foot, if you end on row 13 of leg chart)