
Cozy Clusters Mittens
CrochetbyCarr@gmail.com www.Facebook.com/CrochetbyCarr
The written pattern and photos may not be copied, shared, or sold in full or in part. The finished product is yours to do with as you wish, including personal use, gifting, charity, and non-commercial sale. If you are selling online, I'd love it if you would share a link to my website. Potogahy coutey oKellyMeCuePhotography
Pattern Notes
Materials:
Light Worsted Weight yarn G hook Sewing Needle Stitch marker
Gauge:
Rounds 1-2 of mitten measure 2 and 3/8 inches in diameter. Adjust hook size to meet gauge if needed
Pattern Notes:
\*A stitch marker will be helpful in determining what round you are on. \*This pattern is worked in a continuous round. Do not join rounds. \* Stitch Counts are included at the end of each round. \*Cluster stitches will be worked into the cluster from the previous round, except where specifically stated in rounds 2 and 3 of the body of the mitten. (See photos on page 7)
Abbreviations:
Ch Chain SI St Slip Stitch Sc Single Crochet Hdc Half Double Crochet Fpdc Front Post Double Crochet Bpdc Back Post Double Crochet Dc Double Crochet Beg-Cluster Beginning Cluster Stitch Cluster Cluster Stitch Cluster-dec Cluster Stitch Decrease Note: When a number precedes a stitch abbreviation, you will put that number of stitches into the same stitch. For example "2hdc" means put 2 hdc in the same stitch.
Special Stitches:
Beg-Cluster Ch 2, (Yarn over, insert into stitch, draw up a loop, yarn over, pull through 2) 2 times all in the same stitch. Yarn over and pull through 3 loops. Ch 1. Cluster (Yarn over, insert into stitch, draw up a loop, yarn over, pull through 2) 3 times all in the same stitch. Yarn over and pull through 4 loops. Ch 1.
Beg-Cluster-dec
Ch 2, yarn over, insert into stitch, draw up a loop, yarn over pull through 2, (Yarn over, insert hook into next stitch, draw up a loop, yarn over, pull through 2) 2 times in same stitch. Yarn over and pull through 4 loops. Ch 1. ----This stitch will combine 2 clusters from the previous row into 1 cluster.
Cluster-dec
(Yarn over, insert into stitch, draw up a loop, yarn over, pull through 2) 2 times in the same stitch, (Yarn over, insert into stitch, draw up a loop, yarn over, pull through 2) 2 times in the next stitch. Yarn over and pull through 5 loops. Ch 1. --- This stitch will combine 2 clusters from the previous row into 1 cluster.
Toddler
Thumb:
1. In a magic ring, beg-cluster, cluster 3 times. Do not join rounds. Use a stitch marker to mark your rounds if needed. (4 clusters) 2. Cluster in each cluster below. Fasten off leaving a 12 inch tail for sewing. (4 clusters)
Mitten:
1. In a magic ring, beg-cluster, cluster 5 times. (6 clusters) 2. (Cluster in cluster below, cluster in space between clusters) 6 times. (12 clusters) See photos on page 7 for clarification if needed 3-5. Cluster in cluster below around. (12 clusters) 6. Now, you will attach the thumb to the body of the mitten. Cluster in first cluster of the last round of the thumb, cluster in the next 2 clusters on the thumb. Leave the last cluster on the thumb unworked. Skip one cluster on the body of the mitten. Cluster in the next 11 clusters around the body of the mitten. (14 clusters) 7. You will now be working around the base of the thumb and fingers section. Cluster, cluster-dec, cluster 5 times, cluster-dec, cluster 4 times. (12 clusters) 8. Cluster-dec 2 times, cluster 3 times, cluster-dec, cluster 3 times. (9 clusters) 9. (Dc in cluster, dc in ch 1 space) 6 times, hdc in cluster, hdc in ch 1 space, hdc in cluster, sc in ch 1space, sc in cluster, sc in ch 1 space, join with a sl st to 1"t dc. (18 stitches) 10-11. Ch 1,(Fpdc, bpdc) around, join with a sl st to 1st dc. (18 stitches) After round 11, fasten off leaving a 4 inch tail for weaving in end.
Finishing:
Weave in ends securely. Use the 12 inch tail on the thumb to close the hole between the thumb and body of the mitten, then weave in the end securely.
Child Small
Thumb:
1. In a magic ring, beg-cluster, cluster 3 times. Do not join rounds. Use a stitch marker to mark your rounds if needed. (4 clusters) 2-3. Cluster in each cluster below. Fasten off leaving a 12 inch tail for sewing. (5 clusters)
Mitten:
1. In a magic ring, beg-cluster, cluster 5 times. (6 clusters) 2. (Cluster in cluster below, cluster in space between clusters) 6 times. (12 clusters) See photos on page 7 for clarification if needed 3. (Cluster in cluster below 6 times, cluster in space between clusters) 2 times. (14 clusters) 4-7. Cluster in cluster below around. (14 clusters) 8. Now, you will attach the thumb to the body of the mitten. Cluster in first cluster of the last round of the thumb, cluster in the next 2 clusters on the thumb. Leave the last cluster on the thumb unworked. Skip one cluster on the body of the mitten. Cluster in the next 13 clusters around the body of the mitten. (16 clusters) 9. You will now be working around the base of the thumb and fingers section. Cluster, cluster-dec, cluster 5 times, cluster-dec, cluster 6 times. (14 clusters) 10. (Cluster-dec 2 times, cluster 3 times) twice. (10 clusters) 11. (Dc in cluster, dc in ch 1 space) 7 times, hdc in cluster, hdc in ch 1 space, hdc in cluster, sc in ch 1 space, sc in cluster, sc in ch 1 space, join with a sl st to 1"t dc. (20 stitches) 3. Ch 1,(Fpdc, bpdc) around, join with a sl st to 1st dc. (20 stitches After round 13, fasten off leaving a 4 inch tail for weaving in end.
Finishing:
Weave in ends securely. Use the 12 inch tail on the thumb to close the hole between the thumb and body of the mitten, then weave in the end securely.
Child Large
Thumb:
1. In a magic ring, beg, cluster, cluster 4 times. Do not join rounds. Use a stitch marker to mark your rounds if needed. (5 clusters) 2-4. Cluster in each cluster below. Fasten off leaving a 12 inch tail for sewing. (5 clusters)
Mitten:
1. In a magic ring, beg-cluster, cluster 5 times. (6 clusters) 2. (Cluster in cluster below, cluster in space between clusters) 6 times. (12 clusters) See photos on page 7for clarification if needed 3. (Cluster in cluster below, cluster in cluster below, cluster in cluster below, cluster in space between clusters) 4 times. (16 clusters) 4-8. Cluster in cluster below around. (16 clusters) 9. Now, you will attach the thumb to the body of the mitten. Cluster in first cluster of the last round of the thumb, cluster in the next 3 clusters on the thumb. Leave the last cluster on the thumb unworked. Skip one cluster on the body of the mitten. Cluster in the next 15 clusters around the body of the mitten. (19 clusters) 10. You will now be working around the base of the thumb and fingers section. Cluster, cluster-dec, cluster 7 times, cluster-dec, cluster 7 times. (17 clusters) 2 times, cluster 5 times, cluster-dec, cluster 6 times. (14 clusters) ster-dec, cluster 5 times, cluster-dec, cluster 5 times. (12 clusters 13. (Dc in cluster, dc in ch 1 space) 9 times, hdc in cluster, hdc in ch 1 space, hdc in cluster, sc in ch 1 space, sc in cluster, sc in ch 1 space, join with a sl st to 1"t dc. (24 stitches) 14-15. Ch 1,(Fpdc, bpdc) around, join with a sl st to 1st dc. (24 stitches) After round 15, fasten off leaving a 4 inch tail for weaving in end.
Finishing:
Weave in ends securely. Use the 12 inch tail on the thumb to close the hole between the thumb and body of the mitten, then weave in the end securely.
Teen/Adult
Thumb:
1. In a magic ring, beg-cluster, cluster 4 times. Do not join rounds. Use a stitch marker to mark your rounds if needed. (5 clusters) 2-5. Cluster in each cluster below. Fasten off leaving a 12 inch tail for sewing. (5 clusters)
Mitten:
1. In a magic ring, beg-cluster, cluster 5 times. (6 clusters) 2. (Cluster in cluster below, cluster in space between clusters) 6 times. (12 clusters) See photos on page 7 for clarification if needed 3. (Cluster in cluster below, cluster in cluster below, cluster in space between clusters) 6 times. (18 clusters) 4-11. Cluster in cluster below around. (18 clusters) 12. Now, you will attach the thumb to the body of the mitten. Cluster in first cluster of the last round of the thumb, cluster in the next 3 clusters on the thumb. Leave the last cluster on the thumb unworked. Skip one cluster on the body of the mitten. Cluster in the next 17 clusters around the body of the mitten. (21 clusters) 13. You will now be working around the base of the thumb and fingers section. Cluster, cluster-dec, cluster 8 times, cluster-dec, cluster 8 times. (19 clusters) 14. Cluster-dec 2 times, cluster 6 times, cluster-dec, cluster 7 times. (16 clusters) 15. Cluster-dec, cluster 6 times, cluster-dec, cluster 6 times. (14 clusters) 16. Cluster-dec, cluster 12 times. (13 clusters) 17. (Dc in cluster and ch 1 space) 10 times, hdc in cluster, hdc in ch 1 space, hdc in cluster, sc in ch 1 space, sc in cluster, sc in ch 1 space, join with a sl st to 1"t dc. (26 stitches) 18-20. Ch 1,(Fpdc, bpdc) around, join with a sl st to 1st dc. (26 stitches) After round 20, fasten off leaving a 4 inch tail for weaving in end.
Finishing:
Weave in ends securely. Use the 12 inch tail on the thumb to close the hole between the thumb and body of the mitten, then weave in the end securely.
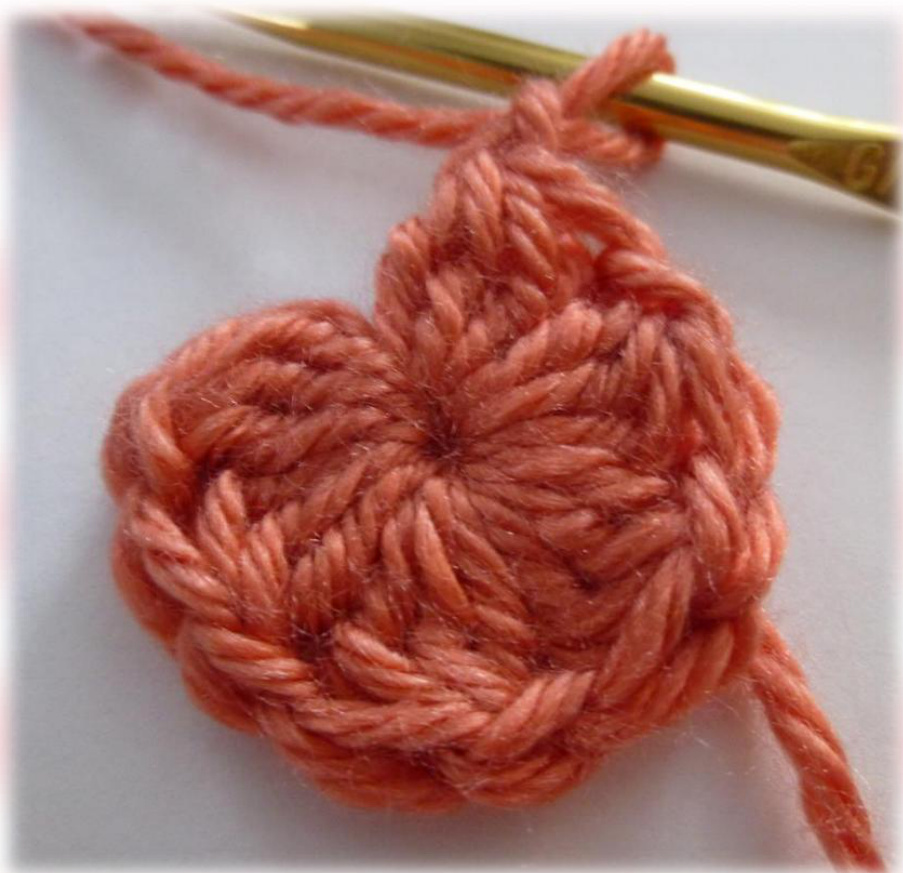
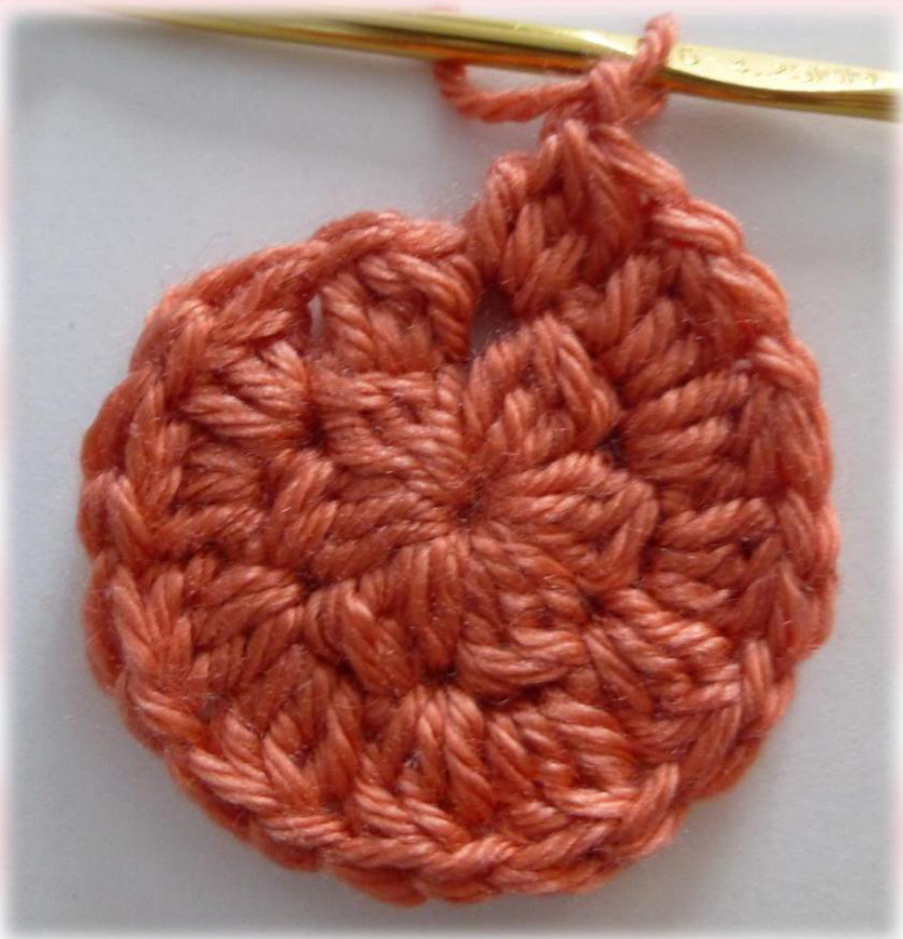
First round of the mitten body. All clusters are working into the magic ring. 2"d round of the mitten body. Clusters are worked in to the cluster below and into the space between clusters.


