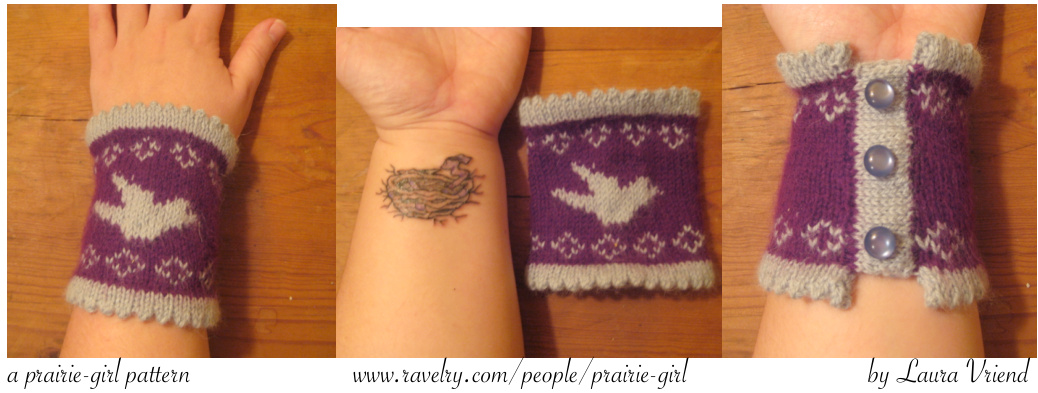
J came up with this pattern after getting a tatoo of a bird's nest on my wrist. J wanted a sweet little birdie cuff to wear in case J needed to hide it from various non-tattoo friendly relatives. But J think it'd be lovely to wear anytime. Hope you enjoy this little pattern as much as J do! Sizes: s/m - 5 12 inch wrist (at narrowest part of wrist), work from chart #1, s/m chart m/1 - 6 /2 inch wrist (at narrowest part of wrist), work from chart #2, m/l chart Notes on sizing: because this cuff extends to the lower forearm, it will be a bit looser at the wrist in order to accommodate the forearm. Refer to photos for an idea of how they fit. Also, if you'd prefer an even smaller cuff, I suggest working from the m/l chart and removing one diamond from either side of the border. Materials: 2 skeins classic elite yarns fresco, main color and contrasting color (shown MC: 5322 Port Royal, CC: 5364 CelestialBlue) US size 3/3.25mm needles (or size needed to obtain guage) 3buttons Guage: 7 sts per inch in St st MC: main color CC: contrasting color K2tog: knit next two stitches together YO: yarn over St st: Stockinette stitch (knit one row, purl the next) St/sts: stitch/stitches m1: lift horizontal bar before next stitch from front to back and place on left needle. Knit into back of st.
Skills NMeeded:
\*Knitting from a chart \*Fair isle and basic intarsia colorwork skills Hint: there are great video tutorials for all skills needed on knittinghelp.com
Lets get started!
Bottom Pecot Edging: Using US size 3 needles and CC, CO 44 (50) sts. work 4 rows in St st as follows: Row 1: knit Row: 2 purl Repeat rows 1 and 2 Row 5: \*k2tog, yo repeat from \* ending with k2tog Work 6 purl Row 7: knit Row 8: purl Row 9: knit Flying home to nest chart: Join MC, but do not cut CC Work chart rows 1-30 joining and picking up CC again for diamond pattern, cut CC and rejoin for bird motif, cut CC and rejoin for top diamond pattern
Chart Notes:
Chart begins on a purl row. The diamond borders (rows 3-7 and 24-28) are worked using stranded fair isle technique The bird motif is worked using a stranded intarsia method, that is, carry MC behind as you go, wrap and drop CC at end of bird motif
Jop Pecot Edging:
Pick up CC and work 5 rows as follows: Row 1: purl Row 2: knit 1, m1, knit to end Row 3: purl Row 4: knit Row 5: purl Next row: \*k2tog, yo repeat from \* ending with k2tog Row 7: purl Row 8: knit Row 9: purl Row 10: knit Bind off Turn under hem at top and bottom of cuffs along k2tog yo rows and stitch in place on wrong side with tapestry needle
Faux Button Band:
With right side facing and CC yarn, pick up 25 stitches on one side. Work in St st for 11 (13) rows (you will begin on a purl row) and bind off. Fold button band flap in half and stitch in place on wrong side of work. Using same color yarn, sew the edge of the band to the other edge of work. Sew buttons on band. Weave in ends and block lightly if desired. Make another for the other wrist using opposite facing bird chart if desired! Note: both s/m and m/l charts are worked starting with a purl row.
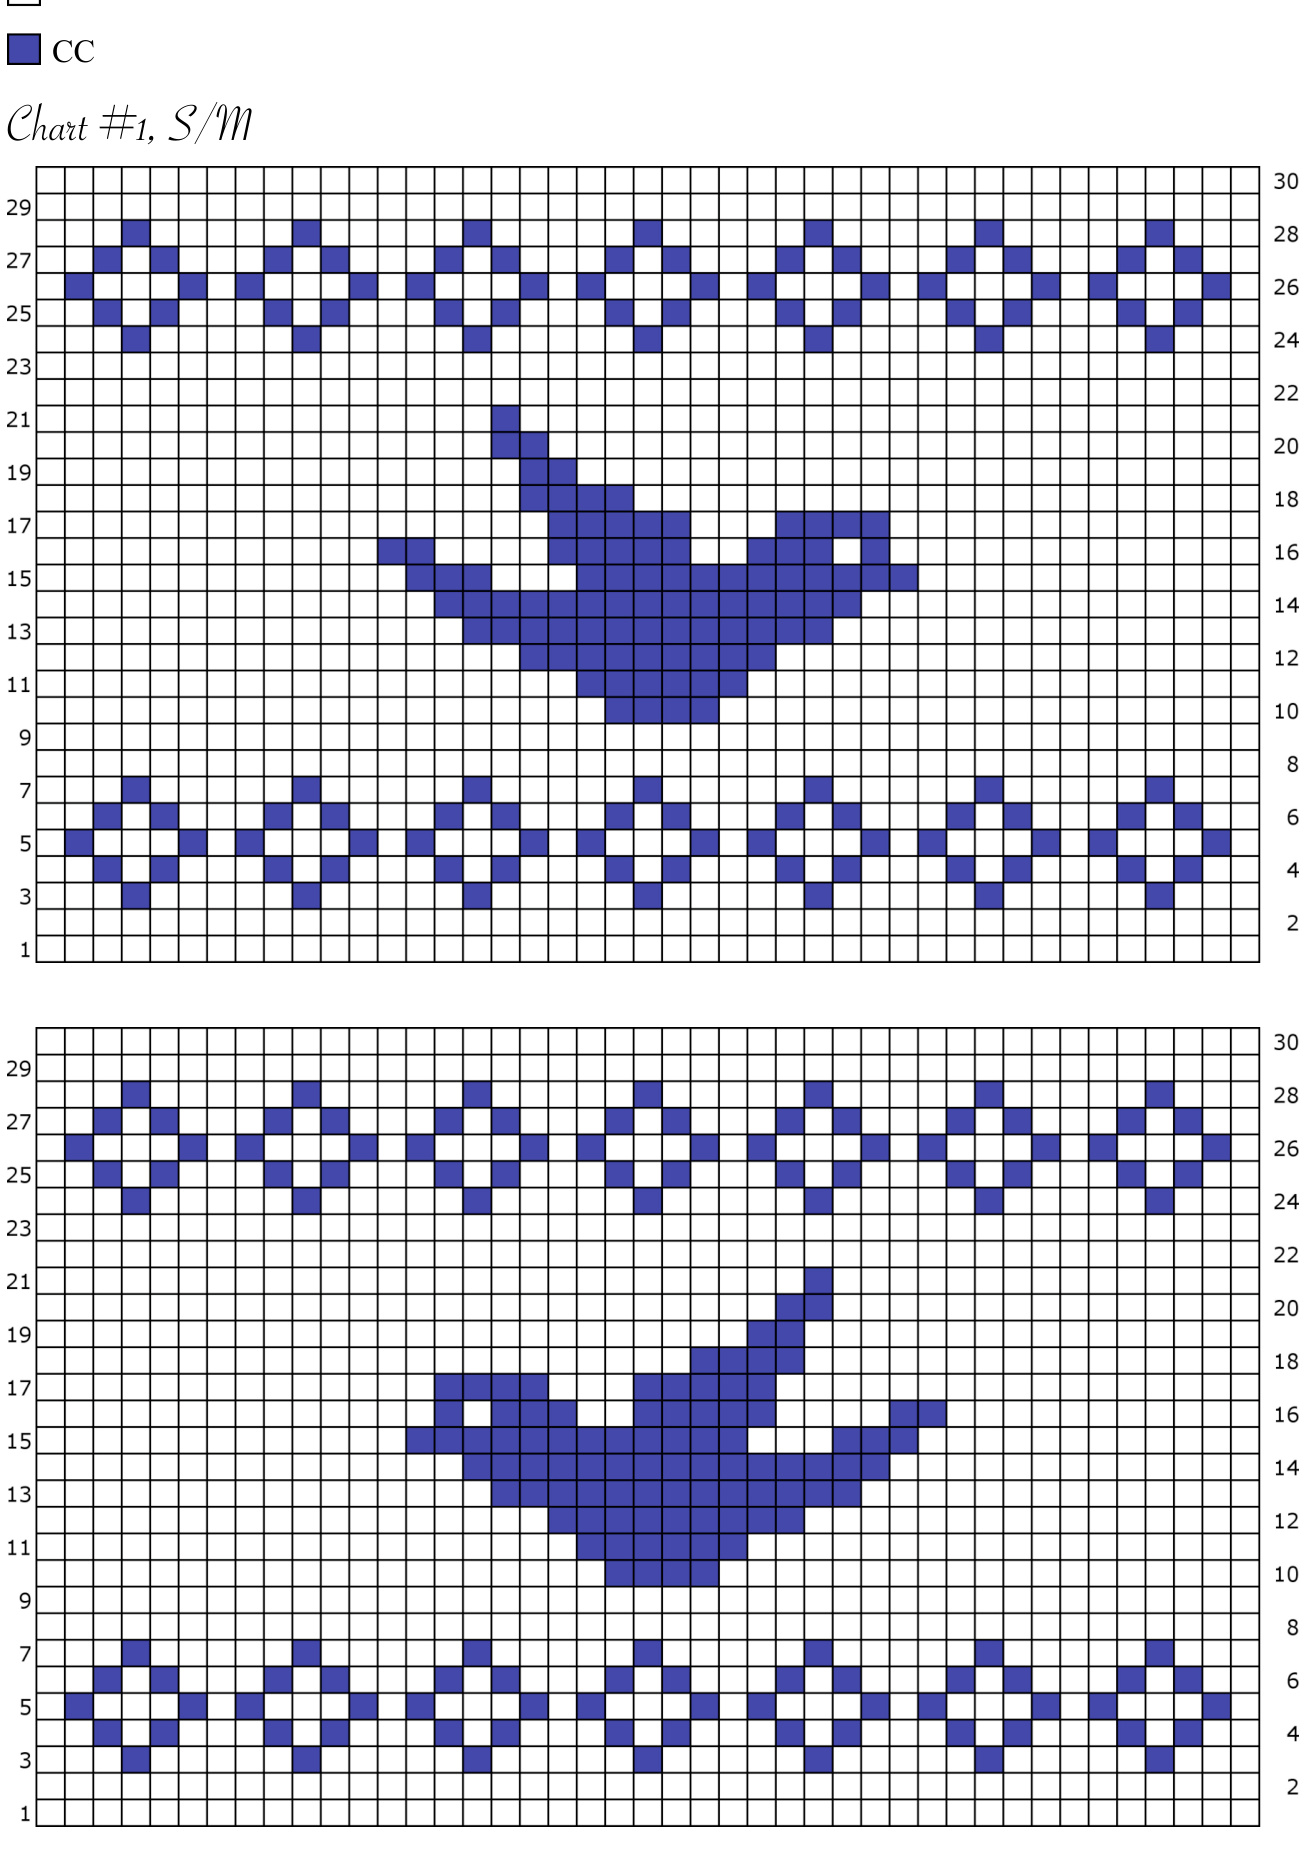
Chart #2, M/L
| 29 | 30 | ||||||||||||||||||||||||||||||||||||||
| 28 | |||||||||||||||||||||||||||||||||||||||
| 27 | 26 | ||||||||||||||||||||||||||||||||||||||
| 25 | |||||||||||||||||||||||||||||||||||||||
| 24 | |||||||||||||||||||||||||||||||||||||||
| 23 | |||||||||||||||||||||||||||||||||||||||
| 21 | 22 | ||||||||||||||||||||||||||||||||||||||
| 20 | |||||||||||||||||||||||||||||||||||||||
| 19 | 18 | ||||||||||||||||||||||||||||||||||||||
| 17 | |||||||||||||||||||||||||||||||||||||||
| 16 14 12 10 8 6 4 2 30 28 26 24 22 20 18 16 14 12 10 8 6 4 2 | |||||||||||||||||||||||||||||||||||||||
| 15 13 11 29 27 25 23 21 19 17 15 13 11 | 6 5 3 6 |
① Laura Vriend/prairie-girl knits 2010
O not sell this pattern or any items made as a result of this pattern Thank you!


