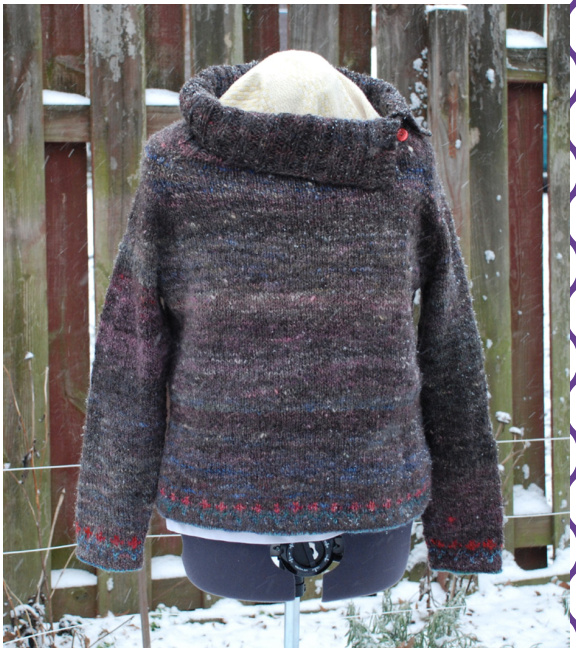
Flowers in the Park
Dakota Designs Original Pattern Here's a nice pullover seamless sweater that I designed for a friend. It has a pattern band of flowers around the bottom and at the ends of the sleeves. The collar is split and asymmetrical, with a couple of buttons to add pizzazz. This sweater is constructed from the bottom up with raglan sleeves. The bottom and sleeves both have French hems using one of the colors in the color band, so just let them roll until you are ready to do the finishing.
Gauge
4 st/inch and 6 rows / inch on Size 7 Needles NOTE - do your swatch in the round for best results! For those of you who want to use a different yarn and gauge, see the notation for the percentage system to use for this sweater.
Needles
$24^{\prime\prime}$ Circular — size 7 Sizes 34(36, 38, 40, 42) With Ease: 38(40, 42, 44, 46) Yarn My homespun averaging 843.4 ypp used 18 oz and 1000 yards
The Body
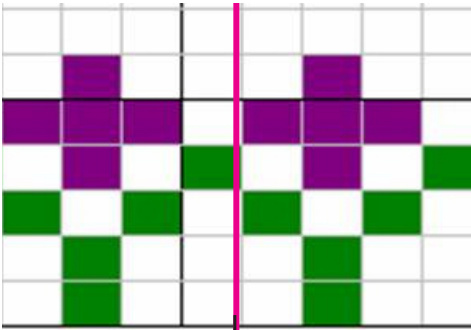
For a 38(40, 42, 44, 46)" circumference Cast on 152(160, 168, 176, 184) Stitches., place marker and join round Knit 2 rounds and then start color band Once the color band is finished knit straight to underarms 16(16.5, 17, 18, 19 ) inches This is JUsT a guideline, measure your length from desired length to arm pit.
Separate for Sleeves/Underarm
Place 6(6, 7, 7, 8) st on a holder (this is 1/2 of the underarm), place 64(68, 70, 74, 76) sts on holder for front of sweater, place 12(12, 14, 14 , 16) sts on holder for underarm, place 64(68, 70, 74, 76) sts on hoider for back of sweater, place remaining 6(6, 7, 7, 8) sts on the first holder (the one with only 6(6, 7,7, 8) on it). You have just divided up your sweater for the arms/yoke. Set work aside until you have knitted the sleeves.
Sleeves
Cast on 36(36, 40, 40, 40) stitches. NOTE: I cast on a few more than $20\%$ since there is no ribbing, and the cuffs will be finished with a french hem. Join, place a marker (this will be the under arm center stitch) and knit 2 rounds then knit color band. After the color band start working increases every 5th or 6th row until you have 50( 54, 56,58, 62) stitches (an increase of 14(18, 16, 18, 22) sts over the length of the sleeve to the underarm) Work the increases on either side of the marked stitch. Work until sleeve measures 17( 18. 19, 20, 20)" (or desired length - just try it on, and work it until it is within 2 inches of the armpit), place 12(12, 14, 14 , 16) stitches on a holder for the under arm (on either side of the center stitch). Place the remaining 38(42, 42, 44, 46) stitches on another holder, yarn, or an extra set of circular needles.
Make the other sleeve to match!
Putting sleeves and body together
OK —- this is not as scary as it Sounds. Right now your body is on holders, or scraps or yarn, front, underarms, back. You are NOT going to knit the underarm stitches, they will stay on the holders. The underarm stitches on the sleeves will also remain on holders. Place markers on the 1st and 64(68, 70, 74, 76)th stitch (first and last) of the Front and Back (you'll use this later for the raglan shaping) Start by knitting the 64(68, 70, 74, 76) stitches from the front, when you get to the underarm, get one of your sleeves and knit the 38(42, 42, 44, 46) stitches from the holder, knit across the back 64(68, 70, 74, 76) stitches, and then across the 38(42, 42, 44, 46) stitches of the other sleeve. Now you have the
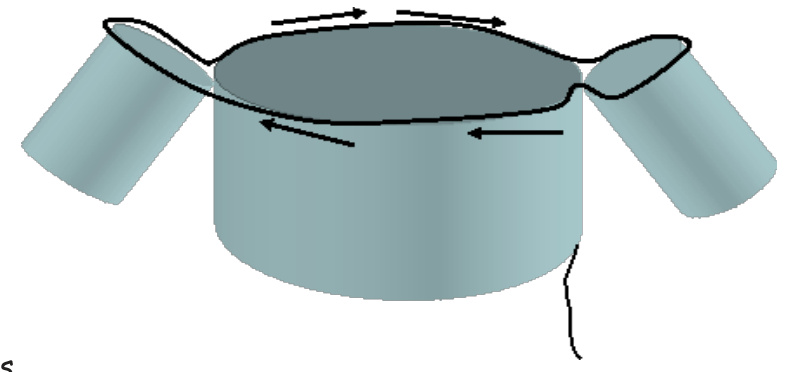
body! The un derarm stitches will stay on their holders until you graft them together later. If you want a roomy armhole knit $1-2^{\prime\prime}$ before starting the Raglan shaping.
Yoke/Raglan Shaping
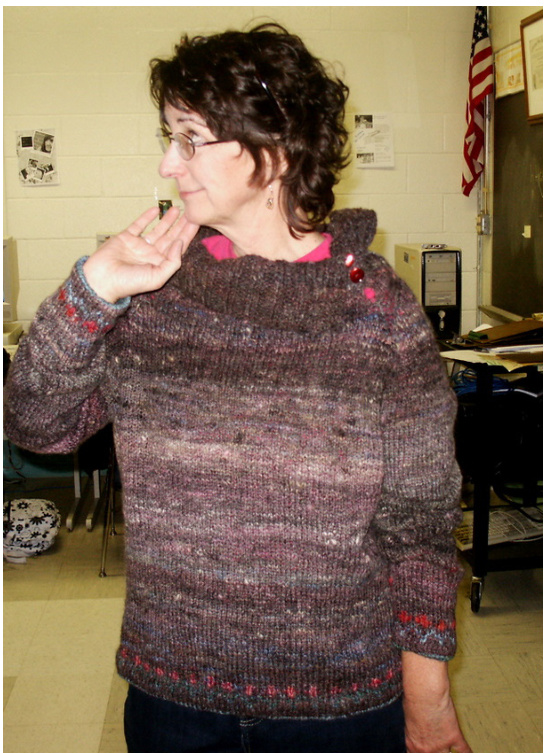
Remember that you marked the 1st and last stitches of the front and the back -- well now you can decrease on either side of the marked stitches (4 of em) by using K 2tog. K1, SSK - this makes a 3 stitch raglan. The decrease is done every other round. You will progress quite quickly. NOTE: To determine when to stop decreasing and to shape the neck opening, you should try the sweater on. My shoulders are quite broad for my size, so I stopped once there were 16 stitches between the raglan decreases (on the shoulder/sleeve side). If you don't want a large neck opening just keep decreasing until you have eaten all of the sleeve stitches, and the front and back raglan stitches meet. Once there are 16 stitches (or whatever you end up deciding on) BETWEEN the raglan stitches (on the shoulder) you can stop and shape the back/shoulders. This makes a large shoulder-to-shoulder neck opening as shown in the photos. Place the front stitches on a holder - this does NOT include the 3 raglan stitches on either side. Work the back and shoulders back and forth decreasing as you have been on every right side, and just purling back on the wrong side. Continue until there are 8 stitches remaining on the shoulders (between the raglan stitches).
Collar
with the right site facing: pick up 5 stitches from the edge that was created from shaping the back and shoulders knit the front stitches from the holder. Pick up 5 stitches on the other edge that was created from shaping the back and shoulders only and then knit across the rest of the shoulders & back. Count your stitches to determine how many stitches to use for your garter stitch opening on either side of the collar. I had i10 stitches, and used 3 stitches on each edge in garter stitch. That left 104 stitches to use for a k2 p2 ribbing - it is important that you keep this in mind. If you want the ribbing to match at each border, for example α k2 next to the garter border on each end, then you will have to account for 1 extra k2. The collar is not knit in the round. I picked the left side of the sweat. er as the opening for my collar. Work a $k2p2$ ribbing with a few stitches in garter at each edge of the collar. The collar needs to be long, in order to flop over, so knit $8"$ or so and press it out with your iron to make it floppy.
Buttons
Sew in 1 or 2 buttons near the base of one side of the collar, and then just smoosh the stitches around and force the button into the border of the other side. there is no real need to knit button holes, garter and size 7 needles make a sufficiently loose knit to just force the button through.
Crewneck Collar variation.
The first time I made this sweater I knit it up to the base of the neck and then did the split ribbed collar. To do this do the following: Knit the raglan decrease until there are 10 stitches between the raglan bands on the shoulders. Reserve 5 stitches on either side of the front then place the remaining front stitches on a holder Work back and forth, decreasing as usual. until the 5 front stitches and the 10 shoul der stitches disappear. Follow the directions for the collar, picking up 3-4 stitches on the edges formed from the back shaping
Finishing
Pick up the cast on stitches along the bottom edge and using one of the flower border colors, knit $1.5"$ ,bind off and hem lossely to sweater on the inside. Do the same with the sleeve edges.
Percentage System
Determine BODy stitches by multiplying your gauge \* the desired size (38, 40, 42, 4 .)-- everything will be a percentage of the body stitches. Sleeves $=20-25\%$ (lower edge) of body Underarm $\mathsf{s}\dag\mathsf{s}=10\%$ (loose, $8\%$ fitted) CrewNeckopening $=40\%$