Eccentric Cables Cardigan by Ann
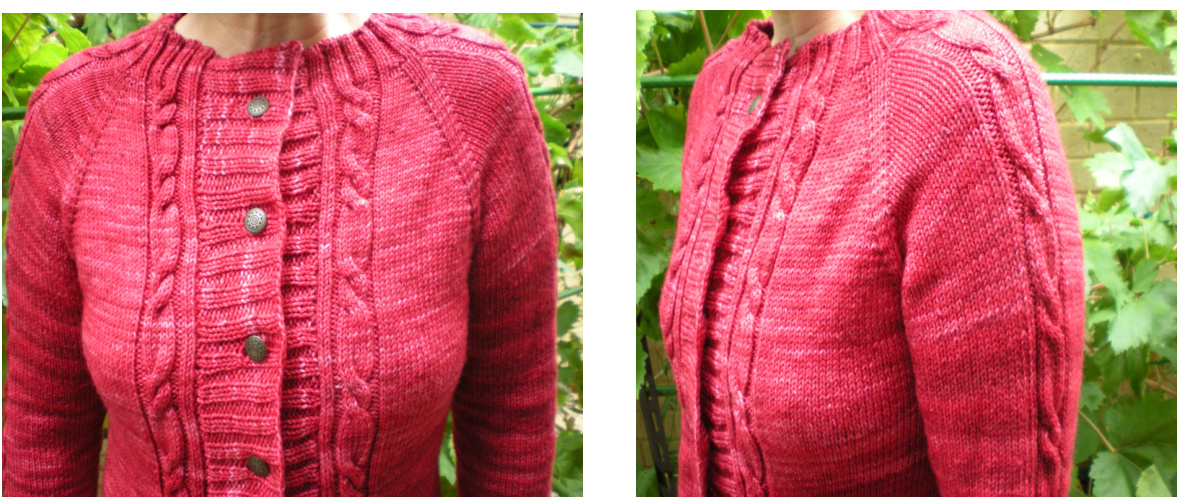
"This cardigan is specially designed for Knitting Inspirations $3^{r d}$ Annual Retreat 2010.It's a design that introduces a knitter to down top knitting & a template that can be easily adapted to any size. Rows of eccentric cables are added on the front, back & sleeves of the cardigan to provide some variation to the simple pattern ."
Materials
3 - 4 skeins of Handmaiden Casbah ( $80\%$ merino, $10\%$ cashmere, $10\%$ nylon) 3.75 mm circular needles
Gauge
30 sts per 10 cm in rib pattern (k2, p2) (This is the gauge that I use for my cardigan & your gauge may be different. Do not worry too much about the gauge, just use the one that gives you the right tension)
Measurements
There are no specific measurements, just measure as you go so that you can fit the cardigan to your own size (my cardigan was knitted in the small size with a bust of $34^{\prime\prime}$ This pattern is different from ordinary patterns, as you will find that there are no sizes given. They are just instructions to achieve the size of your choice.
Abbreviations
Kfb - knit the front of the stitch & knit through the back of the stitch (2 stitches) K2tog - knit 2 stitches together Ssk - slip 1 stitch knitwise, slip next stitch knitwise, place these 2 stitches back to left needle & knit them together through the back Pm - place marker Slm - slip marker Yo - yarn over
Eccentric Cable Pattern
Row 1, 3. 7, 9, 13, 15 - p2, k6, p2 Row 2 & all even rows - k2, p6, k2 Row 5, 11 - p2, C6F (slip 3 sts onto cable needle & hold at front, k3, k3 from cable needle), p2 I did the cable stitch on every $5^{+\mathfrak{h}}$ & 11th row & you can vary this. I also vary between cabling from the front to the back, ie holding the cable needle at the back. Use your creativity !
2-st Twist
Row 1 - k2tog but do not slip sts off the needle, knit the $1^{s\dagger}$ st again & then slipped both sts off the needle (RT - Right Twist) Row 2 - p2 Or Row 1 - knit through the back of $2^{n d}$ st & do not slip st off the needle, knit through the backs of the 1st & 2nd sts & then slipped both sts off the needle (LT - Left Twist) Row 2 - p2 Again you can use either the RT or the LT or a variation of both
Start at the neck
Cast on 110 stitches (I use the long tail tubular cast on to achieve a neat edge for my collar & you can use this technique by viewing this video http://www.youtube.com/watch?v=SrOoXpBwts) (if you have a different gauge, then measure around the neckline that you want & cast on the numbers of stitches that matches your gauge eg. The neckline that I wanted is $38c m\times30$ sts (my gauge) divided by $10=114$ Sts) Knit in $2\times2$ rib for 5-8 cm (depends on how high you want the collar to be) On the next row, you will be placing markers at 4 points to mark the 2 fronts, 2 sleeves & the back & you will also be setting up the cable pattern. (you can read more of this formula from this reference, "The Incredible, Custom-fit Raglan Sweater" on http://www.woolworks.org/patterns/raglan.html ) Row 1 (Rs) - k4, p2, k6, p2, k4, pm, k2, p2, k6, p2, k2, pm, k12, p2, k6, p2, k2, p2, k6,p2, k12, pm, k2, p2, k6, p2, k2, pm, k4, p2, k6,p2, k4 (front $=18$ sts each, back $\underline{{\underline{{\mathbf{\delta\pi}}}}}$ 46 sts, sleeves $\underline{{\underline{{\mathbf{\delta\pi}}}}}$ 14 sts each) Row 2 & all even rows (WS) - knit according to the pattern established (knit the knits & purl the purls) Row $3-{\tt k4}$ , start row 3 of cable pattern, knit to 2 sts before marker, kfb, k1, slm, k1, kfb, start row 3 of cable pattern, knit to 2 sts before marker, kfb, k1, slm, k1, kfb, k10, start row 3 of cable pattern, 2-st twist, start row 3 of cable pattern, knit to 2 sts before marker, kfb, k1, slm, k1, kfb, start row 3 of cable pattern, knit to 2 sts before marker, kfb, k1, slm, k1, kfb, k2, start row 3 of cable pattern, knit to 2 sts before marker, k4 ( 8 sts increased) Row 4 - knit according to the pattern established (knit the knits & purl the purls) Repeat Rows 3 & 4 till the desired size. (measure your armhole width less $10\%$ eg. if your armhole width is 40cm, then you should knit to 36cm or you can put your knitting around your arm & there should be a 2.5cm gap between the 2ends)
Body
Once you have reached the desired length, you are ready to work the body. Firstly you have to put the stitches for the sleeves on waste yarn. Next row $:$ knit to the $1^{s\dagger}$ marker, remove marker, using a darning needle with waste yarn, slip the stitches from the $1^{s\dagger}$ marker to the $2^{n d}$ marker, remove marker, cast on 4 sts, knit to the $3^{r d}$ marker, remove marker, using another piece of waste yarn, slip the stitches from the $3^{r d}$ marker to the $4^{\dag h}$ marker, remove marker, cast on 4 sts, knit to the end. Now all the stitches for the sleeves are held on 2 pieces of waste yarn. Tie a slip knot on each waste yarn to prevent the stitches from slipping out. You will knit the body stitches till the desired length with a 5-8cm rib band. You can cast off in rib or with the tubular cast off (see reference http://techknitting.blogspot.com/2008/01/tubular-cast-off-its-pretty.html)
Sleeves
Slip stitches on waste yarn to either a circular needle & knit the sleeve using the magic loop method. I prefer to knit the sleeves with dpns. Starting from one end of the underarm & with right side facing, pick up 2 sts from the middle of the cast on & then knit the stitches on the needle until to the other end of the underarm, pick up another 2 sts on the remaining cast on. Place a marker (to indicate start of round) & you can start knitting in the round. Knit for 6 cm (about 20 rounds) Next round : K1, k2tog, knit to last 3 sts, ssk, k1 Repeat this decrease round every $8^{+\mathfrak{h}}$ round for another 6-8 times. You can repeat this decrease round more frequently (eg. Every $8^{+\mathfrak{h}}$ or $6^{\dag h}$ round) if you want a narrower sleeve. Knit the sleeve to your desired length with a 5-8 cm rib cuff. Cast off in rib or with the tubular cast off.
Bands
Starting at bottom of the left front, pick up stitches up to the end of the collar. Work the band in rib pattern for 5-8cm. Do the same for the right front but remember to knit in the button holes. I started the button holes half way on the band on a right side row by doing a k2tog. yo For picking up the stitches, I pick up 2 sts for every 3 rows. Sew in the ends, give the cardigan a light block & it's ready to wear !


