Halloween Knitting Patterns
Mamma4earth
These are original designs by Linda Dawkins from Mamma4earth. If you have any questions please email lindadawkins@mweb.co.za I have compiled this little book of Halloween patterns just for you. Happy knitting Kind regards
Linda
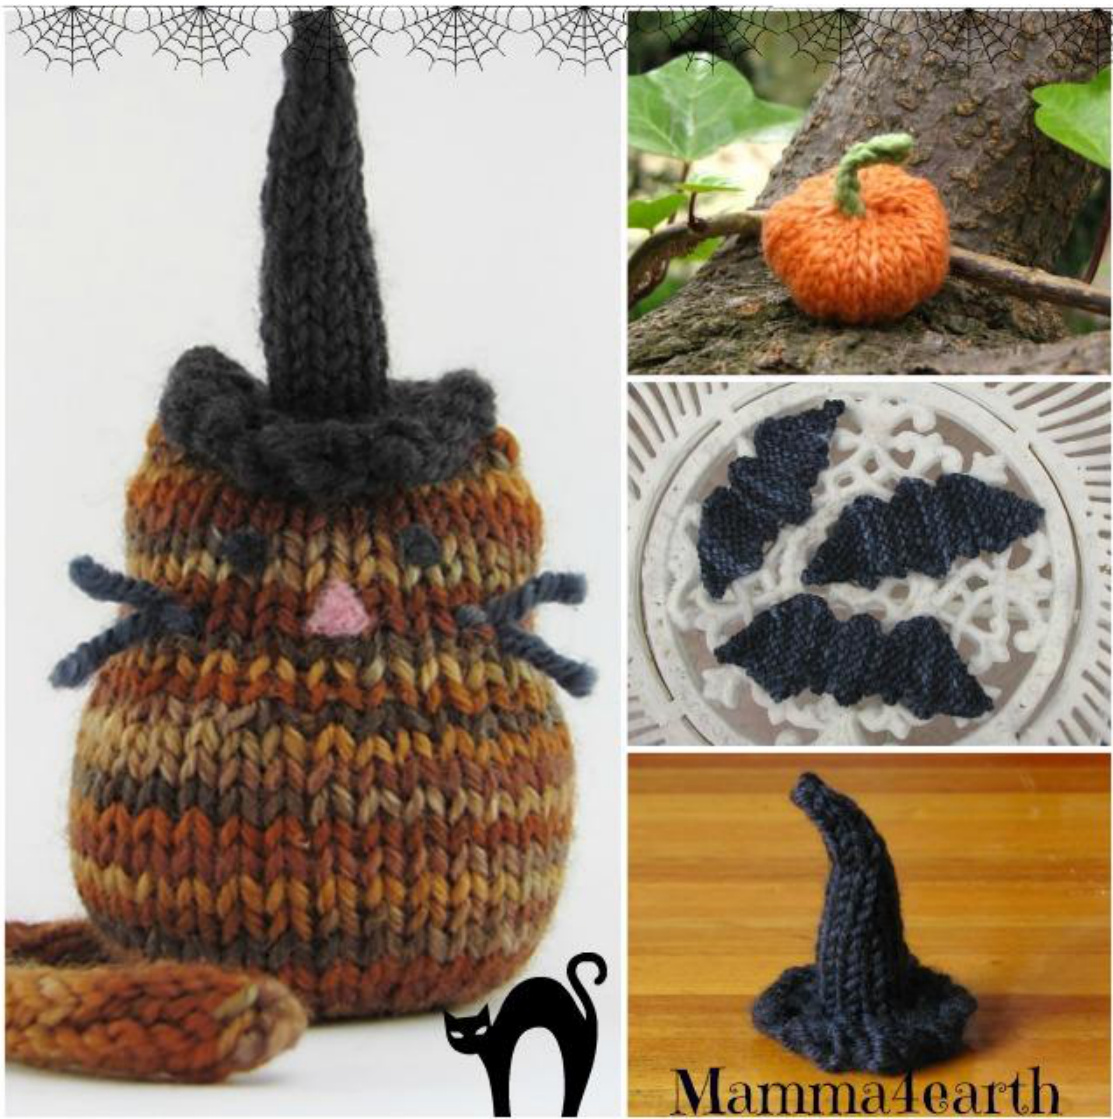
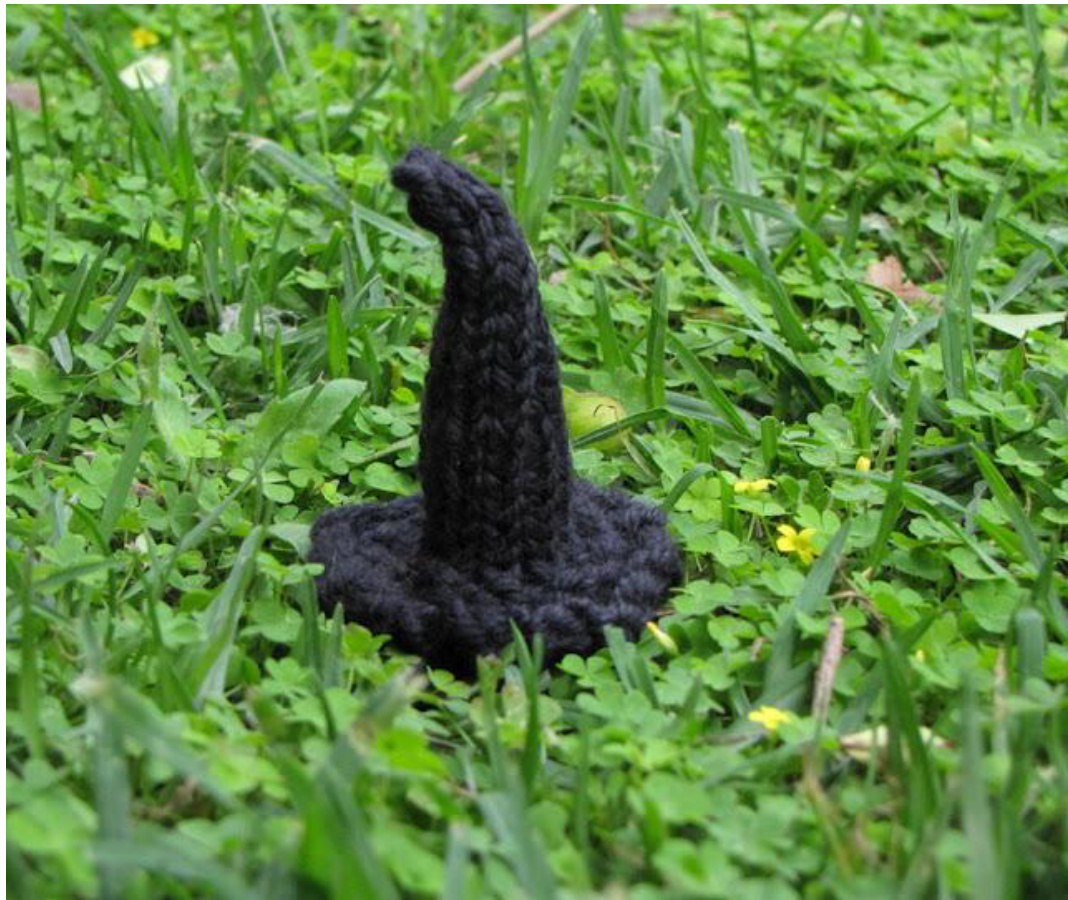
http://www.naturalsuburbia.com/ http://www.etsy.com/shop/mamma4earth?ref=si shop http://www.ravelry.com/groups/mamma4earth http://www.craftsy.com/user/122930/pattern-store http://pinterest.com/mamma4earth/ https://twitter.com/mamma4earth http://www.facebook.com/pages/mamma4earth/48290052809 The Witches Hat
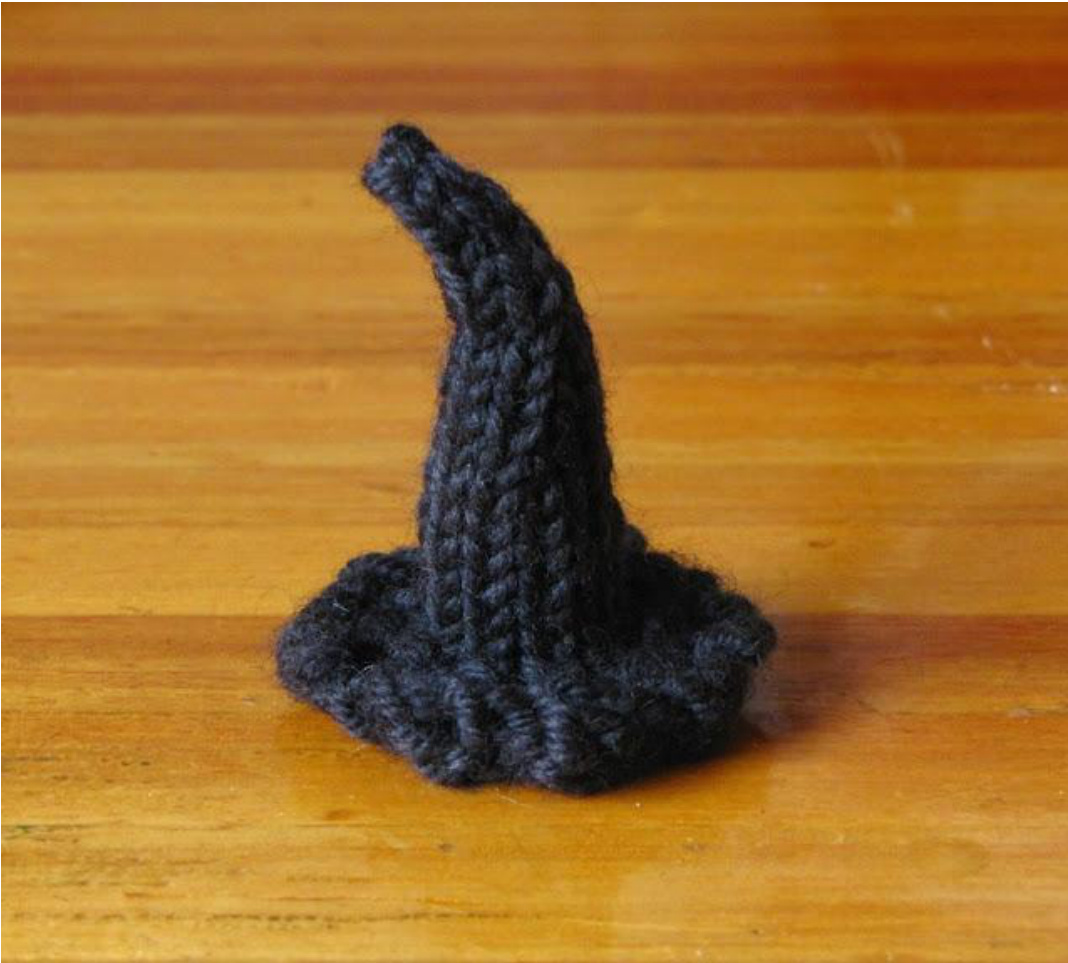
Materials:
Scraps of black yarn. 4mm / 6 US circular needles or 4 DPNs Wool needle for sewing in the ends Fleece if you want to stuff your hat, makes it look nice and full.
Pattern:
Cast on 30 stitches and join for knitting in the round with the magic loop technique or your DPNs. Round 1: Knit Round 2:(Knit 1, Knit 2 together) across the round. (20 stitches) Round 3: Purl Round 4: Knit 2 together across the round. (10 stitches) Rounds 5 to 11: Knit Round 12: Knit 1, knit 2 together, knit 4, knit 2 together, knit 1. (8 stitches) Rounds 13-15: Knit Round 16: Knit 1, knit 2 together, knit 2, knit 2 together, knit 1. (6 stitches) Rounds 17-18: Knit Round 19: Knit 1 knit 2 tog, knit 2 tog, knit 1. (4 stitches) Round 20: Knit Round 21: Knit 2 together, knit 2 together. Break yarn and thread it through a wool needle and thread the needle through the remaining stitches and pull tight. Sew in all the ends. You are finished! Happy knitting:)
Knitted Pumpkin Pattern:

Materials Needed:
Wool needle for sewing up Circular needles 2 double pointed needles Orange yarn for your pumpkin and green for your stem. Fleece for stuffing I have knitted this pumpkin using the magic loop technique.
Pattern:
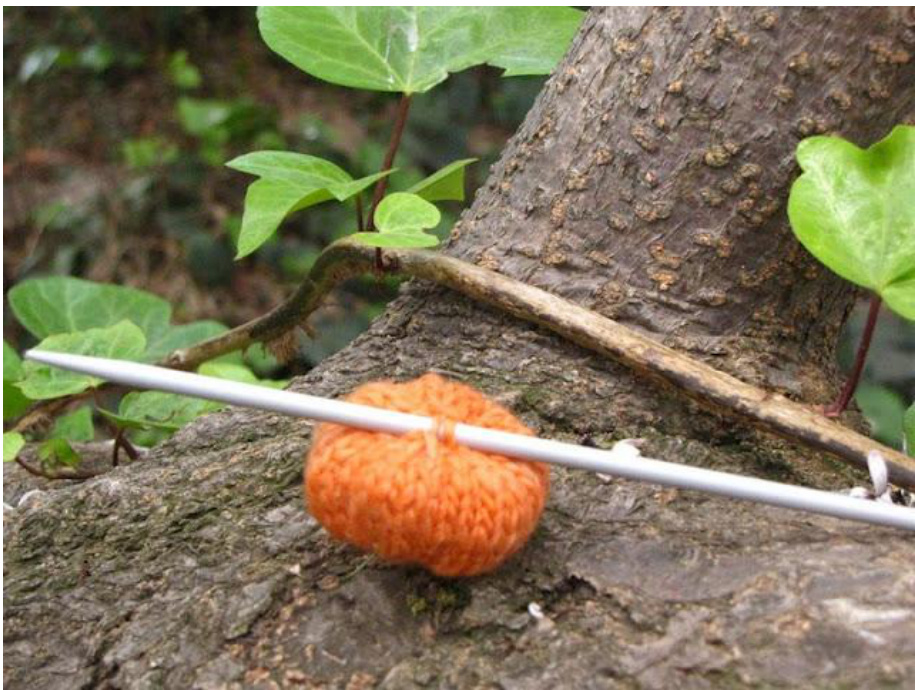
With circular needles cast on 9 stitches. Round 1: Knit the first round. Round 2: Increase into every stitch in the second round, you will now have 18 stitches. Round 3: Knit 1 round. Round 4: Increase into each stitch in the 4th round, you will now have 36 stitches. Round 5 to 9: Knit Round 10: Knit 2 together all across the round.(18 stitches) Round 11: Knit. Round 12: Knit 2 together all across the round. (9 stitches) Round 13: Knit. Leaving a long thread, break yarn and thread onto a wool needle, thread your wool needle through your stitches, stuff and pull tight. Do not overstuff as this might make your pumpkin look too round, I understuffed my pumpkin and the convolutions of the pumpkin's skin showed up quite nicely. The wool I knitted him in was also a little on the chunky side and handspun and thisworked quitewell:) Once you have closed the top opening of your pumpkin, take your needle, push down through your pumpkin, pull out on the other side and pull tight. This makes a depression on the top of your pumpkin. Sew tightly underneath.
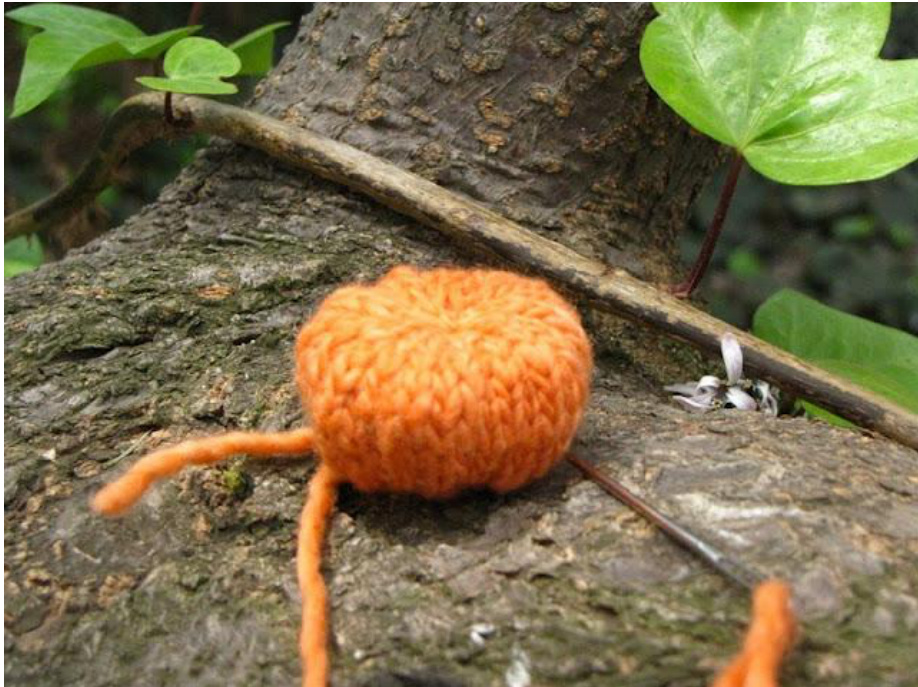
Concave Pumpkin Top
Pick up 2 stitches in the middle of the top of your pumpkin, attach your green thread and knit an I-cord for a stalk.
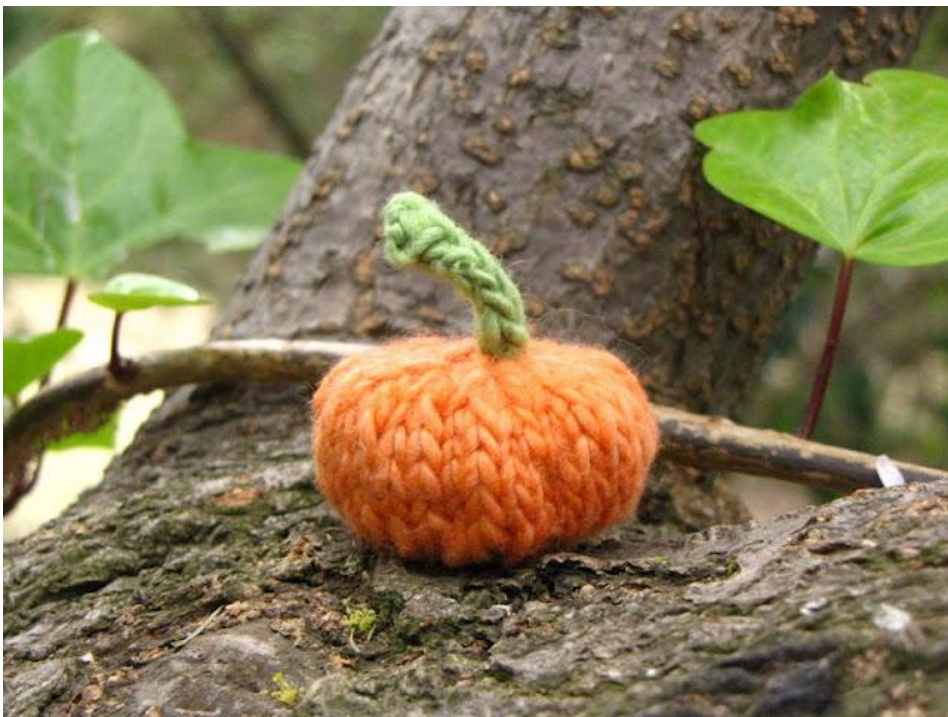
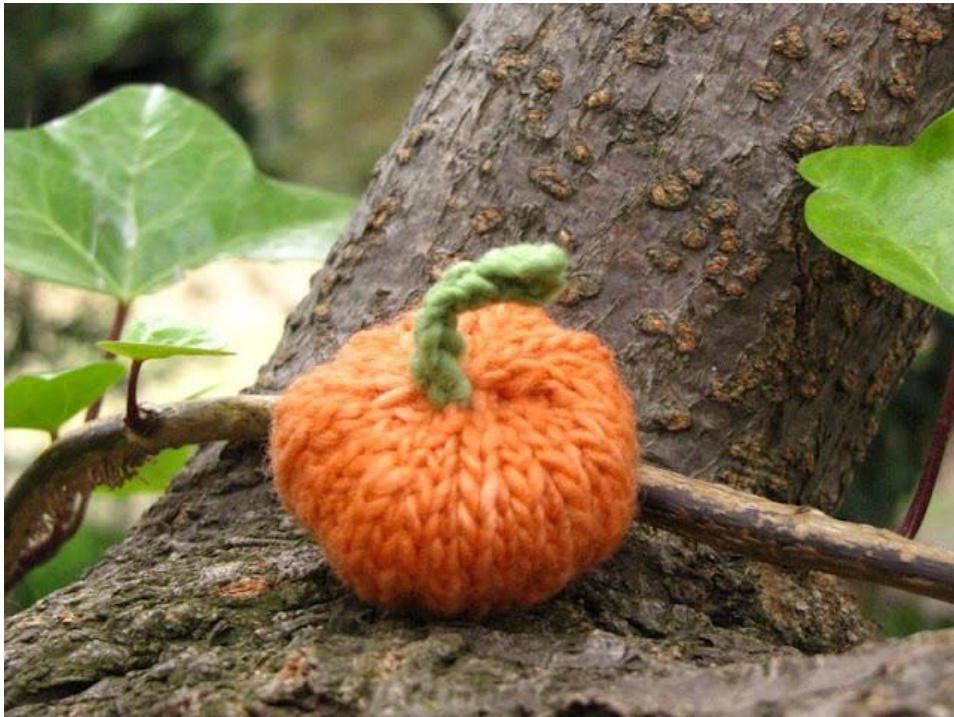
Sew in all your ends and you are finished, enjoy!!
Bat Knitting Pattern

Materials:
Double knitting black yarn 4mm needles wool needle to sew in ends
Pattern:
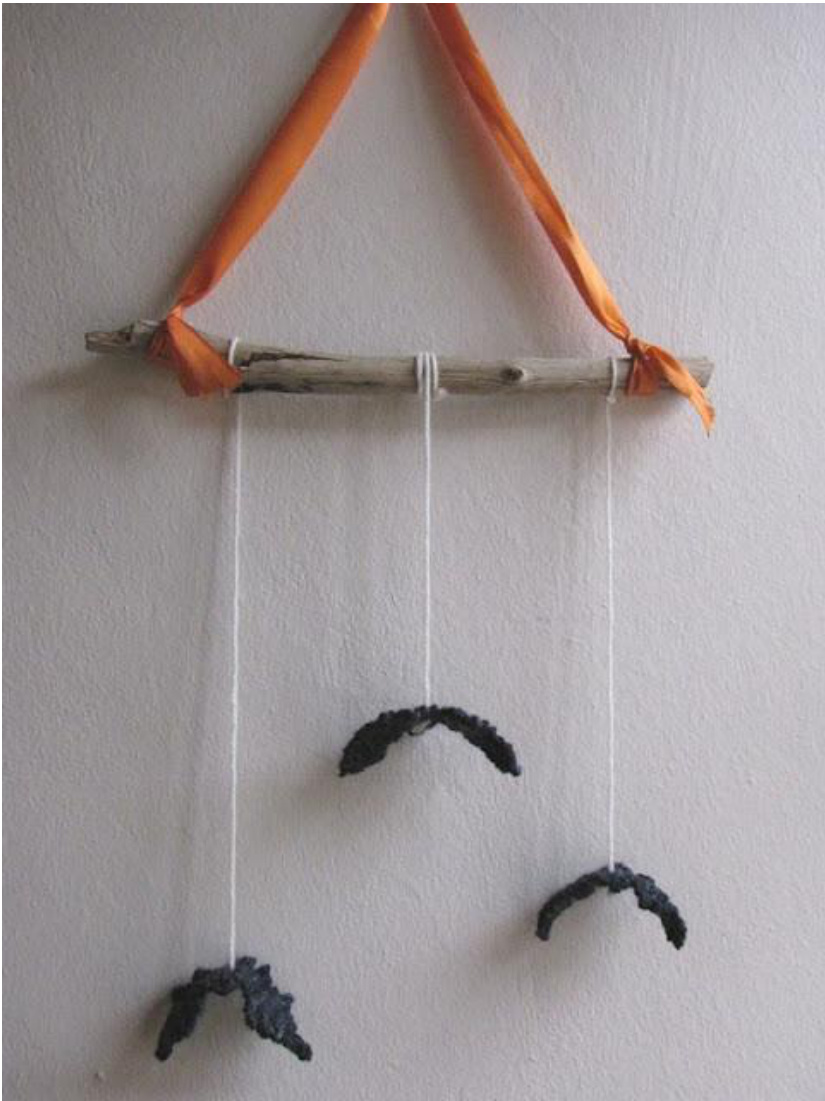
Cast on 2 stitches. Knit 2 rows. Row 3: Knit 1, increase into the front and back of the last stitch (3 stitches). Row 4: Knit Row 5: Knit 2, increase into the front and back of the last stitch (4 stitches). Row 6: Knit Row 7: Knit 3, increase into the front and back of the last stitch (5 stitches). Row 8: Knit Row 9: Increase 1 stitch, knit to end, increase 1 stitch on end. (7 stitches) Row 10:Knit Row 11: Knit across row, increase 1 stitch at the end of row. (8 stitches) Row 12: Knit Row 13: Knit 2 together, knit across row and increase 1 stitch on the end of row. (8 stitches) Row 14: Knit. Row 15: Increase 1 stitch, knit across row, knit 2 together on end. (8 stitches) Row 16: Knit Row 17: Knit 2 together, knit across, knit 2 together at end. (6 stitches) Row 18: Knit Row 19: Increase 1 stitch at the beginning and the end. (8 stitches) Row 20: Knit Row 21: Increase 1 stitch at the beginning and the end of the row. (10 stitches) Row 22: Knit Row 23: Knit across row, knit 2 together at end. (9 stitches) Row 24: Knit Row 25: Knit 2 together, knit across row, knit 2 together. (7 stitches) Row 26: Knit Row 27: Knit 2 together, knit to the end of row. (6 stitches) Row 28: Knit Row 29: Increase 1 stitch at the beginning and end of the row. (8 stitches) Row 30: Knit Row 31: Decrease 1 stitch, knit across, increase 1 stitch on the end of row. (8 stitches) Row 32: Knit Row 33: Increase 1 stitch at the beginning of row, knit, decrease 1 stitch at the end of the row. (8 stitches) Row 34: Knit Row 35: Knit across row, decrease 1 stitch at the end of the row. (7 stitches) Row 36: Knit Row 37: Decrease 1 stitch at the beginning and end of the row. (5 stitches) Row 38: Knit Row 39: Knit 3 stitches, knit 2 together. (4 stitches) Row 40: Knit Row 41: Knit 2 stitches, knit 2 together. (3 stitches) Row 42: Knit Row 43: Knit 1, knit 2 together. (2 stitches) Row 44: Knit Row 45: Knit Bind off. Finishing off: Sew in all ends. Halloween Mobile: Materials: Piece of drift wood or branch Orange ribbon Natural yarn Scissors Assemble as in the photo below...
Witches Cat:
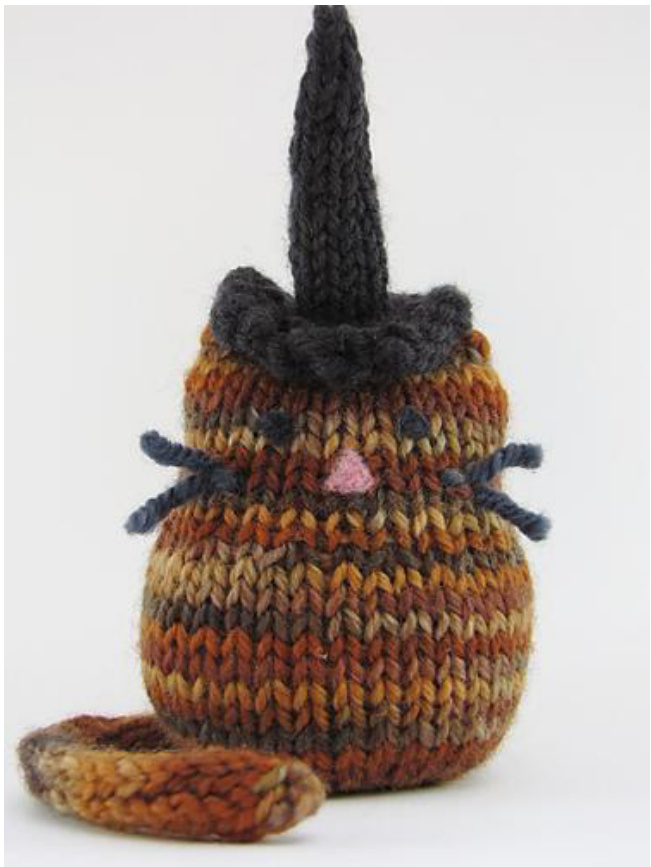
Materials:
Oddments of variegated dk wool 4mm circular needle or dpns or 4mm straight needles Sewing up needle Fleece for stuffing
Abbreviations:
kfb: knit into the front and back of the stitch to increase dpns: double pointed needles knit 2 tog: knit 2 stitches together
Pattern:
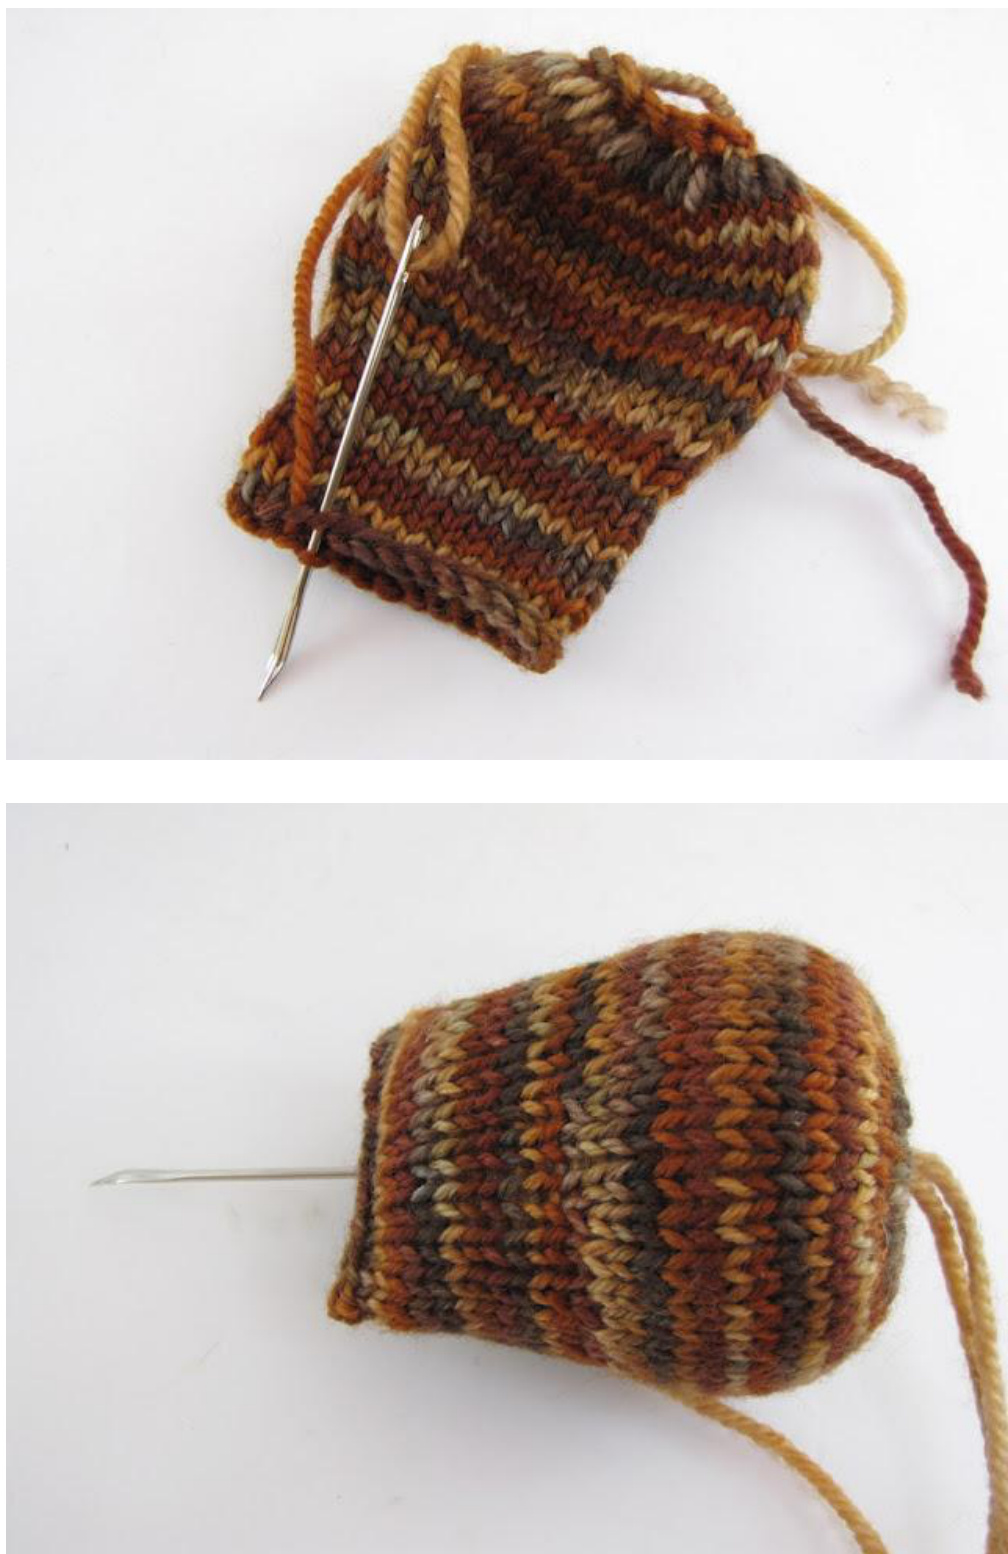
Cast on 10 stitches and join for knitting in the round with the magic loop or on dpns Round 1: Knit Round 2: kfb into each stitch (20 stitches) Round 3: kfb into each stitch (40 stitches) Rounds 4-15: Knit Round 16: (Knit 1, knit 2 tog) across the round knit 1 stitch on the end (27 stitches) Rounds 17-26: Knit Cast off
Finishing Off:
Hold the top of the cast off edge together flat and sew in and out, closing the top of your cat's head.
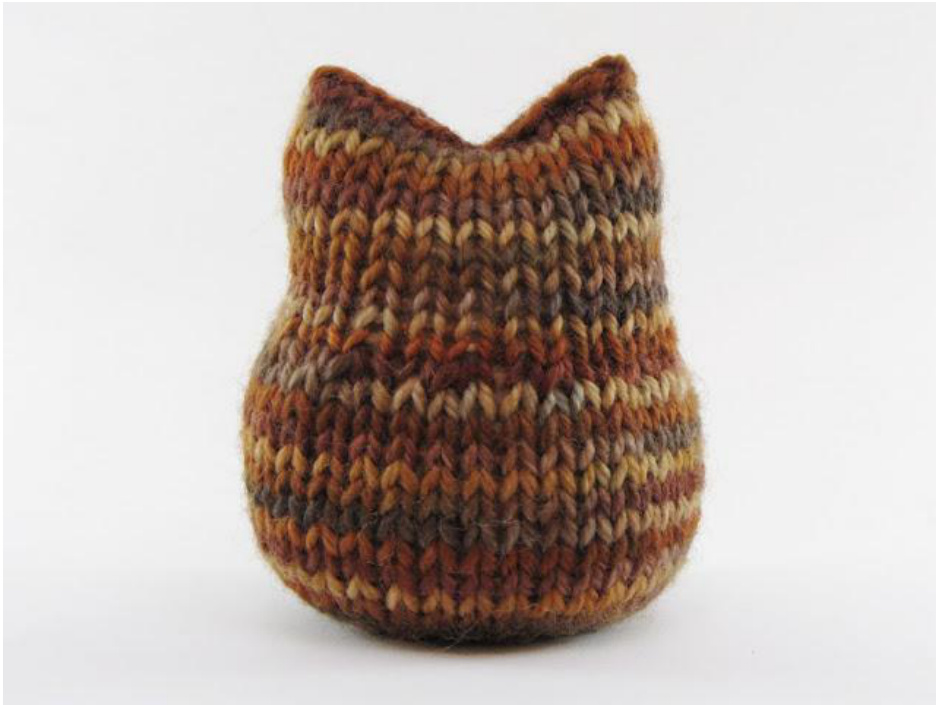
Stuff Beans and make him plump! Once you are happy with the firmness, sew around the open base of his body and pull tight to close. Take a needle and wool, sew into the base of Beans, secure the wool and push the needle up through his body and pull it out the top of his head, sew back down again and pull. This is going to make a nice big concave depression that will form his two ears. Once you have sewn back down, pull the needle and wool out the base of the body, pull tight and sew the wool securely onto the knitting, ensuring the depression remains at the top of the head.
With a felting needle and some black and pink fleece, needle felt on 2 eyes and a nose.
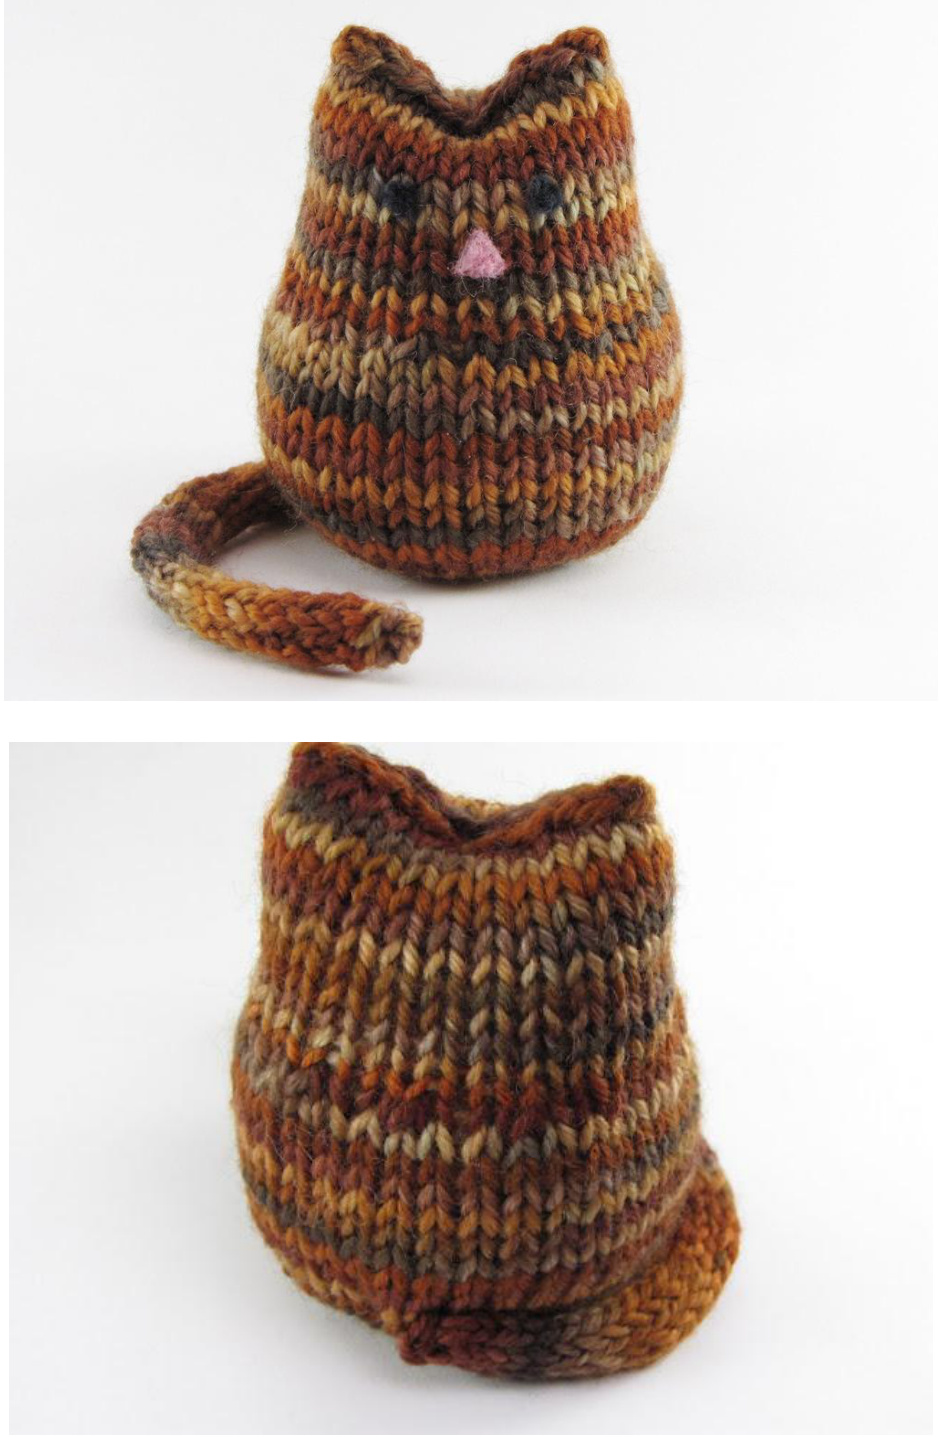
Tail:
With 2 dpns (double pointed needles) cast on 5 stitches and knit an i-cord for the tail, I knit mine about 5 inches long and cast off. Sew on the tail at the back of Beans to the side so that it can wrap around his body.
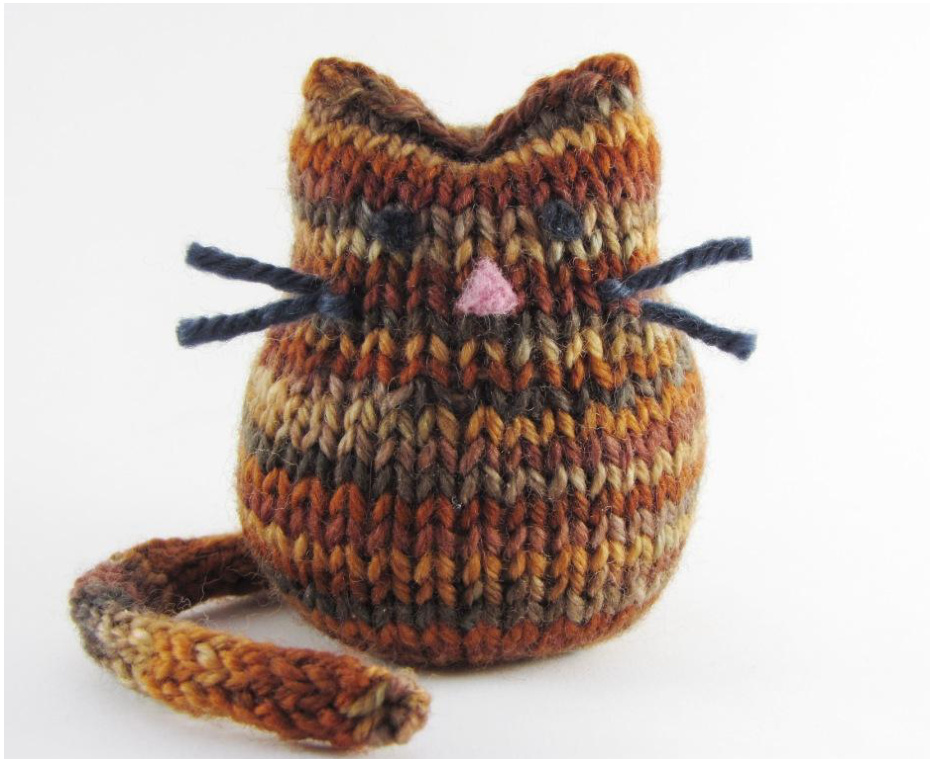
like to add whiskers, just sew some on with a needle and wool in a rug stitch
Please Note:
These patterns are for personal use only, and not for resale, items knitted from these patterns MAY be sold on condition that, I, Linda Dawkins, Mamma4earth am credited as the designer and you link to my shop www.mamma4earth.etsy.com in your listings or on your sales tags. No production line selling of these items are allowed, thank you.Copyright of Mamma4earth @ Mamma4earth Facebook Page: http://www.facebook.com/pages/mamma4earth/48290052809 Mamma4earth Ravelry Group: http://www.ravelry.com/groups/mamma4earth Mamma4earth Blog: http://www.naturalsuburbia.com Mamma4earth Etsy: http://www.etsy.com/shop/mamma4earth?ref=si shop Mamma4earth Craftsy: http://www.craftsy.com/user/122930/pattern--store Mamma4earth Pinterest: http://pinterest.com/mamma4earth/ Mamma4earth Twitter: https://twitter.com/mamma4earth


