Super Mario - amigurumi crochet pattern By Roxanne Wood
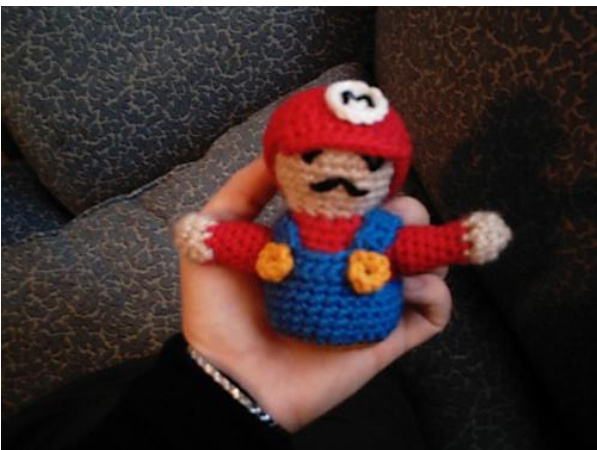
This pattern is recommended for the beginning to intermediate crocheter, with knowledge of color changing, increasing, and decreasing. Also basic sewing and embroidery skills are helpful. The Mario is made in separate pieces which include: body, head, arms, overalls, hat, 'buttons', and the 'm' emblem on the hat. Each piece is worked in a spiral. A stitch marker is recommended in order to keep up with where you are. Supplies: -one crochet hook US size G -dk to worsted weight yarn in the following colors: red, blue, tan, gold, dark gold, black, and cream or white. -stitch marker -yarn needle -poly stuffing Abbreviations: CH-Chain ST-Stitch SL ST- Slip Stitch SC-Single Crochet SC DEC-Single Decrease (worked over two stitches) Rep.-Repeat The Mario measures about 5" tall when finished. Each piece will begin in the same manner, with a chain 2, followed by 5 sc in the first chain. Each piece should be finished by making a sl st into the next st to ensure a smooth finish. We will begin with the body, in the center of the bottom: with red Chain 2 Round 1: In the first st, work a total of 6 SC (6) 2: Work 2 sc in each ST (12) 3: 2 sc in next st, 1 sc\*, rep. from \* 5 more times (18) 4: 2 sc in next st, 2 sc\*, rep from \* 5 more times (24) 5: 2 sc in next st, 3 sc\*, rep from \* 5 more times (30) 6: 2 sc in next st, 4 sc\*, rep from \* 5 more times (36) 7: in back loops only, sc dec, 4sc\*, rep from \* 5 more times (30) 8-10: 30 sC 11: sc dec, 3sc\*, rep from \* 5x more (24) 12: 24 sC 13: sc dec, 2 sc\*, rep from \* 5x more (18) 14: 18 sC 15: sc dec, 1 sc\*, rep from \* 5x more (12) 16: 12 sC finish off, weaving in end. Stuff firmly and perhaps add some sort of weight in the bottom before stuffing to help the little guy stand better! head: with tan, rounds 1-5: work as for body (30) 6-8: 30 sc (30) 9: sc dec, 3sc\*, rep from \* 5x more (24) 10: 24 sC (24) 11:sc dec 12x (12) finish off, leaving a long tail for sewing head and body together. Stuff head firmly. arms (make 2): with tan, begin with 6 sc as established round 2: sc 2 in each sc of previous round (12) 3: sc dec 6x (6) 4: attaching red, 6 sc (6) 5: 2 sc in next sc, 2 sc \*, rep from \* 2x (8) 6: 8 sC 7: 2 sc in next sc, 3 sc\*, rep from \* 2x (10) 8-10: 10 sC finish off, leaving a long tail for sewing to body. Stuff firmly Now we will attach the body to head and then the arms to body, in the appropriate places of course! At this point, our little Mario is looking a bit naked! Let's give him some clothes! Overalls: with dark gold, work rounds 1-6 of the 'body' instructions switching to blue, work rounds 7-10 of 'body" round 11: 30 sc (30) finish off, leaving a 8" tail. Try this peice on Mario and rotate the tail to the back. Now we will work the front flap. Continue as follows: Join in the 12th sc from where you finished off. row 1-3: 8 sc, ch 1 and turn strap # 1: after ch1 and turn on row 3, work 2 sc, ch 1 and turn continue to lengthen the strap for 10 more rows. finish off, leaving a relatively long tail. now for the other strap: join on opposite side and work 11 rows of 2 sc each to mirror the first strap. Dress Mario in the Overalls and secure straps in the center of theback. Buttons (for overalls) (make 2): with gold, chain 2 work 6 sc in first chain. finish off, leaving long tails to firmly secure buttons in appropriate places, which you may do now or later. hat: with red, work rounds 1-6 of body. (36) 7: sc dec, 4 sc\*, rep from \* 5x more (30) 8-9: 30 sc (30) finish off, leaving a long tail for brim: in 11th sc from where you finished off, join and work 10 sc, ch 1 and turn. row2:10sc 3: sl 1, 8 sc, ch 1 and turn 4: 8 sc finish off, and weave in tail. 'm'emblem: with cream or white, ch 2 and work 6 sc in first chain as before. rnd 2: work 2 sc in each of the 6 in the previous round (12) finish off. Attach this to the hat in the center front. With the black yarn, apply the letter "M" into the circle. I used the long tail of the hat to secure the hat to Mario, but you may not want to; in this case weave in the tail. With Black, embroider eyes and moustache as pictured or as you wish. I hope that you think this Mario is as cute as I do!


