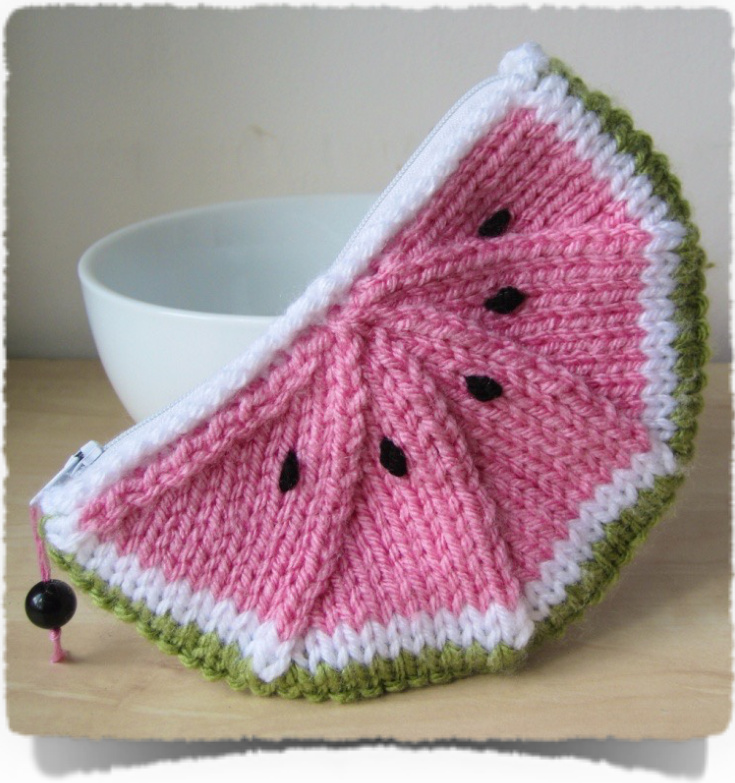
WATERMELON PURSE
KNITTING PATTERNS BY AMANDA BERRY fluffandfuzz@googlemail.com www.fluffandfuzz.weebly.com
YARN + NOTIONS
Needles:
· A pair of 5.5mm straight knitting needles (US 9)
Notions:
· A darning or tapestry needle to sew the knitted pieces together · 1 x 18cm (or longer) closed end zipper, cotton thread and sewing needle Optional decoration - a bead and embroidery thread to add a zipper pull.
Yarn:
Chunky weight yarns, and less than 25g in each colour:
NOTES
Pink: Stylecraft Special Chunky in fondant pink Finished size: The finished purse is 16.5cm wide at the top, and 10cm deep. Green: Stylecraft Special Chunky in meadow green Work flat: All pieces are knitted flat (back and forth) on a pair of straight knitting needles. White: Stylecraft Special Chunky in white The chunky yarn used was sold in skeins weighing 100g, and one skein in each colour will be more than sufficient to knit your purse. Tension: The tension is approximately 15 sts x 21 rows for a 10cm x 10cm square in stockinette stitch on 5.5mm needles. Don't worry too much about tension for this pattern. Casting on: Unless otherwise specified, I prefer to use the long tail cast on for all pieces.

Black: A small amount of DK weight yarn to embroider the pips
ABBREVIATIONS
KNITTING PATTERNS
DK Double knitting or light worsted weight yarn
k
Knit kfb Increase: knit twice into the stitch. Knit into the front of the next stitch on the left-hand needle, but do not slip off the needle. Then take the right-hand needle and knit into the back of the stitch, then remove the loop from the left-hand needle.
p Purl
p2tog Decrease: purl two stitches together
Pull through to cast off
Cut the yarn leaving at least a 30cm tail. Thread the tail onto a darning needle and sew through the remaining sts on the knitting needle. Pull the sts off the knitting needle on to the yarn, gather together tightly and secure the yarn. rep Repeat st(s) Stitch(es) WS Wrong side [..] Repeat the sequence between the square brackets by the number indicated. (.. sts) The number in round brackets at the end of the instruction indicates the number of stitches after working the row. Copyright @ 2014 Amanda Berry All patterns designed by Amanda Berry are protected by international copyright laws. Any unauthorised copying will constitute an infringement of copyright. All rights reserved. Purse Make 1. Cast on 6 sts in pink on straight 5.5mm needles. Work rows 1 to 16 in pink. Row 1: p (6 sts, WS) Row 2: [kfb] x5, k1 (11 sts) Row 3: p (11 sts) Row 4: [k1, kfb] x 5, k1 (16 sts) Row 5: p (16 sts) Row 6: [k2, kfb] x 5, k1 (21 sts) Row 7: p (21 sts) Row 8: [k3, kfb] x 5, k1 (26 sts) Row 9: p (26 sts) Row 10: [k4, kfb] x 5, k1 (31 sts) Row 11: p (31 sts) Row 12: [k5, kfb] × 5, k1 (36 sts) Row 13: p (36 sts) Row 14: [k6, kfb] × 5, k1 (41 sts) Row 15: p (41 sts) Row 16: [k7, kfb] x 5, k1 (46 sts) Work rows 17 to 18 in white. Row 17: p (46 sts) Row 18: [k8, kfb] x5, k1 (51 sts) Work rows 19 to 21 in green. Rows 19 to 21: p (51 sts) Work rows 22 to 23 in white. Row 22: k (51 sts) Row 23: p1, [p2tog, p8] x5 (46 sts) Work rows 24 to 39 in pink. Row 24: k (46 sts) Row 25: p1, [p2tog, p7]x 5 (41 sts) Row 26:k (41 sts) Row 27: p1, [p2tog, p6] x 5 (36 sts) Row 28: k (36 sts) Row 29: p1, [p2tog, p5] x5 (31 sts) Row 30: k (31 sts) Row 31: p1, [p2tog, p4] x 5 (26 sts) Row 32: k (26 sts) Row 33: p1, [p2tog, p3]x 5 (21 sts) Row 34: k (21 sts) Row 35: p1, [p2tog, p2]x 5 (16 sts) Row 36: k (16 sts) Row 37: p1, [p2tog, p1]x5 (11 sts) Row 38:k (11 sts) Row 39: p1, [p2tog]x5 (6 sts) Pull through to cast off. Making up: Using another piece of yarn gather the cast on sts together on the other side to mirror the cast off side.
Purse Trim
This is the white trim which is sewn onto the zipper tape. In white, and with the right side of the work facing you, pick up and knit 31 sts along the top edge of one side. Then cast off all stitches knit-wise. Repeat with the other side to finish the trim.
MAking UP
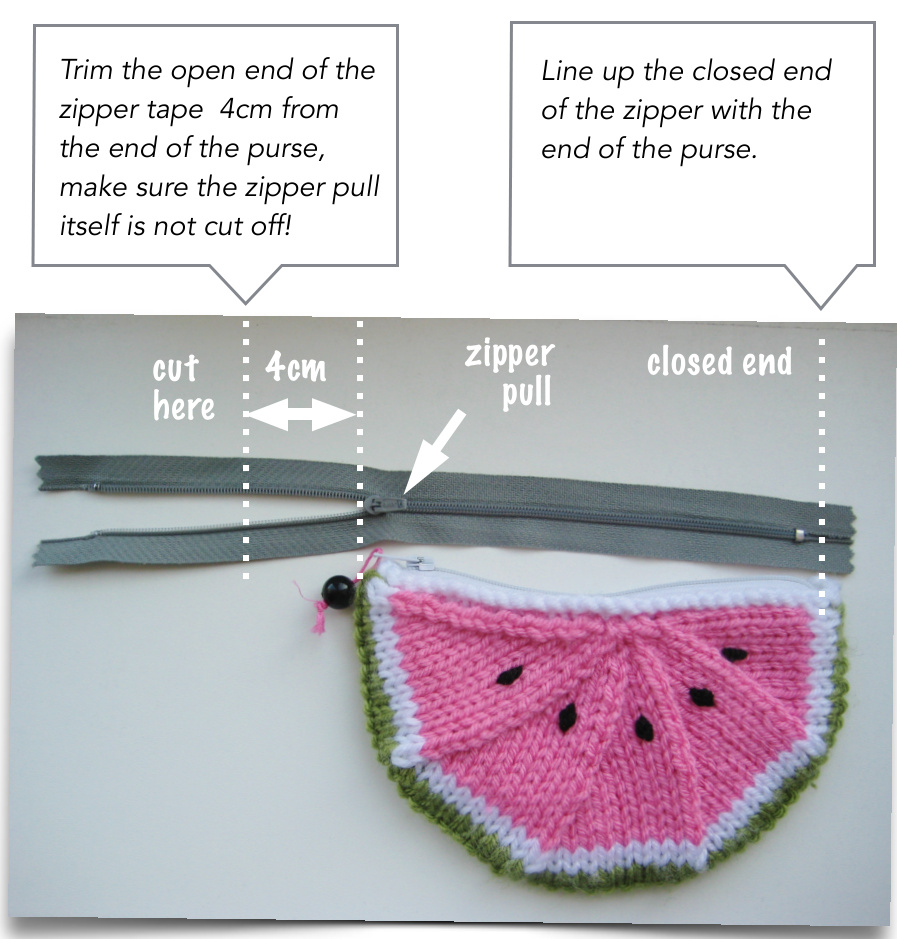
Zipper: Line up your zipper with the top of the purse tucking the ends inside. If you need to trim your zipper to fit, cut the open end so that it is about 4cm longer than the purse (see photo opposite), you can trim it shorter when you have finished to neaten it. Using a cotton thread and sewing needle, sew the zipper tape to the white trim along each side. Make sure the zipper teeth do not catch the knitting when it is pulled along. When finished, use pinking shears to trim the zipper tape ends on the inside of the purse so they do not fray.
Finishing: To finish the purse, embroider the pips in black wool. Finally, if you wish to add a zipper pull, thread a bead onto embroidery thread and tie through the zipper pull.


