
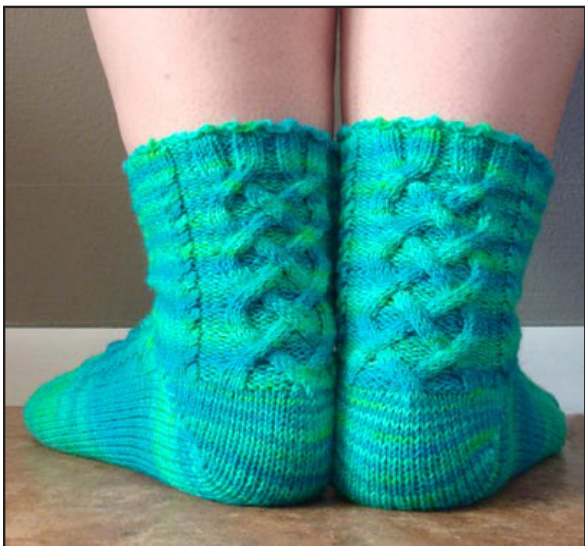
Yarn: 1 skein Jitterbug Sock Yarn (320 yds) Gauge: 8 stitches per inch - US 1 (2.25 mm) needles $k=k\mathsf{n i t}$ ${\mathfrak{p}}={\mathfrak{p}}{\mathfrak{u}}{\mathfrak{r}}|$ st st $=$ stockinette stitch ${\bf c o}={\mathsf{C a S t}}\,0\uparrow$ kbf $=$ knit into back and front of stitch (increase) w&t $=$ wrap and turn $\pmb{5}=$ slip bo $=$ bind off
Notes:
This sock pattern is not for the newbie sock knitter and also with the assumption that the knitter has a basic understanding of sock construction. The instructions are written for a medium 7.5 foot size, but scaling up or down is easily attainable by adding or removing some key purl stitches, located between different sets of cables.These sections are indicated on the chart. The overall stitch count as written is for 72 stitches around with the large main cable contains 20 stitches and the smallside cables containing 4 stitches. You can personalize the sock to your desire by changing the toe / heel or cuff, but the below pattern is written for toe-up on two circular needles using the magic loop cast-on and a short-row for the heal.
Toe:
Place a slip knot onto needle 1 (count as one stitch) and holding both needle 1 and 2 with ends facing same direction start to CO 16 stitches (8 stitches on each needle). Holding the yarn as if doing a long-tail cast-on; yarn tail hooked on on top finger, active yarn hooked on thump, weave the bottom needle 2 up and around for one stitch. Then weave the top needle down and around for the second stitch on needle 1. Continue in this manner until all 8 stitches are on each needle. For more detailed instructions please visit: www.knitty. com keyword: magic cast-on Turn work and knit across 8 stitches on needle 1. Please note on needle 2 of your first round, that it is easier to knit through the back stitch because of the placement of each stitch. This is the only time that is necessary. \*Round 2: k1, kbf, knit until one stitch to end, kbf, k1 (increases are for both needle 1 and needle 2) for a total increase of 4 stitches on round 2. Knit 3 plain st st rounds. Repeat from \* until you have 36 stitches on each needle for a total of 72 stitches.
Foot:
Needle 1 will represent the top of the fot and Needle 2 will represent the bottom / heel stitches. Begin Cable chart across Needle 1 starting with row 1. Please note that the chart has been marked with highlighted adjustable sections for proper fit. If you need to make the sock larger, add purl stitches evenly in these sections. This means if you add a purl stitch before the large cable add an additional stitch after the chart so as to maintain symmetric look. All Odd rows contain cable details and all Even Rows are considered resting rows. Also note that the small side cables skip every other odd row. Needle 2 will maintain a st st.
Heel:
When you've reached desired foot length - usually 2 inches short of full foot length. Then heel construction begins. Take note of where in the cable patten you stop for Needle 1. It will be crucial for when you start knitting the cuff. You will begin knitting the heal with Needle 2 stitches only. Knit across heel stitches until last stitch remains. W&T. You can do this by keeping the unknit stitch on your left needle. Bring yarn to front. Slip unknit stitch to Right needle [slip as if to purl}. Bring yarn to back. Turn work. Slip st again to Right needle without being knit and by doing so will have the working yarn wrapped around it. Purl across until one stitch remains. W&T. Bring yarn to back. Slip stitch to Right needle. Bring yarn to front. Turn work. Slip stitch to right needle and knit until 1 st before the gap of the previously wrapped st. Continue working back and forth wrapping and turning until half the stitches (18) have been wrapped (total of 9 st on each side of heel). Halfof your heal is complete at this point. Second halfinvolves picking up the wrapped stitches. RS facing knit until you reach a wrapped stitch. Insert the right needle tip into the wrap from bottom to top, and then into the stitch. Knit both together. W&T on the next stitch causing that stitch to be wrapped twice.
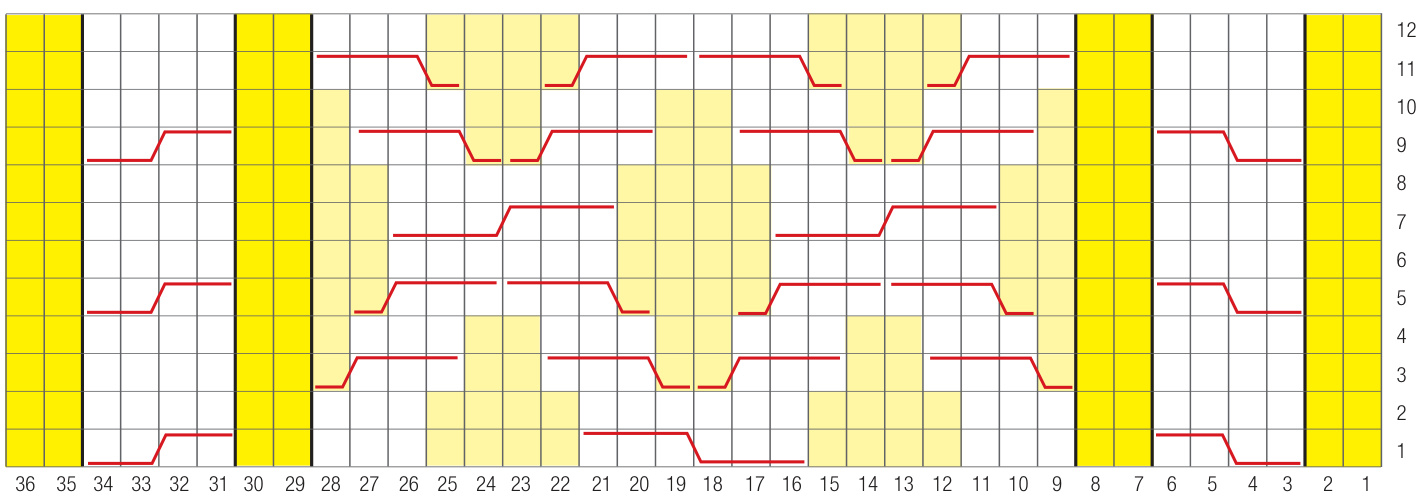
Slip 3 st to front on cable needle. Knit next 3 st from left needle. Knit 3 st from cable needle. Slip 3 st to back on cable needle. Knit next 3 st from left needle. Knit 3 st from cable needle. Slip 2 st to front on cable needle. Knit next 2 st from left needle. Knit st from cable needle. Slip 2 st to back on cable needle. Knit next 2 st from left needle. Knit 2 st from cable needle. Slip 3 st to front on cable needle. Purl 1 st from left needle. Knit 3 st from cable needle. Slip 1 st to back on cable needle. Knit next 3 st from left needle. Purl 1 st from cable needle. Purl across WS until you reach the first wrapped stitch. Pick up the wrap on the right side of the work, from bottom to top and purl together with the stitch.W&T on the following stitch causing the next stitch to be wrapped twice. Continue by picking up double wraps and knitting them with the stitch until all the stitches and wraps have been knit. At this point your going to start knitting with needle one again and moving on to the cuff section of the sock. I prefer to add a few stitches at the joint of the short-row heel and instep sections to tighten the gaps. Two stitches on each end giving me 38 stitch per needle for a total 76 stitches.
Cuff:
Needle one will begin the round. Start with next Row in chart from where you left off of before starting the heel. Continue knitting and repeating chart as many times as needed to obtain desired length. On your final repeat of cable chart should stop when you've reached Row 3 or Row 9. This willine you up to have proper knits and purls distributed fo rbing.
Finishing:
Maintain Knits and Purls in pattern sequence from row 4 or row 10 depending on were you finished in the chart: P2, K4, P3, K3, P2, K3, P2, K3, P2, K3, P3, K4, P2 ribbing for 1 inch or desired length.
Bind-off using a Picot edge. \* K1, insert needle between the next two stitches and cast-on one stitch (otherwise known as a cable cast-on). Immediately Bind-off the new stitch with the stitch on your right needle. Continue Bind-off as normal with the next 2 st. Repeat from \* until all stitches have been worked. You can increase the height of your Picot Edge by cast-on 2 stitches, but recommend also increasing the number of regular bind-offstitches to compensate. Weave in ends. Place on feet and preform the Happy-Joy-Joy-Dance.


