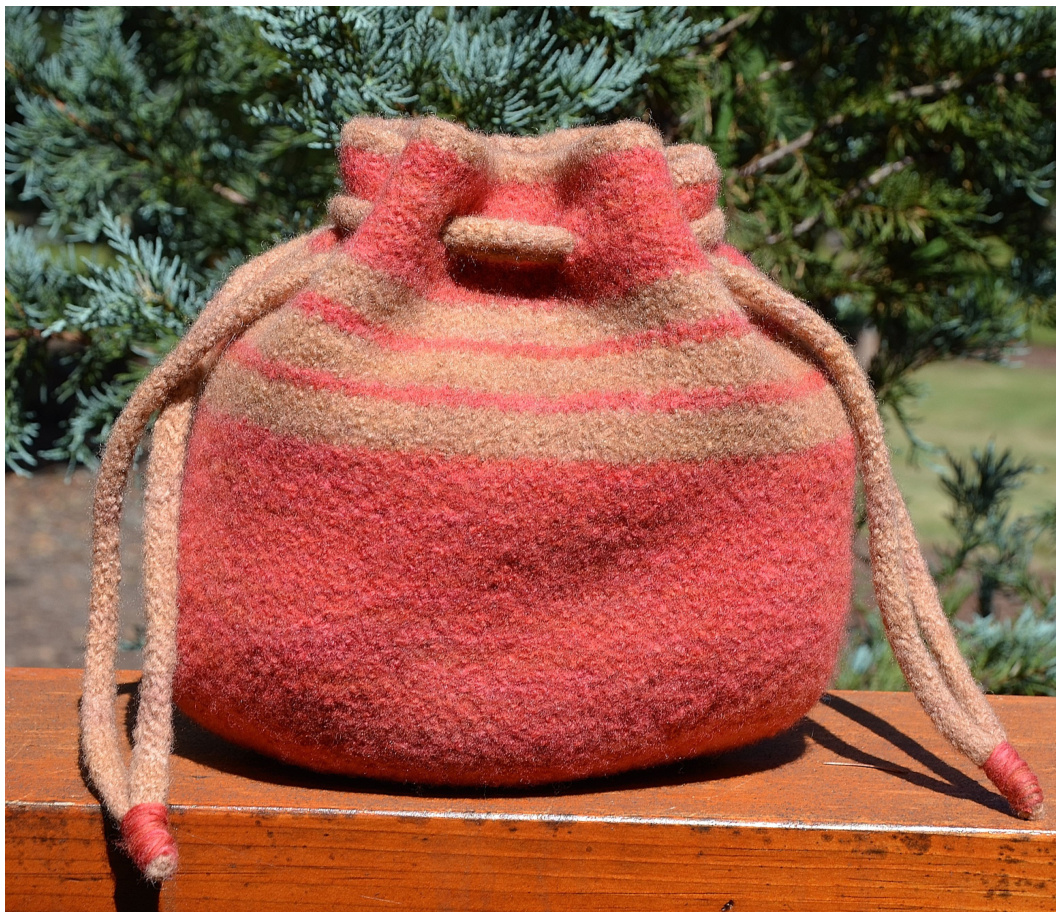
Learn to Felt your own Project Bag by Kristi Holaas
Materials: 100% wool, worsted weight yarn. Do not use superwash, bleached, any non-wool fiber and be careful of combining different yarns. If using leftovers of different brands, make a small swatch first and test the felting process. Sock/Hat Project Bag = 350 yds; Scarf/Shawl Project Bag = 450 yds; Sweater Project Bag = 550 yds 9"t x 8"w x3"d 10"t x 9"w x3.5"d 11"tx 10"w x 4"d Other Materials: US #10.5(6.5mm) or #10(6.0mm) size 16 &/or 24 inch circular needles for travelling loop method: http://www.youtube.com/watch?qydoBkKC8tU or use longer circulars for the magic loop method: http://www.youtube.com/watch?v=BtBSmxGomPk and dpn's for i-cord straps, long strand of cotton yarn, % yd of lining material, tapestry needle Glossary of Terms: k = knit; p = purl; st(s) = stitch(es); rnd = round; k# = knit number of sts; pm = place marker; sm = slip marker; bor = beginning of round; kf&b = k front and back in same st; Cast On using the long tail cast on method: On α 16 or 24 inch circular: Sock/Hat Bag 84 sts; Scarf/Shawl Bag 104 sts; Sweater Bag: 124 sts Instructions are written: Sock/Hat(Scarf/Shawl, Sweater) sizes, for example cast on 84(104,124)sts. Leave a long strand for sewing the bottom of the bag together later. 1. join in the rnd by slipping the first st, place a bor marker and k42(52(62) sts, pm, k to bor 2. sm, k3, kf&b, k to 4 sts before next marker, kf&b, k3, sm, k3, kf&b, k to 4 sts before bor, kf&b, k to bor 3.knit 1 rnd 4. repeat rows 2 and 3 four more times
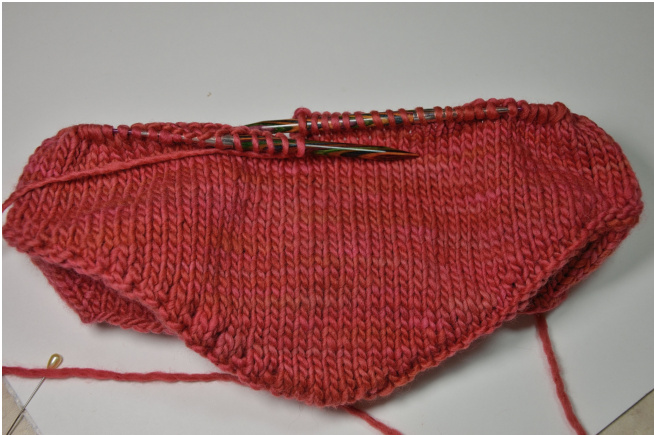
Shape Bottom of Bag
1. After finishing 5 total repeats of rows 2 and 3 above, you will have 104(124(144) sts 2. purl 1 rnd, placing additional markers at the halfway point between the sides: p26(31,36), pm, p52,(62,72), pm, p to bor 3. purl 1 rnd From this point, there are 3 shaping options to the bottom of the bag: 1) a gentle curve as in the sock/hat bag shown to the right; 2) a flattened center, curved gently up to the sides, and 3) flat center with very steep sides. They are written 1 (2,3) below: 1. k to 2(6,8) sts past first marker (center front), ti 2. p to 2(6,8) sts past marker, turn to Rs 3. k to 2(2,1) sts past where you turned prior RS row, turn 4. p to 2(2,1) sts past where you turned prior ws row, turn 5. repeat rows 3 and 4 until you reach bor, turn 6. k to 2(6,8) sts past the second marker (center back), turn 7. p to 2(6,8) sts past marker, turn 8. repeat rows 3 and 4 until you reach the side marker, turn 9. knit to bor, knit 1 rnd and at the side marker:
close up the hole by removing marker, reach down to prior row, pull up the back loops from the sts on either side of the marker. Place them on the left needle, k these 2sts together, k next st, pass first st over second st, pm 11. From this point, instructions revert back to: sock/hat(scarf/shawl,sweater).
Body and Top of Bag
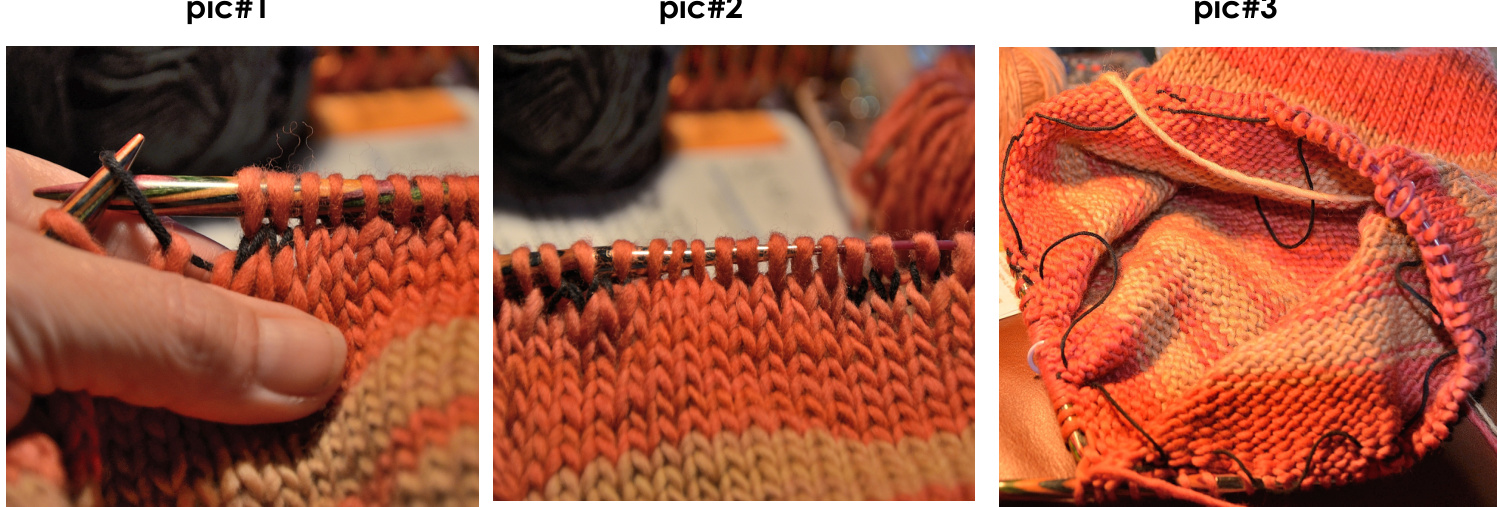
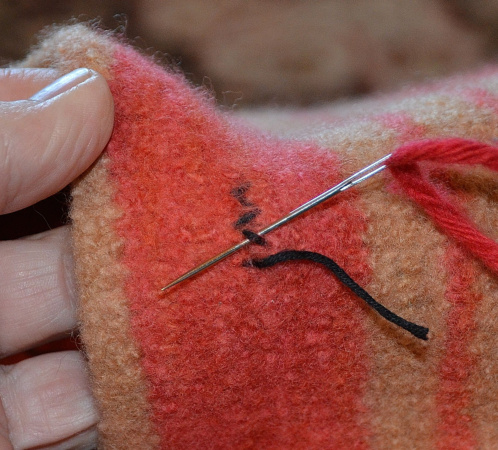
Knit in the round adding stripes and/or any decorative design that strikes your fancy for 8-9(9-10,10-11) inches. At this point you can insert some "holes" for the drawstrings using a strand of 10o% cotton that won't felt with the bag. You can choose to cut holes and insert grommets or add embroidery around the holes, but this is my method: 1. k8(10,12)sts from bor, k3 using the cotton strand, place them back on left needle and k3 using your working yarn (pic#1 below) 2. repeat step1 3 more times (pic#2 below) 3. k8(10,12), slip side marker 4. repat step 1 4 times 5. k8(10,12) to bor. The top of your bag should look like pic#3 below. 6. k 7 rnds 7. knit an applied i-cord finish to the top of the bag: cast on 3 sts, place on left needle, k2, k2t(1 co st + 1 top of bag st) 8. place the 3 sts back on left needle, k2, k2t 9. repeat step #8 until only 3 sts remain on the right needle, place them on the left needle, k1, k2t, place on right needle, k2t and pull tail through 10. sew ends of applied i-cord together with tail at the top of the bag, weave in loose ends 11. sew bottom of the bag together using a loose mattress stitch: http://www.lanagrossa.com/service/stricktipps/stricktipp matratzenstich.html Make 2 30" long i-cords with the dpn's for drawstrings OR you can use ready made cords OR make braided drawstrings described in the Finishing section below.
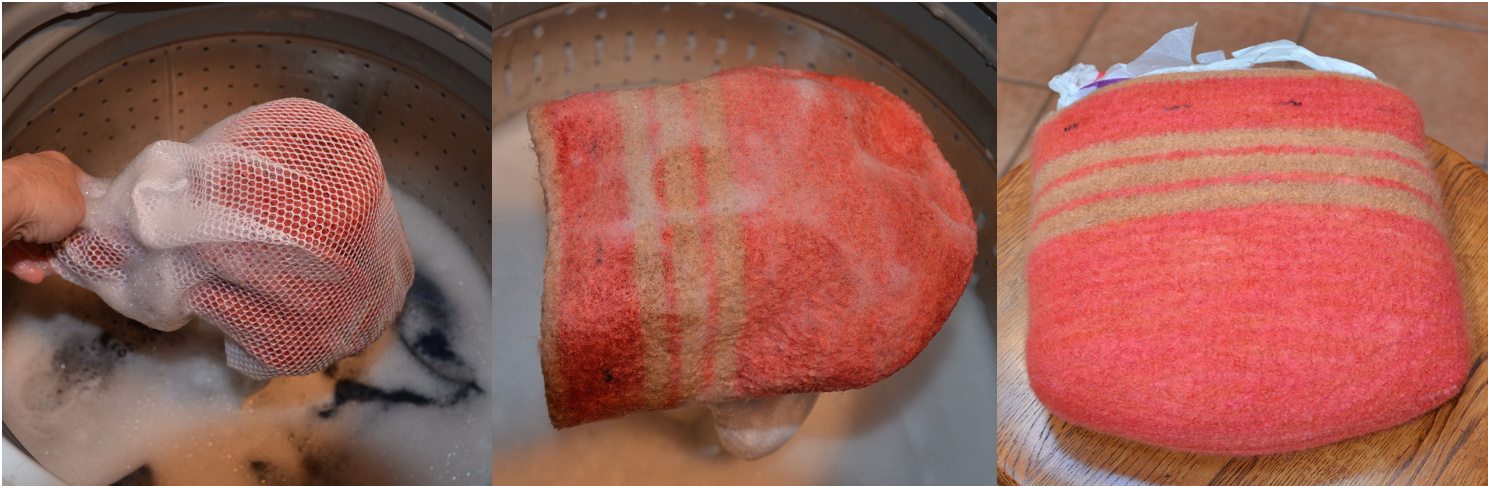
The Felting Process!
1. Use lots of suds and the smallest setting and hot, hot, HOT water! 2. Place bag and i-cords in a garment bag or pillow case to avoid geting fuzzies in your machine. 3. Place a pair or two of jeans, shoes or even a few tennis balls for friction in with your bag. 4. Start the agitation for 15 minutes, check the bag, straighten, stretch and place back in the washer for 5-10 minute increments until your bag is the desired shape and fabric. 5. Do Not Spin! Or you'll end up with unsightly creases in your bag 6. Wring out suds, place in a sink/tub of water and rinse well, wring again layed flat in a towel and do a little jig on the rolled up towel to get the excess moisture out (hah!). 7. Shape your bag, stretching lengthwise, widthwise, then lengthwise again and stuff very firmly with towels or my favorite, plastic shopping bags. Measure your sides, width of bottom to make an even bag. 8. Let dry for 24 hours before removing stuffing. Let dry completely.
Finishing the Bag
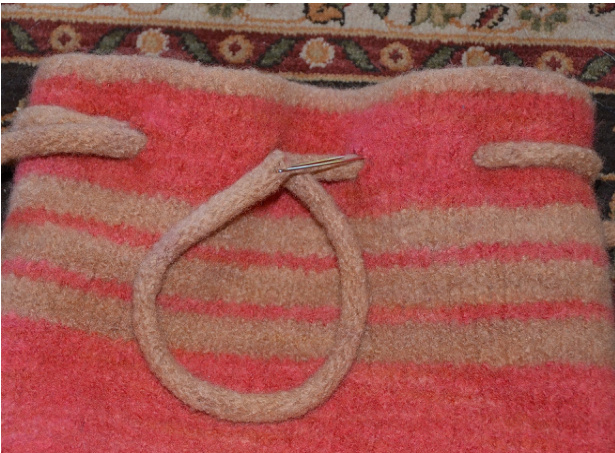
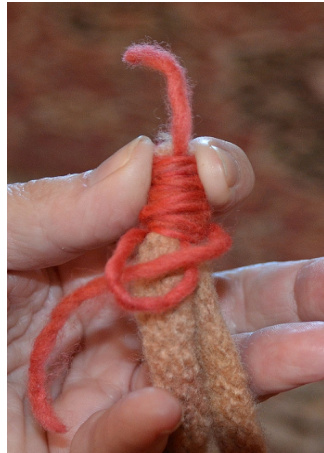
1. After the bag is completely dry, snip and pull out the cotton strand to upen up the drawstring holes, pic #1, OR cut 4 holes evenly spaced on front and back, embroider the edges or place grommets. 2. Thread the i-cords, ready made drawstrings or braided drawstrings (step #4) through your bag, pic #2. 3. One of my favorite methods of joining the two -i-cord ends together is using the wrap method: take a 20" strand of matching wool, form a loop along side the 2 i-cord ends held together, leaving a long tail at the top, wrap around and around tightly, ending with the other end of the strand pulled through the loop, pic #3. Pull up on the top strand which pulls the loop and end inside the wrap. Trim ends. 4. Braid two 24-26" braids w/6 strands of yarn, wrap the ends as described above and follow step #2.
pic #1
pic #2
pic #3
Lining the Project Bag
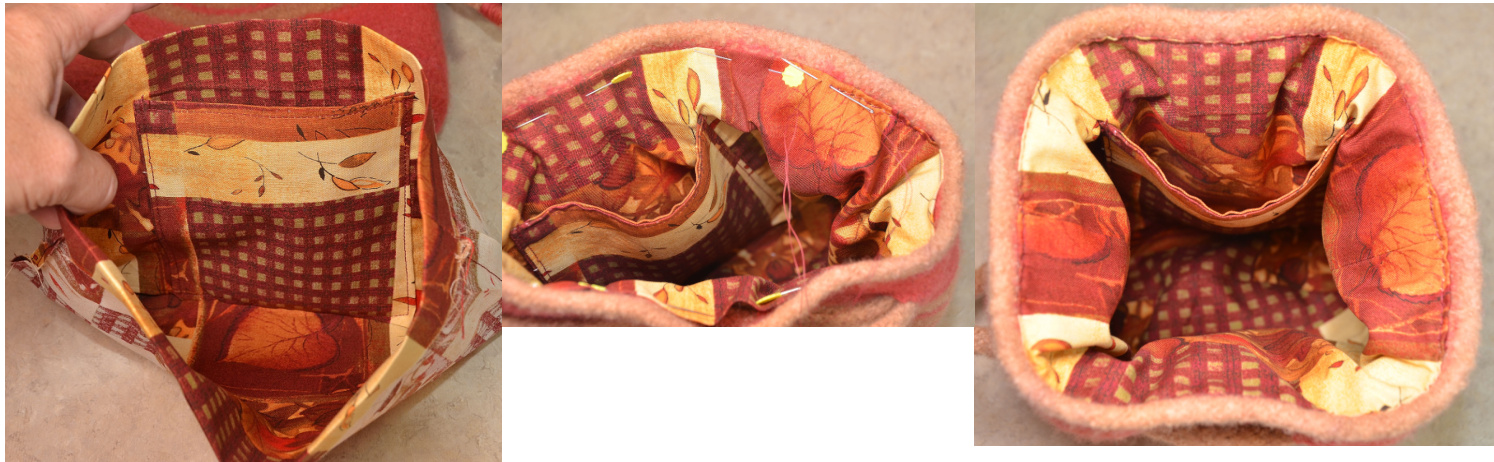
1. Cut 2 body pieces of the bag in the shape of your flattened bag. 2. Cut an optional pocket piece in 2 long rectangular shape, fold in half with right sides together, sew two sides leaving the top open. Fold inside out and iron flat with the top edges folded in, sew the top edge and this will be the top of the pocket. Place pocked centered on one of the body pieces. 3. Sew the two pieces together right sides together, iron seams , fold top edge down to the outside against the wrong side of the lining and iron. 4. Place in bag, pic #1; pin, pic #2; sew by hand in place. 5. Finished lining, pic #4
pic #1 pic #2 pic #3


