HP House Fair Isle Pouch Bags
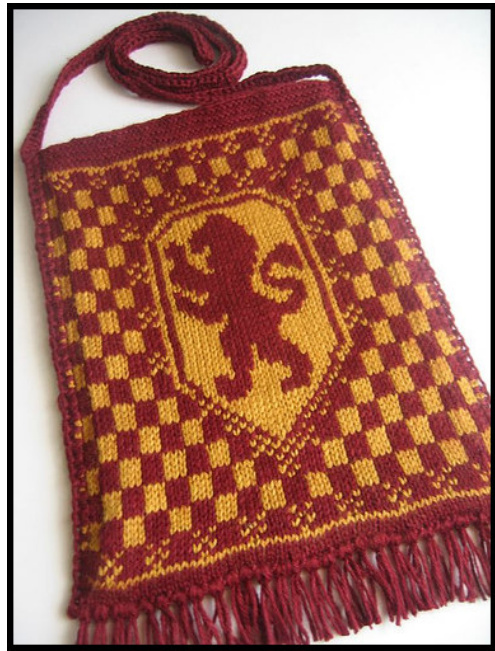
This flat, pouch-style bag orpurse isasimple shape and construction and would bea great starting point for the knitter/crafter who would like to ad pockets, hardware, or more dimension. The charts and colorsare inspiredbythe HarryPotterbooksby.K.Rowling. Hary, Hogwarts, and the four Hogwarts houses are not mine; this pattern is just a manifestation of my love $\circledast$ Techniques required: Fair Isle, knitting in the round, basic crochet, simple sewing Yarn: Your preferred yarn in your chosen house's colors. Bag as shown is knit with DK weight yarn; less than 150 meters of contrast color, slightly more than $150~\mathsf{m}$ in main color.
Hogwarts' house colors:
Gryffindor - Scarlet (MC), Gold (CC) · Hufflepuff - Black (MC), Yellow (CC) · Ravenclaw (book) - Blue (MC), Bronze (CC) · Ravenclaw (movie) - Blue (MC), Silver (CC) Slytherin - Green (MC), Silver (CC)
Other materials needed:
Needles appropriate for your yarn, plus a set of the next size down. Circulars (16" for bag as shown) or double. pointed, for working in the round. Bag as shown is worked on 3.25mm (US 3). Crochet hook appropriate to your yarn. Size D for bag as shown. · Stitch Markers Yarn needle for weaving in ends. Fabric for lining. Optional interfacing. Needle and strong thread. Gauge: Bag as shown is knit with 26 stitches per 4 inches, stockinette in the round. This project can be knit at any gauge. Finished size: Dependent on gauge of kniting. Bag as shown measures about $\9^{\circ}$ wide $\mathsf{x\ 10^{\circ}}$ long, not including fringe and strap.
Knitting instructions:
1. With main color(MC)and larger needles, cast on 114 stitches. Join in the round and work first row of chart, place stitch marker (after 57 stitches), work first row of chart again. Place marker. 3. Upon completing chart (73 rounds) break off CC and switch to main color and smaller needles. Knit one round. 4. [Knit one round, purl one round] three times. 5. Bind off loosely. While binding off, mark the bound off stitches on either side of stitch markers with a safety pin or tied string. Marked stitches indicate the columns behind which the strap is later crocheted. 6.Weave in ends. 7. Wash bag according to yarn's instructions and block flat, making sure that the marked stitches are precisely the first and last stitches on either side. When blocked and dry, you may want to pin bag flat, matching the front patten to the back.
Crocheted strap instructions:
1. Start at bottom corner of bag and slip stitch bottom closed. 2. Begin row one of crochet: Chain one, and passing the hook behind both the first stitch of the front and the last stitch of the back, slip stitch in every other row along the side of the bag. 3. At the top corner of the bag, crochet a chain as long as your desired strap. Bag as shown has $36"$ strap. 4. Join strap chain to opposite top of bag with a slip stitch. As with first side, slip stitch through every other row down the side of the bag. At the bottom, chain 2 and turn. 5. Row 2: Half-double crochet in each slip stitch of the side, each chain stitch of the strap, and each sli stitch of second side. 6. Cut and pull yarn through last stitch. Remove markers. Weave in ends. Fringe bottom of bag with 2 strands of MC placed about 2 stitches apart, 1" or desired length.
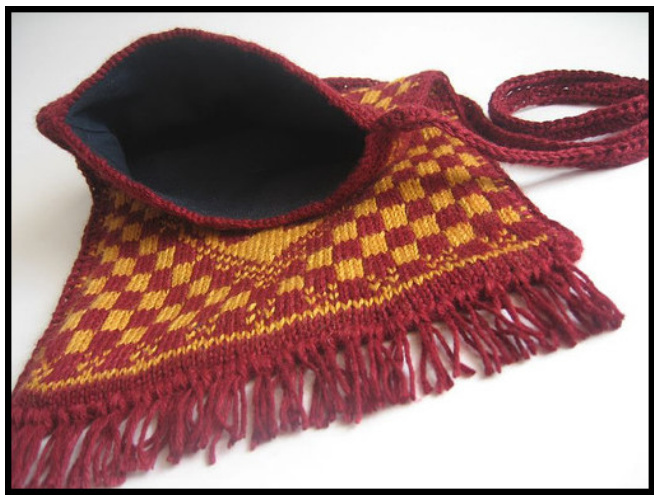
Make and attach lining:
Useafabricof your choice for the lining. Try to match your fabric's care instructions as closely as possible to your yarn care's instructions. If your fabric is thin or slinky, you may want to cut some interfacing in the same shape and hold it together with the fabric while performing the following steps. Interfacing should be on the wrong" side and sandwiched between the lining and the knit bag. Pre wash your fabric according to its care instructions. 1. Measure your finished bag widthwise between the crocheted edges. In other words, the places where the bag is actually open on the inside. Mark your fabric as that wide, plus 1/2 inch. 2.Measureyourag fromjustinside thetop edge of the bag,tjust above the topof the fringe.Mark you fabricas twice that long plus two inches for a hem. 3. Fold the fabric so that the bottom of the bag lining is the fold line. Fold both top edges down 1" to the outside. Pin inplace. 4. Sew the side seams first, 1/4 inch in.Working around the circumference of the lining, sew the hem in place. 5. With wrong side stilout, pinlining inside bag. Line up the lining's side seams with the very side seams of the bag. 6.Using anearly invisible stitch (overhand stitch, sli stitch,whipstitch),hand-stitch the top fold of the lining to th inside topof the bag. For consistency, sew along the same round of the bag and try to make a stitch for each "purl bump" in that round. Pattern, text, and images by Rosemary Waits. Free for you to enjoy, but not for resale or commercial purposes. Spot an error or have questions? Email rosemary.waits@gmail.com
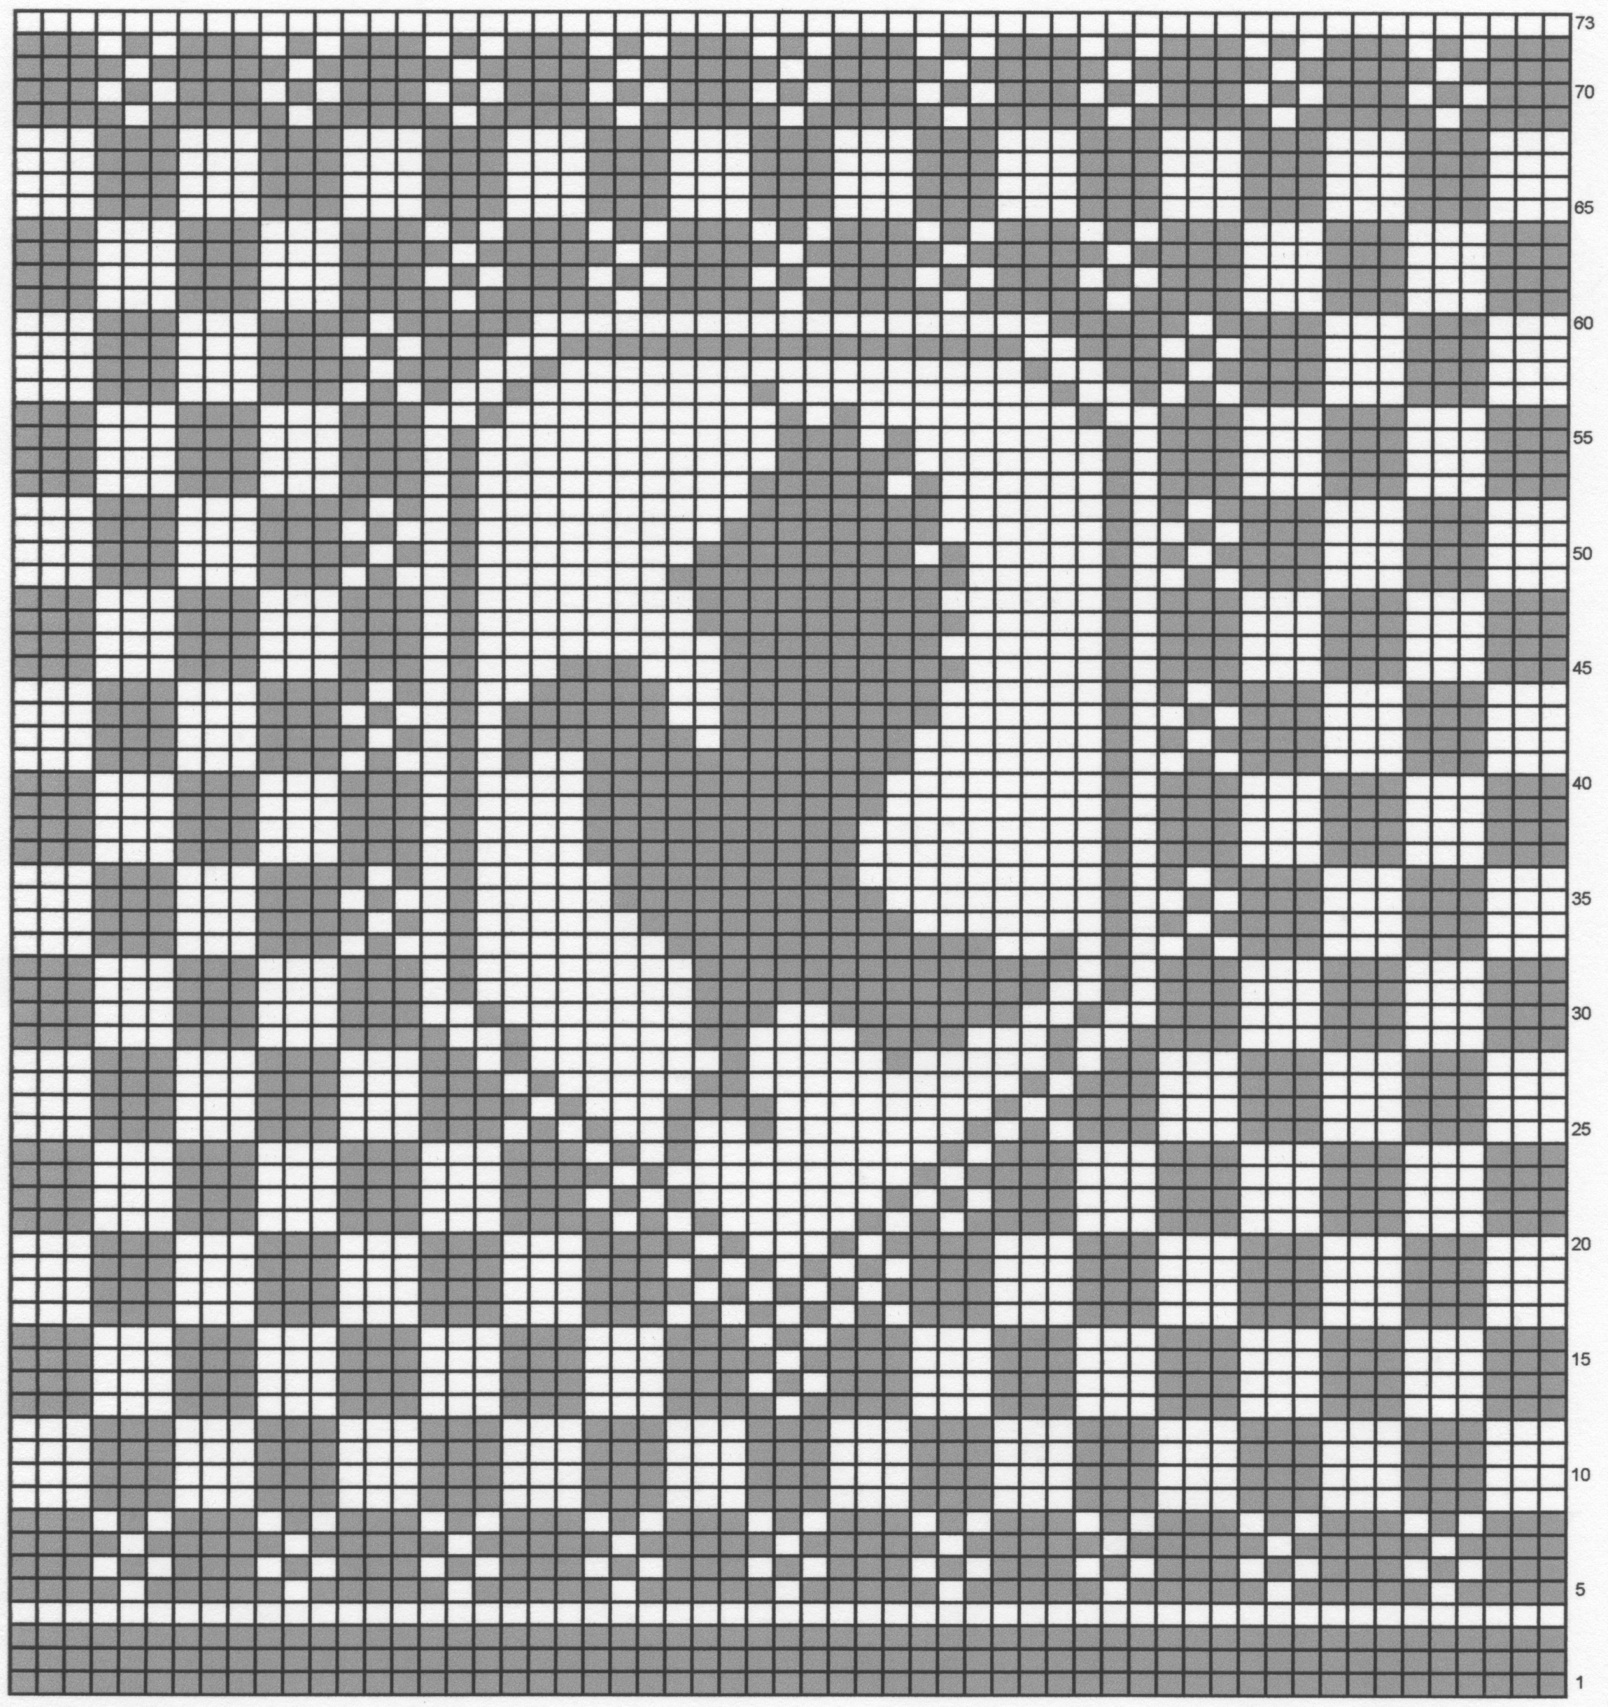
Lion chart (Gryffindor)
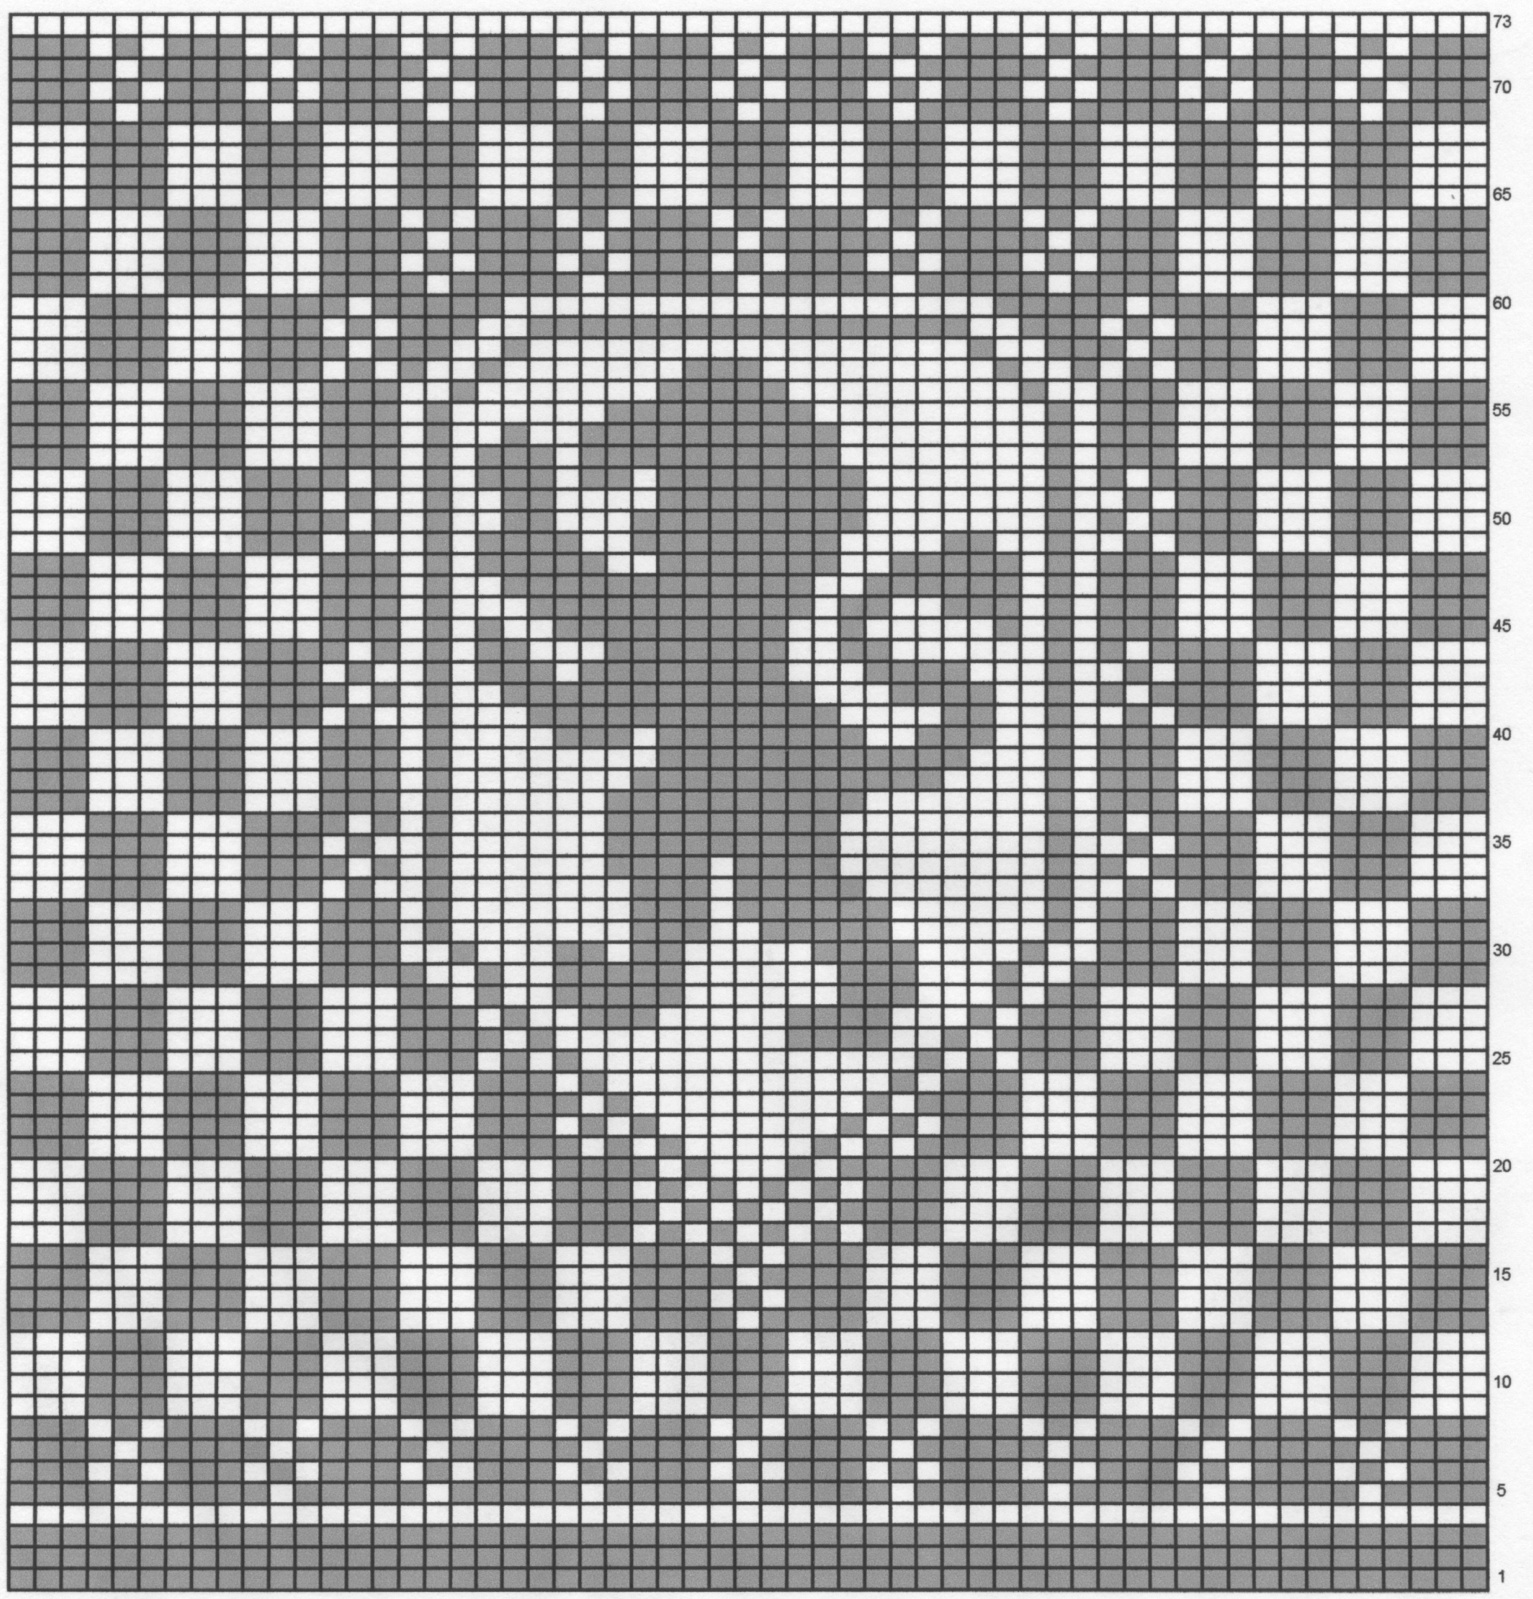
Key: Main color $(\mathsf{M C})=\mathsf{g r e y}$ , Contrast color $\left(\mathsf{C C}\right)=$ white
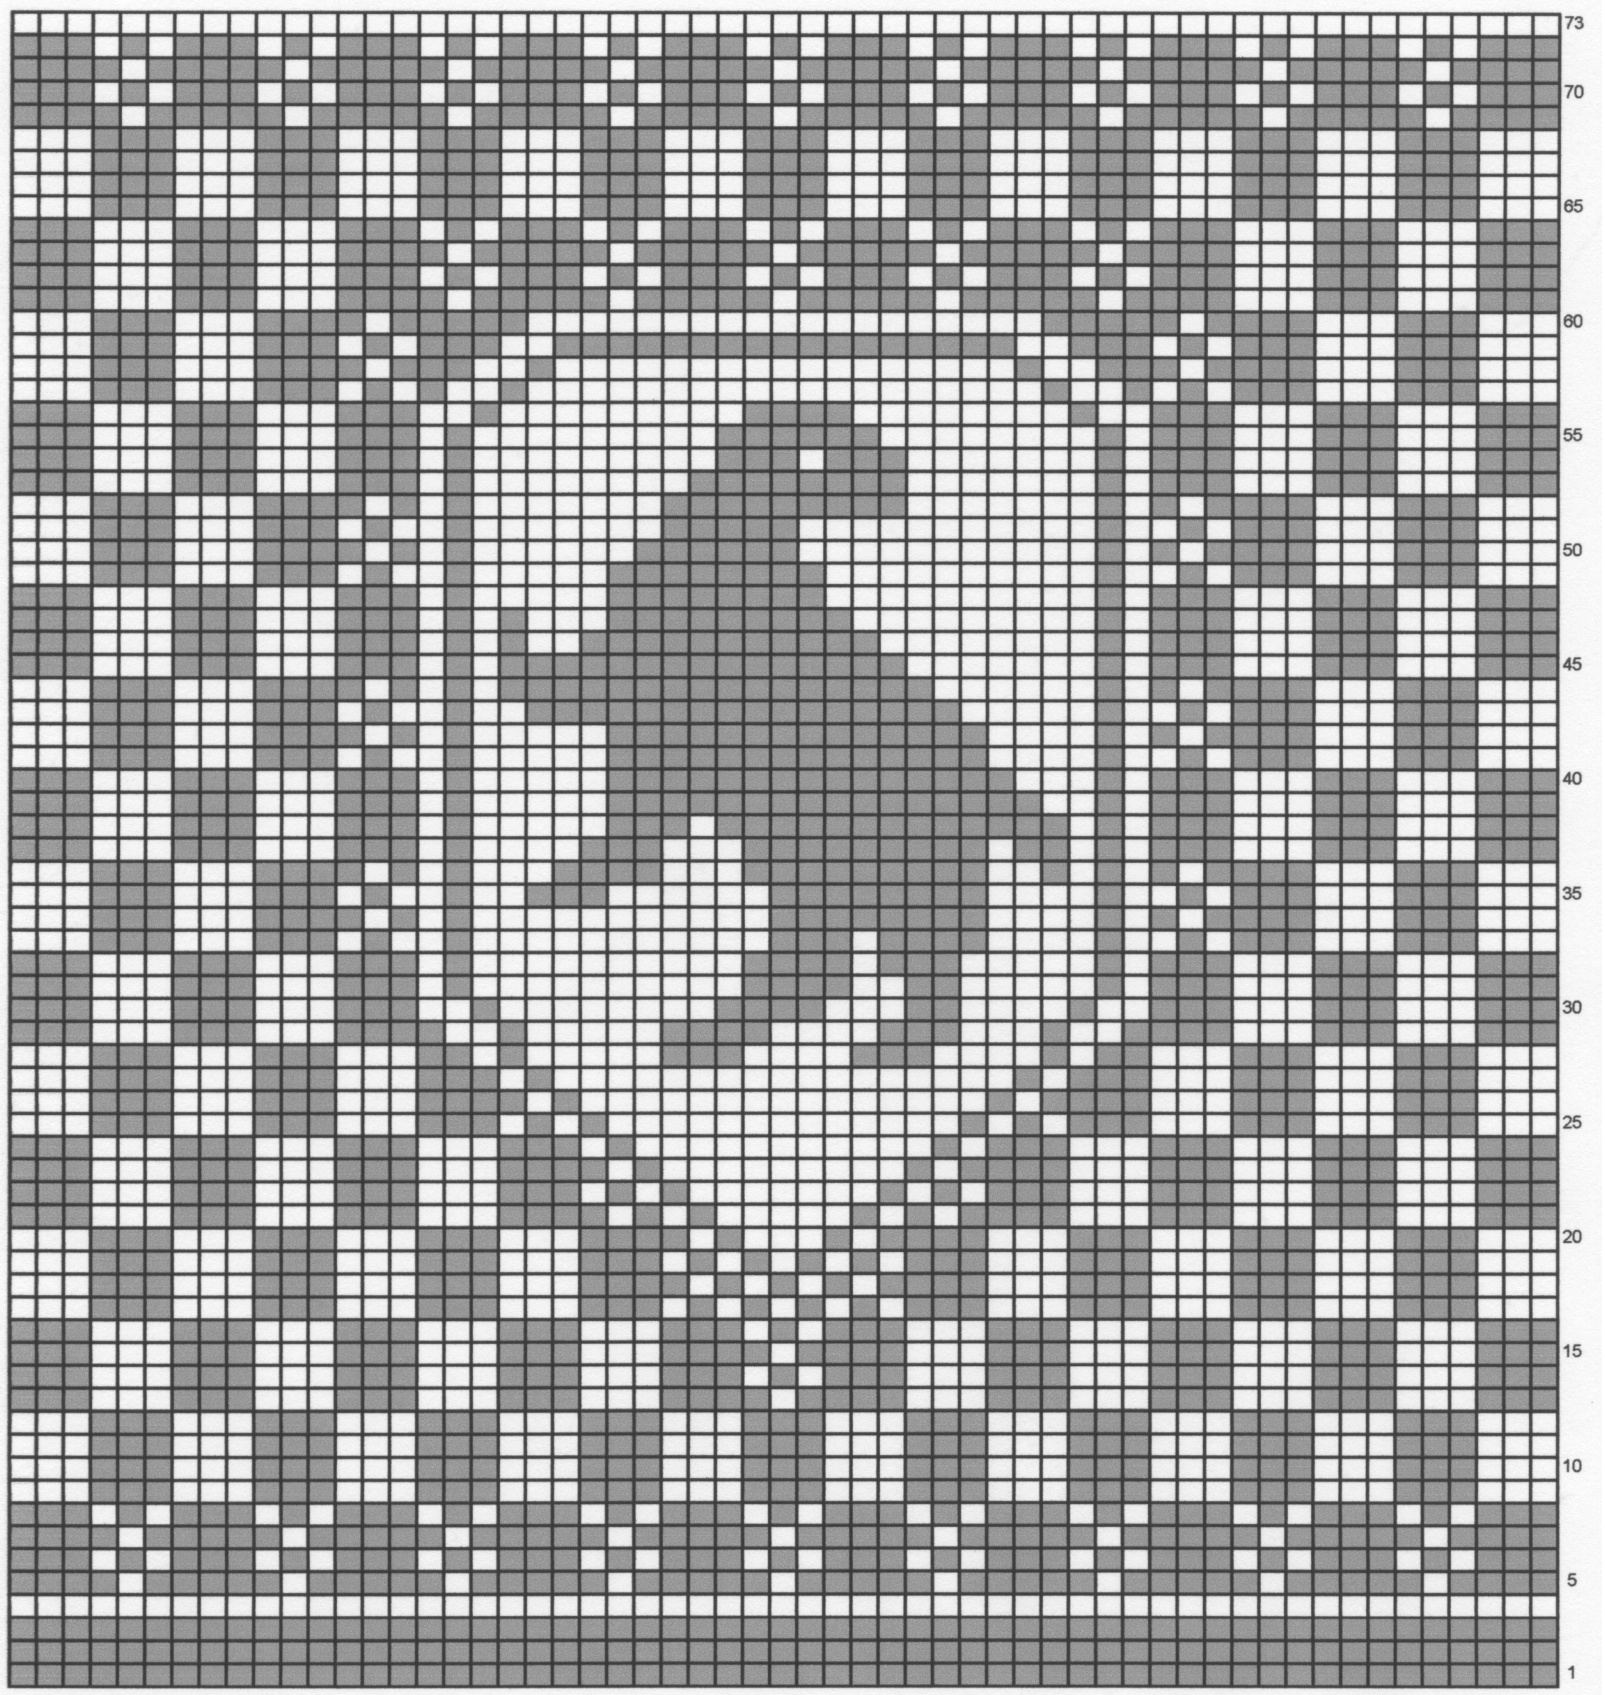
Key: Main color $(\mathsf{M C})=\mathsf{g r e y}$ , Contrast color (CC) $=$ white
Key: Main color (MC) $=$ grey, Contrast color (CC) $=$ white
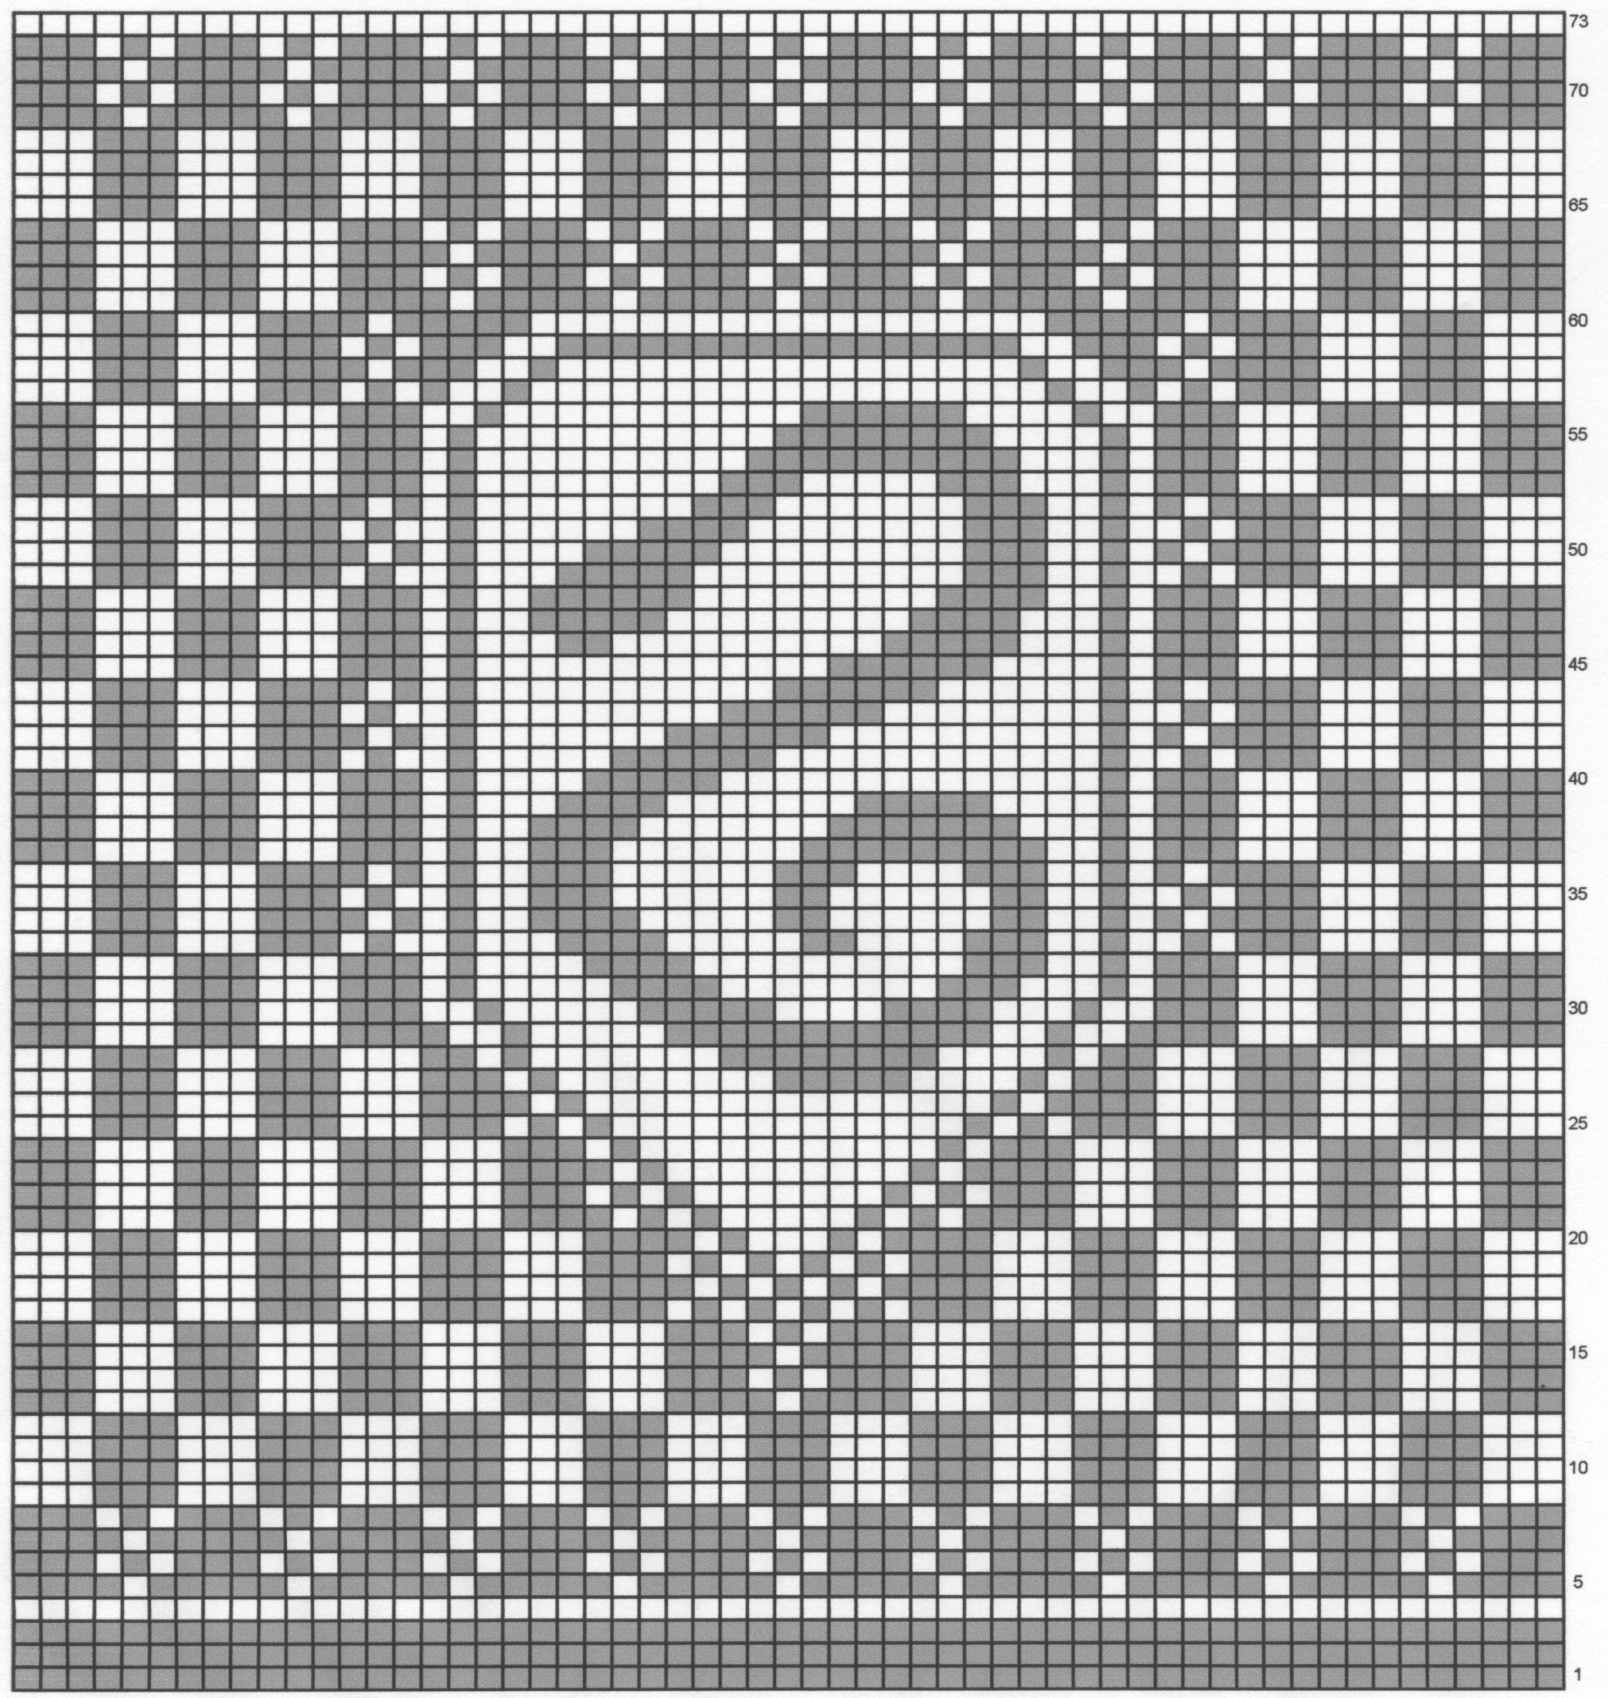
Key: Main color $(\mathsf{M C})=\mathsf{g r e y}$ , Contrast color $\left(\mathsf{C C}\right)=$ white


