Gothica Mitts
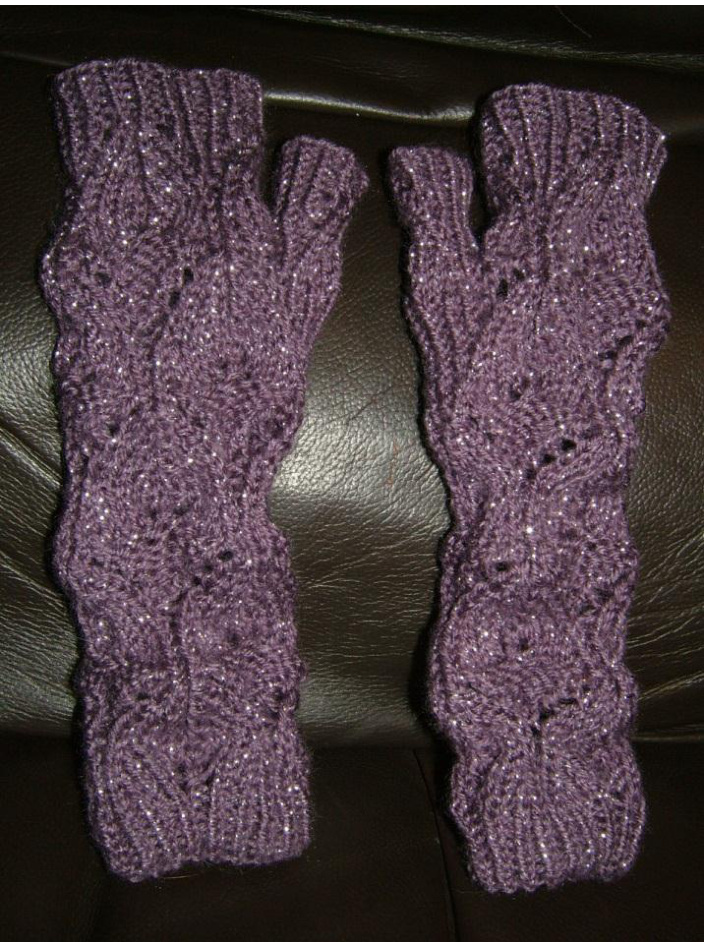
These mitts use a lace pattern from The Knitter's Bible by Claire Crompton called 'Gothic Window'. They are mid-forearm length with a full thumb. They are written to be knitted in the round as it would be difficult to seam this pattern without an obvious break. But when finished they are absolutely beautiful. I knitted the first pair in a sparkly yarn and if they hadn't been far too small for me I'd have kept them! The pattern repeat is 12 stitches, and on 4mm (Us6) needles with dk yarn 36 stitches produces small/medium and 48 stitches medium/large. You could go down one or two needle sizes if you wanted s/m mitts but more repeats of this glorious pattern. Enjoy!
Materials
50-75 g of dk yarn Set of four or five 4mm (Us6) dpns, depending on size of mitts (or circulars if preferred) Four stitch markers (two different colours if possible) Waste yarn or stitch holder (for thumb gusset stitches) Crochet hook or tapestry needle for weaving in ends For mitts knitted in the round, I usually indicate a definite left and right mitt by sewing asmallbuttoninto thebottom cuffofone mitt. This is optional, I do it partly so the palms are always the palms (they can get a bit grubby) and partly so I can hide the join between rounds on the underside of the mitt. I achieve this by changing which needle I knit the thumb gusset into, which I will explain later in the pattern. I don't have trouble with loose joins, rather on very open lacy patterns like this, the 'step' caused by the spiral nature of knitting in the round between last and first needles can be more noticeable. It's entirely up to you, but if you want to do this you will also need a small button and some thread in a matching colour and a sewing needle. The yarn shown in the picture above is 'Twinkle' by James C. Brett in the Mauve colourway. The mitts in the picture are size s/m (36 stitches on 4mm/Us6 dpns). Abbreviations can be found on pages 5 & 6 with the charts.
Instructions
Both mitts: Cast on a multiple of 12 stitches. Distribute evenly on dpns and join for knitting in the round, being careful not to twist. Knit 6 rounds of K1tbl, p1 rib. Referring to chart 1 (page 5 ), knit rows 1-28, repeating around, then rows 1-13, repeating around. Once these rounds are completed, continue as follows to increase for thumb gusset. If you wish to position the join between rounds on the underside of the mitt, increase for the thumb gusset on the first needle of the round for the left mitt and on the last needle of the round for the right mitt. All the other stitches should be knitted in pattern as indicated on chart 1. Slip the markers when you reach them. R14 - p3, k2, (pm), m1r, p1, m1l, (pm), k2, p4 R15 -yo, k3, k2tog, k1tbl, p1, k1tbl, ssk, k3, yo, k1 R16 -k5, m1pr, k1tbl, p1, ktbl, m1pl, k6 R17 -yo, k3, k2tog, p1, (k1tbl, p1) twice, ssk, k3, yo, k1 R18 -k5, m1r, p1, (k1tbl, p1) twice, m1l, k6 R19 - yo, k3, k2tog, (k1tbl, p1) three times, k1tbl, ssk, k3, yo, k1 R20 - k5, m1pr, (k1tbl, p1) three times, k1tbl, m1pl, k6 R21 - k2tog, k3, yo, p1, (k1tbl, p1) four times, yo, k3, ssk, p1 R22 -k5, m1r, p1, (k1tbl, p1) four times, m1l, k5, p1 R23 - k2tog, k2, yo, p1, (k1tbl, p1) five times, k1tbl, p1, yo, k2, ssk, p1 R24 -k4, p1, m1pr, (pm), (k1tbl, p1) five times, k1tbl, (pm), m1pl, p1, k4, p1 On round 25, although the main body of the mitt will continue in pattern through rows 25-28, in the thumb gusset stitches between the two markers you placed in round 24 you will start a pattern repeat of the lace from row 1. You'll only work rows 1-4 before placing the thumb gusset stitches on waste yarn to be worked later. Between these markers and the markers you placed in row 14 you will continue to increase two stitches (one on either end of the thumb gusset) on even numbered rows for a further four rows. Refer to chart 2 (page 6 ) and the following instructions: (rubbish place for a page break- sorry!) Note on picture on page 1 - this is the first pair of mitts I knitted and they are too small for me which is why I didn't photograph them 'on'. They look very skinny and a bit wonky but once they are on they're super stretchy and all the wonkiness straightens out. These mitts can be viewed on my Ravelry page (user ID ruthhr) and I'll upload some pictures of them on someone's hands at some point. Trust me, they look lovely finished - this picture doesn't do them justice but I wanted to get the pattern out there! Gothica Mitts Pattern @ Ruth Hilton-Robinson 2012 {These brackets} indicate the position of the outer stitch markers placed for the thumb increases in round14. The instructions in [square brackets] refer to the stitches between the two markers placed in round 24. R25 - k2tog, k1, yo, p2, {p1, [ssk, k3, yo, k1, yo, k3, k2tog], p1), p2, yo, k1, ssk, p1 R26 -k3, p2, {m1r, p1, [k11], p1, m1l), p2, k3, p1 R27 - k2tog, yo, p3, {k1tbl, p1, [ssk, k3, yo, k1, yo, k3, k2tog], p1, k1tbl], p3, yo, ssk, p1 On round 28 you will also increase by one stitch on either side of the outer markers placed in round 14. This is to allow you to k2tog on the following round to join the thumb gusset, once the thumb stitches have been placed on waste yarn/stitch holder. This will also replace the central stitch in the thumb gusset which has been ‘lost' from the body of the mitt. R28-k2, p2, m1pr, p1, {m1pr, k1tbl, p1, [k11], p1, k1tbl, m1pl, p1, m1pl, p2, k2, p1 On the next round, row 1 of the lace pattern in the body of the mitt, you will place the stitches between the outer markers placed in round 14 on waste yarn/stitch holder to be worked later, leaving the inner markers placed in round 24 in position on the waste yarn/stitch holder. You will then join the mitt across the gap, creating the thumb hole. R1 - ssk, k3, yo, slip next stitch unworked from the left needle to the right needle, remove first outer marker, place next 17 stitches and inner markers onto waste yarn/stitch holder, remove second outer marker, slip unworked stitch back to left needle, k2tog (be careful not to ‘lose' the yo you did before first slipping the unworked stitch or it will throw your stitch count out - speaks from experience ;-p), yo, k3, k2tog, p1. You should now have 12 stitches again on the needle you were using for the thumb increases, and 17 stitches on the waste yarn/stitch holder. Phew! For the rest of the mitt, use chart 2. This chart replaces the bottom of the second set of 'windows' in chart 1 with k1tbl, p1 rib which you will be using for the cuff (see picture on page 6). The instructions for the rib cuff at the top of the mitt are with the chart. Once you have finished the top of the mitt and cast off, you're ready to pick up and work the thumb gusset stitches. at an enormous gap. Have a pretty picture to make yol
(l have three gigantic hydrangea bushes. They are slowly eating my house and my driveway. But they are pretty.)
Thumb Instructions
Place the thumb stitches currently on waste yarn/stitch holder onto three dpns as follows, starting with the first stitch: First needle = 6 st Second needle = 6 st Third needle = 5 st Join the yarn at the beginning of the first needle on the right of the thumb hole as you look at the mitt. Work around the needles, remembering to start on row 5 of the lace pattern repeat on chart 2 for the stitches between markers, until you reach the end of the third needle and the 'gap'.
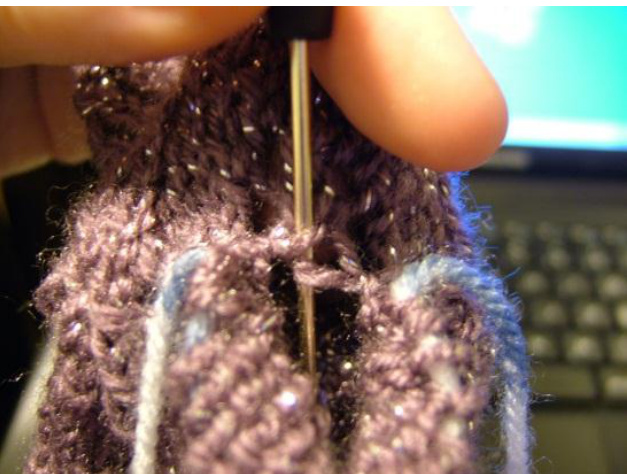
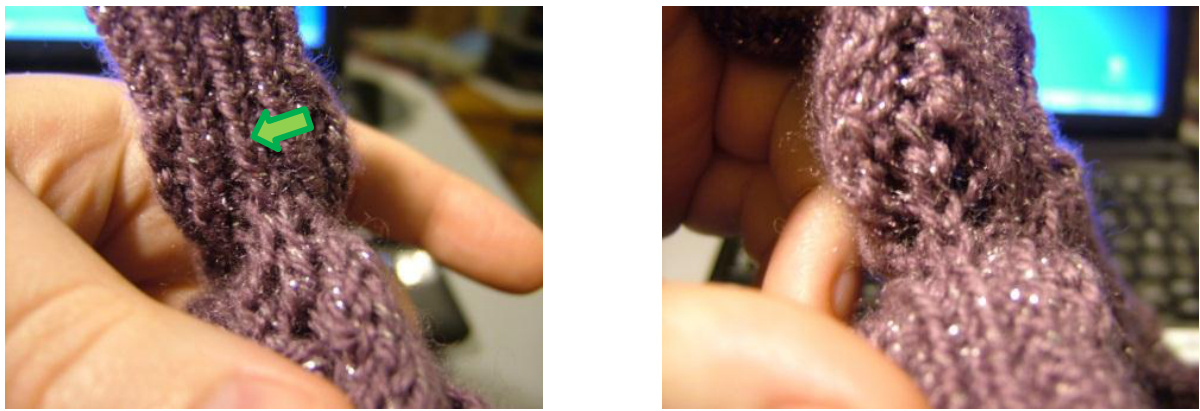
Using the working yarn and a crochet hook, pick up one stitch and place it on the third needle. Pick the stitch up through the centre of the two stitches you knitted together when you placed the thumb stitches on the waste yarn/stitch holder and joined the gap (see picture, left). This ensures that there are no holes (gaaah! I HATE holes) in the thumb where it meets the mitt and keeps the two knittedtogether stitches, well, together ;-). (N.B. I took this picture showing the way to pick up the stitch before I'd put my thumb stitches on the dpns. I did this so the dpns wouldn't get in the Way.) You won't work this stitch on this round. You can now join your three needles to knit the thumb in the round by starting the next round on the first needle. There should now be six stitches on each needle. On this next round, your picked-up stitch will become a k1tbl (left picture, green arrow) and the thumb will join seamlessly to the mitt (right picture).
Knit the thumb stitches as shown in chart 2. Once you have worked round 14, work one row of k1tbl, p1 rib around and cast off loosely in pattern on the next round. Break yarn and weave in all ends. Work another mitt to match, remembering to increase for the thumb at the other end of the round to the one you've just done. You're finished!
Charts for Gothica Mitts
Chart 1 for body of mitt, 'Gothic Window' lace from The Knitter's Bible by Claire Crompton. See next page for chart for thumb gusset and top cuff.
| 28 | P | K | K | P | P | P | P | P | P | P | K | k | |
| d | Ssk | Yo | P | P | P | P | P | P | Yo | K2tog | 27 | ||
| 26 | P | K | K | K | P | P | P | P | P | K | K | k | |
| P | Ssk | K | Yo | P | P | P | P | Yo | K | K2tog | 25 | ||
| 24 | d | K | K | K | K | P | P | P | K | K | K | k | |
| P | Ssk | K | K | Yo | P | P | P | Yo | K | K | K2tog | 23 | |
| 22 | P | K | K | K | K | K | K | K | K | K | k | ||
| P | Ssk | K | K | K | Yo | P | Yo | K | K | K | K2tog | 21 | |
| 20 | K | K | K | K | K | K | P | K | K | K | K | k | |
| K | Yo | K | K | K | ssk | P | K2tog | k | K | K | yo | 19 | |
| 18 | K | K | K | K | K | K | P | k | K | K | K | k | |
| K | Yo | K | K | K | Ssk | P | K2tog | K | K | K | yo | 17 | |
| 16 | K | K | K | K | K | K | P | K | K | K | K | k | |
| K | Yo | K | K | K | Ssk | K2tog | K | K | K | Yo | 15 | ||
| 14 | P | p | P | P | K | K | P | K | K | P | P | P | |
| P | P | P | P | Yo | K2tog | p | ssk | yo | P | P | P | 13 | |
| 12 | P | P | P | K | K | K | K | K | K | P | d | ||
| P | P | P | Yo | K | K2tog | P | Ssk | K | yo | P | P | 11 | |
| 10 | P | P | K | K | K | K | P | K | K | K | K | p | |
| P | P | Yo | K | K | K2tog | Ssk | K | K | Yo | p | 9 | ||
| 8 | P | K | K | K | K | K | P | K | K | K | K | k | |
| P | Yo | K | K | K | K2tog | P | Ssk | K | K | K | yo | 7 | |
| 6 | P | K | K | K | K | K | K | K | K | K | K | k | |
| P | K2tog | K | K | K | Yo | K | Yo | K | K | K | ssk | 5 | |
| 4 | p | k | k | K | K | K | K | K | K | K | K | k | |
| d | K2tog | k | k | k | yo | k | yo | k | k | k | ssk | 3 | |
| 2 | P | K | K | K | K | K | K | K | K | K | K | K | K |
| p | K2tog | k | k | k | yo | k | yo | k | k | k | ssk | 1 |
Abbreviations
K-knit P-purl Ssk - (slip-slip-knit) slip next two stitches knitwise from LH needle to RH needle and knit together through back loops (one stitch decreased) Yo - yarn over needle to create eyelet and additional stitch K2tog - knit next two stitches together (one stitch decreased) (abbreviations cont. overleaf) K1tbl - knit 1 through back loop M1r - make 1 right leaning knit stitch. Pick up running thread from back to front, knit into front of loop M1pr - as m1r, but purl into front of loop M1l - make 1 left leaning stitch. Pick up running thread from front to back, knit into back of loop M1pl - as m1l, but purl into back of loop Pm - place marker St - stitch(es)
| 14 | p | ktbl | p | ktbl | k | ktbl | p | ktbl | k | ktbl | p | ktbl | |
| P | ktbl | p | ktbl | Yo | K2tog | p | ssk | Yo | ktbl | p | Ktbl | 13 | |
| 12 | p | ktbl | P | K | K | K | P | K | K | K | P | Ktbl | |
| p | ktbl | p | yo | k | K2tog | P | Ssk | K | yo | p | ktbl | 11 | |
| 10 | p | ktbl | k | k | k | k | p | K | K | K | K | Ktbl | |
| p | ktbl | yo | k | k | K2tog | p | ssk | k | k | yo | ktbl | 9 | |
| 8 | P | K | K | K | K | K | P | K | K | K | K | k | |
| P | Yo | K | K | K | K2tog | P | Ssk | K | K | K | yo | 7 | |
| 6 | P | K | K | K | K | K | K | K | K | K | K | K | |
| P | K2tog | K | K | K | Yo | K | Yo | K | K | K | ssk | 5 | |
| 4 | P | K | K | K | K | K | K | K | K | K | K | K | |
| P | K2tog | K | K | K | Yo | K | Yo | K | K | K | Ssk | 3 | |
| 2 | P | K | K | K | K | K | K | K | K | K | K | K | |
| P | K2tog | K | K | K | Yo | K | Yo | K | K | K | Ssk | 1 |
Chart 2 with rib instead of next 'windows'. Use this chart for the thumb - there will be five more stitches initially which should maintain the k1tbl, p1 rib pattern and a further one stitch once the thumb gusset stitches are picked up again to knit and an extra stitch added, to make 18 stitches for the thumb in all. In both the thumb gusset and top cuff, after round 14 all stitches should be worked in k1tbl, p1, rib. The knit stitches in round 14 above the final yo's in round 13 (in bold on chart) will become purl stitches. For the top cuff, after row 14 work four rounds of k1tbl, p1 rib and cast off
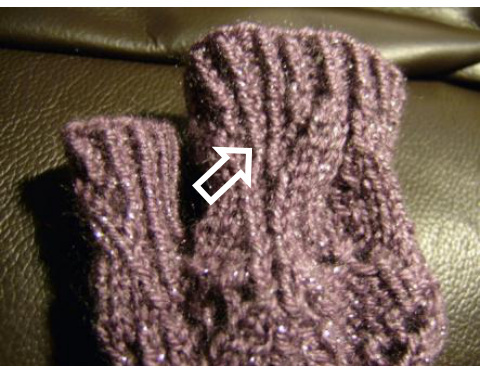
loosely in pattern on the fifth round. The two blue arrows indicate the position of the inner stitch markers placed in round 24ofthe thumb increases.The red arrowindicates where you will begin from when you start working the thumb stitches which were placed on the waste yarn/stitch holder. This picture shows how the rib replaces the reverse stocking stitch at the bottom of the second set of 'windows' in chart 1 (white arrow). Well, I hope that's as clear as mud! As ever, I hope you enjoy making and wearing or gifting these mitts, and any comments, questions and pictures are always welcome. Happy Knitting!


