Suggested Yarn: 50 yards of any worsted weight yarn, for example Lily Sugar'n Cream Cotton, or double-thread hinner yaaccrdinglymust emicrwaveable nmetallicthreads and washable feasmered (hot-cold-pack or teether). Read instruction below carefully regarding the use as hot-and-cold-pack! Possible Colors: CI Red, C2 Indigo or Black, and C3 white any light colored scrap Needles: US size 4 needles or dpns, a crochet hook (optional), and a yarn needle. Other Material: Dry corn, beans, lentils for the flling, or small hot-and-cold gel packs, which remain flexible when frozen (one or two). Lentils have been used successfully for the sample and are hence recommended for this toy. Velcro and a cotton liner are optional. Gauge: Not important for this project, use needles 3 sizes smaller than weight suggests. Skill Level: Ambitious beginner.
Body (worked flat)
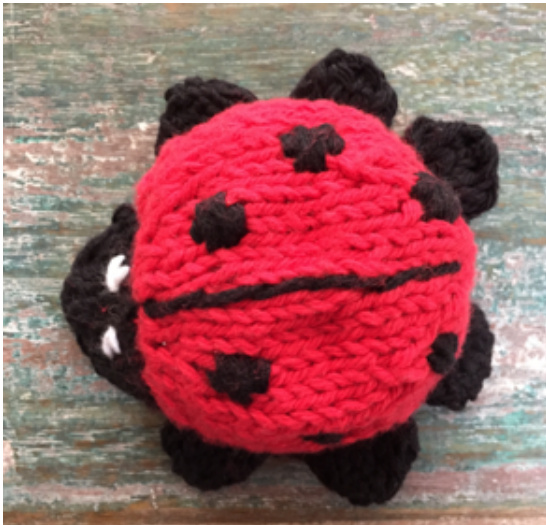
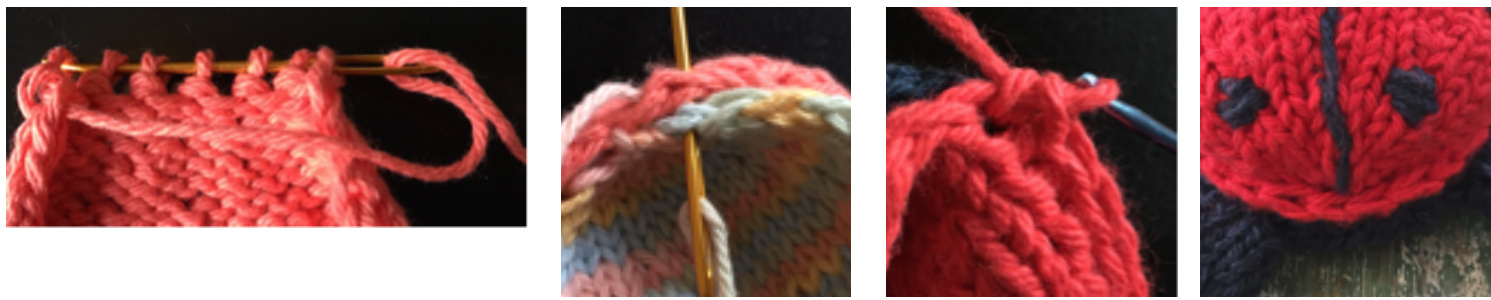
Start with the upper part of the body: In C1 CO 10 sts with long tail or other method. R1: (k2, kfb) rep to end, knit leftover st (=13 sts). R2: slp, purl all sts, R3: slk, knit all sts. R4: slp, (p2, pfb) rep to end (=17 sts). R5: slk, knit all sts, R6: slp, purl all sts. R7: see R1 (= 23 sts) R8-17: see R2+3 R18: slp, (p2, p2tog) rep to end (=17 sts). R19: slk, knit all sts, R20: slp, purl all sts. R21 slk, (k2, k2tog) rep to end (=13 sts). R22: slp, purl all sts. R23: slk, knit all sts. R24: slp,(p2tog) rep to end (=7 sts). Cut yarn, catch all live sts, and pull together (see technical notes p. 3). In C2 whipstitch a line up the middle and six dots on the back. Weave in ends. For the underside of the body: In C2 follow the pattern for the upper part of the body. Join both parts with the knit sides facing out and the CO edges aligning. Sew or crochet together (see p.3), leaving the CO edges open. Weave in ends.
Abbreviations
dpn(s) = double point needle(s) CO = cast on R = row/round st(s) = stitch(es) slp = slip a st purlwise slk = slip a st knitwise k = knit p = purl kfb = knit front and back pfb = purl back and front (...) rep = repeat sts in parenthesis k2tog = knit two sts together p2tog = purl two sts together p2togtbl = purl two sts together through the backloop ssk = slip two sts and knit together BO = bind off Sandra Ronca Designs - all rights reserved. This pattern may be used for non-commercial purposes only. No part of this publication may be reproduced or transmitted without prior permission.
Head (in the round)
In C2 pick up 10 sts on one needles along the CO edge of the upper body. CO 10 more sts on a second needle using the backward loop method. Join in the round. See technical notes p. 3. R1: Knit all sts. R2: (k2tog, k6, ssk) rep on the other needle. R3: (k2tog, k4, ssk) rep on the other needle. R4: (k2tog, k2, ssk) rep on the other needle. Cut yarn, catch allive sts and pull together. Use a thread in C3 to embroider eyes. Weave in ends.
Feet (in the round) (make six)
On the flank of the turtle below the middle/seam, so the belly will not be too protruding, pick up 10 sts ir C2 on two dpns (5 sts each), where you would expect a leg. Join in the round. See technical notes p. 3. R1-3: Knit all sts R4: (k2tog, k1, ssk) rep on the other needle. Cut yarn, catch allive sts, pulltogether and weave in end. Distribute six feet evenly around the body.
Alternatively: Head and Feet (worked flat - separately)
Feet (make six) CO 10 sts. R1: purl all sts, R2: knit all sts, R3: purl all sts. Row 4: (k2tog, k1, ssk) rep to end. Fold vertically. Use tail to close the sides and sew foot to the body. Make six and distribute evenly. Head CO 20 sts. R1: Purl all sts. R2: (k2tog, k6, ssk) rep to end. R3: (p2togtbl, k4, p2tog) rep to end. R4: (k2tog, k2, ssk) rep to end. Finish following the pattern for the head in-the-round. Fold vertically. Use tail to whipstitch the side of the head closed and sew one edge of the head (neck) to the CO edge of the upper body.
Wrapping it up
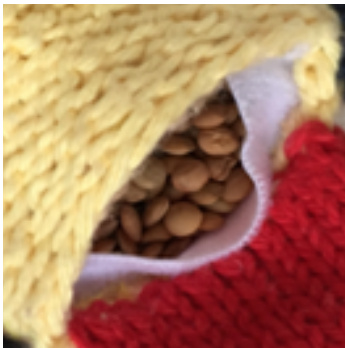
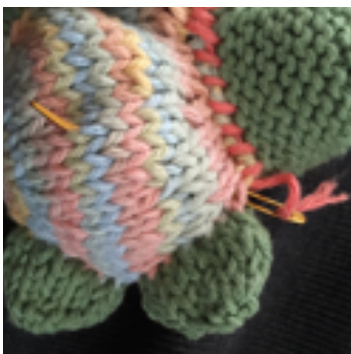
Fillthe body with filling material of your choice - make sure it's microwaveable. Whipstitch the opening closed (CO edge of the underside of the body and CO edge of the head). To wash the hot-and-cold-pack, the seam needs to be reopened, so make it obvious. You can use velcro, too - see technical notes p. 3.
Use as hot-and-cold-pack
Hot: Put the toy in a clean bowl. Microwave for approximately 30 seconds, depending on the strength of your microwave. Increase heat incrementally to make sure that the toy doesn't get too hot. Be especially careful, if you used synthetic yarn: Don't use as hot-pack at all, if yarn behaves suspiciously when heated! Cold: Leave the toy in the bowl in the freezer over night, but at least for 30 minutes to cool. This toy also works as a teether, because the feet are flat and double layered, so they will be sturdy enough for a toddler to gnaw on. For extra safety, you can use a 5x5" cotton liner bag (sewn from t-shirt fabric) to prevent small parts of filling material from escaping, if you want to give this toy to a toddler. @ Sandra Ronca Designs - all rights reserved. This pattern may be used for non-commercial purposes only. No part of this publication may be reproduced or transmitted without prior permission.
Technical Notes
Tapestry needle
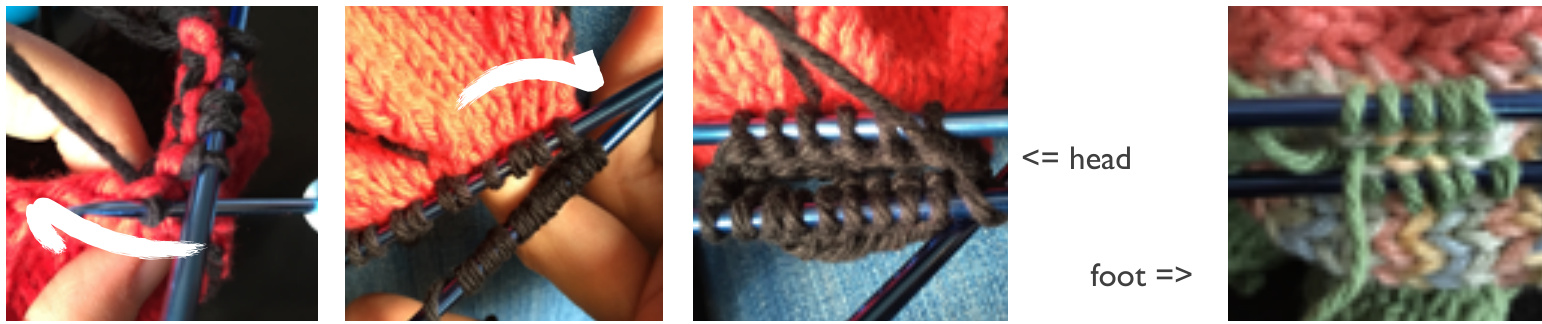
Pick up stitches on two needles and knit in the round: Hone in on a line of stitches - horizontally, vertically or even diagonally to the rows of knitting. It's easier to use a crochet hook to pull yarn through the fabric and put the loop on the knitting needle. Repeat process until you have the required number of stitches on the first needle. Turn work clockwise, that way the purl bumps of the pick up row will be on the inside of the body part. Repeat the process casting on (head) or picking up (fet) the necessary stitches on the second needle.
Velcro: Cut a piece of velcro that fits into the opening and separate the layers. Sew one layer onto the inside, so it will not be visible. Sew just the edge of the other layer onto the edge of the opening on the other side. <= velcro obvious seam =>
@ Sandra Ronca Designs - all rights reserved. This pattern may be used for non-commercial purposes only. No part of this publication may be reproduced or transmitted without prior permission.


