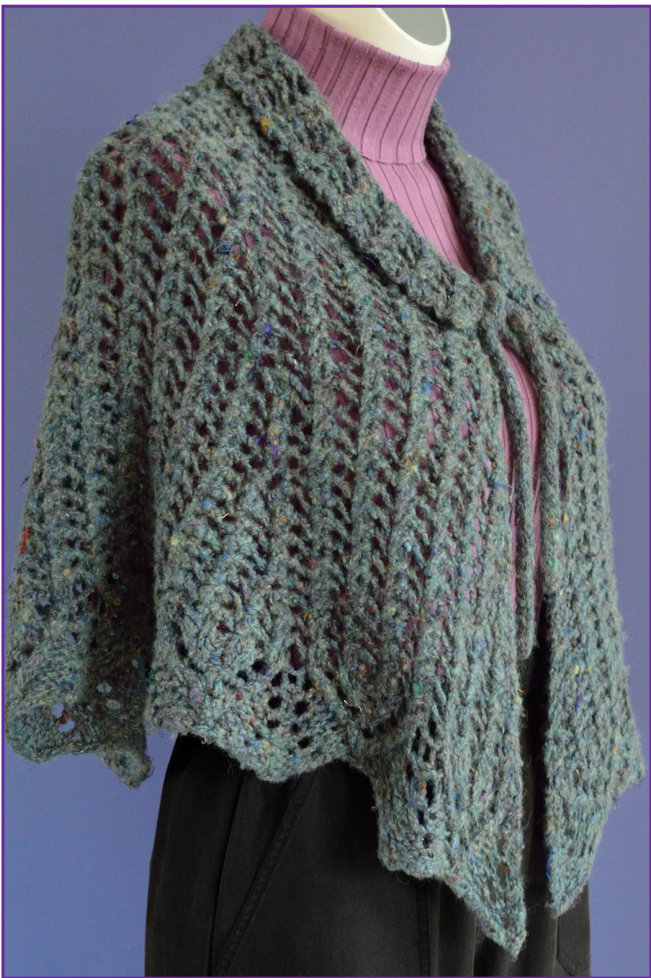
Shetland: Bulky handspun yarn with easy collar option. Shawl was slightly fulled in finishing.

What's Inside
Completely reversible lace shawl 0 Detailed pattern directions Directions and chart on same page, so it's easy to compare the two Easy stitch pattern for body 0 Lace border with matching collar Easy collar option Detailed pick up directions for collar 口 Project tips Lots of annotated photos Tutorials @ Lace blocking @ Lace blocking
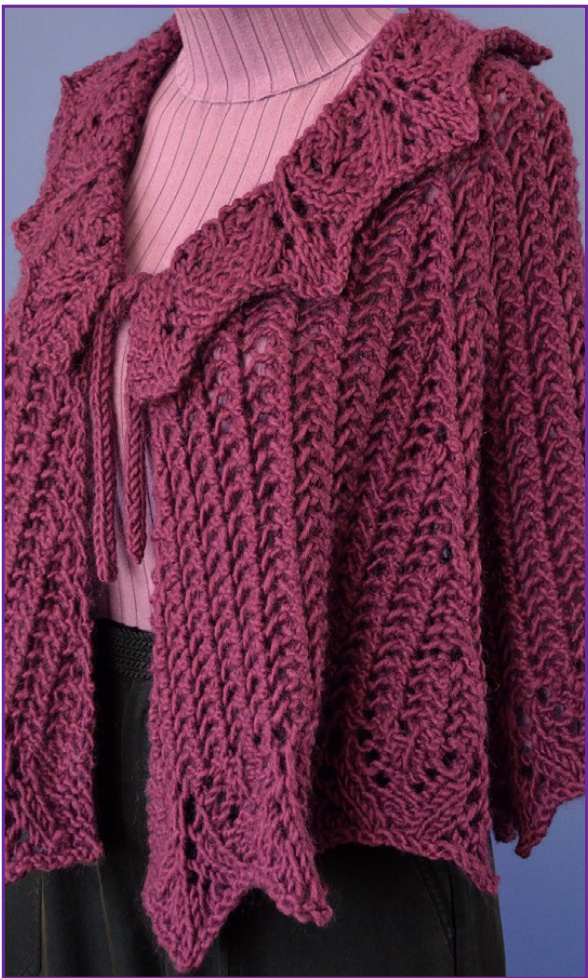
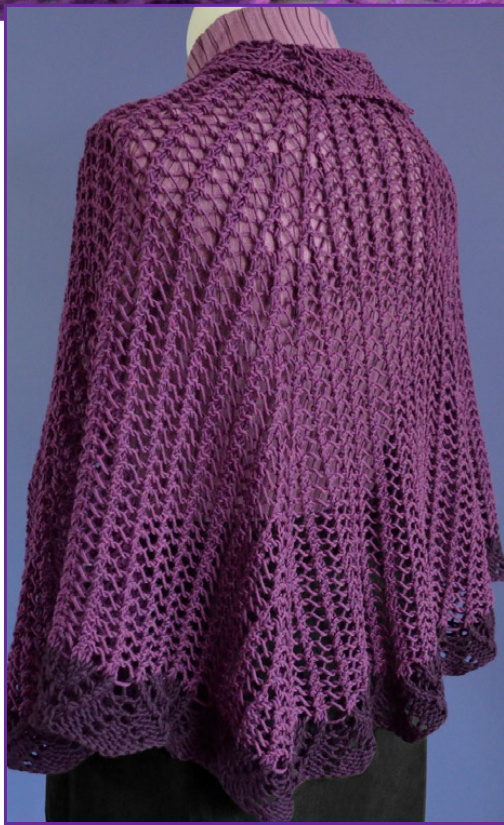
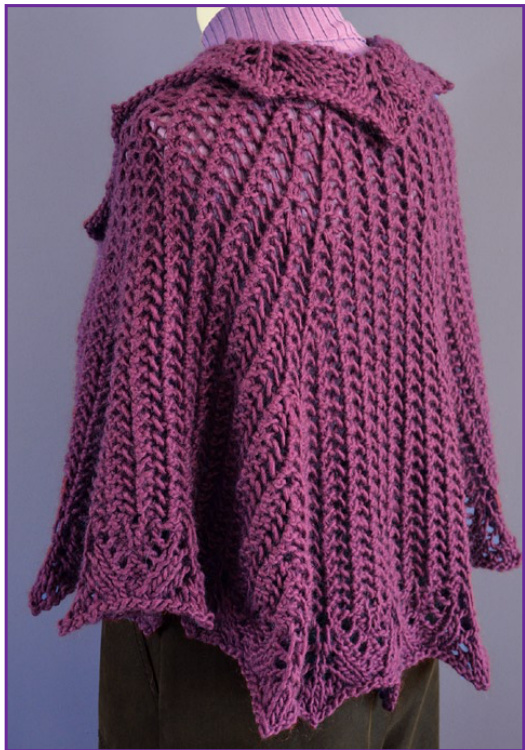
Brown Sheep: Bulky yarn with lace collar that matches bottom edge of shawl.
Overview
Reticulated Cozy is a generously-sized, slightly over half circle reversible lace shawl with almost identical sides. The body is worked in a very simple 3-stitch repeat, used on both right and wrong side rows and forming a built-in row counter. The lace band at the bottom has a 12-stitch repeat. The shawl is worked from the center back neckline down. The collar and ties are picked up and worked after the body is finished. The collar can be worked in the simple 3-stitch repeat or matching the lace bottom band. Use any yarn with an unblocked gauge in garter of 10-12sts in 4"/10cm. There are three models: > Shetland, in bulky handspun on slightly larger needles than would normally be used for this yarn Brown Sheep, in bulky yarn on slightly larger needles than called for on label > Merino, in DK weight yarn on much larger needles than called for on label
Diffculty
Intermediate, because of the lace bottom band, but I've included a lot of help in the pattern. Stitches used for the body are knit, knit 2 together, yarn over, and a 3-stitch increase. The lace band adds ssk [slip, slip, knit] and a centered double decrease. Techniques include using markers to track where you are in the pattern, picking up stitches for the collar, and I-cord. Usually lace that has lace stitches on both right and wrong side rows is more difficult to work than lace with resting, or unpatterned, wrong side rows. The body of the shawl doesn't fit the norm, since the basic 3-stitch repeat is worked the same way for both sides and is easy to memorize. The lace band is a little more challenging. There is knit and purl patterning on wrong side rows, but no increases or decreases.
Merino: A second color begins at the lace border.
Shetland: Handspun Bulky Yarn
Measurements
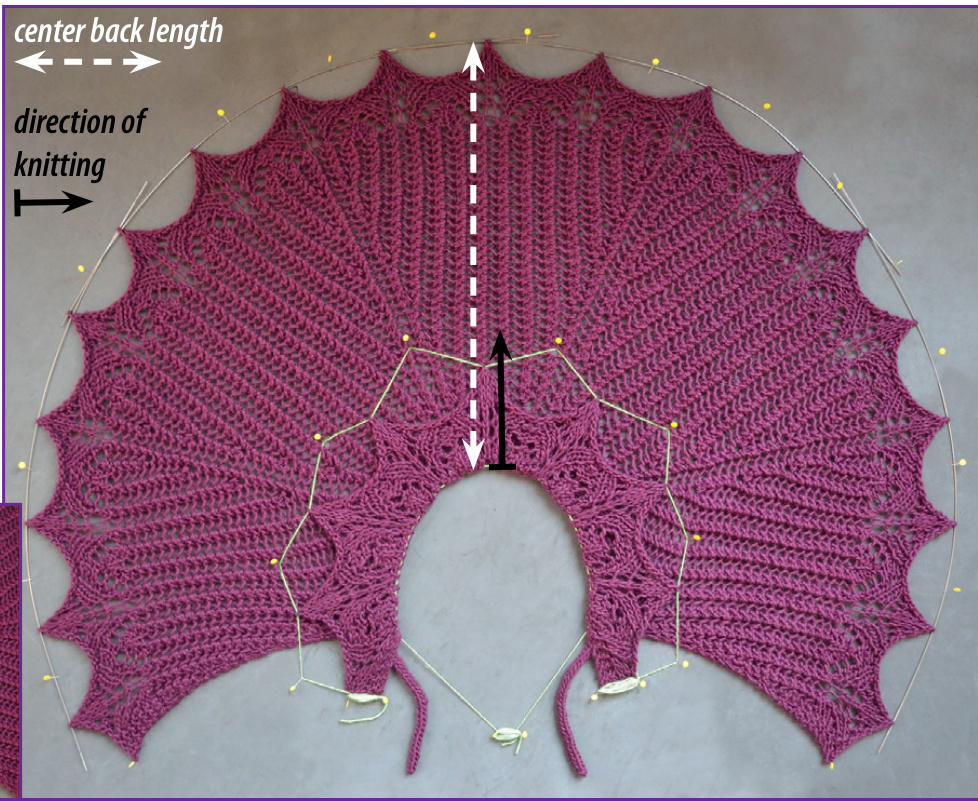
unblocked: bustline 38"/96cm, center back length 17"/43cm blocked: bustline 40"/102cm, center back length 20"/51cm Note: shawl was slightly fulled in finishing, so it did not stretch as much during blocking.
Yarn
Handspun 2-ply from Spinzilla 2014, color teal, 75% Shetland lamb wool, 25% sari silk, 468yd/426m in 13.4oz/380g
Gauge
unblocked, 12sts = 4"/10cm in garter blocked, 10sts = 4"/10cm in 3-st repeat
Brown Sheep: Bulky Yarn
Measurements
unblocked: bustline 40"/102cm, center back length 15-1/2"/39cm blocked: bustline 45"/114cm, center back length 20-1%2"/52cm
Yarn
Brown Sheep Lamb's Pride Bulky, color Chianti MB8, 6 skeins, 85% wool, 15% mohair, 125yd/114m in 4oz/113g label: 12sts = 4"/10cm Us10.5/6.5mm
Gauge
unblocked, 10sts = 4"/10cm in garter blocked, 9.5sts = 4"/10cm in 3-st repeat
Merino: DK Yarn
Measurements
unblocked: bustline 44"/112cm, center back length 15-12"/39cm blocked: bustline 48"/122cm, center back length 22"/56cm
Yarn
Berroco Pure Merino Heather, mc: color 8617, 11 skeins, cc: color 8522, 3 skeins, 100% extra fine Merino wool, 92yd/85m per 1.75oz/50g skein label: 18sts = 4"/10cm Us8-9/5-5.5mm
Gauge
unblocked, 12sts = 4"/10cm in garter blocked, 11sts = 4"/10cm in 3-st repeat
Brown Sheep
Measurement for bustline includes the upper arms. Follow one row of knitting around shawl to measure. The mesh stitch pattern of the body is extremely stretchy. Blocking can emphasize the lengthwise or widthwise stretch, as desired.
Needles
Shetland us11/8mm Brown Sheep Us11/8mm Merino Us10/6mm 40"/100cm to 48"/120cm circular 24"/60cm circular (collar) short circular or 2 double points (I-cord)
Markers
3 markers m, 1 distinguishable mA 6 removable markers for increases, distinguishable from m and mA > 8 removable markers for row repeats
Tips for Body, Charts B & C
Temporary markers and oto3 increases: For every row with 0to3 increases, there are nine rows without them, so you get a lot of practice at just working across the markers. A missing 0to3 increase is easy to overlook, and can only be fixed by tinking. As a reminder, place temporary markers at 0to3s at start of Body row 1, and remove them while working the row. Row directions don't refer to these markers. 3-stitch repeat over previous repeat: To work a k-yo-k2t over a previous one, yo before the yo on left needle. Work k2tog on yo on left needle and following k stitch. If the stitches don't present and work in this manner, there is an error. Markers & k-yo-k2ts: Markers always occur between complete k-yo-k2ts.
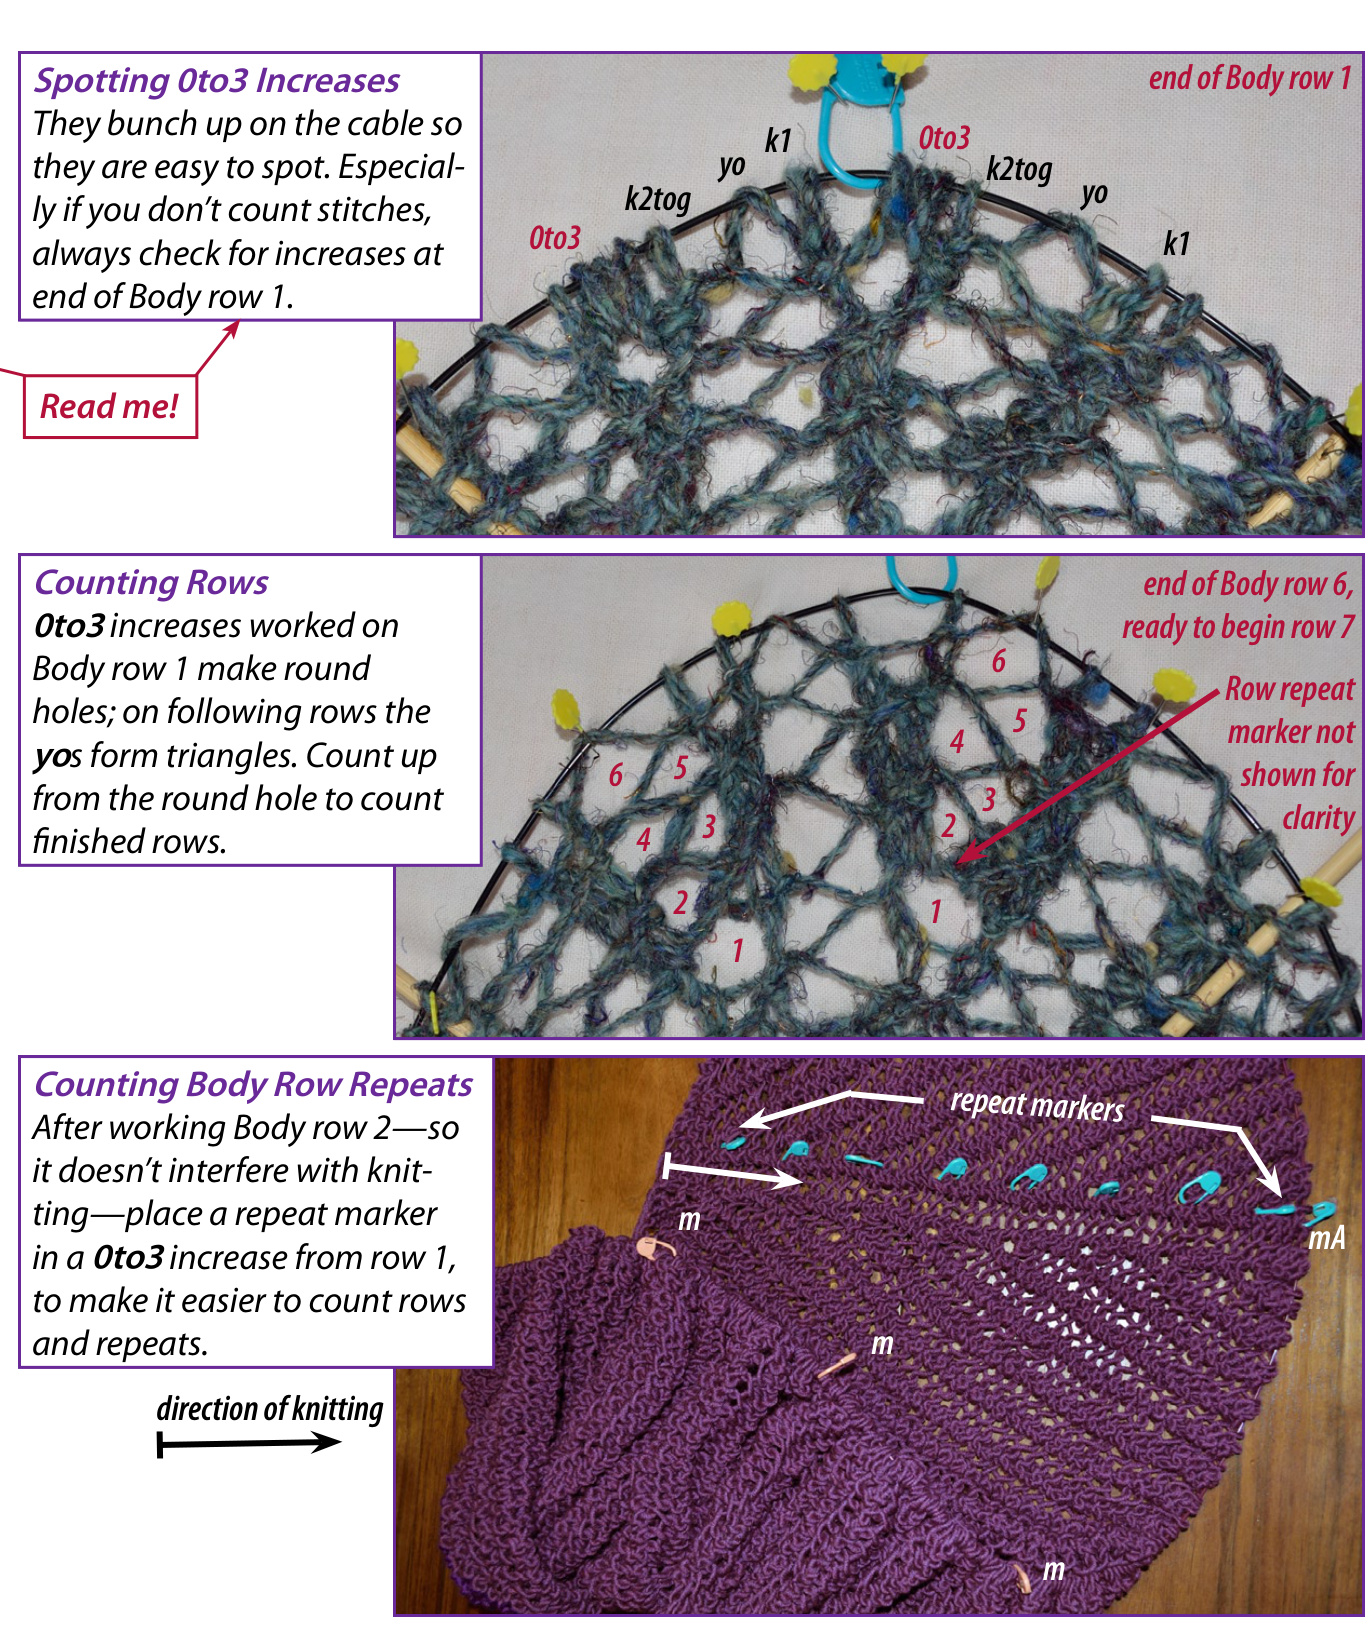
Body row 2: k-yo-k2t over previous 0to3: When working over a Oto3 increase, it is easy to pick up 3 stitches instead of 2 on the k2tog. This will be apparent on the next k-yo-k2t. Fasten off and neaten loose ends.
Tips for Lace Band, Chart D
Markers & Lace Band Setup row: Markers used during Body occur 1 stitch into the 12-stitch lace repeat. Use them to verify alignment on Lace Band Setup row. 12-stitch markers: Markers every 2 to 3 12-stitch repeats help track the lace pattern. Row directions don't refer to these markers.
Abbreviations
k knit k2tog k2 together (-1 st) yo yarn over (+1 st) (k-yo-k2t) k1, yo, k2 together [3-st repeat] m marker mA distinct marker st(s) stitch(es) (#) stitch count link to another page
Stitch Pattern Repeats
Repeats in row directions are underlined: (k3, yo, k5, yo) 3-stitch repeat is highlighted: (k-yo-k2t)
Cast On & Setup
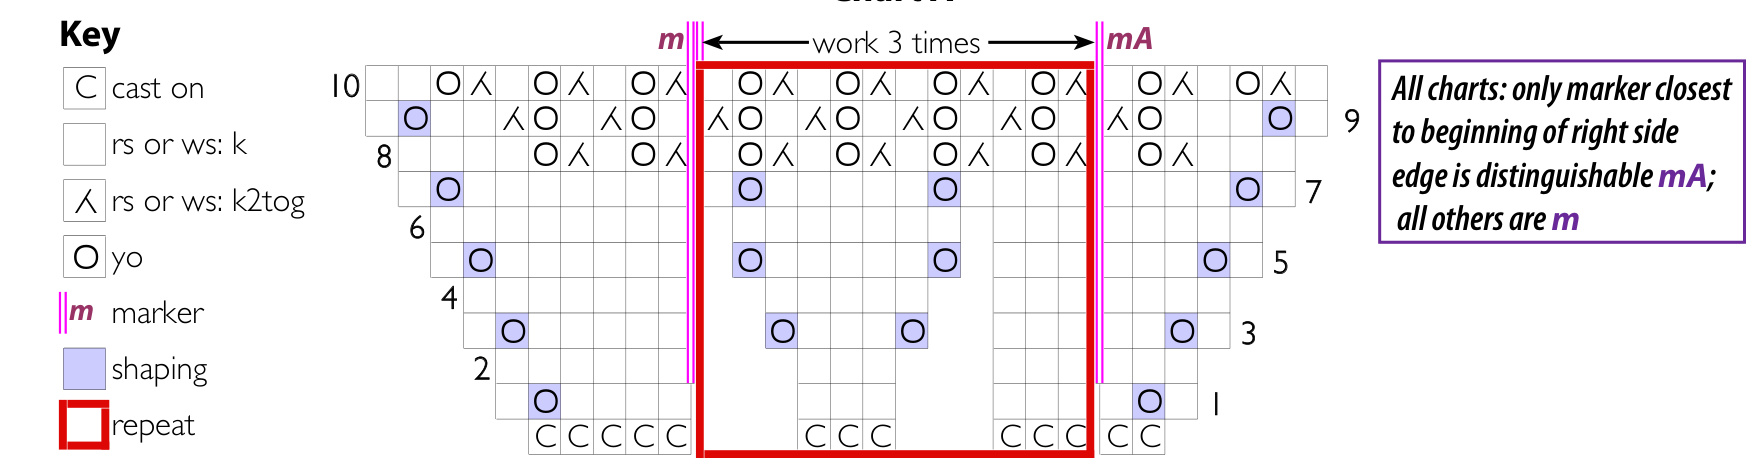
Begin Chart A
Cast on 25 sts. Work rows 1-10 once. Slip markers as you come to them. 1: [right side] k1, yo, k to last st, yo, k1 (27) 2: (k6, place m) 3 times, k6, place mA, k3 [3 m, 1 mA placed] 3: k1, yo, k2, (k3, yo) 6 times, k5, yo, k1 (35) 4: k to end 5: k1, yo, k3, (k3, yo, k5, yo) 3 times, k6, yo, k1 (43) 6: k to end 7: k1, yo, k4, (k4, yo, k5, yo, k1) 3 times, k7, yo, k1 (51) 8: k3, (k-yo-k2t) to last 3 sts, k3 9: k1, yo, k2, (k-yo-k2t) to last 3 sts, k2, yo, k1 (53) 10: k1, (k-yo-k2t) to last st, k1 Continue with Body.
Right Side Rows
Odd numbered rows are right side rows for all charts.
Chart A
Body
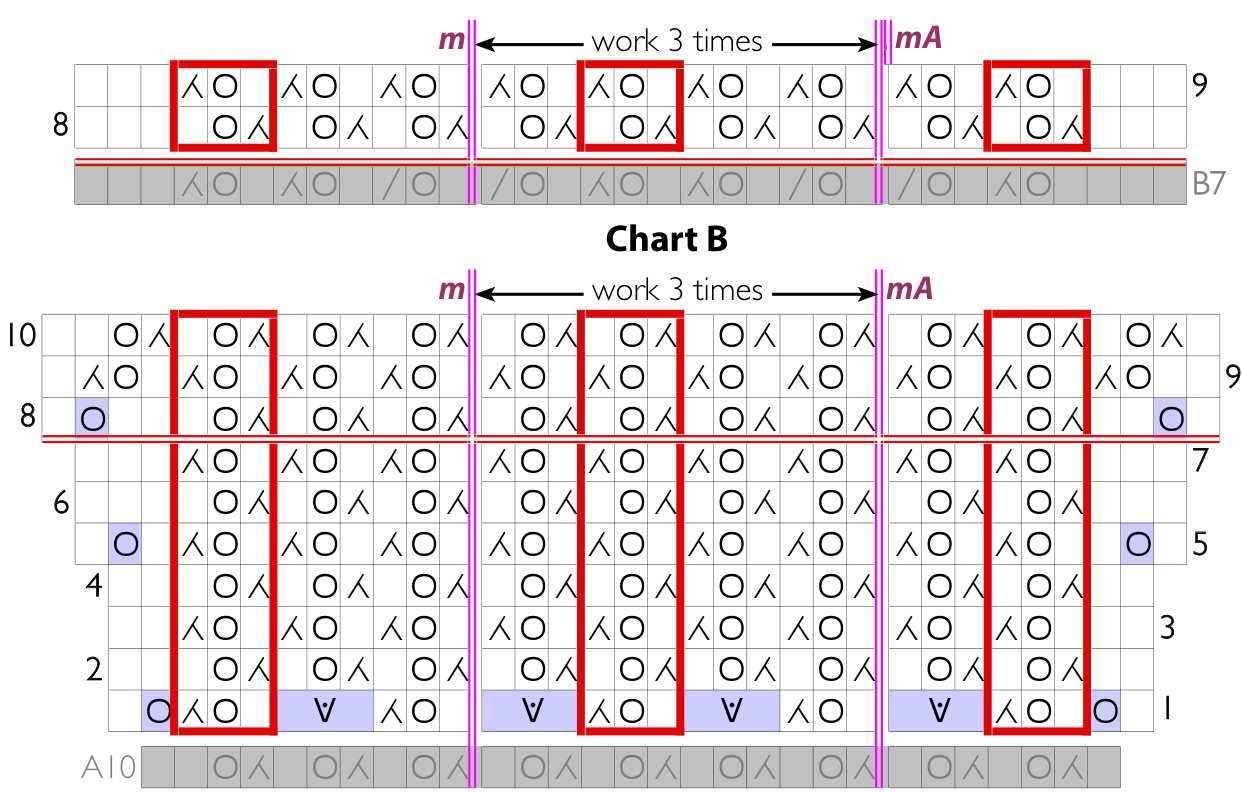
Begin Chart B Tips for Working Body, p4
Repeat rows 1-10 to desired length (see sidebar), ending with an even number of repeats and a completed row 7. The final partial repeat counts as a repeat. Slip markers as you come to them, except where specified in row directions. 1: [place temporary Oto3 markers] [right side] k1, yo, \* (k-yo-k2t)to m, 0to3, slip m, (k-yo-k2t) once, 0to3, repeat from \* 3 more times, (k-yo-k2t)to last st, yo, k1 (+26 sts) [check for increases] 2-4: k2, (k-yo-k2t) to last 2 sts, k2 5: k1, yo, k1, (k-yo-k2t)to last 2 sts, k1, yo, k1 (+2 sts) 6-7: k3, (k-yo-k2t) to last 3 sts, k3 8: k1, yo, k2, (k-yo-k2t) to last 3 sts, k2, yo, k1 (+2 sts)
Stitch Counts for Chart B
| Repeat | Row 1 | Row 5 | Row 7 | Row 8 | End of Repeat | ||
| edge to mA | mto m | m to edge | |||||
| 1 | 79 | 81 | 83 | 13 | 18 | 16 | |
| 2 | 109 | 111 | 113 | 19 | 24 | 22 | |
| 3 | 139 | 141 | 143 | 25 | 30 | 28 | |
| 4 | 169 | 171 | 173 | 31 | 36 | 34 | |
| 5 | 199 | 201 | 203 | 37 | 42 | 40 | |
| 6 | 229 | 231 | 233 | 43 | 48 | 46 | |
| If final repeat: | 231 | 231 | 二 | 42 | 48 | 45 | |
| 7 | 259 | 261 | 263 | 49 | 54 | 52 | |
| 8 | 289 | 291 | 291 | 二 | 54 | 60 | 58 |
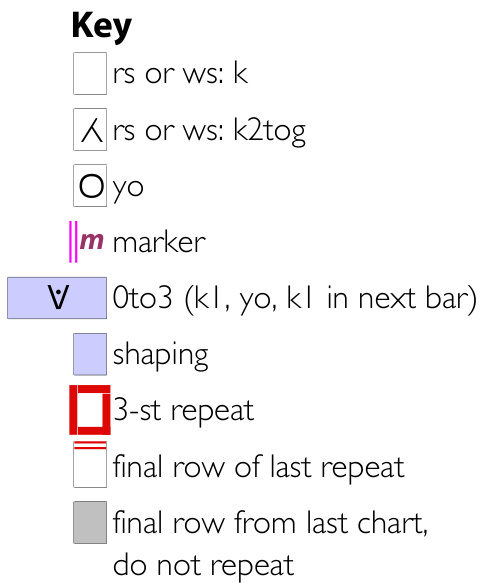
Chart C
Final Body Rows
Begin Chart C
This finishes the final Body repeat worked according to Chart B through row 7. Work rows 8-9 once. 8-9: k3, (k-yo-k2t) to last 3 sts, k3
Oto3 Increase
Shawl Length
Lift bar before next st, place on needle, without twisting k1, yo, k1 in lifted bar (+3 sts) Use less length rather than more to get an even number of repeats. The shawl stretches a lot when blocked—unfulled models gained about 5"/13cm. There is no row 10. Continue with Lace Band. 9-10: k1, (k-yo-k2t)to last st, k1
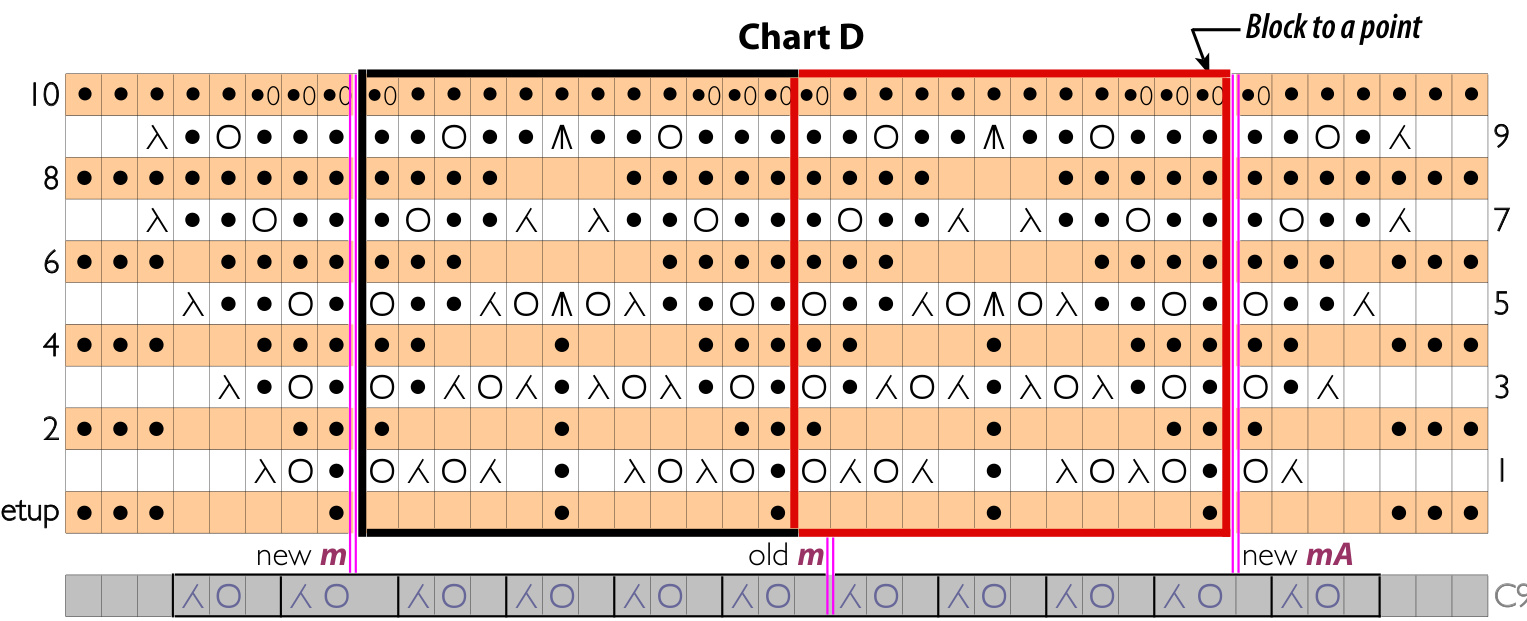
Lace Band
Begin Chart D Tips for Working Lace, p4
Remove old markers and place new ones on Setup row. Add markers for 12-st repeats as desired. Once placed, slip markers as you come to them. If changing color, do so on Setup row. Setup: [wrong side] k3, p4, k1, place m, (p5, k1) to last 7 sts, place mA, p4, k3 1: k5, k2tog, yo, (p1, yo, ssk, yo, ssk, k1, p1, k1, k2tog, yo, k2tog, yo) to m, p1, yo, ssk, k5 2: k3, p3, k2, (k1, p4, k1, p4, k2) to mA, k1, p3, k3 3: k4, k2tog, p1, yo, (p1, yo, p1, ssk, yo, ssk, p1, k2tog, yo, k2tog, p1, yo) to m, p1, yo, p1, ssk, k4 4: k3, p2, k3, (k2, p3, k1, p3, k3) to mA, k2, p2, k3 5: k3, k2tog, p2, yo, (p1, yo, p2, ssk, yo, cdd, yo, k2tog, p2, yo) to m, p1, yo, p2, ssk, k3 6: k3, p1, k4, (k3, p5, k4) to mA, k3, p1, k3 7: k2, k2tog, p2, yo, p1, (p2, yo, p2, ssk, k1, k2tog, p2, yo, p1) to m, p2, yo, p2, ssk, k2 8: k8, (k4, p3, k5) to mA, k7 9: k2, k2tog, p1, yo, p2, (p3, yo, p2, cdd, p2, yo, p2) to m, p3, yo, p1, ssk, k2 10: k5, (k1, yo) 3 times, (k1, yo, k8, (k1, yo) 3 times) to mA, k1, yo, k6 (+4 sts per repeat +4 sts) To work the 12-Stitch Collar, place mB in fabric near mA, to mark that edge for collar placement. Skip placing mB for 3-Stitch Collar. Remove all markers except mB. Bind off loosely. Cut yarn. Continue with Place Collar Markers.
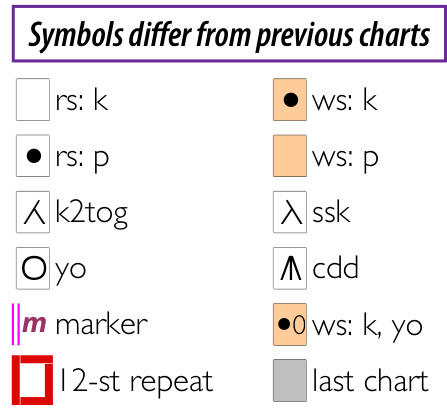
Additional Abbreviations
ssk [left leaning decrease, 1 slip st method] slip 1 knitwise, return twisted st to left needle, k2tog through back loop (-1 st) cdd [centered double decrease] slip 2 together as if to k2tog, kl, pass slipped sts over (-2 sts)
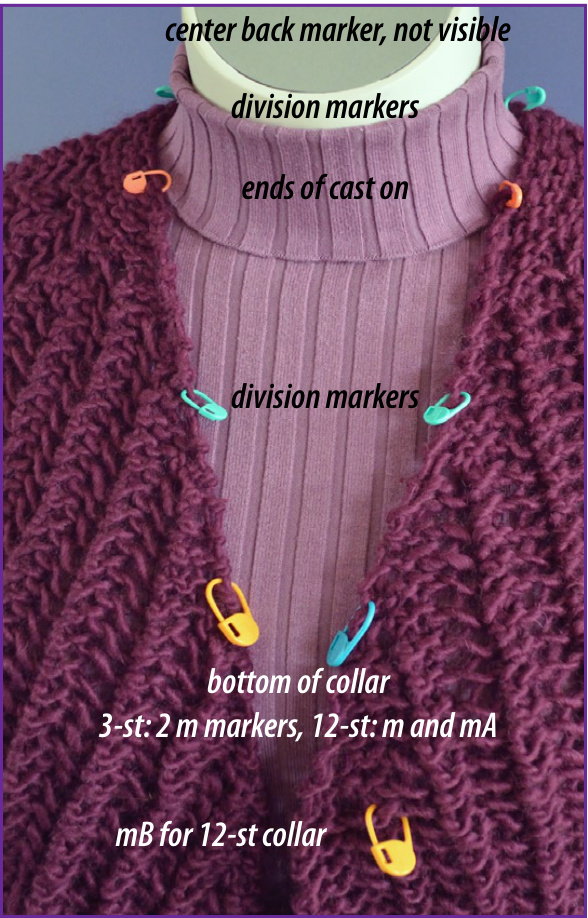
PlaceCollarMarkers
Ignore mB for now. Place 5 markers at desired bottom of collar, ends of original cast on, and center back. Place 4 additional division markers evenly between each pair-9 total markers. Continue with 3-Stitch or 12-Stitch Collar. For a higher bottom on a 12-stitch collar, place higher bottom markers, skip the division markers between bottom of collar and end of cast on and reduce pick up stitch count by 12 stitches—1 repeat—-on each side.
www.JenniferAdair.com ? Jennifer Adair 2015
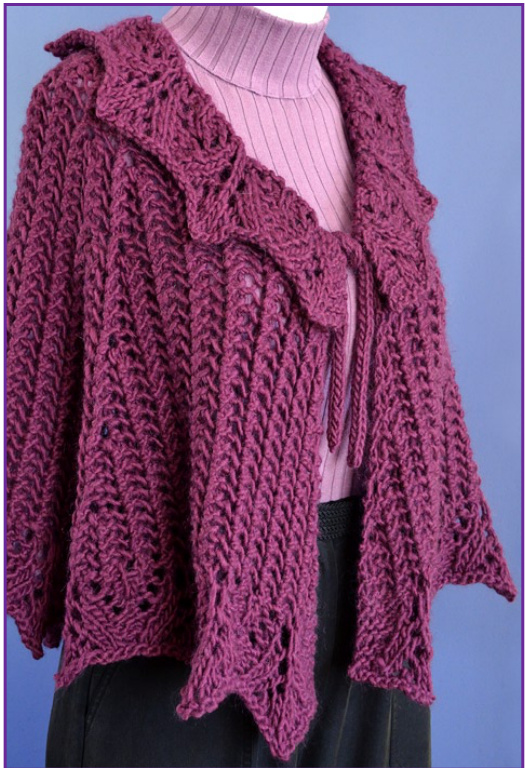
Brown Sheep with 12-Stitch Collar.
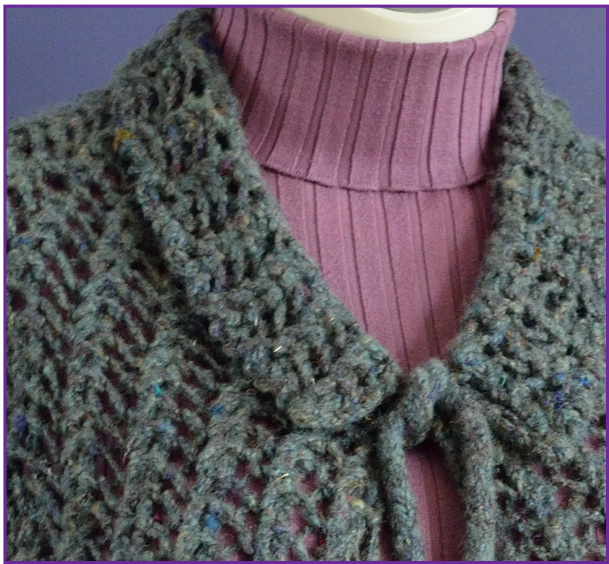
3-Stitch Simple Lace Collar
Total stitch count is an even multiple of 3. Shetland stitch count is 78—see photo below. From bottom m to cast on, pick up 6, 9, or 12 stitches between markers to fit available space. Between cast on markers, pick up 48—12 per section. The 48 stitches will be packed together. Pick up (k1, p1) so collar can lay on either side. Pick Up: Either side facing, moving markers to needle as you come to them, beginning at first m, adding evenly spaced yos to achieve st count if needed, (pick up and k1, pick up and p1) to last m ending k or p Remove all markers. Repeat row 1 until collar is 2%2"/6cm. Work row 2 once. 2: k3, (yo, k1) to last 3 sts, yo, k3 (almost doubles sts) Bind off loosely. Cut yarn. Continue with Ties. Bottom edge and collar are same face showing. Shetlandwith 3-stitch collar.
Bolaced hiaber s pick up count from obott
12-Stitch Lace Collar
The lace pattern is attractive on both sides, but not identical. When shawl is worn with the collar folded down, one face of bottom lace band and opposite face of collar are showing. Brown Sheep has matching faces, photop8. For collar and bottom band to match, mA is bottom of collar marker near mB. For pstefa determined, remove mB. Pick up stitch count is 102 for collar with lower bottom and 78 for higher collar. The 48 stitches between cast on markers will be packed together. Pick up (k1, p1) so collar can lay on either side. Pick Up: Moving markers to needle as you come to them, beginning 3 sts before mA, picking up 12 sts between sets of markers, adding evenly spaced yos to achieve st count if needed, (pick up and k1, pick up and p1) to last m, pick up 3 more sts after m ending k or p (lower collar 102, higher collar 78) Only the markers at bottom of collar are referred to in the directions. Remove the other markers or leave them in place to mark the 12-stitch repeats. Slip markers as you come to them.
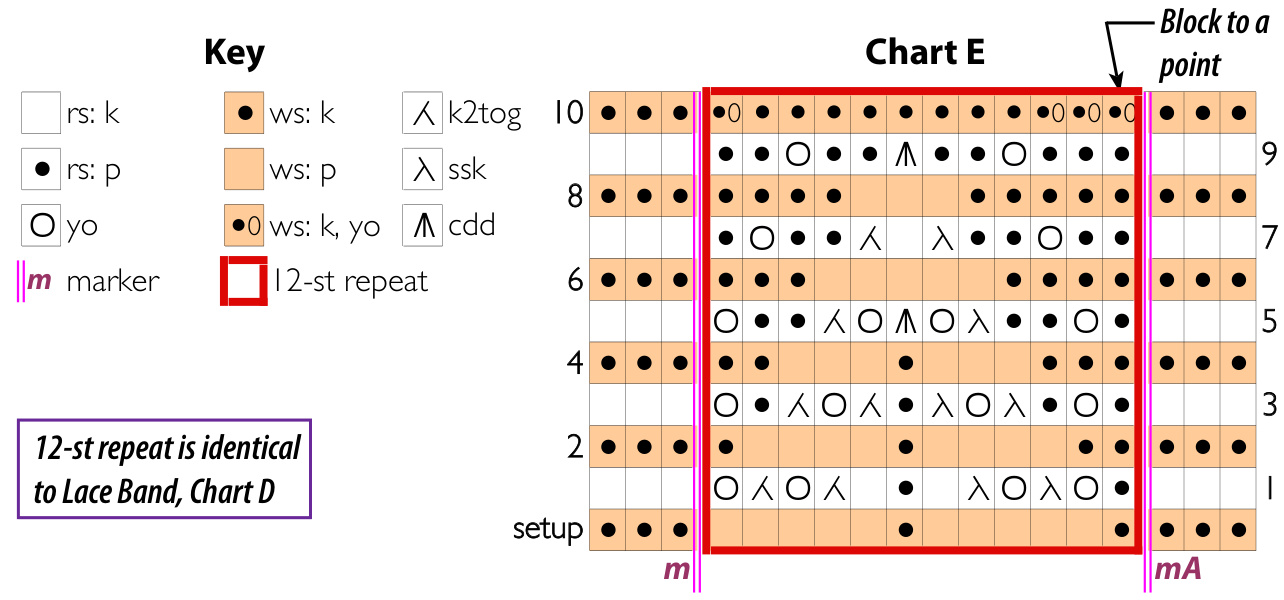
Begin Chart E
Setup: [wrong side, mA at end of row] k3, (p5, k1) to mA, k3 1: k3, (p1, yo, ssk, yo, ssk, k1, p1, k1, k2tog, yo, k2tog, yo) to m, k3 2: k3, (k1, p4, k1, p4, k2) to mA, k3 3: k3, (p1, yo, p1, ssk, yo, sk, p1, k2tog, yo, k2tog, p1, yo) to m, k3 4: k3, (k2, p3, k1, p3, k3) to mA, k3 5: k3, (p1, yo, p2, ssk, yo, cdd, yo, k2tog, p2, yo) to m, k3 6: k3, (k3, p5, k4) to mA, k3 7: k3, (p2, yo, p2, ssk, k1, k2tog, p2, yo, p1) to m, k3 8: k3, (k4, p3, k5) to mA, k3 9: k3, (p3, yo,p2, cdd, p2, yo, p2) to m, k3 10: k3,(k1, yo, k8, (k1, yo) 3 times) to mA, k3 (+4 sts per repeat) Remove markers. Bind off loosely. Cut yarn. Continue with Ties.
Ties
With 2 double points or short circular, under front edge of collar, pick up 3 or 4 sts on body of shawl, work I-cord for 9", bind off, cut yarn. Repeat for other tie. Continue with Finishing & Blocking.
Finishing & Blocking
Weave in any remaining yarn tails. Woven yarn tails should stretch as much as the fabric.
Blocking Supplies
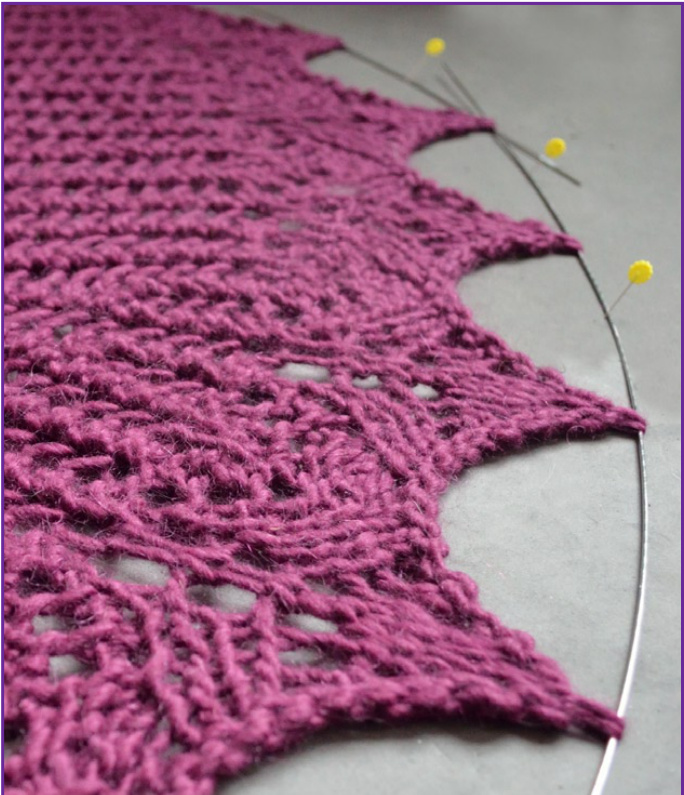
Blocking can be done entirely with pins, however, wires and/or string are very helpful. > Quilting pins with large plastic heads, so you can spot them easily > Stainless steel blocking wires, or 36" x 1/16" stainless steel welding rods from a local welding supply store > Cotton string or smooth yarn, several yards >Blocking mats, or interlocking foam fatigue mats, available at home improvement stores > Tapestry needle
Washing
Gently wash shawl in cold water and remove as much water as possible. I use a front load washer set to drain and spin. Thread after washing, to eliminate tangled strings.
On Threading
Wires and string help keep lines straight and curves smooth, requiring less pinning. Wires will not work on tight curves like the neckline—use string instead. Thread string before wires. Threaded wires fall out, so thread where you will block, overlapping ends of wires. Thread near edges of the garment, through every few stitches. Use yarn overs if available. Follow a pattern, for example, stay on one row instead of wandering in and out from the edge. For the lace edges, thread only at the tips of stockinette diamonds at center of repeats.
Threading Instructions
Thread a string at neckline and collar bind off. Thread the bottom edge, using wires if available; string if not.
Pin in Place
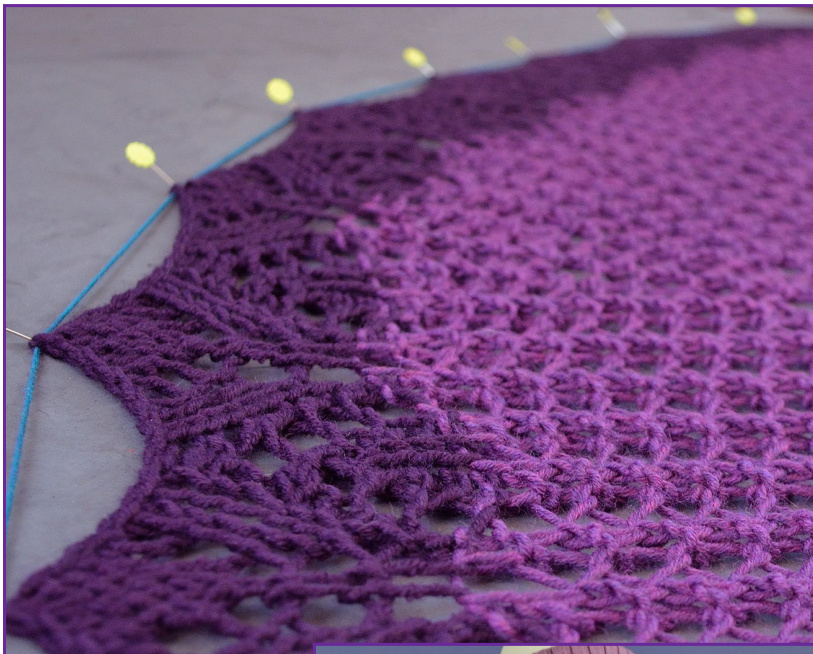
Ignore the collar for now. Pin center back line of shawl first, at bottom edge and neckline. Continue stretching and pinning outward from center back bottom edge until the center five lace points are secured. Tension the neckline string (1 on photo). Finish pinning bottom edge. This is a trial-anderror procedure that always requires moving and adding pins. Periodically stand back to see if shawl is being pinned symmetrically. Use any lines on your blocking surface and look at the negative space—the not-shawl background. Once shawl is in place, turn the collar down, secure the bind off string (2 on photo), and pin out the collar lace points.
Is It Dry Yet?
If taken up damp, the shawl remembers the relaxed shape, not the blocked one. A fan or space heater speeds the process, but it may take a couple of days. If it fels cool, it's still damp.
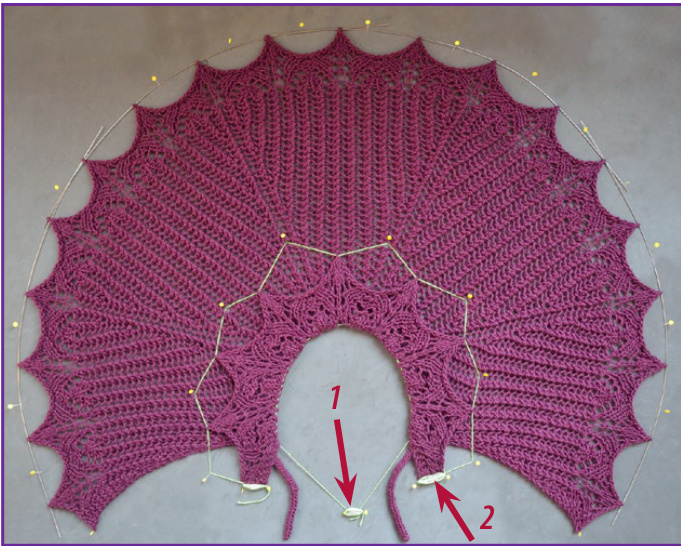
Brown Sheep
Note pins at arrows used as rope cleats—-wrap string in figure-8s——to tension string at neckline and collar edge. Once tensioned, points on the lace collar can be pulled out and pinned.