No-Waste Fleece Baby Quilt
by Jody DeLong Are you a fan of the No-Sew Fleece blanket? Wondering what to do with all of those 5” squares that you cut from the corners of your blankets? Read on! With our recent discovery of the Skip-Stitch Perforating Rotary Blades@, available online at http://www.skipstitch.com/index.html, we have found a way to use all of those small pieces, use up small balls of yarn, and make beautiful blankets for the children in and outside of your life. These are perfect as baby blankets for donation to your local Neonatal Intensive Care Unit (NICU) or other children's charities.
Supplies:
Leftover pieces of fleece fabric, cut into uniform squares. 4 inch to 7inch Small quantity of acrylic yarn Rotary cutter with Skip-Stitch blade CuttingMat Size H (or similar) crochet hook
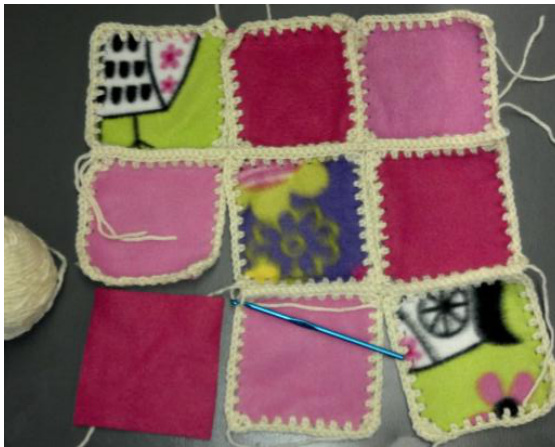
Preparation: Trim the fleece pieces to a uniform size appropriate for your fleece. In pairs of 2 each, arrange on cutting mat and apply a straight edge / inch from edge of fleece. Using the cutter, cut along the straight edge, applying enough pressure to go through both pieces of fleece. Turn squares and repeat for each edge. Once the holes are cut, lay out your squares in a pleasing arrangement and choose which squares will become a quilt. You might use 4 larger squares or 9 smaller, or any other arrangement of squares that results in a blanket of the desired size. Edging: Using one square, begin with a Chain 3 in a corner stitch (if there are more than one, choose the most stable one). Hdc in the same corner hole, ch 1. Working across the square, \* hdc in each hole, ch 1 \* repeat across square to corner hole. \* Hdc in corner hole, ch 1 \* 3 times. Continue working across square as above. Repeat for remaining corners and edges. After the last hole is worked, ch 1, hdc in starting hole, ch 1, slip stitch
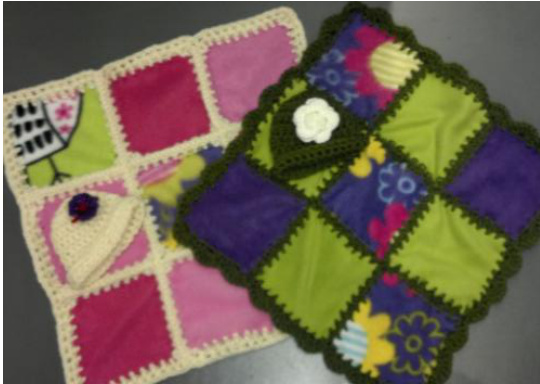
Assembly: To assemble, hold two squares with wrong sides facing. Slip stitch through back loops of both hdc borders across. Once all squares are connected, finish with a hdc row around outside border. Variations: Use any stitch for your base row, (sc, ch1), (dc, ch1), etc. Add additional rows of crochet around before assembling. Use a lacey chain or mattress stitch to connect the squares Use an alternate border such as a picot or shell. Make a matching hat to go with the blanket.


