

Confidence Shawl / Kerchief
Whether you're an experienced shawl knitter or a beginner, yo'llikely agree that wearing a garment you have made yourself causes you to wall tller, have more spring to your step, and feel more confident. Lost City Knits has designed this pattern for just that reason. The Confidence Shawl / Kerchief is a beginner level small shawl and contains notes to help the beginning knitter become comfortable with knitting a traditional triangle shape, reading charts, and blocking. Whether you're a beginner or not, we think you'll find this fun and versatile shawl a wonderful addition to your wardrobe.

Afew things you need toknow howto dobefore starting this project: 1. How to cast on using either the knitted cast on, or long tail cast on. 2. How to execute theknit stitch. 3. How to execute the purl stitch. 4. How to execute a yarn over. Materials needed: One skein of Lost City Knits Wool Silk Fingering Weight Yarn or any 40oyd/365m fingering weight yarn. A size 4Us/3.5mm circular needle. Four stitch markers. A row counter. Pins for blocking after the shawl is complete. Blocking wires if you have them (or know a friend who does).
GENERALINSTRUCTIONS
It's always best to read completely through a pattern before beginning any project. This pattern is a chart-only pattern (without a written translation of the stitches). The symbols for these charts will be found on PAGE 4. The first two stitches and the last two stitches on every row, whether right side (RS) or wrong side (WS) are the EDGING stitches and will always be knit (never purled). The EDGING stitches do not appear on the charts. There is always a CENTER STITCH which also doesn't appear on the chart. It is always knit on the RS and purled on the WS. Gauge 24 stitches per 4 inches using a size 4US/3.5mm circular needle, adjust needle size to get gauge. This pattern is easily adaptable for a thicker yarn and larger needle, finished size and repeats will vary however.
FORBEGINNERS
RS and WS - this is general knitting shorthand for the Right Side or Wrong Side, when a project is knit flat. In most patterns the RS are the odd numbered rows and the WS are the even numbered rows. If you look at a store-bought sweater for instance - the side that is worn next to your skin is the WS and the side the public sees is the RS. After knitting several rows you'llfind that the CENTER STITCH is quite obvious and you wil probably begin to use it as a landmark on your project. Many knitters prefer to slip the first stitch (as if to purl) on each row for a cleaner edge, I highly recommend this little trick. Knitting Math - Most often a traditional triangle shawl increases by four stitches every RS row. For this shawl (and most others) you'll not increase or decrease your number of stitches on the WS rows. I like to use the stitch markers to separate the shawl into sections (more about that later). When you read the letters PM in the directions below it means PLACE MARKER. Any type of stitch marker will do as long as it is easy to shift it from one needle to the other and doesn't get in your way. Beware of the dangly stitchmarker -- while it's pretty it may snag your yarn.
Why Charts? Charts are the best way for a knitter to see how a pattern builds architecturally. Being able to read a chart will help you learn how to catch your errors right away and save you time in the long run. Instead of reading through lengthy translations you'll soon be glancing at a chart to see where you are in your pattern sequence. This pattern is quite simple and could easily be written without a chart, however, in the spirit of learning about how a triangle shawl is constructed a chart is used.
DIRECTIONS
Leaving a six to eight inch tail, cast on three stitches using a long tail cast on or knitted cast on.
SET UP ROWS
Double check your Symbol Key on page 4 to make sure you understand the abbreviations, then knit the six rows below. 1. K, yo, k, yo, k 2. K, p3, k (5 stitches) 3. K2, yo, k, yo, k2 (7 stitches) 4. K2, p3, k2 5. K2, PM, yo, k, yo, PM, k(center stitch), PM, yo, k, yo, PM, k2. (11 stitches) 6. K2, p7, k2 Don't worry about the tail for now. We'll weave it in after the shawl is blocked (more about blocking later). If you weave the tail in before blocking you may get it too tight and cause your finished project to not block to its maximum. WHAT IS ON YOUR NEEDLE AFTER THE SET UP - Remember that the first two and last two stitches are EDGING and now you have a stitch marker nestled up against these stitches on each end of your shawl. Now count across all your stitches (including the yarn overs) to the sixth stitch. That's your CENTER STITCH. Notice that it has a stitch marker on each side of it. If your yarn overs have slipped on the wrong side of your stitch marker don't worry, this happens all the time, just nudge them back so the EDGING and CENTER SPINE are singled out. Now look again at your shawl. You have five sections - two EDGING sections - one at each end, one CENTER SPINE stitch, and the sections (composed currently of three stitches) on either side of the spine - for this shawl we'll call those the WINGS. Compare what you see to the photo below which was taken after completing row 5.
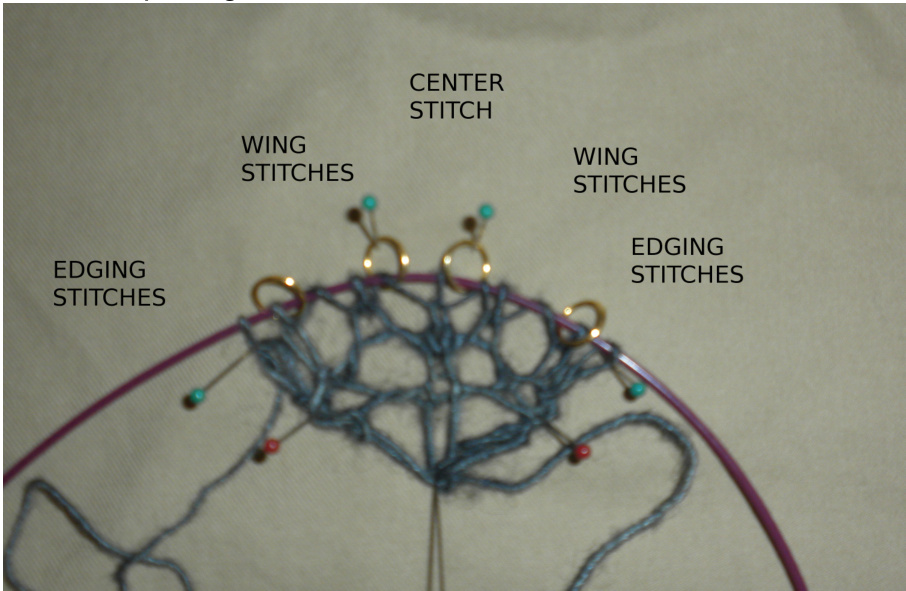
Remember that the math for this shawl says that it grows four stitches on every RS row. Your shawl is growing by use of YOs. Count them. Four! And the YOs will always be in the same place in this shawl - on each end of the two WiNG sections.
| Symbol Key | |
| Knit - k (RS) Knit (WS) Purl | |
| Purl -p (RS) Purl (WS) Knit | |
| No Stitch (RS) No Stitch (WS) No Stitch | |
| YarnOver-yo (RS)YarnOver | |
AFEWNOTESONCHARTREADING
RS rows are read from right to left, and WS rows are read left to right. Often (and in this case) in a triangle shawl pattern a chart will represent just half of the shawl. That may seem weird at first. But if you think of the chart as representing just the stitches in a WING you'll be fine. Remember that the EDGING stitches aren't charted in this pattern? Neither is the CENTER SPINE stitch! Don't get confused - but for this project the CENTER SPINE stitch is always knit on the RS and purled on theWs. Why does a designer write a pattern this way? The simple answer is to keep the chart on a single page whenever possible therefore making it easier for you - the knitter - to follow the pattern. So - the chart below represents One Wing section. What are you supposed to do for the other Wing? Knit the exact same stitches done on the first WiNG. Here's one thing to remember - RS rows are read from right to left, and WS rows are read left to right. To make it easy to read I've colored the even (WS) rows a pale gray. What are those RED LiNES on the chart? The stitches within the red square are the repeat stitch sequence. That means repeat those stitches between the red lines enough times to finish your row. For instance on row 35 - knit the stitches before the red box, then knit the red box stitches as many times as necessary until you have just enough stitches to knit the stitches to the left of the red line. On your first pass through the chart you won't need to worry about the red lines, but we're going to repeat this chart several times before we get to the border (last few rows of a shawl or scarf). This is a very simple chart and the main reason I've charted the pattern is to help the beginning knitter (if that's you - take note) learn how to read charts for future use.
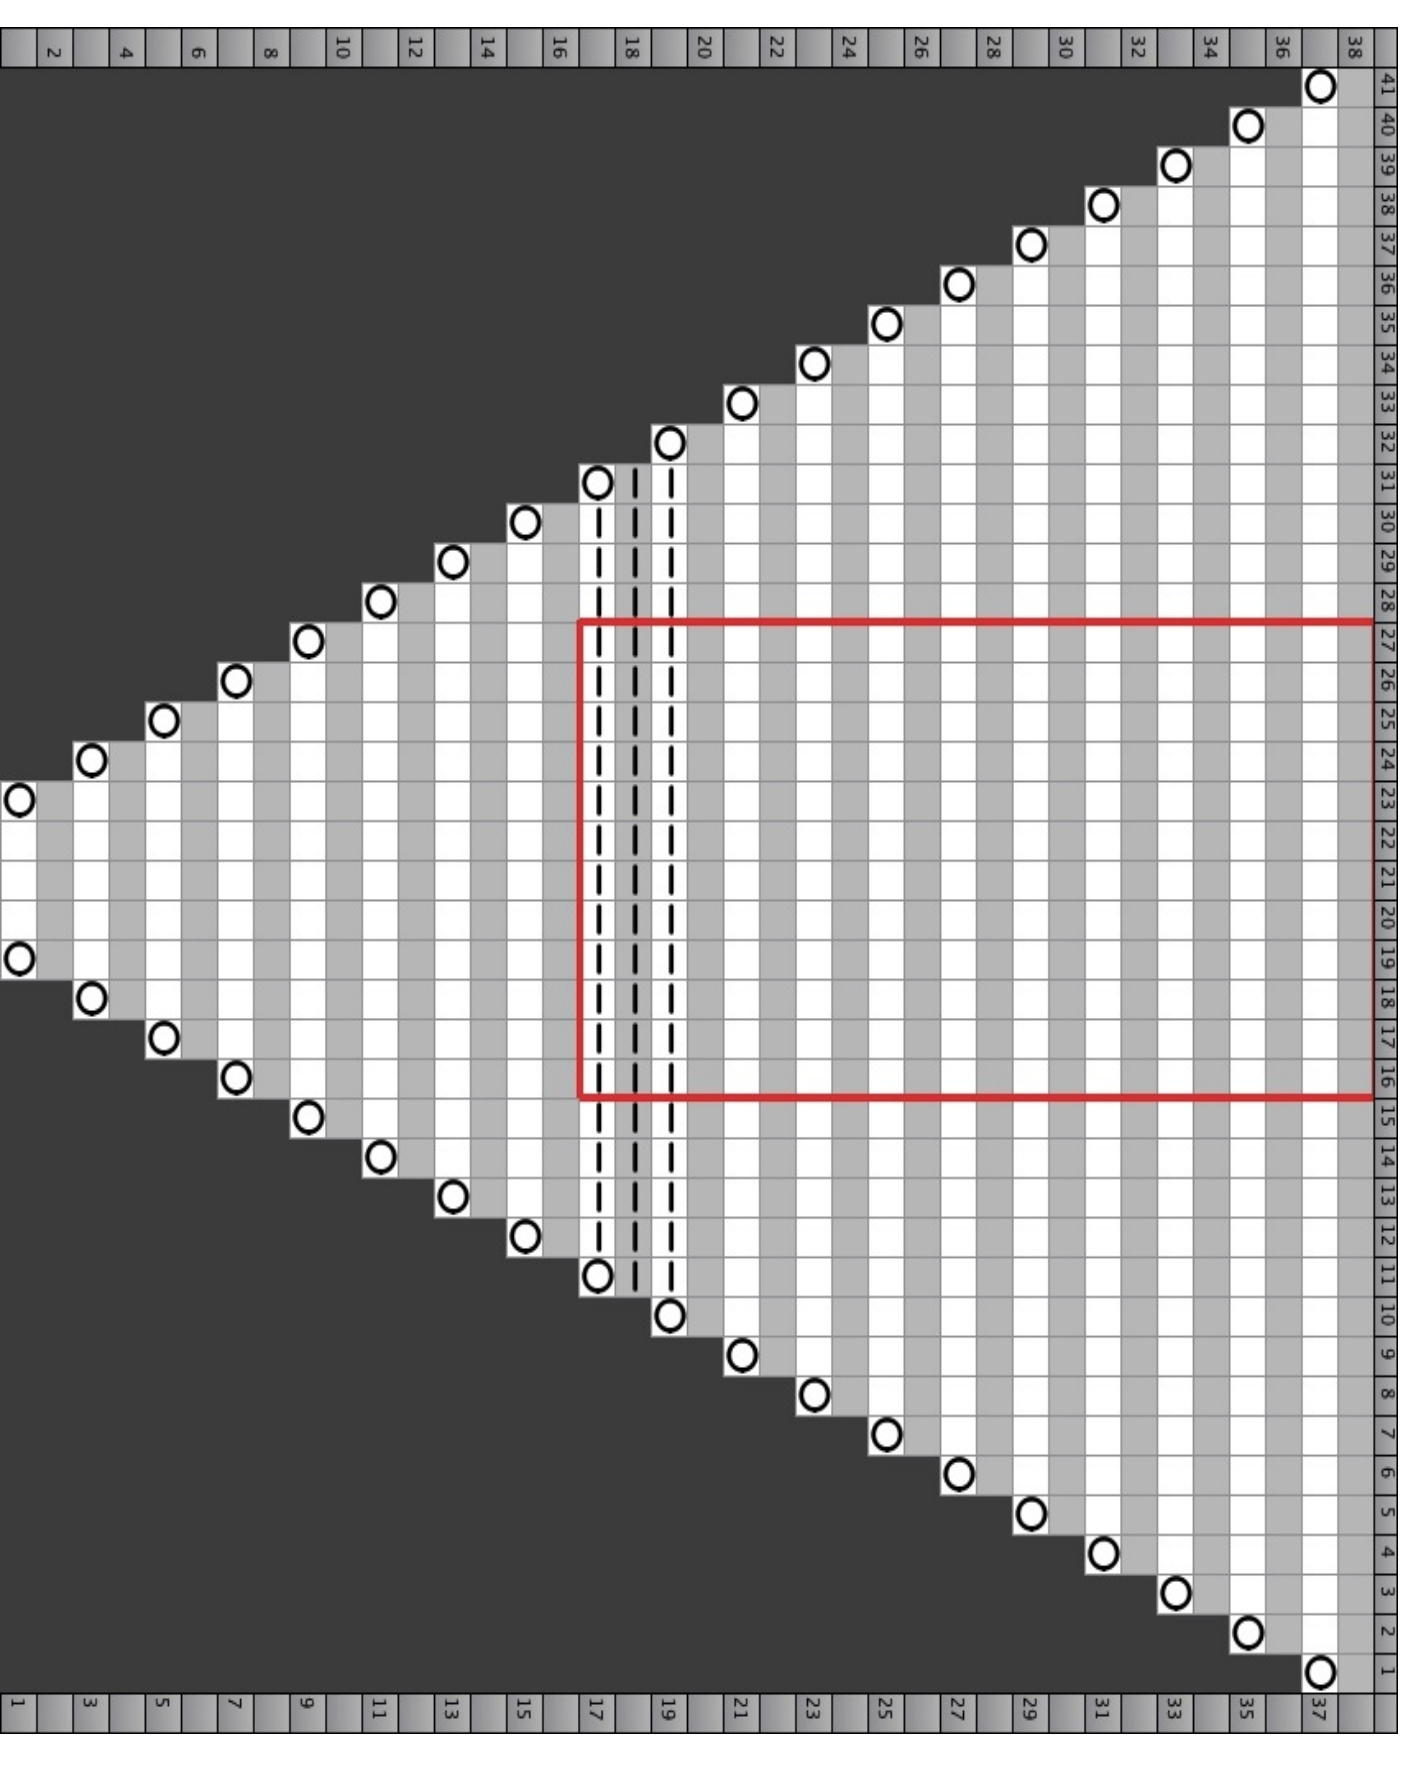
Repeat rows 17 - 38 of chart four times. (This is where the red lines come into play!) Then knit rows 17-20 again then move to the BORDER CHART.
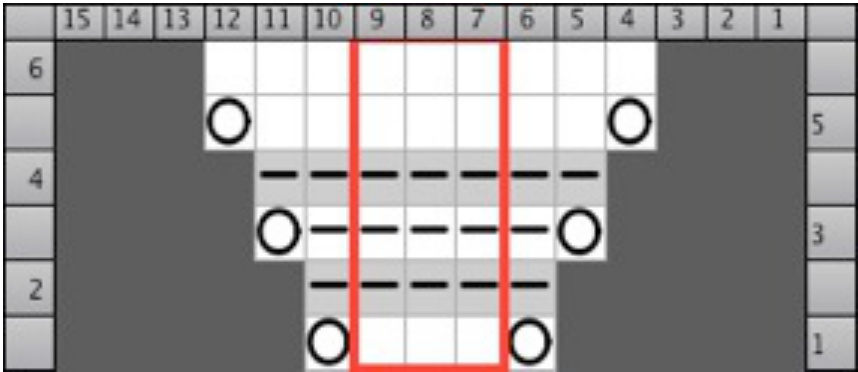
BORDER CHART
The Border is usually the last section of knitting before binding off a triangle shawl. This one is pretty simple and mimics the corrugated effect of rows 17-20 which help break up the stockinette portions of your shawl. Why break up the stockinette portion? Good question -- if you've tried to knit a simple stockinette scarf you've found that without breaking up the stockinette stitches it tends to roll a good deal. By breaking up the stockinette we not only keep from getting bored but help keep the fabric from rolling. Now - knit the Border Chart twice.
BIND OFF
In many lace shawls (although I wouldn't call this shawl "lace" it's still a good practice) you want to make sure the bind off has plenty of stretch to it. You'll understand that better in the Blocking phase. I prefer this technique for binding off shawls - knit two stitches, slip those two stitches back on the left needle, then knit them together as one stitch (commonly called k2tog) . With one stitch on your right needle, knit another stitch, transfer both back to the left needle, k2tog. Continue in this method until the entire border is bound off. Don't weave in those loose ends just yet!
WET BLOCKING
If you decide you really enjoyed knitting a shawl and plan to knit more you may want to invest in blocking wires. I'm pleased with the ones I purchased years ago from Knit Picks, although there are several other companies that carry them. Until then, you can block your finished shawl using T-pins, and a yardstick. Many people use a spare bed to block their finished project on, and some use foam interlocking mats that can be purchased at the big box hardware stores. Soak your finished project in cool water for 15-20 minutes. Don't wring it out but gently fold it into a dry towel and press down to absorb the dripping water. Using your blocking_wires (or Tpins) run a wire through the center spine every other stitch and secure with pins. From there I usually stretch out the top inserting a wire in every yarn over hole and secure the far ends, then go back and place pins at regular intervals just to ease the tension on the wire. Now with the top and center spine secure you can insert wires (or use pins) to stretch out the wings of the shawl to its fullest potential. Use a few T-pins to secure the wire. You may find that you need to adjust your pins on the top a time or two to get everything even.
BLOCKING Continued...
Once you have the shawl pinned out to your satisfaction stand back and admire it. This is what many shawl knitters call the magic moment. You can finally see the full beauty of your creation. It's a good moment. Now - if you have a ceiling fan turn it on, close the door, and walk away for ten to twelve hours. It's okay to go back and admire your handwork - or force friends and family to admire it with you - but don't be tempted to pull out the pins until it is fully dry. When you know it's dry - give it another hour. Then gently pull your pins out and weave in those loose ends with a darning or sewing needle. While you were trying to ignore your finished shawl as it was drying I hope you were searching through your wardrobe for just the right outfit to wear with your new shawl because - now it's ready to show off! Go out somewhere tonight - dinner, a movie, or shopping maybe? The Confidence shawl can be worn gently draped over your shoulders or tied behind your neck with the triangle in front. I greatly enjoy this second method. Not only do you add warmth to the front of your coat where the buttons are usually left open but, when people are admiring your creation you get to watch their faces, smile and feel good about yourself.
You've now finished a fairly simple small shawl/ kerchief using just a few basic stitches. What's next? If you used a solid yarn, knit the pattern again using a multi-colored yarn and compare the visual effect. How about knitting the same pattern using worsted weight and a larger needle? How about enlarging the pattern? If you have more than 4o0yds fingering weight yarn add more repeats and continue the pattern until it becomes the size you'd like, or you use all of your yarn - remember to leave enough to bind off. Happy Knitting, Lost City Denise


