Kiki
The Cutie Kangaroo
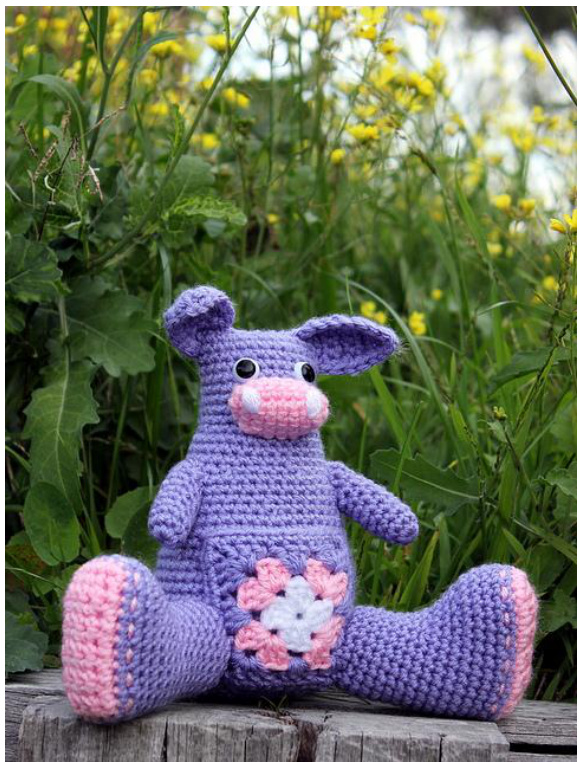
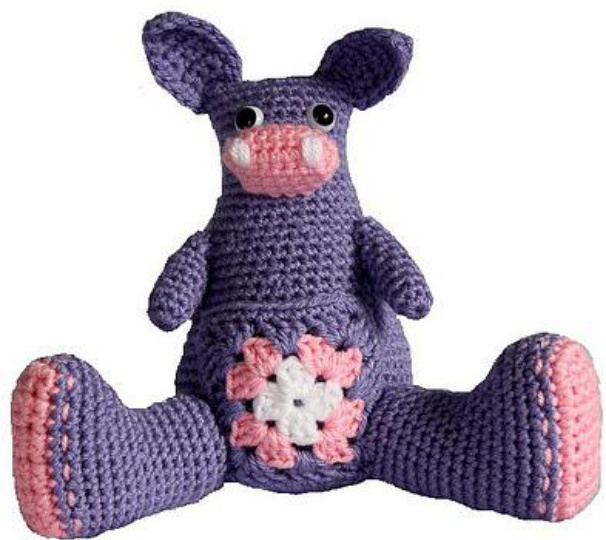
bySharonMaher laughing purple goldfish designs With her oversized ears and classic granny square pouch, Kiki is the most adorable kangaroo you will ever lay eyes on. Make her in natural colours, or let your imagination run wild... Either way, she is sure to bring a smile to someone's face!
Yarn Used
Carnival Soft 8ply (DK) 100% Acrylic 80g/153m, 2.80z/167yds MC Purple, 1 ball (75g used) CC1 Pink, 1 ball (2g used) CC2 White, 1 ball (10g used)
Notions
3 mm crochet hook (Us C or D) Wool needle Stitch marker 12mm safety eyes (2) Polyfill stuffing, 40g/1.4oz
Finished Size
Toy sits 20 cm (8 in) tall.
Gauge (tension)
For the sample, 20 sts and 20 rows measure 10 x10 cm / 4 x 4in,worked in sc (Us) using 3 mm hook and MC. Exact gauge is not important, but stuffing in the finished doll should not be visible between your stitches. If necessary, change the hook size to suit your tension.
Abbreviations
Standard US abbreviations are used. Kiki the Cutie Kangaroo - by Sharon Maher of laughing purple goldfish designs' @2012
Special stitches
Adjustable magic ring (AMR)
Make a loop of yarn by wrapping in a clockwise direction around two fingers on the left hand Pinch the point where the yarn meets, between the thumb and forefinger Slide fingers out so that the ring can be used Place crochet hook into the centre of the ring, and pull a loop of the working yarn through - this is the starting point for the round Work as the pattern instructs for the remainder of the round - all stitches are worked around both the ring and the tail When completed, the beginning tail can be pulled tight thus closing the ring

Invisible decrease - invdec
Put hook through the FRONT LOOP ONLY of the next stitch Then bring the hook back to the front of your work again, this time put it through the FRONT LOOP ONLY of the following stitch (try to ignore the fact that it feels a little awkward) You should now have three stitches on your hook YO, pull through 2 loops; YO again, pull through remaining two loops · The kangaroo body is worked in the round from the base up. All other pieces are attached to the main body. · Please note that buttons are not recommended on toys for children under three years of age.
Pattern notes
Kiki the Cutie Kangaroo - by Sharon Maher of laughing purple goldfish designs' @2012
PATTERN BEGINS
Unless otherwise indicated, the pieces are worked in spirals. Do NOT join the rounds. Use your stitch marker to keep track of the beginning of each round.
Body and Head
Begin at base of body.
| Start | Using MC (purple) make an AMR. |
| Round 1 (right side) | Ch 1, 6 sc into ring, tighten tail - 6 sc. |
| Round 2 | 2 sc in each st - 12 sc. |
| Round 3 | * 2 sc in next st, sc; repeat from * around - 18 sc. |
| Round 4 | * 2 sc in next st, 2 sc; repeat from * around - 24 sc. |
| Round 5 | * 2 sc in next st, 3 sc; repeat from * around - 30 sc |
| Round 6 | * 2 sc in next st, 4 sc; repeat from * around - 36 sc. |
| Round 7 | * 2 sc in next st, 5 sc; repeat from * around - 42 sc. |
| Round 8 | * 2 sc in next st, 6 sc; repeat from * around - 48 sc. |
| Rounds 9-18 | Sc around -48 sc. |
| Round 19 | * 6 sc, invdec; repeat from * around - 42 sc. |
| Rounds 20-22 | Sc around - 42 sc. |
| Round 23 | * 5 sc, invdec; repeat from * around - 36 sc. |
| Rounds 24 - 26 | Sc around - 36 sc. |
| Round 27 | * 4 sc, invdec; repeat from * around - 30 sc. |
| Rounds 28- 30 | Sc around - 30 sc. |
| Round 31 | * 3 sc, invdec; repeat from * around - 24 sc. |
| Rounds 32-40 | Scaround-24 sc. |
| Fasten off Insert eyes | Leave a 20 cm (8 in) tail for seaming. |
| Insert the left eye 4 rows down from the top edge of the head. Insert the right eye 5 sts to the right of this point. There should be approx. 3 sts visible between the eyes. When confident the eyes are in the correct position, click safety ring onto the back of each eye. Eyes cannot be re-positioned after this step. | |
| Finish off | Stuff with polyfill, and seam across the top of the head. |
Ears (make 2)
Please note that the ears are worked flat in rows. Turn your work at the end of each row.
| Start | Using MC (purple) make an AMR. |
| Row 1 | Ch 1,2 sc into ring, tighten tail; turn -2 sc. |
| Row2 | Ch 1, sc across; turn -2 sc. |
| Row3 | Ch1,2scineachstitch;turn-4 sc. |
| Rows4-6 | Ch 1, sc across; turn - 4 sc. |
| Edgetheear | Work a round ofsc around theear,to give a neat appearance. Ch 1, 4 sc across base; 6 sc up to the tip; 2 sc across the tip; 6 sc back down to starting point; join with a sl st in top of first sc-18 sc. |
| Fasten off | Leave a 20 cm (8 in) tail for attaching. |
| Attach | Stitchtheearstothecornersatthetopofhead. |
Snout
Please note that the wrong side of your work is facing.
| Start | Ch 8 using CC1 (pink). |
| Round 1 (wrong side) | 2 sc into 2nd ch, 5 sc, 2 sc in last ch; rotate piece and work sc into other loop ofeachfoundationch-16sc. |
| Rounds 2 - 4 | Sc around - 16 sc. |
| Fasten off Embroider | Leave a 20 cm (8 in) tail for seaming. Make sure the piece has been turned inside out, so that the back of the stitches are facing out. Use CC2 (white). |
| Find thelinewhichrunshorizontallyacrossthecentreofthesnout(this line is formed by your starting chain at the beginning of the snout instructions). Work onenostril ateachendof thisline. Nostrilsaretwostitchestall,onestitchabovethecentrelineandonestitch below the centre line. Simply work one stitch, then another one right next to it (but with exactly the same entry and exit points for your needle). | |
| Attach | Repeatuntil thereare4stitchessidebysideforeachnostril. Stitch the snout to the centre of the face,one row down from the eyes. Stuff as you go. |
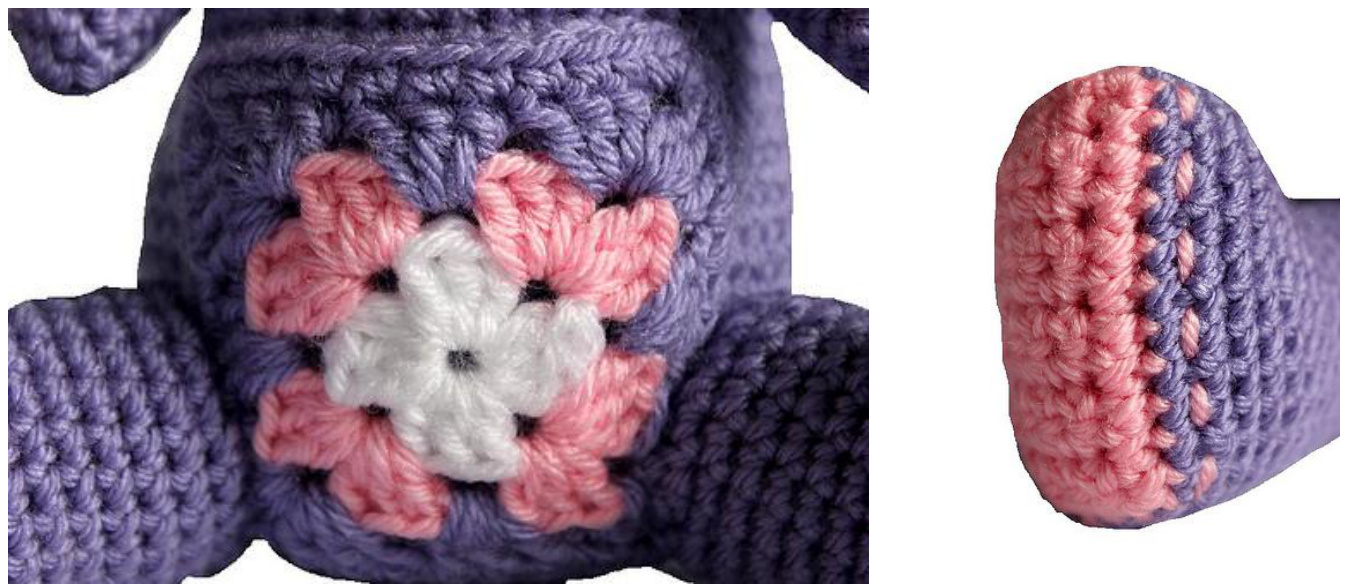
Pouch
| Start | UsingCC2(white)makeanAMR. |
| Round 1 | Work the following stitches into the ring: Ch 3 (counts as first dc), 2 dc, * ch 2, 3 dc; repeat from * twice, tighten tail; join with a hdc into top of beginning dc - 12 dc. |
| Change colour | Fasten off CC2 (white) and join in CC1 (pink) at any ch-2 space from previous round. |
| Round 2 | [Ch 3 (counts as first dc), 2 dc] into first ch-2 space, * [3 dc, ch 2, 3 dc] into next ch-2 space repeat from * twice; 3dc into starting ch-2 space; join with ahdcinto topofbeginning dc-24 dc. |
| Change colour | Fasten off CC1 (pink) and join in MC (purple) at any ch-2 space (corner) from previous round. |
| Round 3 | xu x s o) ] between previous 3 dc clusters, [3 dc, ch 2, 3 dc] into ch-2 space repeat from * twice; 3dc in next space between previous 3 dc clusters, 3 dc into starting ch-2 space; join with a hdc into top of beginning dc - 36 dc. |
| Round 4 | Ch 1, sc in corner space; sc in each dc around, 2 sc in each corner space, finish with sc in starting corner space; join with a sl st in top of starting sc - |
| Fasten off | 44 sc. |
| Attach | Leave a 40 cm (16 in) tail for attaching. Stitch the pouch to the belly of the kangaroo leaving the top edge open. |
Close ups of Pouch and Foot Embroidery:
Hind Legs (make 2)
The sole of each foot is worked flat, then the remainder of the piece is worked in the round.
| Start | Ch 5 using CC1 (pink) |
| Row 1 | Sc into 2nd ch from hook, sc in each ch across; turn - 4 sc. |
| Rows 2-10 | Ch 1, sc across - 4 sc. |
| Edge the sole | Work a round of sc around the sole, to give a neat appearance. Ch 1, 4 sc across base; sc at corner point; 10 sc up to the top; sc at corner point; 4 sc across the top; sc at corner point; 10 sc back down to starting point; sc at corner point; use MC (purple) to join with a sl st in top of first |
| Change colour | SC-32 sc. Continue to work in MC (purple). |
| Please note | Leave a 40 cm (16 in) tail of CC1 (pink) for embroidery detail. This section is worked in the round. |
| Rounds 1 - 5 | Work in a spiral. Do not join the rounds. Sc around - 32 sc. |
| Embroider | Embroider a running stitch between rounds 1 and 2 using the CC1 (pink) |
| Round 6 | tail left for this purpose. Fasten ends securely when done. 12 sc,6 invdec,8sc-26 sc. |
| Round 7 - 8 | Sc around - 26 sc. |
| Round 9 | 9 sc, 6 invdec, 5 sc- 20 sc. |
| Rounds 10 - 16 | Sc around - 20 sc. |
| Fasten off | Leave a 20 cm (8 in) tail for attaching. |
| Stuff | Stuff each leg with polyfill. |
| Attach | Stitch to the base of the body. The inner edges of the legs should overlap the pouch. There is a space of 5cm (2 in) between the legs at the front of the kangaroo. |
Front Legs (make 2)
| Start | Using MC (purple) make an AMR. |
| Round 1 | Ch 1,8 sc into ring, tighten tail - 8 sc. |
| Rounds 2 - 8 | Sc around - 8 sc. |
| Shapeshoulder | TURN. Work this section flat. |
| Row 1 | Ch 1, 5 sc; turn - 5 sc. |
| Row 2 | Ch 1, dec, sc, dec; turn - 3 sc. |
| Row 3 | Ch 1,scacross-3 sc. |
| Edge | Finishing thelegwitharoundofscaround thetopedgeofyourwork. |
| Fastenoff | Leavea20cm(8in)tailforattaching. |
| Stuff | Stuffwithpolyfill. |
| Position legs | Pin thelegs to the side of thebody,5 cm(10 rows)below the ears.Check thepositionlooksbalanced.Stitchlegsinplace. |
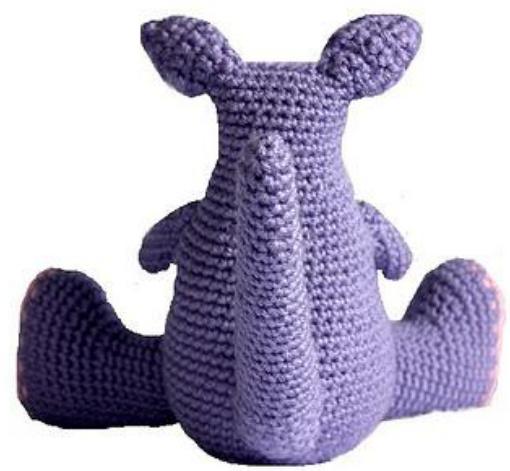
Tail
Tail is worked from the tip down to the base.
| Start | Using MC (purple) make an AMR. |
| Round 1 | Ch 1, 4 sc into ring; tighten tail - 4 sc. |
| Round 2 | 2 sc in each st - 8 sc. |
| Rounds 3 - 7 | Sc around - 8 sc. |
| Round 8 | * 2 sc in next st, 3 sc; repeat from * - 10 sc. |
| Rounds 9- 13 | Sc around - l0 sc. |
| Round 14 | * 2 sc in next st, 4 sc; repeat from * - 12 sc. |
| Rounds 15-19 | Sc around - 12 sc. |
| Round 20 | * 2 sc in next st, 5 sc; repeat from * - 14 sc. |
| Rounds 21 - 25 | Sc around - 14 sc. |
| Shape base | TURN. Work this section flat. |
| Row 1 | Ch 1,12 sc; turn -12 sc. |
| Row 2 | Ch 1, dec, 8 sc, dec; turn - 10 sc. |
| Row 3 | Chl, sc across; turn - 10 sc. |
| Row 4 | Chl, dec, 6 sc, dec; turn - 8 sc. |
| Row 5 | Ch 1, sc across; turn - 8 sc. |
| Row 6 | Ch 1, dec, 4 sc, dec; turn - 6 sc. |
| Row 7 | Ch 1, sc across; turn - 6 sc. |
| Row 8 | Ch 1, dec, 2 sc, dec; turn - 4 sc. |
| Row 9 | Ch 1, sc across - 4 sc. |
| Edge | Finishing the tail with a round of sc around the top edge of your work. |
| Fasten off | Leave a 30 cm (12 in) tail for attaching. |
| Stuff | Stuff the tail with polyfill. |
| Attach | Centre the tail at the base of the kangaroo. Stitch in place at the rear of the toy. |


