
Storw
Your first handspun socks are a special triumph. The marathon spinning of the yarn (is it really thin enough?) the endless plying?
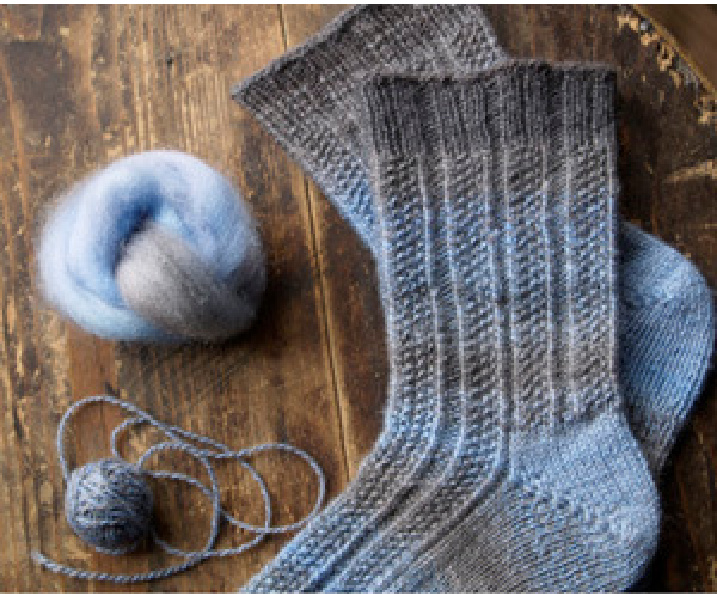
And then knitting and knitting, hoping the colours will come out the way you planned when you first dyed the fibre. These socks, like many of my handspun garments, didn't behave quite in the way I expected. But I've realised that this is the true wonder of using a yarn you have created yourself.
Requirements
$100(125)\mathrm{g}$ Blue-Faced Leicester fibre, dyed in a stripe pattern; $2.75\mathrm{mm/80cm}$ circular needle, or needles for your preferred method of knitting in the round; Crochet hook and smooth waste yarn for provisional cast-on; Stitch markers (optional); Yarn needle.
Size
Women's (Men's) average Shown in smaller size
Gauge
7.5 sts = 2.5cm(1 inch) in stocking stitch
Pattern Notes
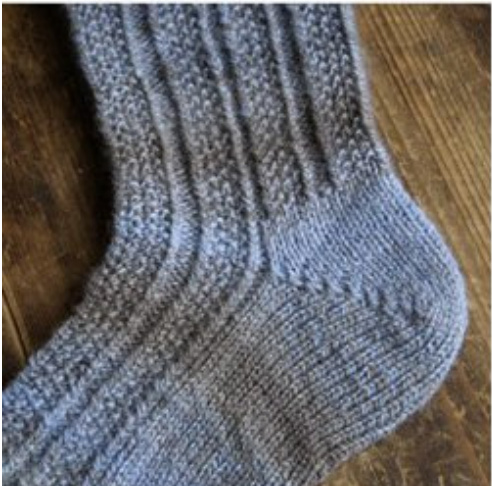
General instructions are given for spinning the fibre, however, it is assumed that the reader has some previous experience. You can by all means use a commercially spun yarn if you Wish. The short row toe and heel are worked using a yarn-over method. Bringing the yarn forward or back before making a stitch creates a yarn-over pair, these pairs are worked in the second half of the short rows to close any gaps along the sides of the toe. The simple moss stitch pattern has been chosen to draw the eye upwards along the sock, without distracting attention from the lovely subtle striping of the handspun yarn. The ribbed structure is important in a handspun sock as the yarn has a tendency to be rather less elastic than commercial sock yarns.
Spinning Instructions
Split the roving very carefully lengthwise into four equal strips, mark the first end of each strip with a clip or peg and be sure to start from the same end each time when you spin. When plied, the colour stripes on each single will match up creating a striped yarn. Human error, and the impossibility of splitting absolutely perfectly, leads to the portion of overlap at the edges of each strip creating a soft transition from one colour to the next. Use a high ratio on your wheel, at least 11:1, and spin a fine, even z-twist single of around 32-36 wpi. To create a bouncy, durable sock yarn, overply the yarn slightly. As you ply, check the amount of twist by relaxing the yarn. It should kink up a little rather than hanging evenly. Finish the yarn by plunging alternately into hot and cold water and whacking the skein against a cupboard door. This treatment will absorb the extra twist you added and add bounce and durability to the yarn. Hang to dry and wait patiently to cast on! After finishing, yar masure 1 wpi f your yarn is a slightly different weight, us a larger or smaller needle to obtain correct tension.
Abbreviations
k - knit; p- purl; yo - yarn over; ssk - slip next two sts as if to knit, return to left needle and knit together through back loops; k2tog - knit next two sts together; k3tog - knit next three sts together; p2tog - purl next two sts together; p3tog - purl next three sts together; tbl - through back loops; rpt - repeat; kwise - as if to knit; pwise - as if to purl; yf - yarn forward as if to purl yb - yarn back as if to knit
Instructions
Using waste yarn, crochet a chain of around 32(35)sts. Join main yarn and pick up and knit 28(32)sts in back loops of chain. Row $1\colon\mathbf{k}$ to last stitch, turn Row 2: yb p1, p to last stitch, turn Row 3: yf k1, k to next yo pair, turn Row 4: yb pl, p to next yo pair, turn Repeat rows 3 and 4 until 9(11) stitches remain between the yarn-over pairs.
To complete toe:
Row 1: yf k1, kto next yo pair, k Ist stitch of pair, slip next yo pwise and slip first stitch of next pair kwise, return slipped stitches to left needle and k2togtbl Row 2: yb pl, pto next yo pair, plst stitch of pair, p2tog (next yo and 1st stitch of next pair) Row 3: yf k1, kto next yo pair, k 1st stitch of pair, slip next 2 yos pwise and slip first stitch of next pair kwise, return slipped stitches to left needle and k3togtbl Row 4: yb pl, pto next yo pair, p 1st stitch of pair, p3tog (next 2 yos and 1st stitch of next pair) Repeat rows 3 and 4 until the final k3togtbl, there willstill be yarn-overs at the other end of the needle. Commence working in the round. Unzip provisional cast-on and knit across the resulting 27(31) live sts, m1. Next round: k3tog (last two yarn-overs), $\mathbf{k}$ to end of round. Instep: Commence pattern Round 1: \*p1, kltbl, kl, pl, k1, kltbl, $\mathfrak{p}1(2)^{*}$ repeat from \* to $^*\,\,2$ more times, pl, kltbl, kl, p1, k1, kltbl, pl, knit to end of round. Round 2: \*pl, kltbl, pl, kl, pl, kltbl, $\mathfrak{p}1(2)^{*}$ repeat from \* to $^*\,\,2$ more times, pl, kltbl, pl, k1, p1, kltbl, pl, knit to end of round. Repeat these two rounds until 5cm/2in short of back of heel. Heel: The heel is worked in the same way as the toe, over the 28(32)sts of stocking stitch on the sole of the foot. Setup: \*p1, kltbl, kl, pl, k1, kltbl, $\mathfrak{p}1(2)^{*}$ repeat from \* to $^*\,\,2$ more times, pi, kltbl, kl, pi, kl, kltbl, p1, $\mathrm{k0}(1)$
Work short rows as for toe, beginning with Row 1. After the final k3togtbl is worked, recommence knitting in the round as follows: Next round: $^{*}\mathrm{p}1$ , kltbl, pl, kl, pl, kltbl, $\mathfrak{p}1(2)^{*}$ repeat from \* to $^*\,\,2$ more times, pl, kitbl, pl, ki, pl, kltbl, p1, k0(1), k3tog, knit to end of round. Cuff Round 1: \*pl, kltbl, kl, pl, kl, kltbl, $\mathfrak{p}1(2)^{*}$ repeat from $^*$ to $^*$ to end of round. Round 2: \*p1, kltbl, pl, kl, pl, kltbl, $\mathfrak{p}1(2)^{*}$ repeat from \* to \* to end of round. Continue in pattern until $3.75(5)\mathrm{cm}/1\slash_{2}(2);$ inches short of desired length. Ribbing: \*p1, k2, p1, k2, $\mathfrak{p}1(2)^{*}$ repeat from \* to \* around. Work a total of 14(18) rounds of ribbing. Bind off as follows: k2, \*slip 2sts back to left needle, k2togtbl, k1, rpt from \* to end. Draw yarn through last stitch. Finishing Darn in ends and block if desired. This pattern is copyright $\circled{\mathbb{C}}\ 2010$ to Diane Mulholland and is intended for your own personal non-commercial use only. No distribution or reproduction, electronic or otherwise, is permitted without express written permission of the copyright owner. If you have any questions or queries related to this patern please do not hesitate to contact me,I'm happy to help!


