Waves & WaterfaUs Lace Shrug by Amanda Woeger
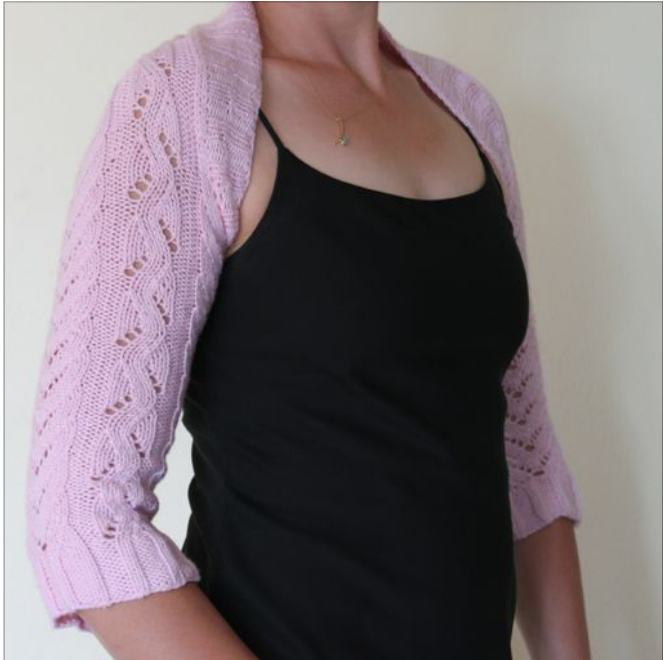
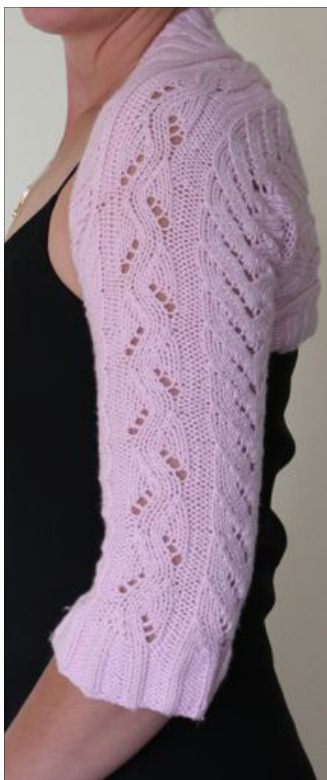
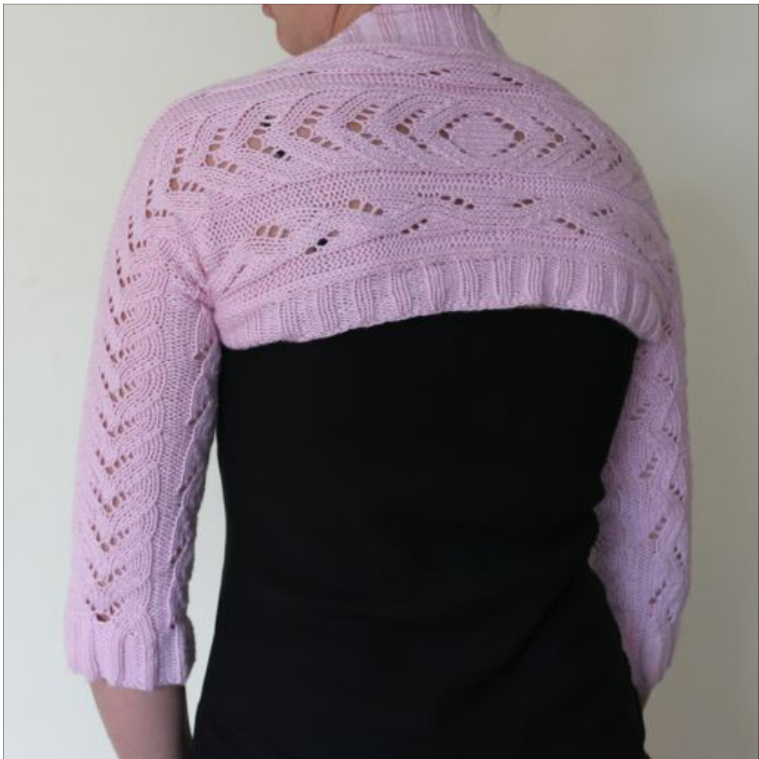
This warm little shrug is perfect for you evening out. The elegant lace pattern gives the shrug a nice luxurious look. Knit from the cuff up, the pieces are sewn together using a modified form of the kitchener stitch. The ribbing around the neck is added afterwards and is slightly wider on the top for the collar. The yarn is a tightly plied merino/silk/cashmere blend. The tight ply givez the lace pattern good definition. The model shown isinasizemedium. Yow may contact me on Ravelry should you have any questiony or commenty. Happy Knitting, Amanda Woeger http://amandawoeger.blogspot.com Sizes Gauge Difficulty Needlez stitch Markers Yarn Small (Medium, Large) - approx. 11" (12", 13") / 27.9 (30.5, 33) cm upper arm circumference 20 sts. 4" (10 cm) in stockinette stitch on size Us 7 (4.50 mm) needles (or size needed to get gauge) Intermediate US Size 7 (4.5 mm) circular needles Markers of two different colors approx. 500 (600, 700) yards / 460 (550, 600) m of a tightly plied worsted weight yarn. Pictured in Le Fibre Nobili Super Tajmahal (70% merino, 22% silk, 8% cashmere) / Colorway Pink (1407)
Instructions
Measure your upper arm circumference to determine sizing. For size 11" (small) upper arm circumference, use "A" charts. For size 12" (medium) upper arm circ., use "B" charts. For size 13" (large) upper arm circ., use "C" charts.
Beginning work at sleeve cuff
Use the knitted cast-on method purl-wise to C0 60 (72, 84) sts. Using magic loop method, place 30 (36, 42) stitches on each needle and begin knitting in the round. Or, using double points, place 15 (18, 21) stitches on each of 4 needles. Place marker for beginning of the round, do not twist.
Ribbing
Rnds 1-12: p1 (2,3), \*k2, p3 (4,5) rep. from \* to last four stitches, k2, p2 Decreaseround: Small ONLY - p1, \*k2, p2tog, p1, rep. from \* around to last 4 sts., k2, p2tog 48 stitches on needles. Medium ONLY-\*p2tog,k2, p2tog twice, k2, p1, p2tog, p1, k2, p2tog twice, k2, p1, p2tog, p1, k2, p2tog twice, k2, p2tog, repeat from \* once more to end of round, -- 52 stitches on needles. Large ONLY - \*p3tog, k2, p2tog, p3tog, k2, p1, p2tog, p2, k2, p2tog, p3tog, k2, p1, p2tog, p2, k2, p2tog, p3tog, k2, p2tog repeat from \* ol more to end of round, -- 56 stitches on needles.
Lace pattern
When kniting in the round using the charts, you are going to have to rearrange yourstitches at the beginning of each round for every 3rd and 11th round. The first stitch on each needle in round 1 are yo stitches. The first 2 stitches in the 2d round are k1, p1(into the yo stitch of the 1st round). In the 3?d and 11th rounds you k1, and move this stitch to the opposite needle to keep the lace pattern even as well as to keep the correct number of stitches on each needle. Moving this stitch has been noted in the charts. Copyright2012AmandaWoeger Please respect my copyright. Do not distribute this pattern, do not use it or items made with it for commercial purposes. Begin lace pattern knitting in the round for your size, repeat pattern 5 % times or until piece measures 14" from cast on edge (or desired length). Be sure to end with a row 8 or 16 to keep lace pattern uniform from sleeve to back piece. At this point, try the sleeve on to ensure the top edge is snug to the underarm and the sleeve is of desired length. Binding off at underarm / increase for back In the last round 8 (or 16 if more sleeve length is desired), knit around to last 7 stitches, k3, B0 4. Continue binding off 4 more stitches on first needle of the next round. Bind off as follows: k2, \*slip 2nd st on right needle over the first st on right needle, k1, repeat from \* until all 8 have been bound off. The first stitch in the new row will be a stitch with the last bound off stitch around it.
Small ONLY - k2, pfb, p1, knit in pattern for next 6 stitches (continuing with a row 9 or 1), pfb, p1, knit in pattern for next 14 stitches, pfb, p1, knit in pattern for next 6 stitches, pfb, p1, k3, turn -- 44 stitches on needles Medium ONLY - k2, p1, pfb, p1, knit in pattern for next 6 stitches, p1, pfb, p1, knit in pattern for next 14 stitches, p1, pfb, p1, knit in pattern for next 6 stitches, p1, pfb, p1, k3, turn. -- 48 stitches on needles Large ONLY - k2, p1, pfb, p2, knit in pattern for next 6 stitches, p1, pfb, p2, knit in pattern for next 14 stitches, p1, pfb, p2, knit in pattern for next 6 stitches, p1, pfb, p2, k3, turn. -- 52 stitches on needles At this point you will have to determine just how wide to make the back. To do this, first measure your total back width from underarm to underarm. (In the model, the back width was measured to be 18"). Use the charts for knitting flat to continue knitting in rows (back and forth) in established pattern, until piece measures % of this total back measurement. You will want to end either in a row 8 or 16 for both sleeves to give the back seam a nice transition between the two pieces. Do not bind off. Keep the stitches live either on extra needles or wasteyarn. Repeat for second sleeve using the same lace pattern. Seamingtogetheratcenterback You will be using the kitchener stitch to seam up the back. If you are already familiar with this method, please read through the instructions, as it is modified to account for the patterning of the lace. Use the kitchener stitch to sew up the middle back seam IN PATTERN as follows.This should be done as ble, you can always pull the extra tension through, it is more difficult to fix this if it is to tighi 1) Pick up the live stitches of each half so that when you hold your needles in your left hand, with the points facing your right, the WRONG sides of the fabric are facing each other. 2) Attach a tapestry needle to a piece of yarn at least 4x the length of the seam. 3) Set up stitches: pullthe tapestry needle through the first stitch on the needle nearest to you as if to purl. Then without wrapping the yarn around (rather by going "under") the needles pull the yarn through the first stitch on the far needle as if to knit. 4) Begin ktchener stitch for knit stitching: NEAR Needle: pull yarn through 1st stitch as if to knit, drop this stitch, pull yarn through 2nd stitch as if to purl, leave this stitch on. FAR Needle: pull yarn through 1st stitch as if to purl, drop this stitch, pull yarn through 2nd stitch as if to knit, leave this stitch on. Repeat step 4 until the 2nd stitch on the NEAR needle is a purl stitch, when this is the case continue to step 5. 5) Set up for purl stitching: NEAR Needle: 1st stitch as if to knit, drop, 2nd stitch as if to knit, leave on. FAR Needle: 1st stitch as if to purl, drop, 2"d stitch as if to purl, leave on. Do not repeat this step (continue to 6 for purl stitching). 6) NEAR Needle: 1st stitch as if to purl, drop, 2nd stitch as if to knit, leave on. FAR Needle: 1st stitch as if to knit, drop, 2nd stitch as if to purl, leave on. Repeat step 6 until the 2nd stitch on the NEAR needle is a knit stitch, continue to step 7. 7) Set up for knit stitching: NEAR Needle: 1st stitch as if to knit, drop, 2nd stitch as if to knit, leave on FAR Needle: 1st stitch as if to purl, drop, 2nd stitch as if to purl, leave on. Do not repeat this step (go back to step 4 for knit stitching). Continue in this matter until all stitches have been grafted or sewn together at the middle back seam. Be sure to work very loose, so that you may tighten these stitches to the desired tension after grafting. If you pull too tight, you will have a much more difficult time evening out the stitching by having to move the slack in the yarn "backwards."
Collar ribbing
After the back has been seamed, beginning at an underarm, pick up the 4 underarm stitches, then pick up 2 stitches for every 3 along edge of shrug until you reach the second underarm, pick up 8 stitches here, then continue picking up 2 for every 3 back to 1 underarm, pick up 4 back to beginning of round. Make sure that you have a multiple of 8 stitches on your needles. Place a marker at each side seam (at the beginning of the round for the first underarm) and be sure that your stitches are divided in half when you do this (if you have 200 stitches, 100 should be between the markers). Join in the round begin ribbing as follows: p1, k2, (p2, k2) to last stitch, p1 Rib a total of 4 rounds even. Colar shaping Anote on short rows: You may use any short row method you prefer, however I would recommend the "shadow wrap" or "twin stitch" short row method. This method minimizes holes in your work and has the added advantage of no wraps to pick up on the row immediately following the short row.I have included a short written tutorial for this method at the end of the pattern. There are also youtube videos available if you need more help, simply search for either "shadow wrap" or "twin stitch" short row. In the fifth round being short rows for the collar as follows: (RS) knit in k2, p2 pattern (bottom back stitches) past first side seam marker and across the top back of shrug to 3 stitches before beginning side seam, wrap and turn (w&t) next stitch. (Ws) work ribbing to 3 stitches before side seam marker, w&t. (RS) work ribbing to 2 stitches before previous wrapped stitch, w&t. Continue to work short rows 2 stitches before the previous wrapped stitch 9 more times (you should have a total of 6 wrapped stitches on either side of the collar). (RS) work ribbing to beg of round marker picking up wraps (if necessary) as you come to them. Slip beg. of round marker and continue on with the ribbing on the bottom back of the shrug to side marker. Continue knitting in the round even for 5 more rounds. Bind off around the ribbing in pattern using the following method: k2, \*insert left needle into the front of the two knitted stitches on right needle, knit 1 through the back loops, k1, repeat from \* to the end of round. Weave in any ends. Soak and block your new shrug.
Abbreviations & Definitions
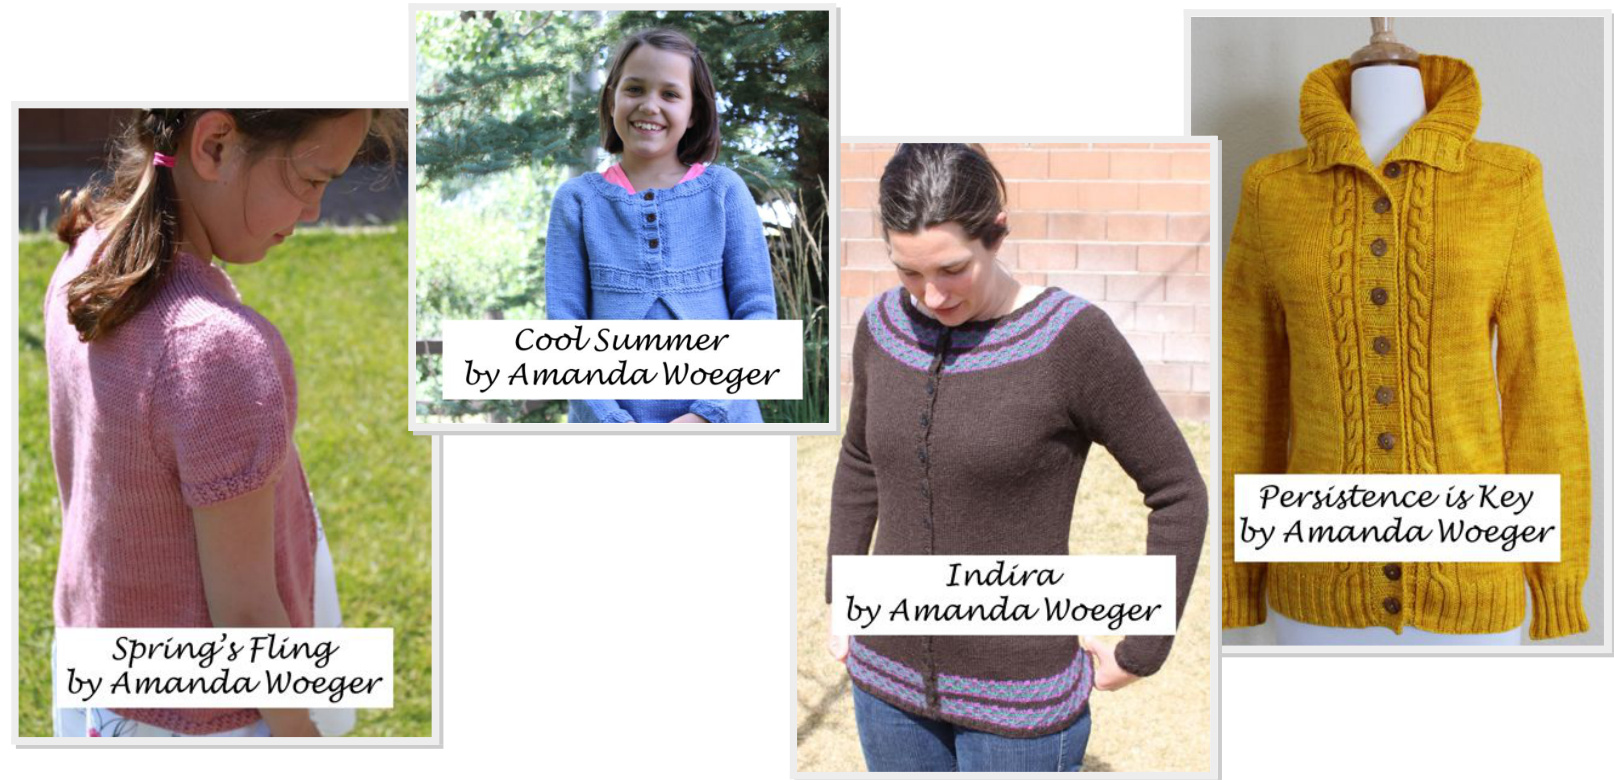
beg. beginning rep. repeat co cast on RS right side of work dpn double pointed needle s1 slip one stitch as if to purl k1 knit one stitch sm slip marker k2tog knit two stitches together through the front loops ssk slip, slip, knit (slip 2 stitches as if to knit, then knit k3tog knit three stitches together through the front loops through the back loops p1 purl one stitch st(s). stitch(es) p2tog purl two stitches together as one (decrease 1 stitch) WS wrong side of work p3tog purl three stitches together as one (decrease 2 sts.) w&t Wrap and turn the next stitch. pfb purl into the front and back of the next stitch yo yarn over rnd(s). round(s) "shadow Wrap" OR "Twin Stitch" Tutorial With right / knit side facing: 1. Work to the stitch that is to be wrapped. With your right needle, pick up the knit stitch from the previous row, front to back and place on the left needle, then knit into the front of this stitch. 2. Slip the next stitch (stitch to be wrapped) as if to purl from the left needle to the right needle and turn work. 3. Slip the first two twinned or joined sts. as if to purl from the left needle to the right and work normally on the purl side of your work. 4. The twin stitch is treated as a single stitch on the next row. With wrong / purl side facing: 1. Work to the stitch that is to be wrapped. Slip this "to-be-wrapped" stitch from the left needle to the right, purlwise. 2. While holding the working yarn in the front of the work, pick up the purl rib from the previous row with your left needle from front of work to back, then purl this stitch. Turn your work 3. Slip the first two twinned or joined sts. as if to purl from the left needle to the right and work normally on the knit side of your work. 4. The twin stitch is treated as a single stitch on the next row. 2njoyed thiz pattern, you may also like my other design
Copyright: Please respect the moral rights of independent designers. The copyright of this pattern remains with the author. This pattern is provided for personal home use only. It should not be sold. Commercial use of this pattern is a violation of the copyright. Selling products made from this pattern or distributing this pattern in any manner is prohibited under the copyright unless Amanda Woeger has grantedexpresswrittenpermission. Copyright 2012 Amanda Woeger http://amandawoeger.blogspot.com Thecopyright of this pattern remains with theauthor.
"A" Charts (Size Small) Knitting sleeves in the round
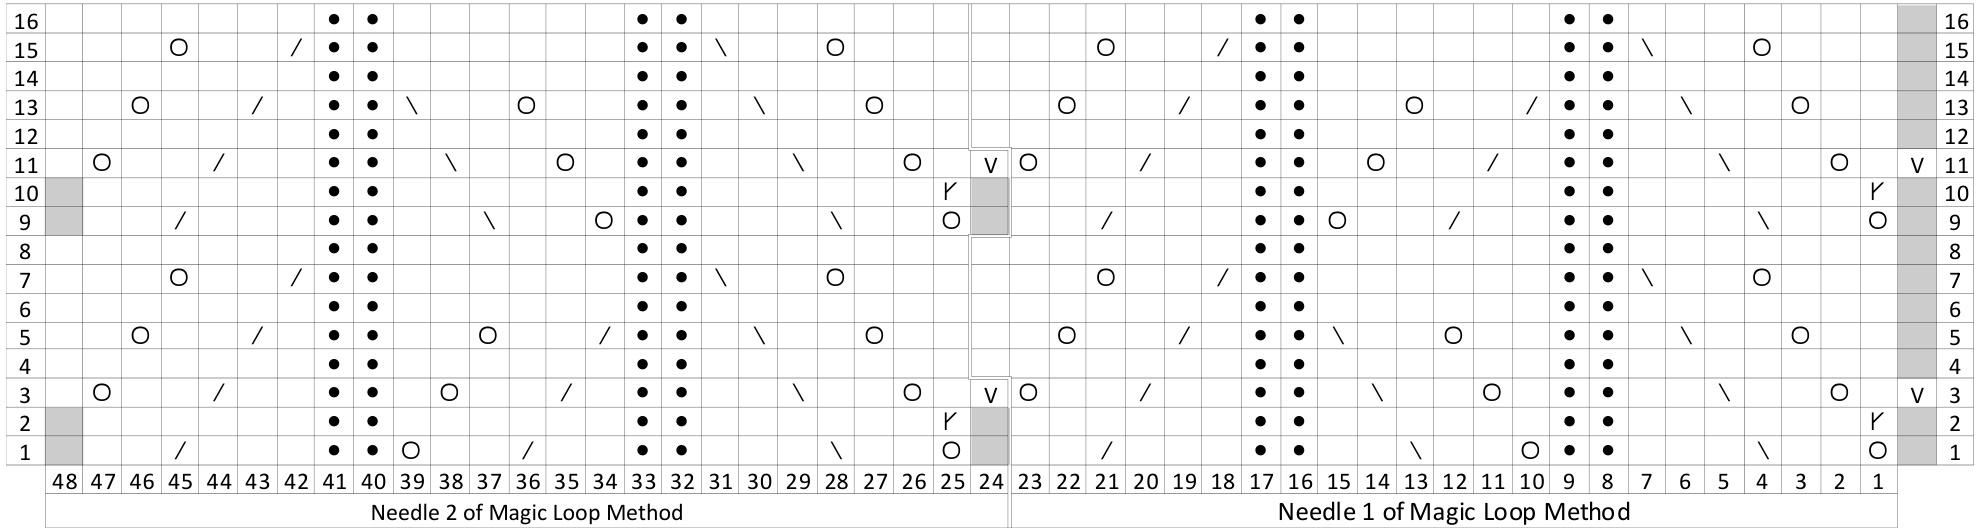
Chart Legend
Knit one stitch on the right side (k1) or purlone stitch on the wrong side (p1) yarnover(yo) slip, slip, knit (ssk) purl one stitch on the right side (p1) or knit one stitch on the wrong side (k1) Knit 2together (k2tog) increase: k1, p1 in yo stitch from prev. row (on wrong side: p1, k1) k1 and slip this stitchto end of opposite needle nostitch
Written instructions - knitting sleeve in the round
Rnd. 1: yo, k2, ssk, k3, p2, yo, k2, ssk, k2, p2, k3, k2tog, k2, yo, k2, ssk, k3, p2, k2, k2tog, k2, yo, p2, k3, k2tog, k2 Rnd. 2: [(k1, p1) in yo stitch, \*k6, p2\* repeat 1 more time, k6] repeat 1 more time Rnd. 3: k1, slip this st.to end of last needle, k1, yo, k2, ssk, k2, p2, k1, yo, k2, sk, k1, p2, k2, k2tog, k2, yo, k1, slip this st. to end of last needle, k1, yo, k2, ssk, k2, p2, k1, k2tog, k2, yo, k1, p2, k2, k2tog, k2, yo, k1 Rnd. 4: k7, p2, k6, p2, k14, p2,k6, p2, k7 Rnd. 5: k2, yo, k2, ssk, k1, p2,k2, yo, k2, ssk, p2, k1, k2tog, k2, yo, k4, yo, k2, ssk, k1, p2, k2tog, k2,yo, k2, p2, k1, k2tog, k2, yo, k2 Rnd. 6: repeat rnd.4 Rnd.7: k3, yo, k2, sk, p2, k6, p2, k2tog, k, yo, k6, yo, k2, ssk, p2, k6, p2, k2tog, k2, yo,k3 Rnd. 8: repeat rnd.4 Rnd. 9: yo, k2, sk, k3, p2, k2, k2tog, k2, yo, p2, k3, k2tog, k2, yo, k2, ssk, k3, p2, yo, k2, sk, k2, p2, k3, k2tog, k2 Rnd. 10: repeat rnd. 2 Rnd. 11: k1, slip this st.to end of last needle, k1, yo, k2, ssk, k2, p2, k1, k2tog, k2, yo, k1,p2, k2, k2tog, k2, yo,k1, slip this st.to end of last needle, k1, yo, k2, ssk, k2, p2, k1, yo, k2, ssk, k1, p2, k2, k2tog, k2, yo, k1 Rnd. 12: repeat rnd. 4 Rnd. 13: k2, yo, k2, ssk, k1, p2, k2tog, k2, yo, k2, p2, k1, k2tog, k2, yo, k4, yo, k2, sk, k1, p2, k2, yo, k2, ssk, p2, k1, k2tog, k2, yo,k2 Rnd. 14: repeat rnd. 4 Rnd. 15: repeat rnd. 7 Rnd. 16: repeat rnd. 4
"A" Charts (Size Small) Knitting flat for back
| 16or8 | |||||||||||||||||||||||
| 14or6 | 0 | 0 | 15or7 | ||||||||||||||||||||
| 0 | g | ||||||||||||||||||||||
| 12 or 4 | g | o | 0 | 0 | 13or5 | ||||||||||||||||||
| g | |||||||||||||||||||||||
| 10or2 | 0 | 0 | 0 | 0 | 11o0r3 | ||||||||||||||||||
| r | |||||||||||||||||||||||
| 0 | g | \ | 0 | 0 | 9 or 1 | ||||||||||||||||||
| 8or16 | g | ||||||||||||||||||||||
| 0 | 0 | . | g | 7 or 15 | |||||||||||||||||||
| 6 or14 | g | 0 | |||||||||||||||||||||
| 0 | 0 | / | g | 0 | 5or13 | ||||||||||||||||||
| 4or12 | g g | g g | |||||||||||||||||||||
| 0 | 0 r | 0 | 0 | g | 3 or 11 | ||||||||||||||||||
| 2 or 10 | 0 | 0 4 3 2 | 1 or 9 1 | ||||||||||||||||||||
| 4443424140393837363534333231302928272625242322212019181716151413121110 | 9 | 0 8 7 | 6 5 |
Written instructions - knitting flat for back
Rnd. 1 or 9 (Rs): k3, p3, yo, k2, sk, k2, p3, k3, k2tog, k2,yo, k2, sk, k3, p3, k2,k2tog, k2, yo, p3, k3 Rnd. 2 or 10 (Ws): p3, k3, p6, k3, p6, (p1, k1) in yo stitch, p6, k3, p6, k3, p3 Rnd. 3 or 11: k3, p3, k1, yo, k2, ssk, k1, p3, k2, k2tog, k2, yo, k2, yo, k2, ssk, k2, p3, k1, k2tog, k2, yo, k1, p3, k3 Rnd. 4 or 12: p3, k3, p6, k3, p14, k3, p6, k3, p3 Rnd. 5 or 13: k3, p3, k2, yo, k2, ssk, p3, k1, k2tog, k2, yo, k4, yo, k2, ssk, k1, p3, k2tog, k2, yo,k2, p3, k3 Rnd. 6 or 14: repeat rnd. 4 Rnd. 7 or 15: k3, p3, k6, p3, k2tog, k2, yo, k6, yo, k2, ssk, p3, k6, p3, k3 Rnd. 8 or 16: repeat rnd. 4 Rnd. 9 or 1: k3, p3, k2, k2tog, k2, yo, p3, k3, k2tog, k2, yo, k2, ssk, k3, p3, yo, k2, sk, k2, p3, k3 Rnd. 10 or 2: repeat rnd. 2 Rnd. 11 or 3: k3, p3, k1, k2tog, k2, yo, k1, p3, k2,k2tog, k2, yo, k2 yo, k2, ssk,k2, p3, k1,yo, k2, ssk, k1, p3, k3 Rnd. 12 or 4: repeat rnd. 4 Rnd. 13 or 5: k3, p3, k2tog, k2, yo, k2,p3, k1, k2tog, k2, yo,k4, yo, k2, ssk, k1, p3,k2, yo, k2, ssk, p3, k3 Rnd. 14 or 6: repeat rnd. 4 Rnd. 15 or 7: repeat rnd. 7 Rnd. 16 or 8: repeat rnd. 4
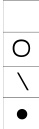
"B" Charts (Size Medium) Knitting sleeves in the round
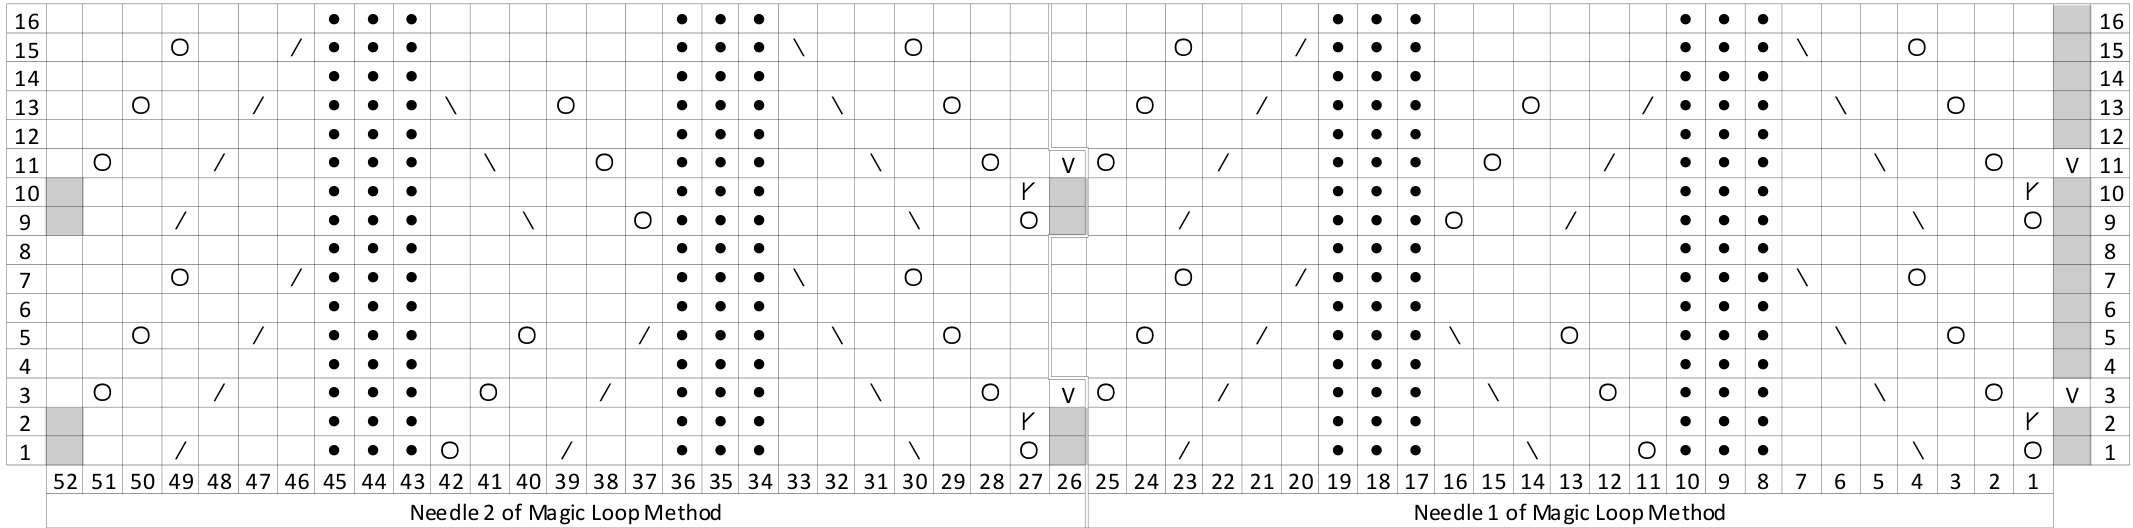
Chart Legend
Knit one stitch on the right side (k1) or purlone stitch on the wrong side (p1) yarnover(yo) slip, slip,knit (ssk) purl one stitch on the right side (p1) or knit one stitch on the wrong side (k1) Knit 2together (k2tog) increase: k1, p1 in yo stitch from prev. row (on wrong side: p1, k1) k1 and slip this stitchto end of opposite needle nostitch
Written instructions - knitting sleeve in the round
Rnd. 1: yo, k2, ssk, k3, p3, yo,k2, sk, k2,p3, k3, k2tog, k2, yo, k2, ssk, k3, p3, k2, k2tog, k2, yo, p3, k3, k2tog, k2 Rnd. 2: [(k1, p1) in yo stitch, \*k6, p3\* repeat 1 more time, k6] repeat 1 more time Rnd. 3:k1 siths st.toendof last n,k,yo,k, ssk,,p,,y,k, s,k,p,,ko,k,yo,k, sp thsst.tndof last n,k,yo,k,ssk,, k1, k2tog, k2, yo, k1, p3, k2, k2tog, k2, yo, k1 Rnd. 4: k7, p3, k6, p3, k14, p3, k6, p3, k7 Rnd. 5: k2, yo, k2, ss, k1, p3, k2, yo, k2, ssk, p3, k1,k2tog, k2, yo, k4, yo, k2, ssk, k1, p3, ktog, k2, yo, k2, p3, k1, k2tog, k2, yo, k2 Rnd. 6: repeat rnd.4 Rnd. 7:k3,yo, k2, ssk, p3,k6,p3ktog,k, yo,k6, yo,k, sk, p3,k6, p,ko,k2, y, Rnd. 8: repeat rnd.4 Rnd. 9: yo, k2, ssk, k3, p3, k2, k2tog, k2, yo, p3 k3, k2tog, k2, yo, k2, sk, k3, p3,yo, k2, ssk, k2, p3, k3, k2tog, k2 Rnd. 10: repeat rnd. 2 Rnd :k,slpthisst.to endof last nede,k,yo,k2, sk,k,p3,k1, kto,k,yo,k,p,k,kto,k,yo,k,slpthisst.toed of lst edle,,yo,k, k, p3, k1, yo, k2, ssk, k1, p3, k2, k2tog, k2, yo, k1 Rnd. 12: repeat rnd. 4 Rnd. 13: k2, yo, k2, ssk, k1, p3, k2tog, k2, yo, k2, p3, k1, k2tog, k2, yo, k4, yo, k2, sk, k1, p3, k2, yo, k2, ssk, p3, k1, k2tog, k2, yo, k2 Rnd. 14: repeat rnd. 4 Rnd. 15: repeat rnd. 7 Rnd. 16: rebeat rnd. 4
"B" Charts (Medium Small) Knitting flat for back
| 16or8 | |||||||||||||||||||||||
| 0 | 0 | 15 or 7 | |||||||||||||||||||||
| 14 or 6 | |||||||||||||||||||||||
| 0 | |||||||||||||||||||||||
| 12 or 4 | 0 | 0 | 0 | / | 13 or5 | ||||||||||||||||||
| 0 | 0 | ||||||||||||||||||||||
| 0 0 | |||||||||||||||||||||||
| 10 or2 | / | 0 0 | 0 | / | 0 | / | g 0 g 8 7 6 | 5 | 4 3 2 | 11 or 3 9 or 1 7 or 15 5or13 3 or 11 1 or 9 1 | |||||||||||||
| 0 17161514131211109 | |||||||||||||||||||||||
| 8or16 6 or 14 4 or 12 2or10 | 48474645 | 44434 | 0 | 0 | 0 | 0 | r 0 | 0 0 0 |
Written instructions - knitting flat for back
Rnd. 1 or 9 (Rs): k3, p4, yo, k2, ssk, k2, p4, k3, k2tog, k2,yo, k2, ssk,k3, p4, k2,k2tog, k2, yo, p4, k3 Rnd. 2 or 10 (Ws): p3, k4, p6, k4, p6, (p1, k1) in yo stitch, p6, k4, p6, k4, p3 Rnd. 3 or 11: k3, p4, k1, yo, k2, ssk, k1, p4, k2, k2tog, k2, yo, k2, yo, k2, ssk, k2, p4, k1, k2tog, k2, yo, k1, p4, k3 Rnd. 4 or 12: p3, k4, p6, k4, p14, k4,p6, k4, p3 Rnd. 5 or 13: k3, p4, k2, yo, k2, ssk, p4, k1, k2tog, k2, yo, k4, yo, k2, ssk, k1, p4, k2tog, k2, yo,k2, p4, k3 Rnd. 6 or 14: repeat rnd. 4 Rnd. 7 or 15: k3, p4, k6, p4, k2tog, k2, yo, k6, yo, k2, ssk, p4, k6, p4, k3 Rnd. 8 or 16: repeat rnd. 4 Rnd. 9 or 1: k3, p4, k2, k2tog, k2, yo, p4, k3, k2tog, k2, yo, k2, sk, k3, p4, yo, k2, ssk, k2, p4, k3 Rnd. 10 or 2: repeat rnd. 2 Rnd. 11 or 3: k3, p4, k1, k2tog, k2, yo,k1, p4, k2,k2tog, k2, yo, k2 yo, k2, ssk, k2, p4, k1,yo, k2, ssk, k1, p4, k3 Rnd. 12 or 4: repeat rnd. 4 Rnd. 13 or 5: k3, p4, k2tog, k2, yo, k2,p4, k1, k2tog, k2, yo,k4, yo, k2, ssk, k1, p4,k2, yo, k2, ssk, p4, k3 Rnd. 14 or 6: repeat rnd. 4 Rnd. 15 or 7: repeat rnd. 7 Rnd. 16 or 8: rep eat rnd. 4
"C" Charts (Size Large) Knitting sleeves in the round
Chart Legend
Knit one stitch on the right side (k1) or purl one stitch on the wrong side (p1) yarnover(yo) slip, slip, knit (ssk) purl one stitch on the right side (p1) or knit one stitch on the wrong side (k1) Knit 2together (k2tog) increase: k1, p1 in yo stitch from prev. row (on wrong side: p1, k1) k1 and slip this stitch to end of opposite needle nostitch
Written instructions - knitting sleeve in the round
Rnd. 1: yo, k2, ssk, k3, p4, yo,k2, ssk, k2, p4, k3, k2tog, k2, yo, k2, ssk, k3, p4, k2, k2tog, k2, yo, p4, k3, k2tog, k2 Rnd. 2: [(k1, p1) in yo stitch, \*k6, p4\* repeat 1 more time, k6] repeat 1 more time Rnd. 3: k1, slip this st.to end of last needle, k1, yo, k2, ssk, k2, p4, k1, yo, k2, ssk, k1, p4, k2, k2tog, k2, yo, k1, slip this st.to end of last needle, k1, yo, k2, ssk, k2, p4, k1, k2tog, k2, yo, k1, p4, k2, k2tog, k2, yo, k1 Rnd. 4: k7, p4, k6, p4, k14, p4, k6, p4, k7 Rnd. 5: k2, yo, k2, sk, k1, p4, k2, yo, k2, ssk, p4, k1,k2tog, k2, yo, k4, yo, k2,ssk, k1, p4, k2tog, k2,yo, k2, p4, k1, k2tog, k2, yo, k2 Rnd. 6: repe at rnd.4 Rnd.7: k3, yo, k2, ssk, p4, k6, p4, k2tog, k2, yo, k6, yo, k2, ssk, p4, k6, p4, k2tog, k2, yo, k3 Rnd. 8: repeat rnd.4 Rnd. 9: yo, k2, sk, k3, p4, k2, k2tog, k2, yo, p4 k3, k2tog, k2, yo, k2, ssk, k3, p4, yo, k2, sk, k2, p4, k3, k2tog, k2 Rnd. 10: repeat rnd. 2 Rnd. 1: k1, slip this st. to end of last needle, k1, yo, k2,ssk, k2, p4, k1, k2tog, k2, yo, kl,p4, k2, k2tog, k2, yo, kl1,slip thist.to end of last needle, k1, yo, k2, ssk, k, p4, k1, yo, k2, sk, k1, p4, k2, k2tog, k2, yo, k1 Rnd. 12: repeat rnd. 4 Rnd. 13: k2, yo, k2, ssk, k1, p4, k2tog, k2, yo, k2, p4, k1, k2tog, k2, yo, k4, yo, k2, s, k1, p4, k2, yo, k2, ssk, p4, k1, k2tog, k2, yo, k2 Rnd. 14: repeat rnd. 4 Rnd. 15: repeat rnd. 7 Rnd. 16: rebeat rnd. 4
"C" Charts (Size Large) Knitting flat for back
| 16or8 | 15 or 7 | |||||||||||||||||
| 14 or 6 | ||||||||||||||||||
| 0 | 0 | 13or5 | ||||||||||||||||
| 12 or 4 | 0 | 0 | 0 | / | / | |||||||||||||
| o | ||||||||||||||||||
| 10 or2 | 11 or 3 | |||||||||||||||||
| O | 0 | / | 9 or 1 | |||||||||||||||
| 8or16 | o | |||||||||||||||||
| 0 | 7 or 15 | |||||||||||||||||
| 6or14 | o | |||||||||||||||||
| 0 | 5or13 | |||||||||||||||||
| 4 or 12 | 0 | |||||||||||||||||
| o | 0 | |||||||||||||||||
| 2 or 10 | 52515049484746454443424140393837363534333231302928272625242322212019181716151413121110 | r | 3 or11 | |||||||||||||||
| 0 | 0 | o 9 8 7 | 6 5 4 | 32 1 | 1 or 9 | |||||||||||||
Written instructions - knitting flat for back
Rnd. 1 or 9 (Rs): k3, p5, yo, k2, ssk, k2, p5, k3, k2tog, k2,yo, k2, sk,k3, p5, k2,k2tog, k2, yo, p5, k3 Rnd. 2 or 10 (Ws): p3, k5, p6, k5, p6,(p1, k1) in yo stitch, p6, k5, p6,k5, p3 Rnd. 3 or 11: k3, p5, k1, yo,k2, ssk, k1, p5, k2, k2tog, k2, yo, k2, yo, k2, ssk, k2, p5, k1, k2tog, k2, yo,k1, p5, k3 Rnd. 4 or 12: p3, k5, p6, k5, p14, k5,p6, k5, p3 Rnd. 5 or 13: k3, p5, k2, yo, k2, ssk, p5, k1, k2tog, k2, yo, k4, yo, k2, ssk, k1, p5, k2tog, k2, yo,k2, p5, k3 Rnd. 6 or 14: repeat rnd. 4 Rnd. 7 or 15: k3, p5, k6, p5, k2tog, k2, yo, k6, yo, k2, ssk, p5, k6, p5, k3 Rnd. 8 or 16: repeat rnd. 4 Rnd. 9 or 1: k3, p5, k2, k2tog, k2, yo, p5, k3, k2tog, k2, yo, k2, sk, k3, p5, yo, k2, ssk, k2, p5, k3 Rnd. 10 or 2: repeat rnd. 2 Rnd. 11 or 3: k3, p5, k1, k2tog, k2, yo,k1, p5, k2,k2tog, k2, yo, k2 yo, k2, ssk,k2, p5, k1,yo, k2, ssk, k1, p5, k3 Rnd. 12 or 4: repeat rnd. 4 Rnd. 13 or 5: k3, p5, k2tog, k2, yo, k2,p5, k1, k2tog, k2, yo,k4, yo, k2, ssk, k1, p5,k2, yo, k2, ssk, p5, k3 Rnd. 14 or 6: repeat rnd. 4 Rnd. 15 or 7: repeat rnd. 7 Rnd. 16 or 8: repeat rnd. 4


