Relative Dimensions In Space Wrap/Shawl/Shawlette/Scarf
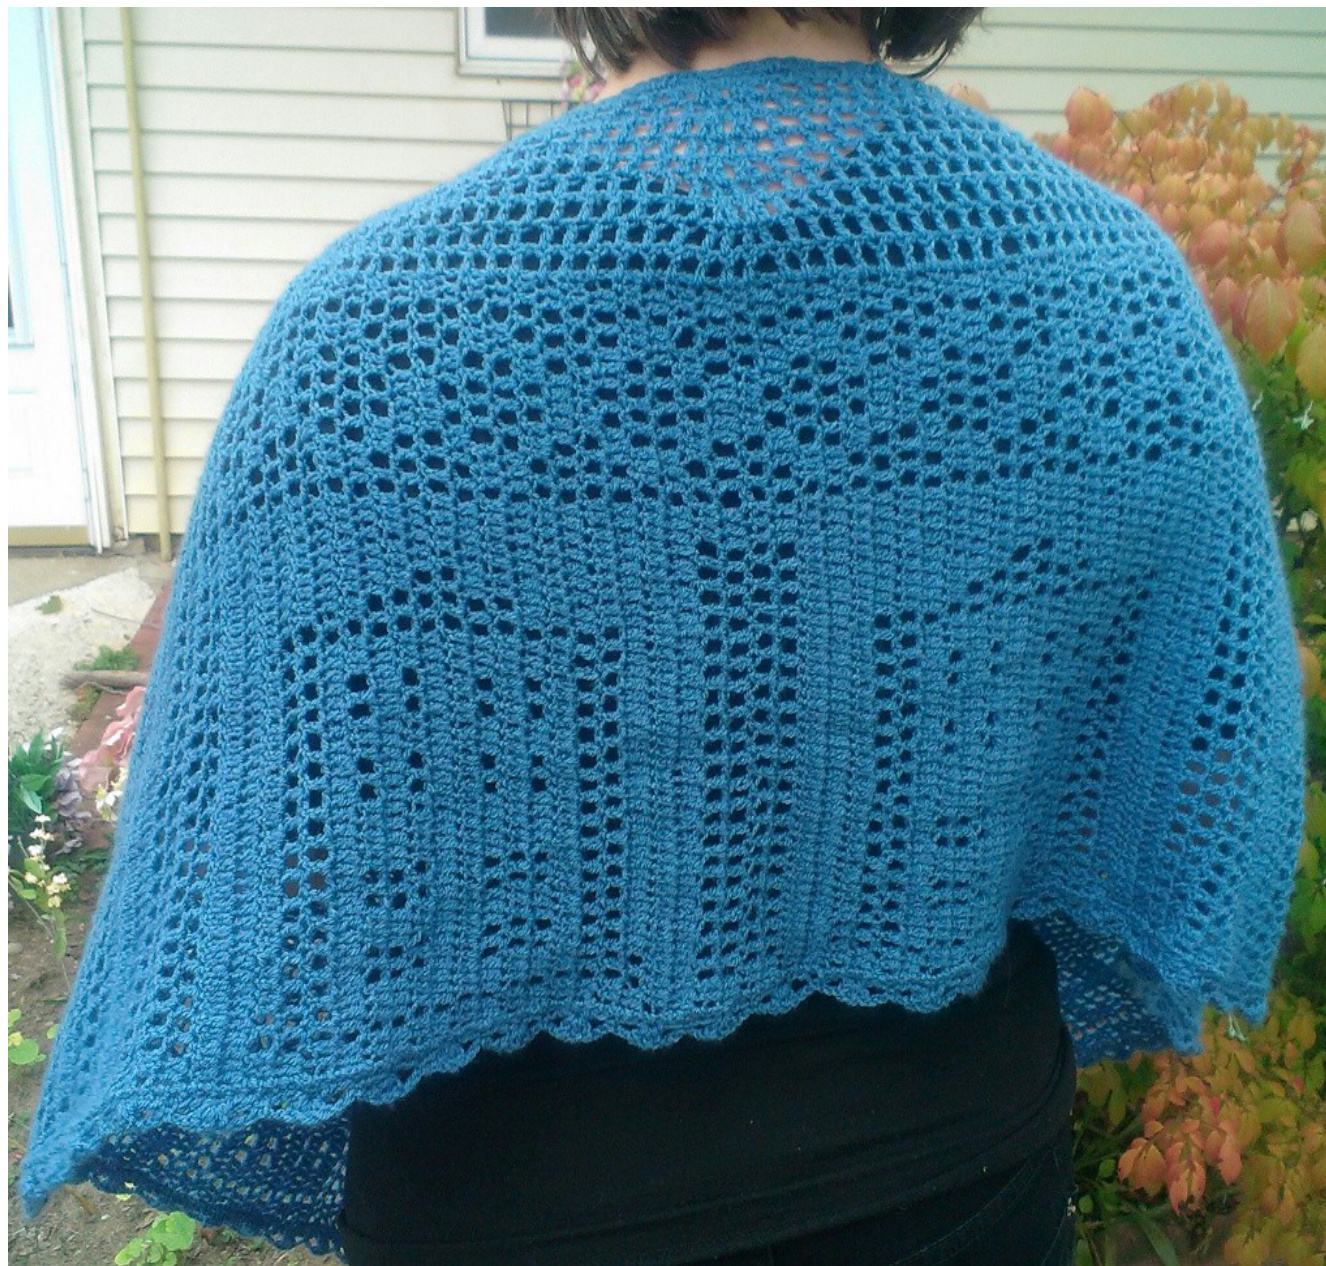
By Caren's Crochet
Using the Charts
Version 1: Know Your Length (Vertical Construction)
Chain: 48 stitches per panel for the Large Chart x Number of Panels +1 Select your TARDIS style, and start at the bottom corner, using the Version 1 chart, work row 1 from the right, and up the chart; if you only want to work just the TARDIS motif, stop at row 21. (Vertical charts, pages 3 & 4)
Version 2: Length Unknown (Horizontal Construction)
Chain: 61 stitches per panel for the Large Chart 43 sts for the TARDIS only Chart Select your TARDIS style, and start at the bottom corner, using the Version 2 charts, working row 1 from the right, and up the chart (Horizontal charts, pages 6, 7, 8, 9) Note: I used the 3-dc filet crochet method. To use the 4-dc option, you would multiply the number of squares by 3 instead of 2. A Note about the Name: Relative Dimensions in Space is called as such because you can make the wrap any size you like. You can crochet just the TARDIS chart, and make one, both, or none of the borders. You can make the full chart and make one, both, or none of the borders. You can add the decrease rows after the TARDIS chart, or full chart, or not at all. This will make all of the wraps made from this pattern somewhat relative to each other. And since it's a 3D item, that gives it the "in space" component. This pattern is written in US terms.
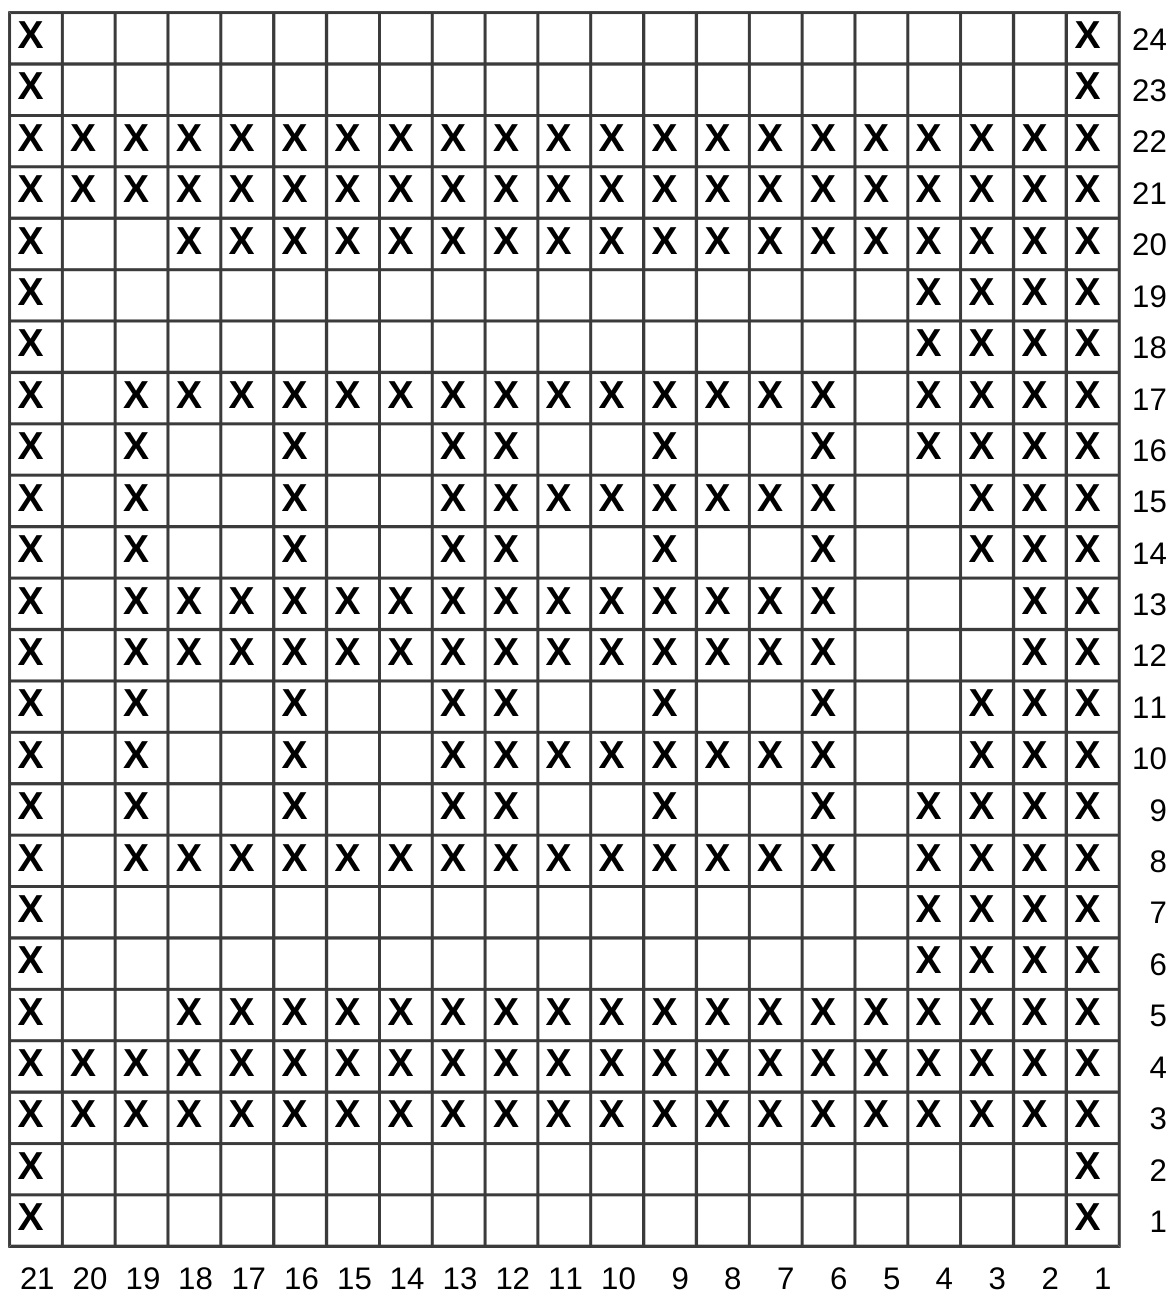
Vertical TARDIS Charts
TARDIS style 1
| xx xx xx xx x x x xx xx xx xx xx xx x | 30 | ||||||||||||||||||||||||
| 29 | |||||||||||||||||||||||||
| xx | x x | xx | xx | 28 | |||||||||||||||||||||
| x | x | x | [x | x | [x | x | x | 27 | |||||||||||||||||
| x | xx | xx | xx | x | 26 | ||||||||||||||||||||
| x | xx | xx | xx | x | 25 | ||||||||||||||||||||
| [x | x | x | [x | [x | x | x | x | 24 | |||||||||||||||||
| xx | xx | xx | xx | 23 | |||||||||||||||||||||
| 22 | |||||||||||||||||||||||||
| xxx | [x | x | x | x | ×× × x x x x x | xx> | X | xxxx x | 21 | ||||||||||||||||
| x | x | x | x | x | x | x | x | X | x x | x | x | x | x | x | x | x | xx | 20 | |||||||
| xxx | x | x | xxxx> | xxx | x | [xl | xxxx | 19 | |||||||||||||||||
| x | x | [x | xxxx | xxx | xxx | 18 | |||||||||||||||||||
| x | xx | xxx | 17 | ||||||||||||||||||||||
| x | xx | xx xxx | xxxxx | xxx | 16 | ||||||||||||||||||||
| x | xx | x | x | xx | x | x | xx | 15 | |||||||||||||||||
| x | [x | x | x | x | xx | x | x | x | x | x | x 1 | 14 13 12 11 10 9 8 7 6 5 4 3 2 1 | |||||||||||||
| x | x 2423222120191817161514131211 10 | x x x x x x x x x x x x | [x x [x x [x [x xx [x [x [x x xx x [x x | x x x x x [x | [x x | x | x | xxxx x x xx xxxx x x xxxx x x xxxx x | x x | x x x x | |x x | [x xx xx x x xx xx x x x x | xx x x xxxx x x x x x | x x | xxx x x x x | x x 9 | x x x x x x x x 8 | x 7 | x 6 | x x x x x x x x x xxx x 5 | x x x x x x x x x xx x x 4 | x x x x x x x x x x x x 3 2 | |
Vertical TARDIS Charts
TARDIS style 2
| xx x x xxxxx x x x x x x x x x x xxxxx | |||||||||||||||||||||||||
| 30 | |||||||||||||||||||||||||
| x x | 29 | ||||||||||||||||||||||||
| x | x | x | x x | xx | xx | 28 | |||||||||||||||||||
| x | xx | [x | x | [x | x | x | 27 | ||||||||||||||||||
| x | xx | xx | xx | x | 26 | ||||||||||||||||||||
| x | xx | xx | x | 25 | |||||||||||||||||||||
| x | x x | x | [x | [x | [x | x | x | 24 | |||||||||||||||||
| x x | xx | xx | 23 | ||||||||||||||||||||||
| xx x | x | x | x | X | X | x | 22 | ||||||||||||||||||
| x x | x | x | x | x | x | X | X | x | x x | x [x | x x | x | x | x | x | x | x | xxx | 21 | ||||||
| x [x | [x | x | x | x | x | x | x | xxx | x | x | x | x | x | xx | 20 | ||||||||||
| x xx | xxxx | xxx | x | x | x | xxx | 19 | ||||||||||||||||||
| x | xx | Xxxxxxx xxx | 18 | ||||||||||||||||||||||
| x | xx | xx x xx x xx x x | xxx | 17 | |||||||||||||||||||||
| x | [x | x | x | xx | x | x | xx | 16 | |||||||||||||||||
| x | [x | x | x | xx | x 1 | 15 14 13 12 11 10 9 8 7 6 5 4 3 2 1 | |||||||||||||||||||
| x|x | x x x x x x x x x x x x x | x [x [x xx [x [x x x x x x x x | [x x x x x [x x x x x | x | x | | X× ×X x x xxxx xx x x xx x x xxx | x x | x x x x x | x [x x | xx x x x x x x x x | Xx X x x [x x x x x x x x x | xxx x x x | xxx x x x x x x 24 23 22 21 20 19 18 17 16 15 14 13 12 11 10 | xx [xx 9 | x x x [x x x x x x 8 | 7 | xx 6 | x x x x x x x x x x x x 5 | x xl x xx x x x x x x xx xx x 4 | x x x x x x x x x x x x 3 2 | |

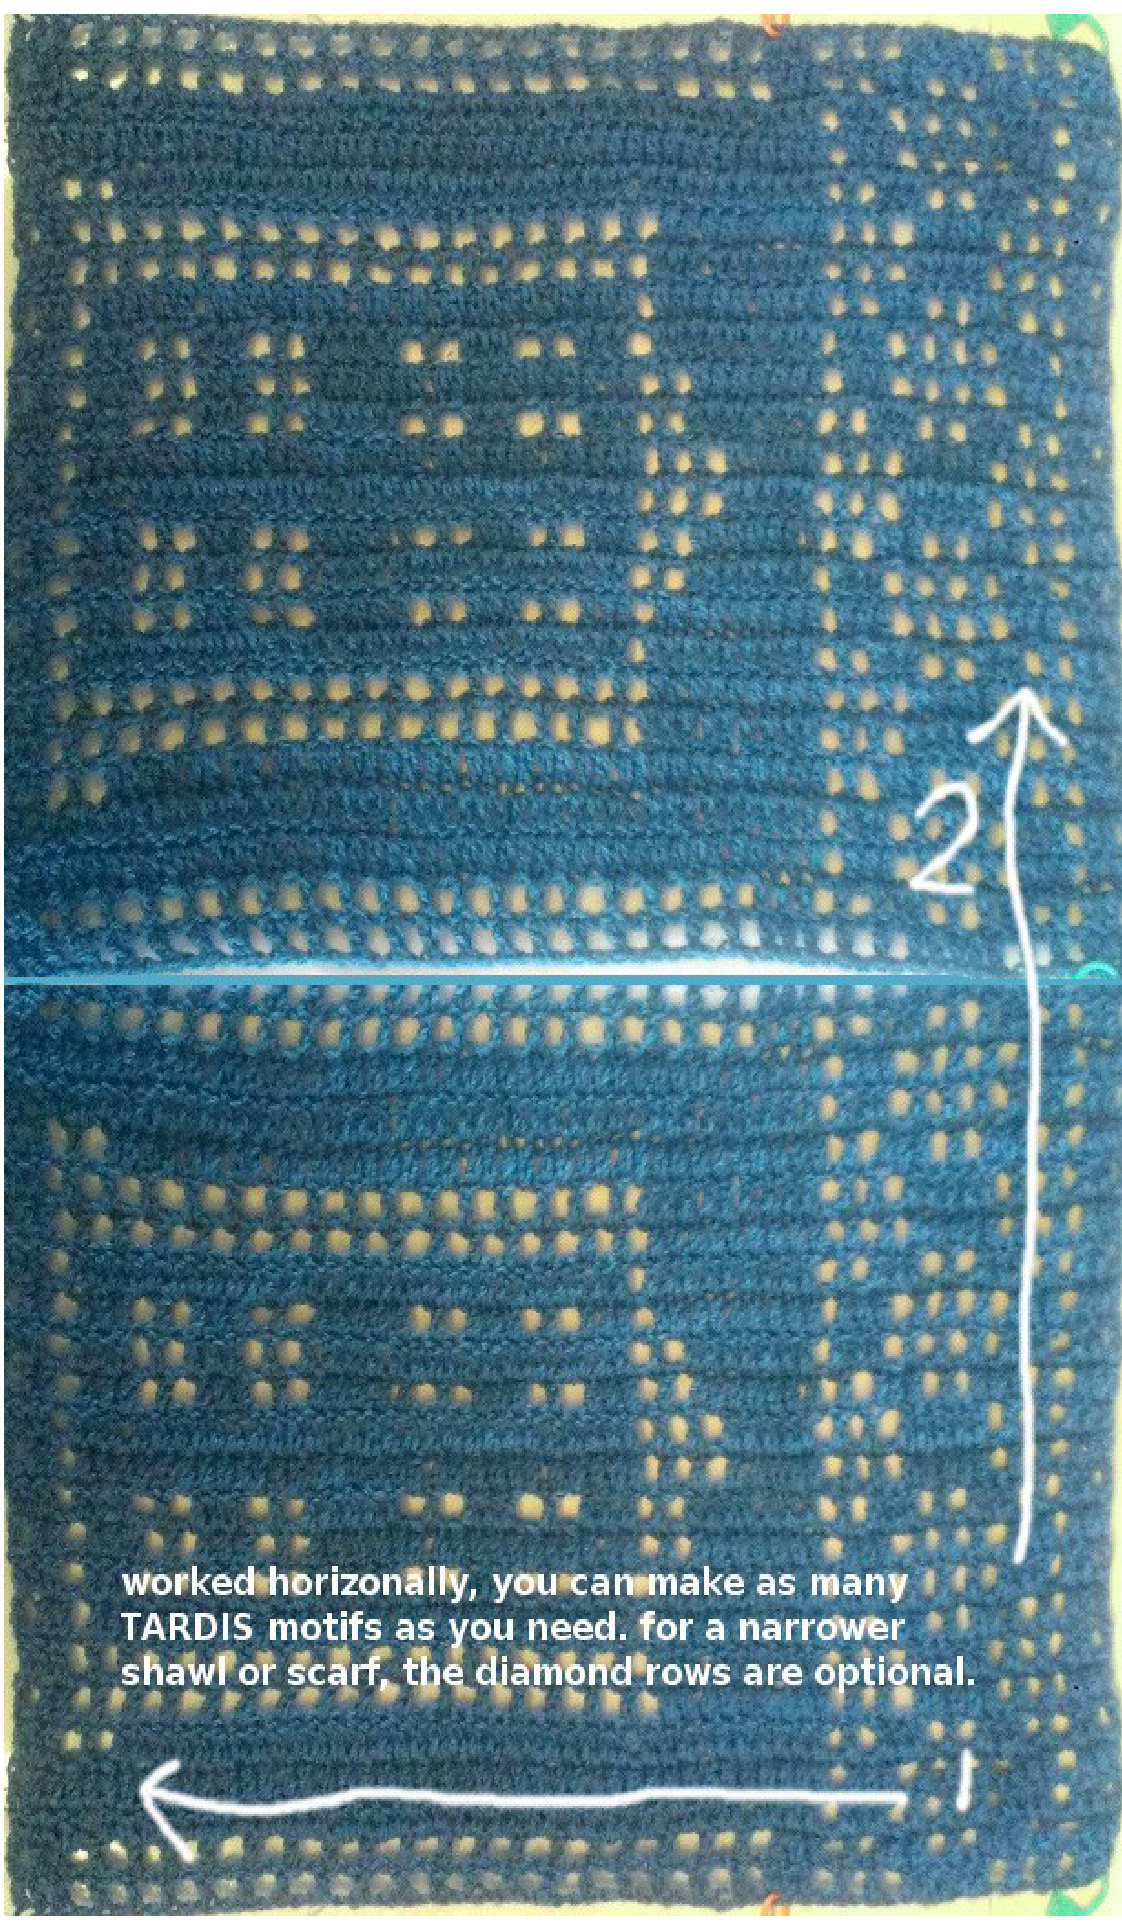
Horizontal TARDIS Charts with Diamond Rows
TARDIS style 1
| x | x | xx | x | |||||||||||||||||||||||||||
| x | x | x | x | x | 24 23 | |||||||||||||||||||||||||
| x | x | |x | x | x x | x | x x | x | x | x | x | x | x | x | x | X | x | xx | x | x | x | 22 | |||||||||
| x | xx | [x | x x | x | x x | x | x | x | x | x | x | x | x | x | x | x | [x | x | x | x | 21 | |||||||||
| x | xx | x | x | x | x | X | x | x | x | X | x | x | x | x | x | x [x | x | x | x | 20 | ||||||||||
| x | x x | x | x | xx | x | 19 | ||||||||||||||||||||||||
| x | x x | x | [x | xx | x | 18 | ||||||||||||||||||||||||
| x | x|x|x | x | xx | x | x | x | x | x | xxx | x | x x | x | x | x | x | 17 | ||||||||||||||
| x | x | x | x | x | x | x | x | x | x | x | x | x | 16 | |||||||||||||||||
| x | x | x | x | x | xx | x | xx | x | x | x | x | x | x | x | 15 | |||||||||||||||
| x | x | x | x | x | x | x | xxx | x | x | x | 14 | |||||||||||||||||||
| x | xxx | x | xx | x | x | xx | x | x×x | xx | xx | x | 13 | ||||||||||||||||||
| x | X× ×X | xx | x | x | xx | x | xxx | xx | x[x | x | 12 | |||||||||||||||||||
| x | x | x | x | x | x | x | xxx | x | x | x | 11 | |||||||||||||||||||
| x x | x | x x x x x | xix x x x | x x x | x x x x x x | x x x x x x | [xx x x x | x|x | x x x | x x X x x x | xxx x x x | xxx x x x | x ix x x | x x x x x x | xx xx xx xx x x | xxx xx> xx> | xx x x | 9 | x x x x 8 | x x x 7 | xx xx xx 6 | 5 | x x x 4 | x x x x | N | x x x x x x x x x x 1 | 10 9 7 5 4 3 2 1 | |||
| x x x x x x x x | xx x|x | x | XXXX> xx x x x x |
Horizontal TARDIS Charts with Diamond Rows
TARDIS style 2
| x | x | xx | x | ||||||||||||||||||||||||||||
| x | x | x | x | x | 24 23 | ||||||||||||||||||||||||||
| x | [x | x | x | x | x | X | x | x | x | x | x | x | x | x | x x | x | x | xx | x | x | x | 22 | |||||||||
| x | x|x | x | x | x | x | x | x | x | x | x | x | x | x | x x | x | x | x | [x | x | x | x | 21 | |||||||||
| x | xx | x | x | x | x | x | x | x | x | x | x | x x | x | x | x | x | x | x | x | 20 | |||||||||||
| x | x | x | x | x | xx | x | 19 | ||||||||||||||||||||||||
| x | x | x | x | x | xx | x | 18 | ||||||||||||||||||||||||
| x | X×X | X | xx | x | x | X | |x | x | xxx | x | x | x | [x | x | x | x | 17 | ||||||||||||||
| x | x | x | xx | x | x | xx | xx | x | x | x | 16 | ||||||||||||||||||||
| x | X×X | x | xx | x | x | x | x | xxx | x | x | x | 15 | |||||||||||||||||||
| x | x | x | x | x | x | x | xxx | x | x | x | 14 | ||||||||||||||||||||
| x | xxx | x | x | x | x | x | x | x | x | xxx | xx | x[x | x | 13 | |||||||||||||||||
| x | xxx | x | xx | x | x | xx | x | ××X | xx | xx | x | 12 | |||||||||||||||||||
| x | x | x | x | x | x | x | xxx | x x x x 7 | xx xx x[ 6 | [x 5 | x x x x 4 | x x x x | 2 | x x x x x x x x x x x 1 | 11 10 9 7 9 5 4 3 2 | ||||||||||||||||
| x x x x x x x x x x | x x | x [x x | x x x | xxx XXX x x x | x x x x x x | xx xx x x x | x x x x x x x x | x | x x x x x x | x x x | [xx x x x | x x x x x x | x x x | x x x | x x x x x | x x x | x x x x x x x | x x x x x x x x x | xx x x x x x x x x | x x x x x x x | x x x x 9 8 |
Horizontal TARDIS Charts withOUT Diamond Rows
TARDIS style 1
Horizontal TARDIS Charts withOUT Diamond Rows
TARDIS style 2

Part II - Decrease Rows
If you have worked the chart rows using Version 1, you don't have to turn your work horizontally. Work Row 1 into the stitches below. If you have used Version 2, turn your wrap horizontally, so you are now working along the top of the rows. Row1 chain 4, skip 1 stitch, dc into next stitch across. Ch 3, turn. OR chain 4, dc into each row end with a ch-1 between the dcs. Ch 3, turn. I made 6 TARDIS motifs, and got 145 stitches across, incl the ch-4. NOTE 1: the decreases are above the last two stitches of one TARDIS panel and the first two stitches of the next. All decreases are above these stitches. NOTE 2: it's ok to have more or fewer ch-1/dc stitches in each panel than are noted as long as the decreases are all in the same places each row. Row2 dc in next dc, (ch 1 and skip the chain below, dc) 22x. dc in next 3 dcs, [(ch 1/sk ch, dc) 21x, dc in next 3 dcs] across until the end. dc in top of turning chain. Ch 3, turn. Row3 dc in next dc. (this makes two dcs at the beginning.) decrease (ch1/sk ch, dc) 20x, dc2tog, dc2tog, dc in next row [(ch1/sk ch, dc) 19x, dc2tog, dc2tog, dc in next] until last motif (ch1/sk ch, dc) 21x, dc in turning chain. Ch 3, turn. Row4 dc in next dc, (ch 1 and skip the chain below, dc) 21x. dc in next 3 dcs, [(ch 1/sk ch, dc) 19x, dc in next 3 dcs] across until the last panel. (ch1/sk ch, dc) 20x, dc in turning chain. Ch 3, turn. Row5 dc in next dc. (ch1/sk ch, dc) 19x, dc2tog, dc2tog, dc in next decrease [(ch1/sk ch, dc) 17x, dc2tog, dc2tog, dc in next] until last motif row (ch1/sk ch, dc) 20x, dc in turning chain. Ch 3, turn. Row6 dc in next dc, (ch 1 and skip the chain below, dc) 20x. dc in next 3 dcs, [(ch 1/sk ch, dc) 17x, dc in next 3 dcs] across until the last panel. (ch1/sk ch, dc) 19x, dc in turning chain. Ch 3, turn. Row7 dc in next dc. (ch1/sk ch, dc) 18x, dc2tog, dc2tog, dc in next decrease [(ch1/sk ch, dc) 15x, dc2tog, dc2tog, dc in next] until last motif row (ch1/sk ch, dc) 19x, dc in turning chain. Ch 3, turn.
Part II - Decrease Rows
Row 8
dc in next dc, (ch 1 and skip the chain below, dc) 19x. dc in next 3 dcs, [(ch 1/sk ch, dc) 15x, dc in next 3 dcs] across until the last panel. (ch1/sk ch, dc) 18x, dc in turning chain. Ch 3, turn. Row9 dc in next dc. (ch1/sk ch, dc) 17x, dc2tog, dc2tog, dc in next decrease [(ch1/sk ch, dc) 14x, dc2tog, dc2tog, dc in next] until last motif row (ch1/sk ch, dc) 19x, dc in turning chain. Ch 4, turn.
Row 10
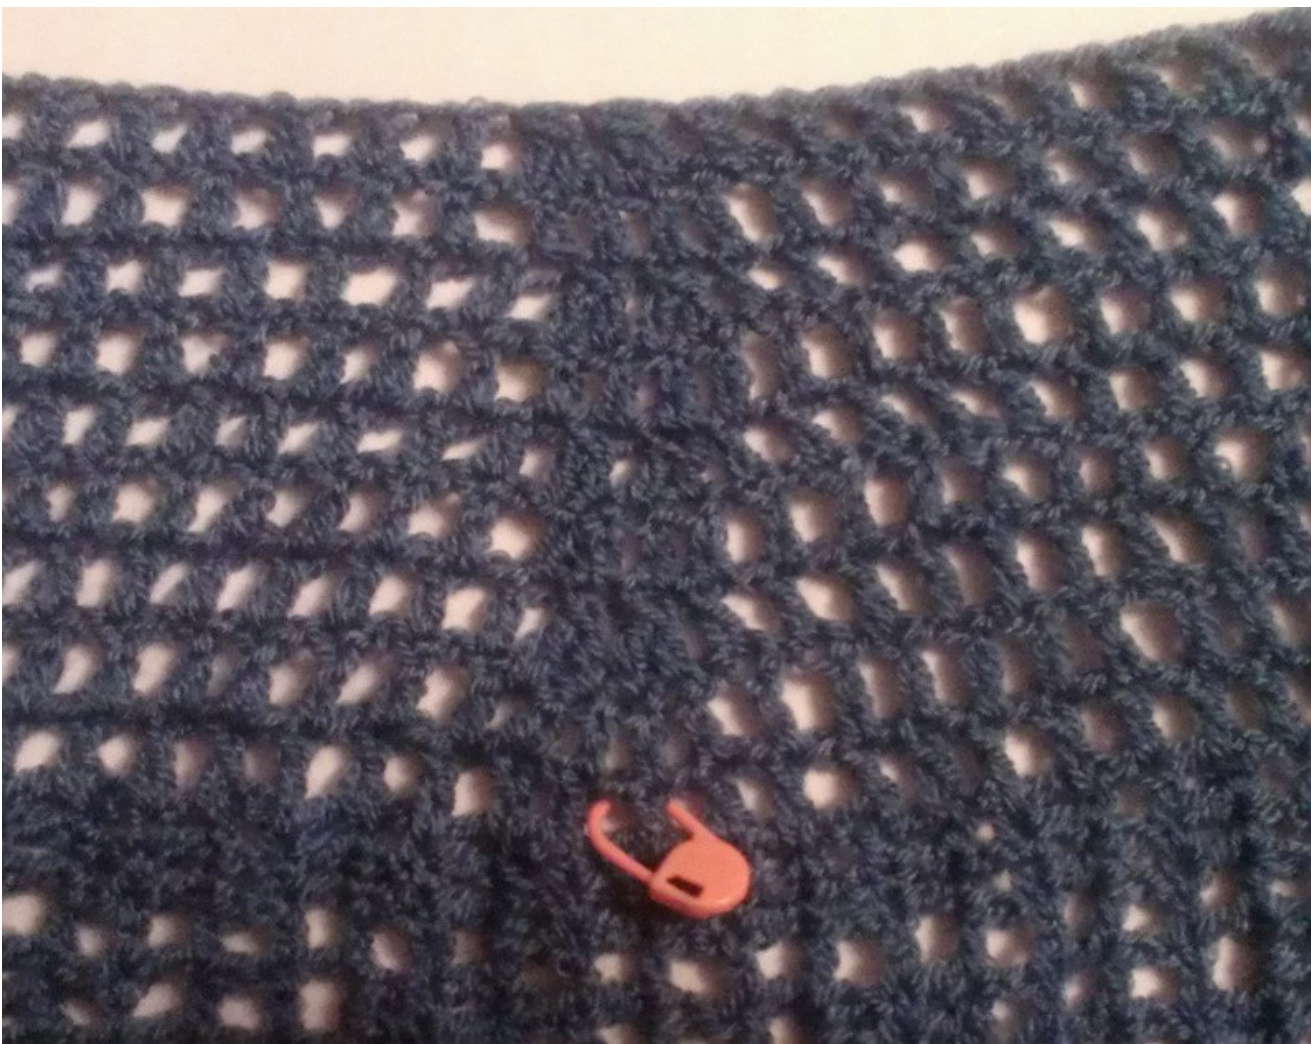
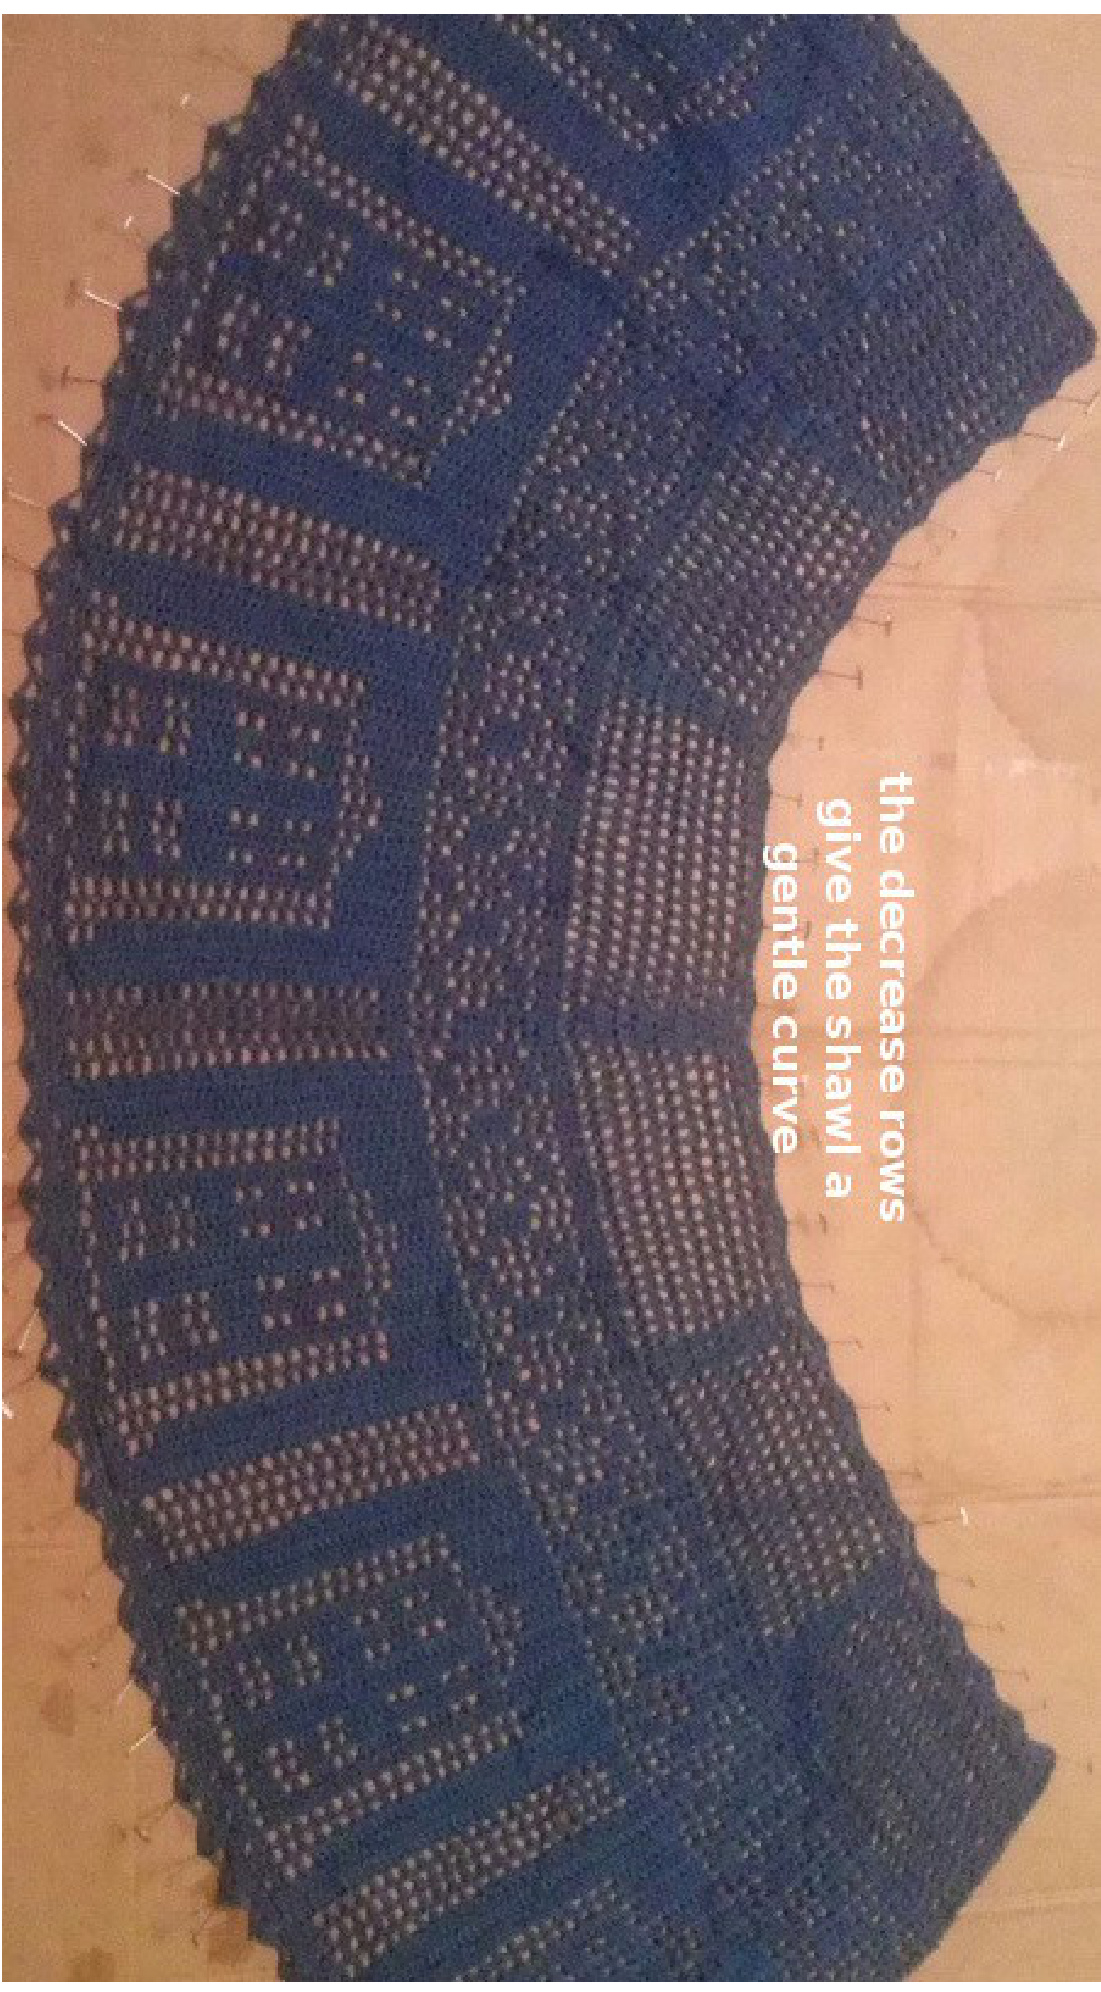
(ch 4 counts as first stitch) dc in every dc across, making last dc in top of turning chain. for my 6 TARDIS motifs, I got 105 stitches across, incl the ch-4. detail of the decrease rows
Part III - Borders
When you have completed Row 10 of the decrease rows, determine the right and wrong sides of your wrap. If you are already on the right side of your wrap, you are in the upper left corner. Chain 1, DO NOT turn: Side 1 sc evenly down the left side of the wrap, 2 sc in corner, Side 2 bottom border\*, 2 sc in corner Side 3 sC evenly up the right side of the wrap, 2 sc in corner, Side 4 top border\*, finish off If you are on the wrong side of your wrap, chain 1, TURN: Side 1 top border\*, 2 sc in corner, Side 2 sc evenly down the left side of the wrap, 2 sc in corner, Side 3 bottom border\*, 2 sc in corner Side 4 sc evenly up the right side of the wrap, finish off sc in first, [sk2, shell\*, sk 2, sc] repeat across. Last sc should be in last stitch ofrowbelow. \*make shells in the following pattern: (or you can just use one style shell across) 3dc shell, 4 dc shell, 5 dc shell, 4 dc shell, 3 dc shell; repeat across shell = 3, 4 or 5 dcs all in the same stitch. Bottom Border: “Pearl Shell" Taken (and slightly modified) from Vogue Stitchionary Vol 4, Crochet: (pg 128) CL (3dc-cluster) - 3 dc all in the same shell multiple of 6 stitches +1 Row1 ch 1, sc in first st, and sc across. Ch 1, turn. \*Note 1: each TARDIS panel is 24 squares wide, 48 stitches. Therefore each panel is already a multiple of 6. To find out how many stitches to do, multiply your number of panels by 48, and then add 1 Row2 1 sc in first 3 sc, \*3 sc in next sc, 1 sc in 5 sc\* repeat across end last repeat with 1 sc in last 3 sc. Ch 3, turn.
Part III - Borders
Row3 skip 2 sc, \*CL in center st of 3-sc group, ch 2, sk 2 sc, 1 sc in next sc, ch 2, sk 2 sc\* repeat across. end CL in center sc of last 3-sc group, ch 2, sk 2, 1 sc in last sc. \*Note 2: any bottom border will work, especially if the following criteria are met: \~the border you choose uses a multiple of 6 stitches theborderhasanodd numberof rows this way, when you do row 1 on the right side, all other odd numbered rows are also on the right side This pattern was created by Caren Franco, 2014. Please enjoy making this TARDiS wrap for you or others, but please do not sell this pattern.


