One Hook Productions
Retro Capelet
An original Design by Mike Horwath www.onehookproductions.com Do not copy or distribute
Tools/Equipment:
Worsted Weight Yarn (Approx 770yds) Size I Hook Stitch Marker Darning needle Clasp or closure Sewing Thread
Glossary:
SS- Slip Stitch sC- Single Crochet hdc- Half double crochet blsc- back loop single crochet blhdc- back loop Half double crochet
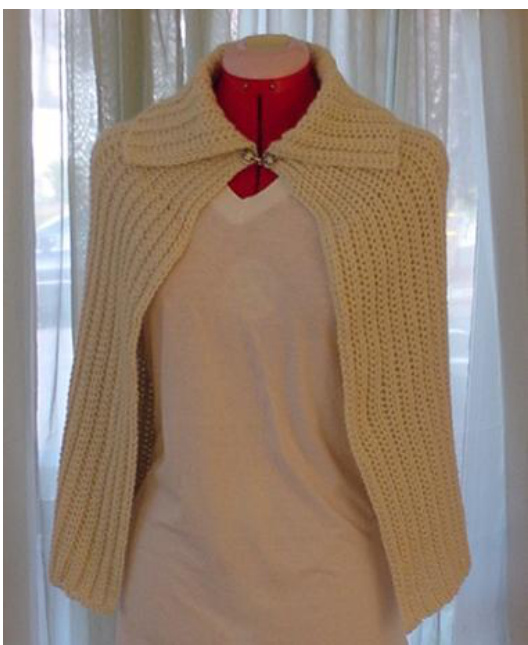
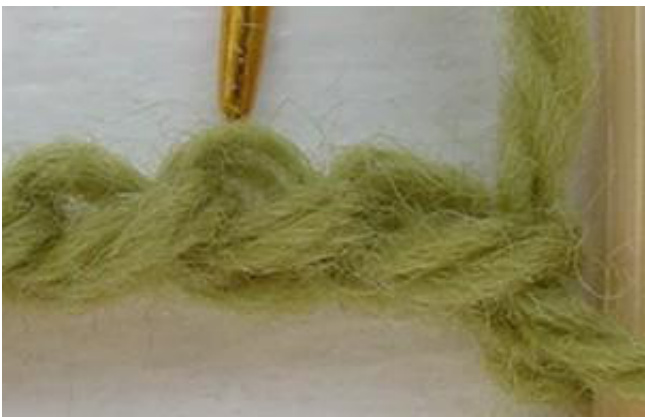
For this pattern- Knitpicks Andean Silk in Cream was used in creating the item pictured, and is sized Petite/Small (Med / Large) in parenthesis. This pattern was expertly tested by Erica Note: for Row 1- it is important to work through the back loop (BUMP) on the back side of the foundation chain. This will give a clean edge on that side of the garment.Seeimagebelow
ing in back loops on alternate rows creates the ridge p Row 1(working through "bump"-see special instructions above)- ss in 2"d chain from the hook and in next 4 chains (5 ss), sc in next chain and in the next 9 chains (10 sc), hdc in next chain, and in the next 60 chains (61 hdc) - 76 stitches Row 2- chain 2, blhdc in next 60 hdc, blsc in next 10 sc, ss in next 5 ss- chain 1 Row 3- ss in first 5 ss, sc in next 10 sc, hdc in next 61 hdc Rows 4 - 99 (113) Repeat rows 2 and 3 as established pattern- Fasten off Collar: Foundation- Chain 20+2 Row 1(working through "bump"-see special instructions above)- hdc 3rd chain from hook, and in each across- 21 sts incl. turn chain Row 2- Chain 2, blhdc in each across Row 3- Chain 2, hdc in each across Row 4- 46 (52)- repeat rows 2 and 3 for established pattern. Fastenoff Attach Collar to Body (best done on a large flat surface) Lay body of capelet flat with WRONG SIDE UP gather bottom a bit so neckline lies straight and flat. Lay Collar on top of the body with WRONG SIDE UP. Starting at Center of neck- Whip stich from center to end.
Clasp:
Sew clasp/closure to neck line at at the slip stitch/collar join line. Due to the nature of this pattern (See Row 1 Instruction Note), no finishing round is needed. You can make the capelet body wider or narrower by adding or omitting rows. This will be helpful if you have a favorite stash yarn that is smaller than worsted weight (use a cooresponding hook relative to the yarn size). Note: When sizing- You should always end with an ODD NUMBER row. The collar should be re-sized 1 row for every 2 rows added or deleted to body (for example, if you took the large size above (113 rows) and increased to 115- you should add ONE row to the collar for a total of 53 rows).


