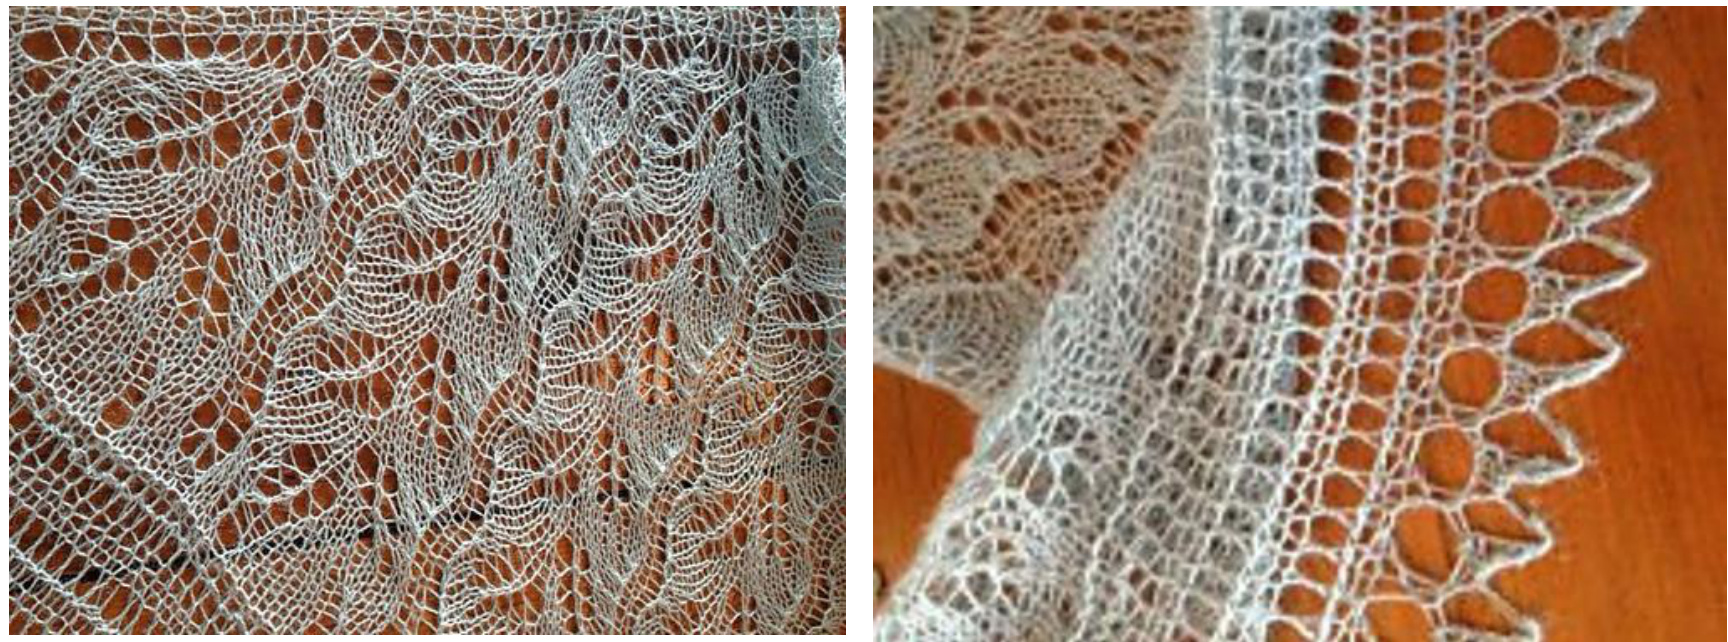
RUTH ELISABETH A Lace Shawl Designed by Priscilla White-Tocker
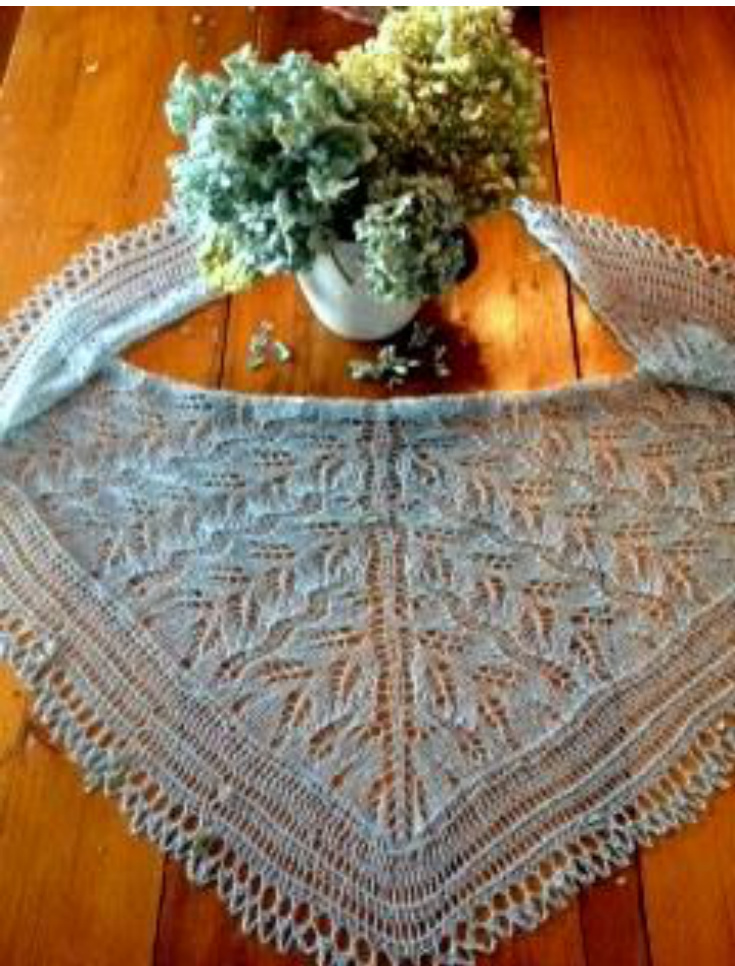
side of the shawl is a mirror image of the right side. This shawl is designed in memory of my mother, Ruth White, whose girlhood name was Ruth Elisabeth Ruggles. My mother lived into her eighties but she never lost the youthful qualities that she had must have had as a young girl, growing up in the town that she lived in all of her life. When I was designing this shawl I wanted to create a very feminine pattern that evokes plants and flowers, as my mother always loved these - and also to create a pattern with a sense of flow, movement, and expansion outward, as my mother was always a whirlwind of activity and was continually reaching out to connect with her family and her community. I think that those who knew her will be able to recognize how she inspired the design. The shawl is knit using a typical triangular shawl construction. It begins with six stitches cast on for the top center, and the shawl is worked outward and downward to the bottom edge where a lace edging is attached. Increases occur on the right side rows of the shawl by adding an extra yarn over bordering each edge of the shawl and on either side of the center column. The upper edge of the shawl is made to curve upward to create a heart-shaped effect by adding some extra increases to a few rows within the body of the shawl, and these will be noted in the written instructions and in the chart. You will also notice that the left This pattern is designed to be knit with any weight/gauge of yarn and any size needles to whatever measurements you desire. The suggested materials and gauge provided in the instructions were used to crea1 the shawl in this photo, which was made by working the set of rows comprising the main body of the shawl three times, and measures 48"W x18" from center of upper edge to tip of lower edge. Row-by-row written instructions are included, as well as charts, so you may use whichever of these you choose or use them in conjunction with one another This pattern assumes that the knitter has experience working all of the types of stitches in this shawl, particularly yarn overs, and is also familiar with the use of lifelines and with blocking finished pieces. The instructions are meant to provide detailed guidance for knitters who have never created a triangular lace shawl with multiple repeats. If you would like additional instruction on how to work any of the stitches, there are excellent instructional videos on www.knittinghelp.com.
\*\*Before you start to knit, please note:\*\*
· While most of the right side rows will increase by 4 stitches, a few of the rows will increase by 8. Stitch counts for each row are noted in the written instructions. · When knitting rows 19-42 for the first time, you will not repeat the stitches in blue print, (these stitches correspond to the blue shaded sections of the charts). These stitches will be worked multiple times as you continue on to repeat this set of rows and the shawl grows wider. · I highly recommend that you place stitch markers after the first P2 edge stiches, before the last P2 edge stiches, on either side of the center P2 column, and before and after each of the sets of repeated stitches within each row. Doing this will make it much easier for you to keep track of your stitch count and to identify where any mistakes may have occurred so that you can make adjustments. Keep slipping the markers upward as you go and add additional markers as your shawl widens. · The P2 stiches which make up the center column of the shawl should always line up directly above one another as you work the rows. These are denoted in bold as P2 to help orient you if you are using the written instructions. The P stitches within the blue shaded areas will line up also, although due to the nature of the pattern these will create wavy "rivulets" that will flow down the body of the shawl.
INSTRUCTIONS FOR SHAWL
Suggested Materials: (used for shawl in the photo) Yarn: Silky Alpaca Lace by Classic Elite Yarns (70% alpaca, 30% silk; 440 yds./50 grams per skein); shown in colorway Beach Glass using 1 skein Needles: US# 4 circular, at least 16". also one US#4 double point needle, or size for desired gauge. Shawl in F knit to gauge of 8" per inch (unblocked) in stockinette Round stitch markers to mark off sections of the pattern Waste yarn (optional)- several yards, if you wish to add lifelines
Legend:
K2TOG=knit 2 stitches together (creates a right-leaning decrease) SSK=slip two stitches knit wise and separately to the right needle, then knit both together through the front of the stitches (creates a left-leaning decrease) K3TOG= knit 3 stitches together (creates a right-leaning decrease) S1-K2TOG-PssO=slip one stitch knitwise, knit next two stitches together, pass slipped stitch from right to left over this new stitch and off the needle (creates left-leaning decrease) RS= right side of shawl, or the side meant to be worn outward ws=wrong side of shawl BO=Bind Off
Starting to Knit
Cast 6 stiches onto your circular needle. Purl two rows. Then you will start creating the lace pattern and building the shawl. Only the odd numbered rows are written out, and these make up the RS of the shawl. All of the even numbered rows are the ws.
Set-Up Rows:
Row 1: P2, YO, P2, YO, P2 (8 stiches) Row 2: (and all even number WS rows) - P across entire row Row 3: P2, YO, K1, YO, P2, YO, K1, YO, P2 (12 stitches) Row 5: P2, YO, K1, P1, K1, YO, P2, YO, K1, P1, K1, YO, P2 (16 stitches) Row 7: P2, YO, K2, P1, K2, YO, P2, YO, K2, P1, K2, YO, P2 (20 stitches) Row 9: P2, YO, K3, P1, K3, YO, P2, YO, K3, P1, K3, YO, P2 (24 stitches) Row 11: P2, YO, K1, YO, K1, SSK, P1, K4, YO, P2, YO, K4, P1, K2TOG, K1, YO, K1,YO, P2 (28 stitches) Row 13: P2, YO, K3, YO, SSK, P1, K5, YO, P2, YO, K5, P1, K2TOG, YO, K3, YO, P2 (32 stitches) Row 15: P2, YO, K6, P1, K2TOG, K3, YO, K1, YO, P2, YO, K1, YO, K3, SSK, P1, K6, YO, P2 (36 stitches) Row 17: P2, YO, K1, YO, K4, SSK, P1, K2TOG, K2, YO, K3, YO, P2, YO, K3, YO, K2, SSK, P1, K2TOG, K4, YO, K1, YO, P2 (40 Stitches)
Main Body of Shawl:
Row 19: P2, YO, K1, YO, K1, YO, K3, S1-K2TOG-PSSO, P1, K8, YO, P2, YO, K8, P1, K3TOG, K3, YO, K1, YO, K1, YO, P2 (44 stitches) Row 21: P2,YO, K1, K2, YO, K1, YO, K2, S1-K2TOG-PSSO, P1, K8, K1,YO, P2, YO, K1, K8, P1, K3TOG, K2, YO, K1, YO, K2, K1, YO, P2 (48 stitches) Row 23: P2, YO, K2, K3, YO, K1, YO, K1, S1-K2TOG-PSSO, P1, K3TOG, K4, YO, K1, YO, K2, YO, P2, YO, K2, YO, K1, YO, K4, S1-K2TOG-PSSO, P1, K3TOG, K1, YO, K1, YO, K3, K2, YO, P2 (52 stiches) Row 25: P2, YO, K2TOG, YO, K1, K8, P1, K3 TOG, K3, YO, K1, YO, K1, K3, YO, P2, YO, SSK, YO, K1, K1, YO, K1, YO, K3, S1-K2TOG-PSSO, P1, K8, K3, YO, P2 (56 stitches) Row 27: P2, YO, K2TOG, YO, K2, K8, P1, K3TOG, K2, YO, K1, YO, K2, K4, YO, P2, YO, K4, K2, YO, K1, YO, K2, S1-K2TOG-PSSO, P1, K8 , K2, YO, SSK, YO, P2 (60 STITCHES) Row 29: P2, YO, K2, YO, K3, YO, K1, YO, K4, S1-K2TOG-PSSO, P1, K3TOG, K1, YO, K1, YO, K3, YO, K1, YO, K2, SSK, YO, P2, YO, K2TOG, K2, YO, K1, YO, K3, YO, K1, YO, K1, S1-K2TOG-PSSO, P1, K3TOG, K4, YO, K1, YO , K3, YO, K2, YO, P2 (68 stitches) Row 31: P2, YO, K7, K1, YO, K1, YO, K3, S1-K2TOG-PSSO, P1, K8, K1, YO, K1, YO, K2, S1-K2TOG-PSSO, YO, P2, YO, K3TOG, K2, YO, K1, YO, K1, K8, P1, K3TOG, K3, YO, K1, YO, K1, K7, YO, P2 (72 stitches) Row 33: P2, YO, K8, K2, YO, K1, YO, K2, S1-K2TOG-PSSO, P1, K8, K2, YO, K1, YO, K2, S1-K2TOG-PSSO, YO, P2, YO, K3TOG, K2, YO, K1, YO, K2, K8, P1, K3TOG, K2, YO, K1, YO, K2, K8, YO, P2 (76 stitches) Row 35: P2, YO, K1, P1, K2TOG, K4, YO, K1, YO, K3, YO, K1, YO, K1, S1-K2TOG-PSSO, P1, K3TOG, K4, YO, K1, YO, K3, YO, K1, YO, K1, SSK, P1, K1, YO, P2, YO, K1, P1, K2TOG, K1, YO, K1, YO, K3, YO, K1, YO, K4, S1- K2TOG-PSSO, P1, K3TOG, K1, YO, K1, YO, K3, YO, K1, YO, K4, SSK, P1, K1, YO, P2 (84 stitches) Row 37: P2, YO, K3, P1, SSK, K3, YO, K1, YO, K1, K8, P1, K3TOG, K3, YO, K1, YO, K1, K4, YO, K1, YO, SSK, P1,K3, YO, P2, YO, K3, P1, K2TOG, YO, K1, YO, K4, K1, YO, K1, YO, K3, S1-K2TOG-PSSO, P1, K8, K1, YO, K1,YO, K3, SSK, P1, K3, YO, P2 (92 stitches) Row 39: P2,YO, K5, P1, K2TOG, K2, YO, K1, YO, K2, K8, P1, K3TOG, K2, YO, K1, YO, K2, K8, P1, K3, YO, K1, YO, P2, YO, K1, YO, K3, P1, K8, K2, YO, K1, YO, P2, S1-K2TOG-PSSO, P1, K8, K2, YO, K1, YO, K2, SSK, P1, K5, YO,P2 (100 stitches) Row 41: P2, YO, K1, YO, K4, SSK, K2TOG, K1, YO, K1, YO, K3, YO, K1, YO, K4, S1-K2TOG-PSSO, P1, K3TOG, K1, YO, K1, YO, K3, YO, K1, YO, K4, S1-K2TOG-PSSO, P1, K2TOG, YO, K1, YO, K3, YO, P2, YO, K3, YO, K1, YO, SSK, P1, K3TOG, K4, YO, K1, YO, K3, YO, K1, YO, K1, S1-K2TOG-PSSO, P1, K3TOG, K4, YO, K1, YO, K3, YO, K1, YO, K1, SSK, P1, K3TOG, K4, YO, K1, YO, P2 (108 stitches) End this section with Row 42 - P straight across. Repeat Rows 19-42 as many times as you wish to the desired size, working the blue sets of stitches multiple times to complete each row. For example, the second time you knit Rows 19-42, you will work the blue set 3 times per row on each half of the shawl; the third time you knit these rows, you will work the set five times per row on each half, etc. Once you have reached your desired size (note - you must always end on a row 42 in order for the border to fit properly), you will knit the following section once:
Main Body of Shawl Border:
Row 1: P2, YO, K1, YO, K1, YO, K3, S1-KSTOG-PSSO, P1, K8, YO, P2, YO, K8, P1, K3TOG, K3, YO, K1, YO, K1, YO, P2 Row 3: P2, YO, K1, K2, YO, K1, YO, K2, S1-K2TOG-PSSO, P1, K8, K1, YO, P2, YO, K1, K8, P1, K3TOG, K2, YO, K1, YO, K2, K1, YO, P2 Row 5: P2, YO, K1, YO, K1, K3, SSK, K3, YO, P1, YO, K3, K2TOG, K3, K1, YO, K1, YO, P2, YO, K1, YO, K1, K3, SSK, K3, YO, P1, YO, K3, K2TOG, K3, K1, YO, K1, YO, P2 Row 7: P2, YO, K2, YO, K2, K3, SSK, K3, YO, P1, YO, K3, K2TOG, K3, K2, YO, K2, YO, P2, YO, K2, YO, K2, K3, SSK, K3, YO, P1, YO, K3, K2TOG, K3, K2, YO, K2, YO, P2 Row 9: P2, YO, K3, YO, K3, K3, YO, K3, K2TOG, P1, SSK, K3, YO, K3, K3, YO, K3, YO, P2, YO, K3, YO, K3, K3, YO, K3, K2TOG, P1, SSK, K3, YO, K3, K3, YO, K3, YO, P2 Row 11: P2, YO, P to center column, YO, P2, YO, P to last two edging stiches, YO, P2 End this section with Row 12 - P straight across. Break off yarn, leaving enough to weave in the edge when shawl is completed.
Edging:
With new ball of yarn, cast 11 onto the Size 4 DPN. With the RS of the shawl facing you, hold the left side of the circular needle tip in you right hand. Begin edging pattern by knitting Row 1, passing stitches from DPN to circular needle as you knit. Turn shawl to the WS, so that the circular needle tip is now in your left hand. Knit row 2 and pass the stitches back onto the DPN. while the last stitch of both Rows 2 and 4 is written as K1, you will actually be knitting this stitch together with a shawl body stitch, thus attaching the edging directly to the shawl as you work. Row 1: (RS) K3, [YO, SSK K1] 2x, YO2, K1, YO2, K1 (15 stitches) Row 2: (ws) [K2, P1] 4x, K3 (15 stitches) Row 3: (RS) K3, YO, SSK, K1, YO, SSK, K7 (15 stitches) Row 4: (wS) BO4, K3, P1, K2, P1, K3 (11 stitches) Work these rows until the entire bottom of the shawl has been edged. You should end with a row 4, and then BO the 11 stitches. Weave in all loose ends and block the shawl, taking special care with the pointed loops of the edging.
INSTRUCTIONS FOR USING THE CHARTS
General Notes on the Charts
·Starting with Row 1 of each chart, the RS rows are read from right to left and worked upward. WS rows of charts (even numbered rows) are knitted from left to right. Charts are written to show all of the stitches as they appear on the RS, so when you are knitting the WS rows the K stiches are done as P, and vice versa (see Legend).Since all of the WS rows in Charts A, B (divided into left and right halves to make it larger to read) and C are P straight across, this only matters when you are working with Chart D for the edging. · The blue shaded areas in Charts B and C indicate the sets of stitches that are worked multiple times per row (these correspond to the blue stitches in the written instructions). The blue area is worked only once the first time you knit Chart B, but is worked multiple times in subsequent repeats of this charts. · The gray shaded areas indicate where there are no stitches, so you will skip across these areas and work the rows as if they were not there. · The name of each chart and the row numbers are written to correspond to the written instructions, which yo' can refer to if you have questions about reading the charts. Knitting from the Charts: · Knit Chart A( Set-Up Chart) once. You will end the last row of Chart A with 4O- stitches. · Knit Chart B (Main Body of Shawl), divided into right and left halves. Note that the left half of Chart a mirror image or the right half, minus the P2 center column. You will only need to refer to the right hall Chart B if you knit each RS row on this chart to the P2 center column, and then knit the row in reverse from left to right substituting right leaning decreases for their corresponding left leaning decreases, and vice-v As you knit, you may notice that the P stitches that are worked in the unshaded areas of the chart (on either side of the blue), appear to line up diagonally, rather than directly above one another as they appear in tl chart. Don't worry, just keep knitting! This happens because of the extra increases that occur in these rows, so just continue to knit the chart as indicated and you will find that the rest of the pattern will line up correctly. You will end the chart with a total of 108 stitches. · Repeat Charts B until your shawl is the desired size, allowing for the length that will be added by the border and edging. The second time you repeat this chart you will work the blue shaded area three time each half of the shawl, the third repeat of the chart it will be worked five times, etc. Always end on a row that the border will fit correctly. · Knit Charts C (Main Body of Shawl Border) once. The chart ends on a wrong side row. You will break about 4 inches of yarn to weave in later. · Knit Chart D (Edging) : Refer to the written instructions describing how the edging is worked and attached to the main body of the shawl. Note that for this chart, row 1 (RS) starts at the top. Rows 1 3 are knit from right to left. Also note that the WS rows 2 and 4 are read from left to right and indicate h the stitches will appear on the RS (see Legend for Charts below).
| K (P on WS rows) | |
| P (K on WS rows) | |
| 0 | YO |
| K2TOG | |
| SSK | |
| > | K3TOG |
| < | S1-K2TOG-PSSO |
| X | BO |
| + | StichleftonneedleafterBOstitches |
| No stitch | |
| Section tobe repeated across row |
CHART A - SET UP CHART
| 0 | 0 | 0 | 0 | 17 | |||||||||||||||||||||||||||||
| 0 | |||||||||||||||||||||||||||||||||
| 0 | 0 | 0 | 一 | 一 | 0 | 0 | 0 | 15 | |||||||||||||||||||||||||
| 0 | 0 | - | 0 | - | 0 | 一 | 0 | 0 | 一 | 13 | |||||||||||||||||||||||
| 一 | 0 | 0 | - | 0 | - | 0 | 0 | 0 | 11 | ||||||||||||||||||||||||
| 0 | 0 | - | 0 | 0 | 一 | 9 | |||||||||||||||||||||||||||
| 0 | - | 0 | - | 0 | 0 | 7 | |||||||||||||||||||||||||||
| 0 | 0 | 0 | 0 | -- -- | 5 3 1 | ||||||||||||||||||||||||||||
| 0 | 0 0 | 一 | 0 | 0 0 | - |
CHART B - MAIN BODY OF SHAWL (RIGHT HALF AND CENTER COLUMN)
| 0 | o/ | O | 0 | 0 | > | 0 | o | o | /- | 0 | 41 | ||||||||||||||||||||||||
| o | |||||||||||||||||||||||||||||||||||
| - | 0 | 0 | 0 | > | o | 0 | 0 | = | 39 | ||||||||||||||||||||||||||
| 0 | 0 | > | 0 | 37 | |||||||||||||||||||||||||||||||
| 0 | > | 0 | 0 | 0 | 35 | ||||||||||||||||||||||||||||||
| 0 | < | 0 | 0 | 0 | 33 | ||||||||||||||||||||||||||||||
| 一 | = | < | 0 | 0 | 0 | 31 | |||||||||||||||||||||||||||||
| 0 | |||||||||||||||||||||||||||||||||||
| o | 0 | 0 | 一 | 29 | |||||||||||||||||||||||||||||||
| O | 0 | > > | 0 0 | 0 0 | 0 | 0 0 0 | = | 27 25 23 21 19 | |||||||||||||||||||||||||||
CHART B - MAIN BODY OF SHAWL (LEFT HALF)
| 0 | /- | 0 | 0 | > | < | 0 | 0 | 0 | o | - | 0 | 0 41 | ||||||||||||||||||||||||
| - | ||||||||||||||||||||||||||||||||||||
| - | 0 | 0 | o | 0 | 0 | 0 | 39 | |||||||||||||||||||||||||||||
| 0 | 0 | 0 | 0 | o | 37 | |||||||||||||||||||||||||||||||
| > | 0 | = | 35 | |||||||||||||||||||||||||||||||||
| O | 0 | > | 0 | > | 33 | |||||||||||||||||||||||||||||||
| o | ||||||||||||||||||||||||||||||||||||
| 0 | O | 0 | > | 0 | > 0 | 31 | ||||||||||||||||||||||||||||||
| 0 | 0 | > | > | 0 | 0 | 0 | 0 | o | 29 | |||||||||||||||||||||||||||
| 0 | 0 0 | 0 0 | > > > | 0 | 0 0 0 | 0 | 0 | 27 25 23 21 19 | ||||||||||||||||||||||||||||
CHART C - MAIN BODY OF SHAWL BORDER (RIGHT HALF AND CENTER COLUMN)
| O | -—- | 11 | |||||||||||||||||||||||
| 0 | |||||||||||||||||||||||||
| 0 | 0 | 0 | 0 | 0 | - | 9 | |||||||||||||||||||
| 0 | 0 | 0 | 0 | 0 | 0 | 7 | |||||||||||||||||||
| 0 | 0 | 0 | 0 | 0 | 0 | - | 5 | ||||||||||||||||||
| 0 | 0 | 0 | 0 | , | 3 | ||||||||||||||||||||
| 0 | 0 | 0 | 0 | - | 1 |
CHART C - MAIN BODY OF SHAWL BORDER (LEFT HALF)
| 11 | |||||||||||||||||||||||||||||
| 0 | |||||||||||||||||||||||||||||
| 一 | 0 | 0 | 0 | 0 | 0 | 6 | |||||||||||||||||||||||
| 0 | 0 | 0 | 0 | 0 | 7 | ||||||||||||||||||||||||
| 0 | 0 | 0 | 0 | 0 | 0 | 5 | |||||||||||||||||||||||
| 一 | 0 | 0 | 0 | > | 0 | 3 | |||||||||||||||||||||||
| 0 | 0 | 0 | > | 0 | 1 |
Chart D - EDGING
| 0 | 0 | 0 | 0 | 0 | 1 | ||||||||||
| 2 | |||||||||||||||
| 0 | 0 | 3 | |||||||||||||
| X | X | X | X | + | 4 |